GSP1089

Overview
Cloud Run functions is Google Cloud's Functions-as-a-Service offering. It comes with an advanced feature set and is powered by Cloud Run and Eventarc, giving you more advanced control over performance and scalability, and more control around the functions runtime and triggers from over 90+ event sources.
In this lab, you create Cloud Run functions that respond to HTTP calls, and get triggered by Cloud Storage events and Cloud Audit Logs. You also deploy multiple revisions of a Cloud Run function and explore new settings.
What's new?
This new version of Cloud Run functions provides an enhanced FaaS experience powered by Cloud Run, Cloud Build, Artifact Registry, and Eventarc.
Enhanced Infrastructure
-
Longer request processing: Run your Cloud Run functions longer than the 5 minute default, making it easier to run longer request workloads such as processing large streams of data from Cloud Storage or BigQuery. For HTTP functions, this is up to 60 minutes. For event-driven functions, this is currently up to 10 minutes.
-
Larger instances: Take advantage of up to 16GB of RAM and 4 vCPUs on Cloud Run functions allowing larger in-memory, compute-intensive and more parallel workloads.
-
Concurrency: Process up to 1000 concurrent requests with a single function instance, minimizing cold starts and improving latency when scaling.
-
Minimum instances: Provide for pre-warmed instances to cut your cold starts and make sure the bootstrap time of your application does not impact the application performance.
-
Traffic splitting: Support multiple versions of your functions, split traffic between different versions and roll your function back to a prior version.
Broader Event coverage and CloudEvents support
-
Eventarc Integration: Cloud Run functions now includes native support for Eventarc, which brings over 125+ event sources using Cloud Audit logs (BigQuery, Cloud SQL, Cloud Storage...), and of course Cloud Run functions still supports events from custom sources by publishing to Cloud Pub/Sub directly.
-
CloudEvent format: All event-driven functions adhere to industry standard CloudEvents (cloudevents.io), regardless of the source, to ensure a consistent developer experience. The payloads are sent via a structured CloudEvent with a cloudevent.data payload and implement the CloudEvent standard.
Objectives
In this lab, you learn how to perform the following tasks:
- Write a function that responds to HTTP calls.
- Write a function that responds to Cloud Storage events.
- Write a function that responds to Cloud Audit Logs.
- Deploy multiple revisions of a Cloud Run function.
- Get rid of cold starts with minimum instances.
- Set up concurrency.
Setup and requirements
Before you click the Start Lab button
Read these instructions. Labs are timed and you cannot pause them. The timer, which starts when you click Start Lab, shows how long Google Cloud resources are made available to you.
This hands-on lab lets you do the lab activities in a real cloud environment, not in a simulation or demo environment. It does so by giving you new, temporary credentials you use to sign in and access Google Cloud for the duration of the lab.
To complete this lab, you need:
- Access to a standard internet browser (Chrome browser recommended).
Note: Use an Incognito (recommended) or private browser window to run this lab. This prevents conflicts between your personal account and the student account, which may cause extra charges incurred to your personal account.
- Time to complete the lab—remember, once you start, you cannot pause a lab.
Note: Use only the student account for this lab. If you use a different Google Cloud account, you may incur charges to that account.
How to start your lab and sign in to the Google Cloud console
-
Click the Start Lab button. If you need to pay for the lab, a dialog opens for you to select your payment method.
On the right is the Lab setup and access panel with the following:
- The Open Google Cloud console button
- The temporary credentials (username and password) that you must use for this lab
- Other information, if needed, to step through this lab
Note that the lab timer is located near the top of the page, showing the remaining time.
-
Click Open Google Cloud console (or right-click and select Open Link in Incognito Window if you are running the Chrome browser).
The lab spins up resources, and then opens another tab that shows the Sign in page.
Tip: Arrange the tabs in separate windows, side-by-side.
Note: If you see the Choose an account dialog, click Use Another Account.
-
If necessary, copy the Username below and paste it into the Sign in dialog.
{{{user_0.username | "Username"}}}
You can also find the Username in the Lab setup and access panel.
-
Click Next.
-
Copy the Password below and paste it into the Welcome dialog.
{{{user_0.password | "Password"}}}
You can also find the Password in the Lab setup and access panel.
-
Click Next.
Important: You must use the credentials the lab provides you. Do not use your Google Cloud account credentials.
Note: Using your own Google Cloud account for this lab may incur extra charges.
-
Click through the subsequent pages:
- Accept the terms and conditions.
- Do not add recovery options or two-factor authentication (because this is a temporary account).
- Do not sign up for free trials.
After a few moments, the Google Cloud console opens in this tab.
Note: To access Google Cloud products and services, click the Navigation menu or type the service or product name in the Search field.

Activate Cloud Shell
Cloud Shell is a virtual machine that is loaded with development tools. It offers a persistent 5GB home directory and runs on the Google Cloud. Cloud Shell provides command-line access to your Google Cloud resources.
-
Click Activate Cloud Shell  at the top of the Google Cloud console.
-
Click through the following windows:
- Continue through the Cloud Shell information window.
- Authorize Cloud Shell to use your credentials to make Google Cloud API calls.
When you are connected, you are already authenticated, and the project is set to your Project_ID, . The output contains a line that declares the Project_ID for this session:
Your Cloud Platform project in this session is set to {{{project_0.project_id | "PROJECT_ID"}}}
gcloud is the command-line tool for Google Cloud. It comes pre-installed on Cloud Shell and supports tab-completion.
- (Optional) You can list the active account name with this command:
gcloud auth list
- Click Authorize.
Output:
ACTIVE: *
ACCOUNT: {{{user_0.username | "ACCOUNT"}}}
To set the active account, run:
$ gcloud config set account `ACCOUNT`
- (Optional) You can list the project ID with this command:
gcloud config list project
Output:
[core]
project = {{{project_0.project_id | "PROJECT_ID"}}}
Note: For full documentation of gcloud, in Google Cloud, refer to the gcloud CLI overview guide.
Task 1. Enable the APIs
Before you create the Cloud Run functions, you need to enable the relevant APIs.
- Execute the following command to enable all the necessary services.
gcloud services enable \
artifactregistry.googleapis.com \
cloudfunctions.googleapis.com \
cloudbuild.googleapis.com \
eventarc.googleapis.com \
run.googleapis.com \
logging.googleapis.com \
pubsub.googleapis.com \
cloudquotas.googleapis.com \
monitoring.googleapis.com
Task 2. Create an HTTP function
For the first function, you create an authenticated Node.js function that responds to HTTP requests, and use a 10 minute timeout to showcase how a function can have more time to respond to HTTP requests.
Create
- In the Cloud Shell terminal, run the following command to create the folder and files for the app and navigate to the folder:
mkdir ~/hello-http && cd $_
touch index.js && touch package.json
-
Click the Open Editor button on the toolbar of Cloud Shell.
-
Add the following code to the hello-http/index.js file that simply responds to HTTP requests:
const functions = require('@google-cloud/functions-framework');
functions.http('helloWorld', (req, res) => {
res.status(200).send('HTTP with Node.js in GCF 2nd gen!');
});
- Add the following content to the
hello-http/package.json file to specify the dependencies.
{
"name": "nodejs-functions-gen2-codelab",
"version": "0.0.1",
"main": "index.js",
"dependencies": {
"@google-cloud/functions-framework": "^2.0.0"
}
}
Deploy
- In the Cloud Shell terminal, run the following command to deploy the function:
gcloud run deploy nodejs-http-function \
--source . \
--function helloWorld \
--base-image {{{project_0.startup_script.node_gcp_runtime | node_gcp_runtime}}} \
--region {{{project_0.default_region|Region}}} \
--timeout 600s \
--max-instances 1 \
--no-allow-unauthenticated
Note: If you get a permissions error, please wait a few minutes and try the deployment again. It takes a few minutes for the APIs to be enabled.
The flags used in this command include:
-
--source .: instructs Cloud Run to build the function into a container image using buildpacks.
-
--function helloWorld: sets the function entry point to be invoked.
-
--base-image {{{project_0.startup_script.node_gcp_runtime | node_gcp_runtime}}}: specifies the runtime base image and enables automatic base image updates for security fixes.
-
--timeout 600s: allows the function to have a longer timeout (600 seconds) to respond to HTTP requests.
-
--max-instances 1: sets the maximum number of instances to 1.
-
--no-allow-unauthenticated: ensures the function requires authentication.
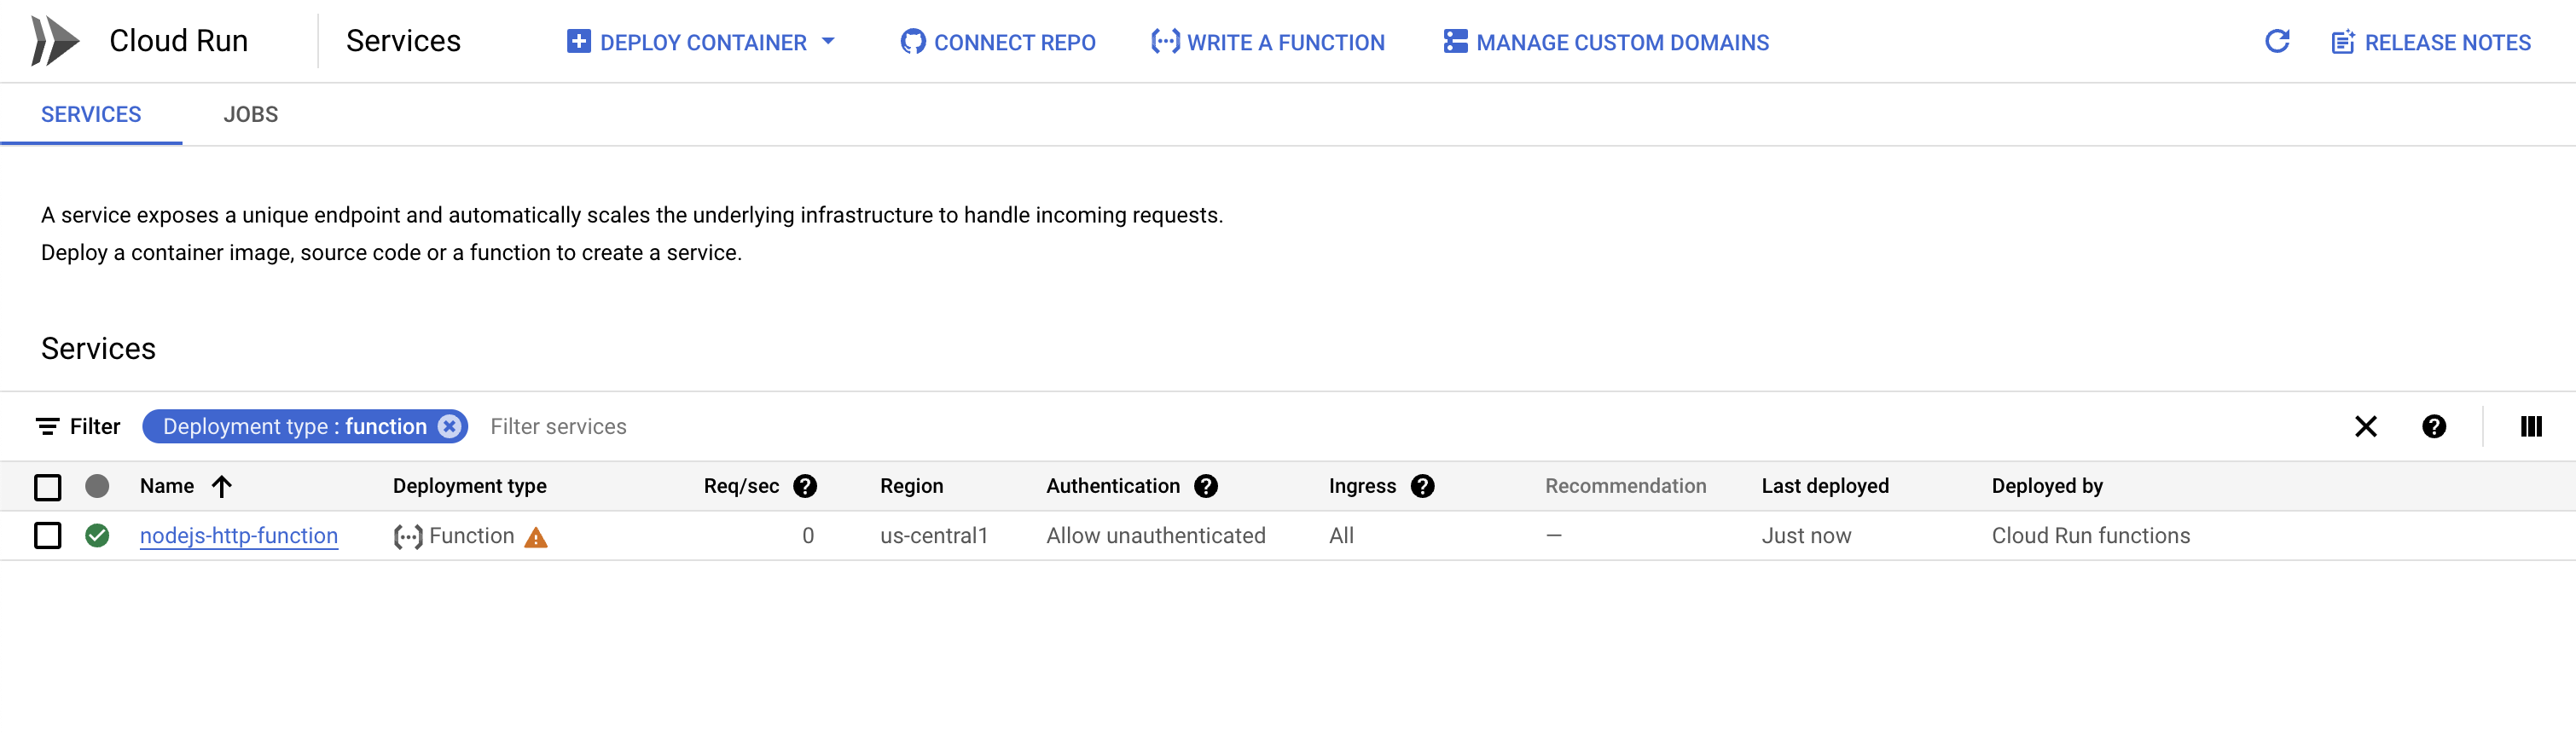
- Once the function is deployed, in the Google Cloud console navigation menu, go to Cloud Run and verify that
nodejs-http-function is listed.
Test
- In Cloud Shell, retrieve the service URL of your function and store it in an environment variable:
SERVICE_URL="$(gcloud run services describe nodejs-http-function --region {{{project_0.default_region|Region}}} --format 'value(status.url)')"
- Test the authenticated HTTP function by passing your identity token in the authorization header:
curl -H "Authorization: Bearer $(gcloud auth print-identity-token)" $SERVICE_URL
You should see the following message as a response:
HTTP with Node.js in GCF 2nd gen!
Click Check my progress to verify the objective.
Create an HTTP function
Task 3. Create a Cloud Storage function
In this section, you create a Node.js function that responds to events from a Cloud Storage bucket using an Eventarc trigger.
Set up
- Run the following commands to grant the necessary IAM roles to the Cloud Storage and Compute Engine service accounts:
PROJECT_NUMBER=$(gcloud projects list --filter="project_id:{{{ project_0.project_id | PROJECT_ID }}}" --format='value(project_number)')
SERVICE_ACCOUNT=$(gcloud storage service-agent --project="$PROJECT_NUMBER" | xargs)
gcloud projects add-iam-policy-binding {{{ project_0.project_id | PROJECT_ID }}} \
--member serviceAccount:$SERVICE_ACCOUNT \
--role roles/pubsub.publisher
gcloud projects add-iam-policy-binding {{{ project_0.project_id | PROJECT_ID }}} \
--member serviceAccount:$PROJECT_NUMBER-compute@developer.gserviceaccount.com \
--role roles/eventarc.eventReceiver
Create
- Run the following command to create the folder and files for the app, and navigate to the folder:
mkdir ~/hello-storage && cd $_
touch index.js && touch package.json
-
Click the Open Editor button on the toolbar of Cloud Shell.
-
Add the following code to the hello-storage/index.js file that simply responds to Cloud Storage events:
const functions = require('@google-cloud/functions-framework');
functions.cloudEvent('helloStorage', (cloudevent) => {
console.log('Cloud Storage event with Node.js in GCF 2nd gen!');
console.log(cloudevent);
});
- Add the following content to the
hello-storage/package.json file to specify the dependencies:
{
"name": "nodejs-functions-gen2-codelab",
"version": "0.0.1",
"main": "index.js",
"dependencies": {
"@google-cloud/functions-framework": "^2.0.0"
}
}
Deploy
- First, run the following command to create a Cloud Storage bucket to use for generating events:
export BUCKET_NAME="gcf-gen2-storage-{{{ project_0.project_id | PROJECT_ID }}}"
gcloud storage buckets create gs://$BUCKET_NAME --location={{{project_0.default_region|Region}}}
- Run the following command to deploy the Cloud Run function:
gcloud run deploy nodejs-storage-function \
--source . \
--function helloStorage \
--base-image {{{project_0.startup_script.node_gcp_runtime | node_gcp_runtime}}} \
--region {{{project_0.default_region|Region}}} \
--max-instances 1 \
--no-allow-unauthenticated
Note: As before, if you get a permissions error, please wait a few minutes and try the deployment again. It can take a few minutes for the APIs to be enabled.
- Now, create the Eventarc trigger to route Cloud Storage object creation events to your deployed function:
gcloud eventarc triggers create nodejs-storage-function-trigger \
--location={{{project_0.default_region|Region}}} \
--destination-run-service=nodejs-storage-function \
--destination-run-region={{{project_0.default_region|Region}}} \
--event-filters="type=google.cloud.storage.object.v1.finalized" \
--event-filters="bucket=$BUCKET_NAME" \
--service-account=$PROJECT_NUMBER-compute@developer.gserviceaccount.com
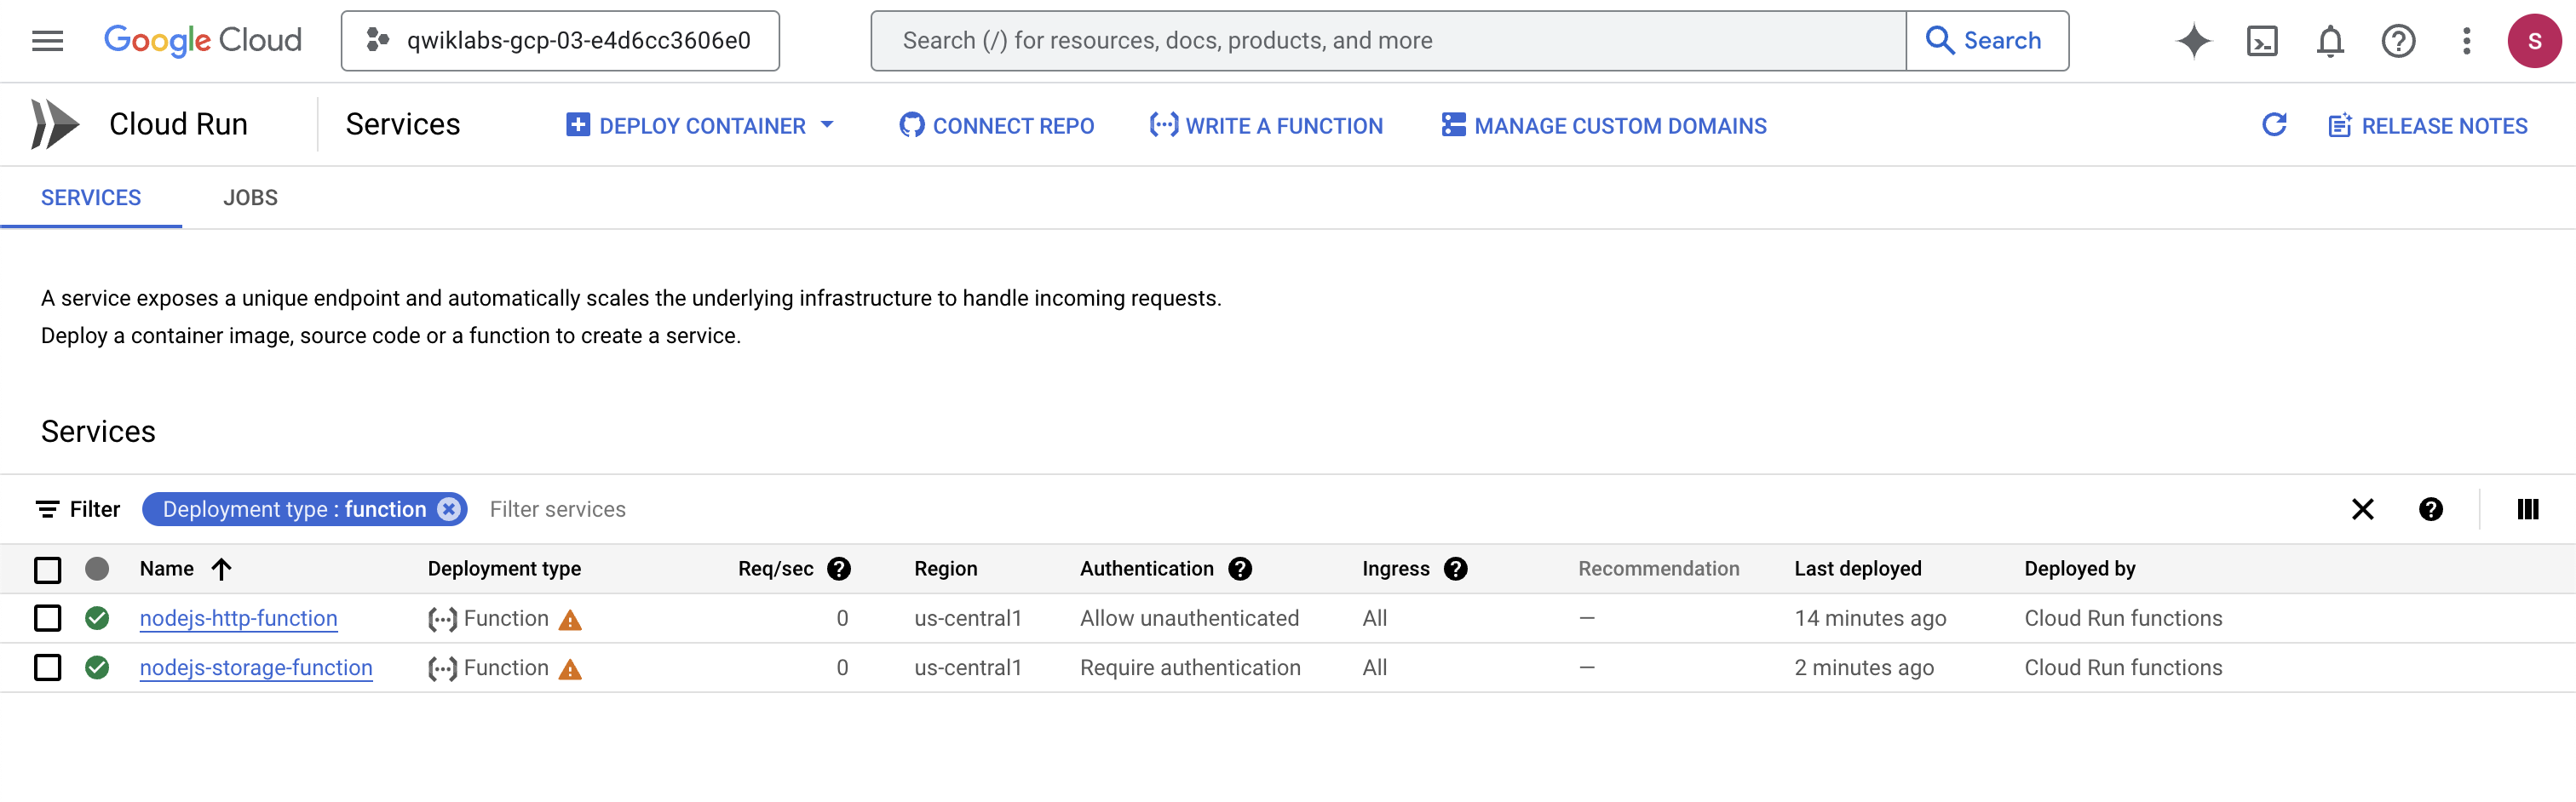
- Once the function and trigger are deployed, verify that you can see
nodejs-storage-function under the Cloud Run console.
Test
- Run the following command to upload a file to the bucket to test the function:
echo "Hello World" > random.txt
gcloud storage cp random.txt gs://$BUCKET_NAME/random.txt
- Run the following command to read the service logs. You should see the received CloudEvent in the logs:
gcloud run services logs read nodejs-storage-function \
--region {{{project_0.default_region|Region}}} --limit=100
Note: It may take a minute to generate logs.
You should see output similar to the following.
Output:
}
traceparent: '00-c74cb472d1e78f7225b6f617a31d9c08-96f0380bb62be2c1-01'
},
etag: 'CKOx1L3wofoCEAE='
crc32c: 'R1jUOQ==',
mediaLink: 'https://storage.googleapis.com/download/storage/v1/b/gcf-gen2-storage-qwiklabs-gcp-00-101b4b9ca9bb/o/random.txt?generation=1663625646643363&alt=media',
md5Hash: '5Z/5eUEET4XfUpfhwwLSYA==',
size: '12',
timeStorageClassUpdated: '2022-09-19T22:14:06.657Z',
storageClass: 'STANDARD',
updated: '2022-09-19T22:14:06.657Z',
timeCreated: '2022-09-19T22:14:06.657Z',
contentType: 'text/plain',
metageneration: '1',
generation: '1663625646643363',
bucket: 'gcf-gen2-storage-qwiklabs-gcp-00-101b4b9ca9bb',
name: 'random.txt',
selfLink: 'https://www.googleapis.com/storage/v1/b/gcf-gen2-storage-qwiklabs-gcp-00-101b4b9ca9bb/o/random.txt',
id: 'gcf-gen2-storage-qwiklabs-gcp-00-101b4b9ca9bb/random.txt/1663625646643363',
kind: 'storage#object',
data: {
bucket: 'gcf-gen2-storage-qwiklabs-gcp-00-101b4b9ca9bb',
time: '2022-09-19T22:14:06.657124Z',
subject: 'objects/random.txt',
type: 'google.cloud.storage.object.v1.finalized',
specversion: '1.0',
source: '//storage.googleapis.com/projects/_/buckets/gcf-gen2-storage-qwiklabs-gcp-00-101b4b9ca9bb',
id: '5693030851428996',
{
Cloud Storage event with Node.js in GCF 2nd gen!
Click Check my progress to verify the objective.
Create a Cloud Storage function
Task 4. Create a Cloud Audit Logs function
In this section, you create a Node.js function that receives a Cloud Audit Log event when a Compute Engine VM instance is created. In response, it adds a label to the newly created VM, specifying the creator of the VM.
Determine newly created Compute Engine VMs
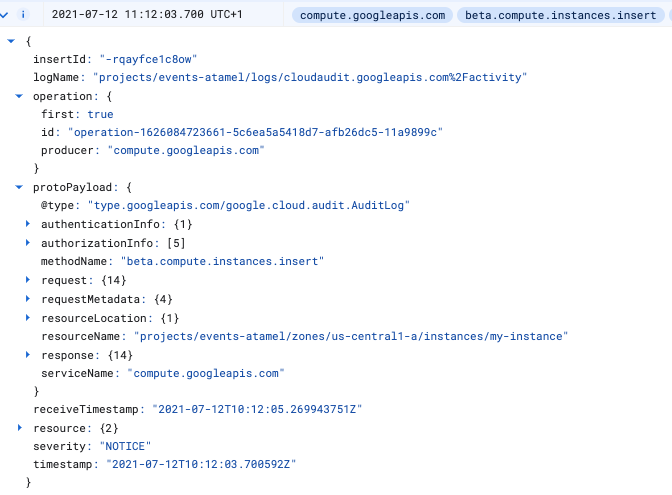
Compute Engine emits 2 Audit Logs when a VM is created.
The first one is emitted at the beginning of the VM creation and looks like this:
The second one is emitted after the VM creation and looks like this:
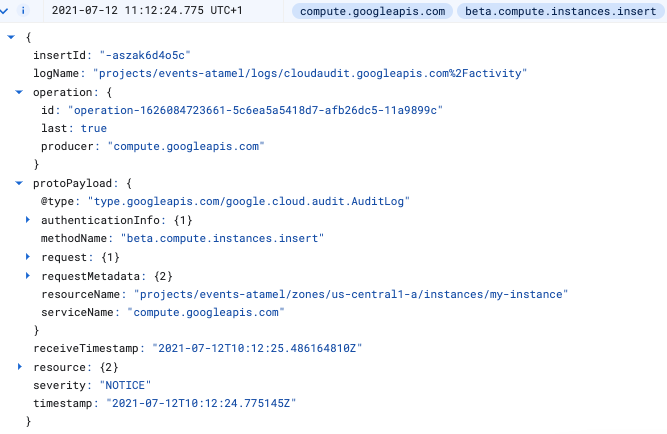
Notice the operation field with the first: true and last: true values. The second Audit Log contains all the information you need to label an instance, therefore you use the last: true flag to detect it in Cloud Run functions.
Set up
To use Cloud Audit Log functions, you must enable Audit Logs for Eventarc. You also need to use a service account with the eventarc.eventReceiver role.
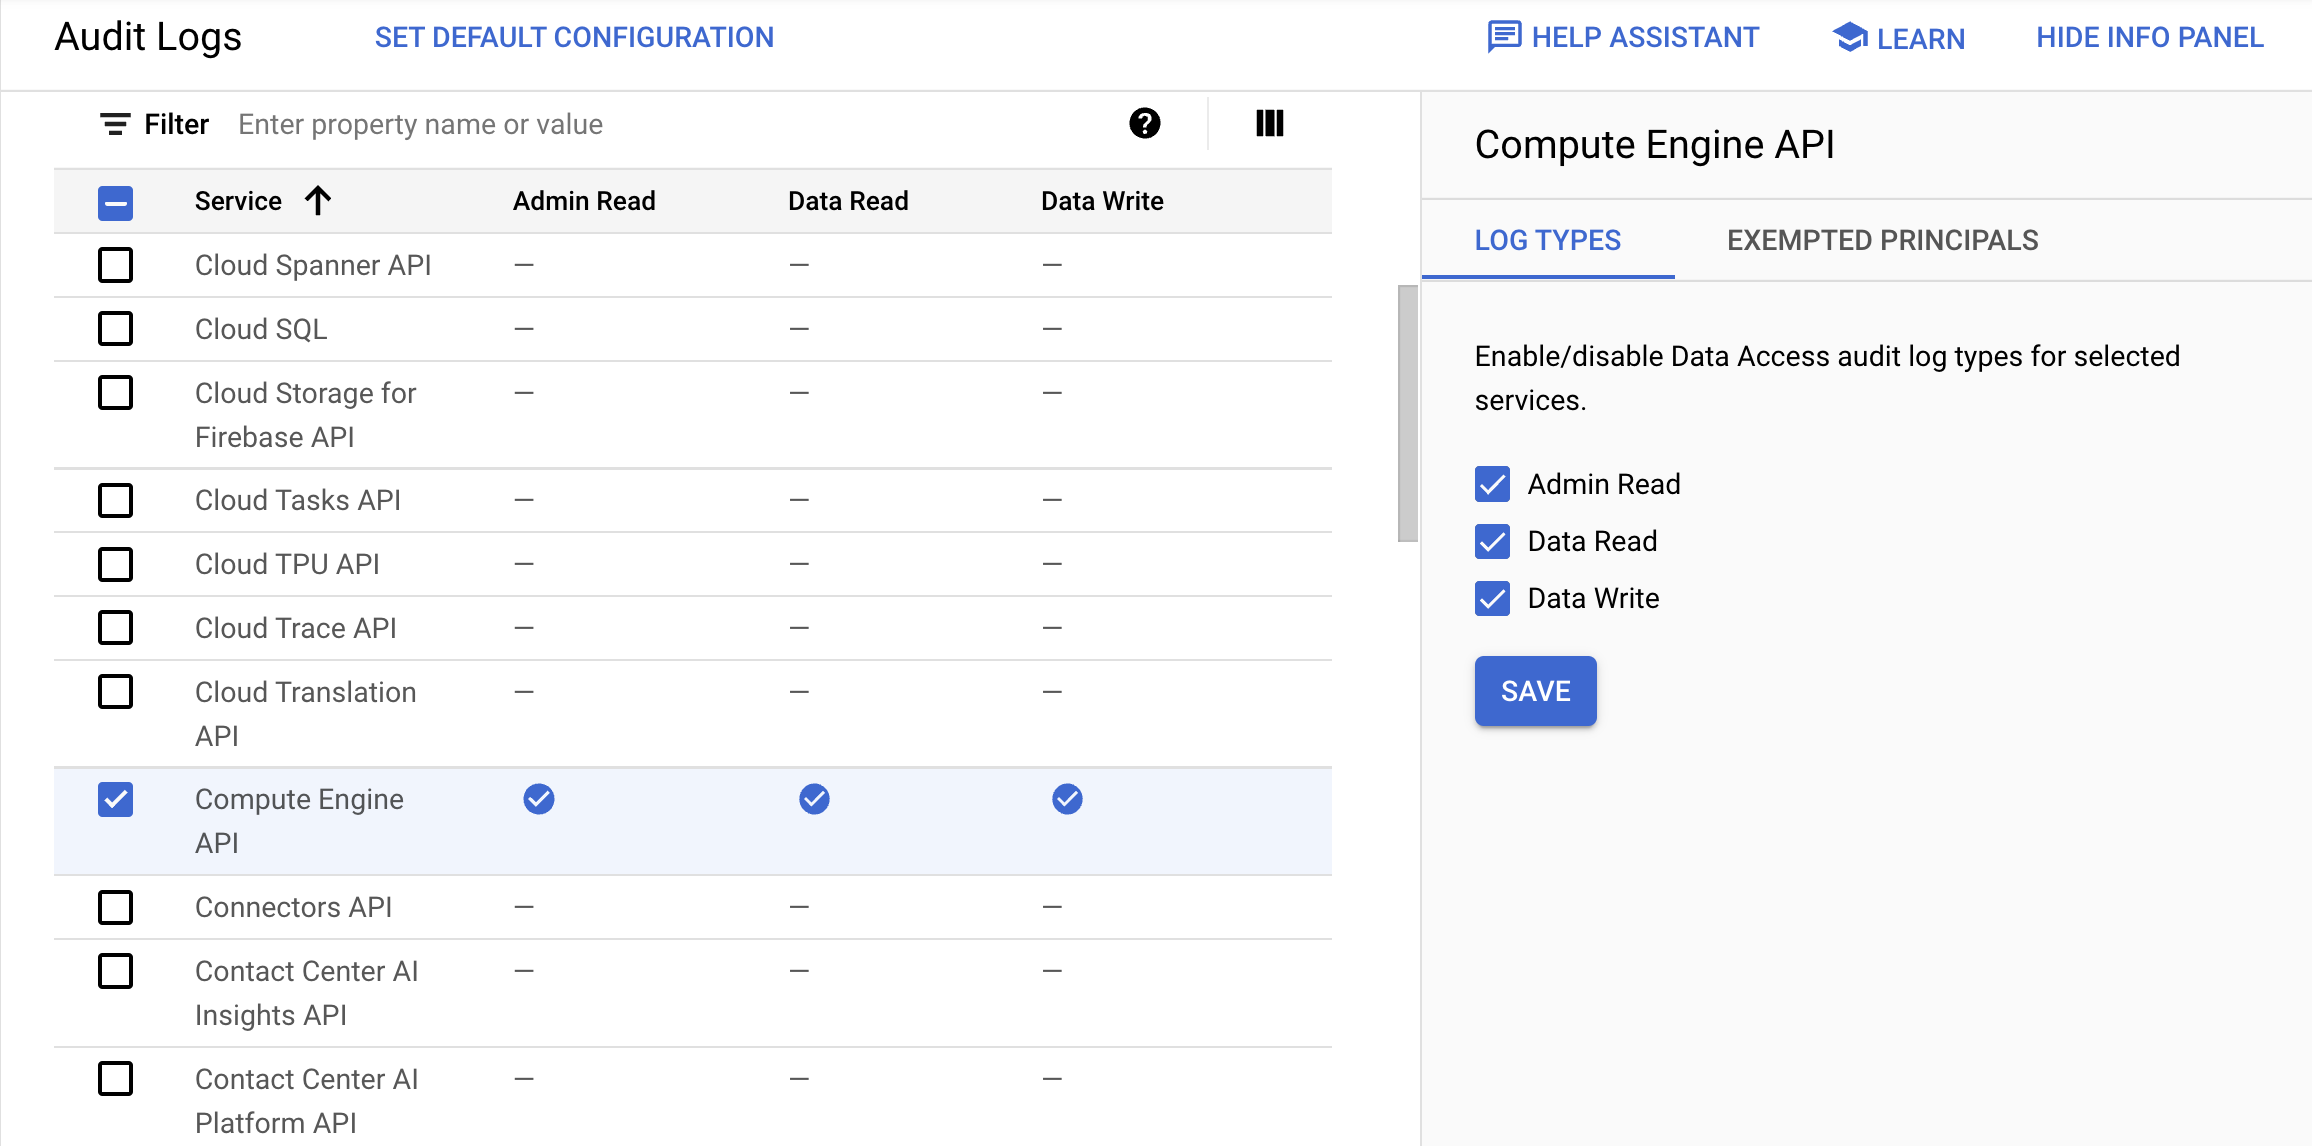
- From the Navigation menu, go to IAM & Admin > Audit Logs.
Note: you can ignore the missing resourcemanager.folders.getIamPolicy permission warning.
-
Find the Compute Engine API and click the checkbox next to it. If you are unable to find the API, search for it on the next page.
-
On the info pane on the right, select the checkboxes for the Admin Read, Data Read, and Data Write log types, then click Save.
- Grant the default Compute Engine service account the
eventarc.eventReceiver IAM role:
gcloud projects add-iam-policy-binding {{{ project_0.project_id | PROJECT_ID }}} \
--member serviceAccount:$PROJECT_NUMBER-compute@developer.gserviceaccount.com \
--role roles/eventarc.eventReceiver
Get the code
- Run the following code to clone the repo that contains the application:
cd ~
git clone https://github.com/GoogleCloudPlatform/eventarc-samples.git
-
Click the Open Editor button on the toolbar of Cloud Shell.
-
In the file Explorer, navigate to eventarc-samples > gce-vm-labeler > gcf > nodejs and open index.js.
The index.js file contains the application code that receives the Audit Log wrapped into a CloudEvent. It then extracts the Compute Engine VM instance details and sets a label on the VM instance. Feel free to study index.js in more detail on your own.
Deploy
- In the Cloud Shell terminal, run the following command to navigate to the app directory:
cd ~/eventarc-samples/gce-vm-labeler/gcf/nodejs
- Run the following command to deploy the Cloud Run function:
gcloud run deploy gce-vm-labeler \
--source . \
--function labelVmCreation \
--base-image {{{project_0.startup_script.node_gcp_runtime | node_gcp_runtime}}} \
--region {{{project_0.default_region|Region}}} \
--max-instances 1 \
--no-allow-unauthenticated
- Create the Eventarc trigger to filter on Audit Logs for Compute Engine instance insertions:
gcloud eventarc triggers create gce-vm-labeler-trigger \
--location={{{project_0.default_region|Region}}} \
--destination-run-service=gce-vm-labeler \
--destination-run-region={{{project_0.default_region|Region}}} \
--event-filters="type=google.cloud.audit.log.v1.written" \
--event-filters="serviceName=compute.googleapis.com" \
--event-filters="methodName=beta.compute.instances.insert" \
--service-account=$PROJECT_NUMBER-compute@developer.gserviceaccount.com
Note: Although your Audit Log function trigger is created immediately, it can take up to 10 minutes for triggers to be fully functional.
Click Check my progress to verify the objective.
Create a Cloud Audit Logs function
Test
To test your Audit Log function, you need to create a Compute Engine VM in the Cloud console. (You can also create VMs with gcloud but it does not seem to generate Audit Logs.)
-
From the Navigation menu, go to Compute Engine > VM instances.
-
Click Create Instance, set the instance Name as instance-1 and the Zone as .
-
Leave all of the other fields as their defaults and click Create.
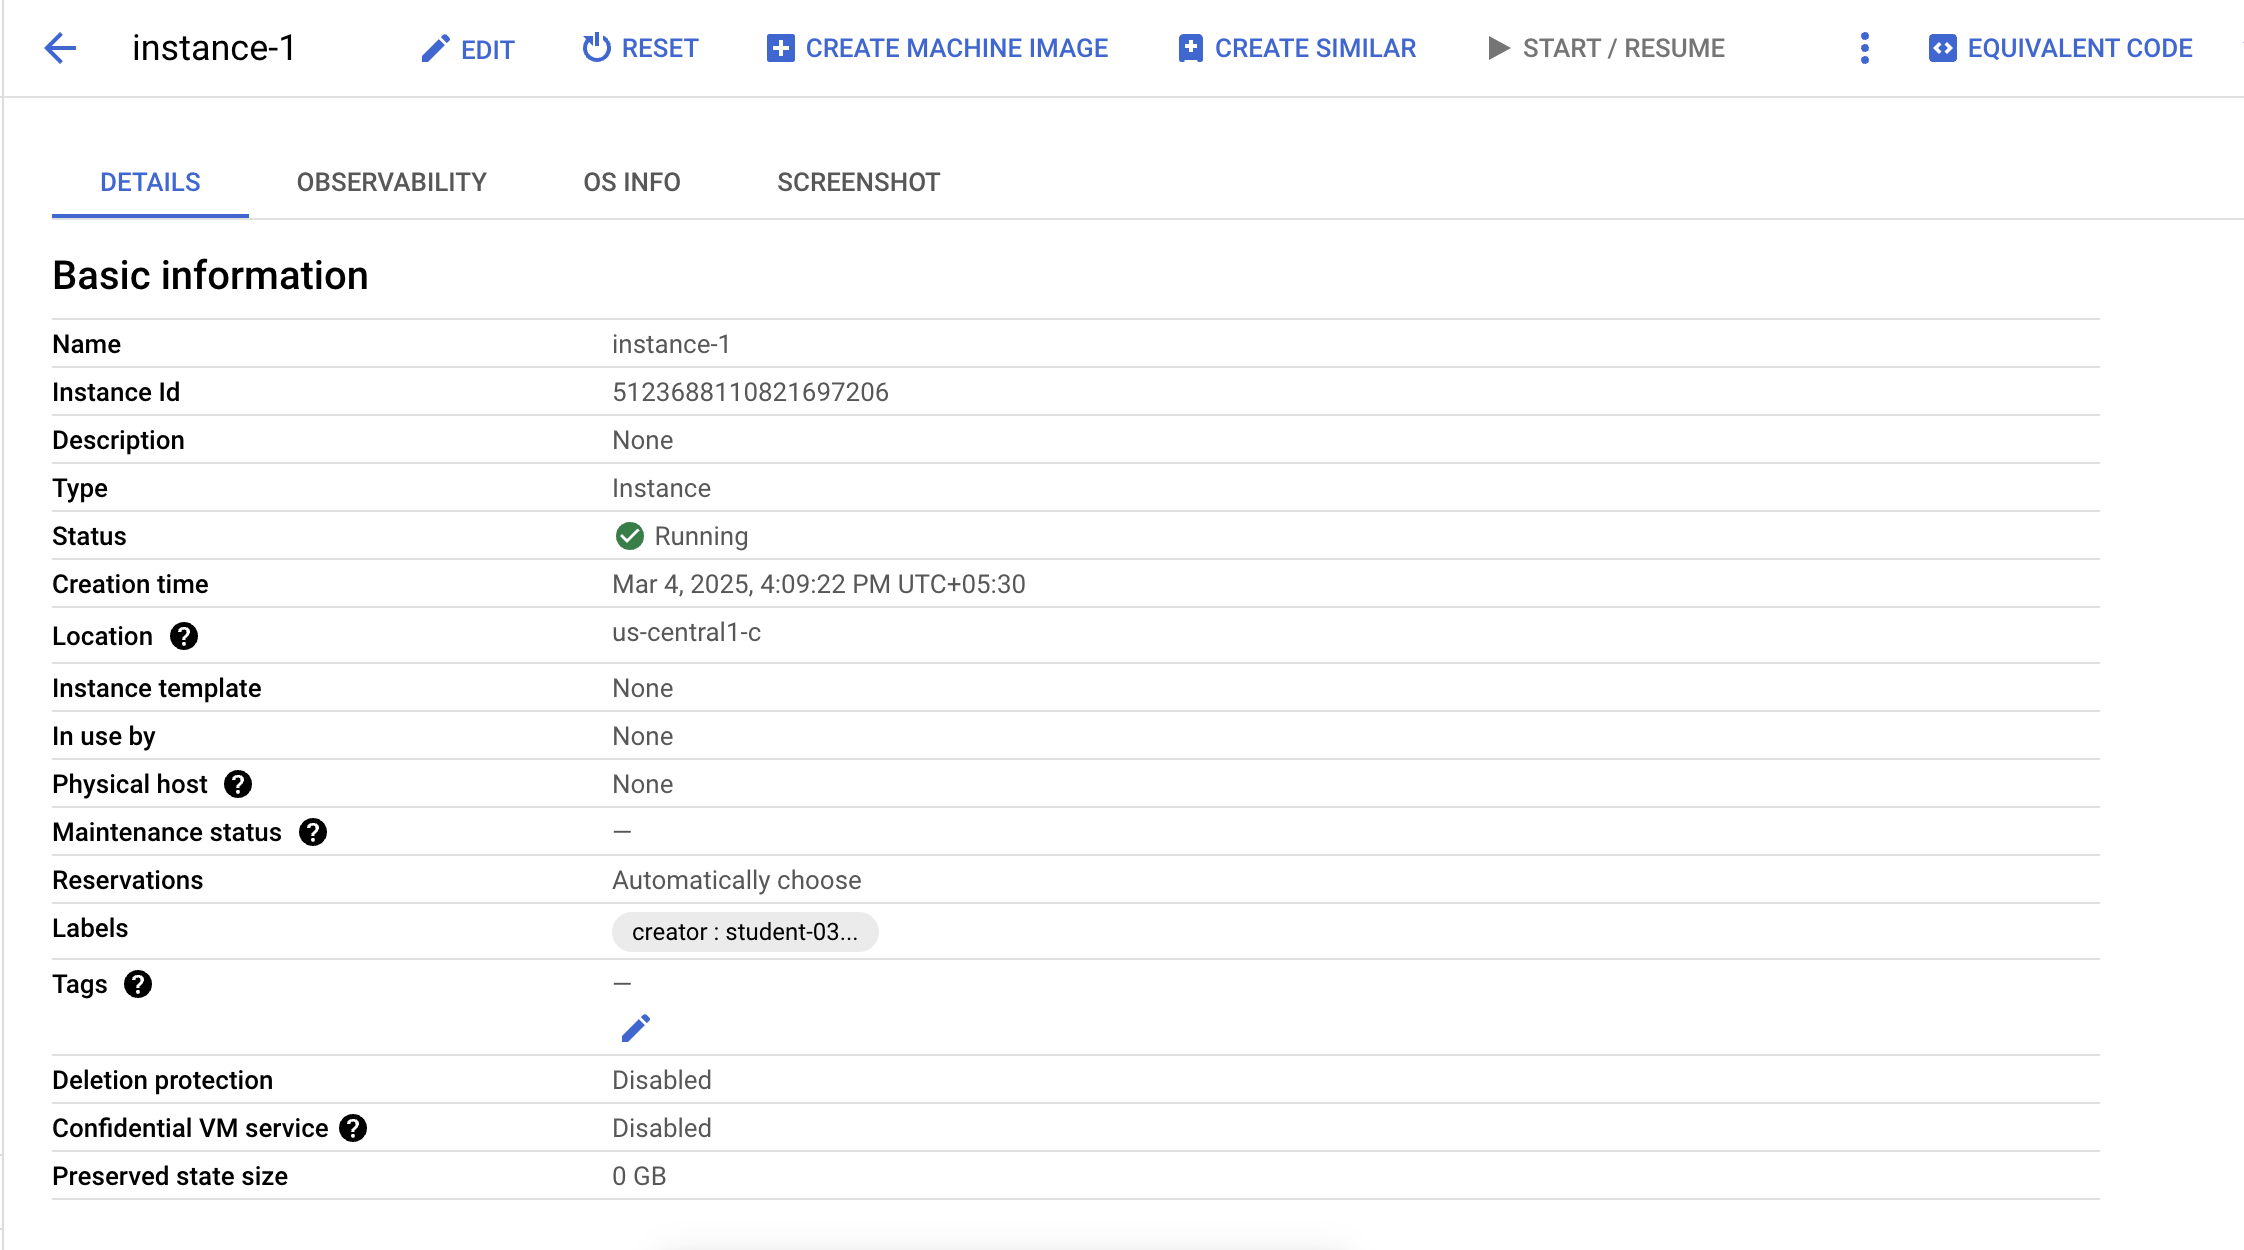
Once the VM creation completes, you should see the added creator label on the VM in the Cloud console in the Basic information section.
- Verify using the following command:
gcloud compute instances describe instance-1 --zone {{{project_0.default_zone | "Zone"}}}
You should see the label in the output like in the following example.
Output example:
...
labelFingerprint: ULU6pAy2C7s=
labels:
creator: student-02-19b599a0f901
...
Click Check my progress to verify the objective.
Create a VM instance
- Run the following command to delete the VM. Type
Y, when prompted, to confirm.
gcloud compute instances delete instance-1 --zone {{{project_0.default_zone | "Zone"}}}
Task 5. Deploy different revisions
Cloud Run functions supports multiple revisions of your functions, splitting traffic between different revisions, and rolling your function back to a prior version. In this section, you deploy two revisions of your Cloud Run function.
Create
- Run the following command to create the folder and files for the app and navigate to the folder:
mkdir ~/hello-world-colored && cd $_
touch main.py
touch requirements.txt
- Add the following code to the
hello-world-colored/main.py file with a Python function that reads a color environment variable and responds with Hello World in that background color:
import os
color = os.environ.get('COLOR')
def hello_world(request):
return f'<body style="background-color:{color}"><h1>Hello World!</h1></body>'
Deploy
- Run the following command to deploy the first revision of the function with an orange background:
COLOR=orange
gcloud run deploy hello-world-colored \
--source . \
--function hello_world \
--base-image python311 \
--region {{{project_0.default_region|Region}}} \
--allow-unauthenticated \
--update-env-vars COLOR=$COLOR \
--max-instances 1
At this point, if you test the function by opening the Service URL (the URI output of the previously executed deployment command) in your browser, you should see Hello World with an orange background:

-
Navigate to the Cloud Run page in the console, and click the hello-world-colored service.
-
Click Edit & Deploy New Revision.
-
Leave everything as their defaults, scroll down, select the Variables & Secrets tab. In the Environment Variables section, update the COLOR environment variable to yellow.
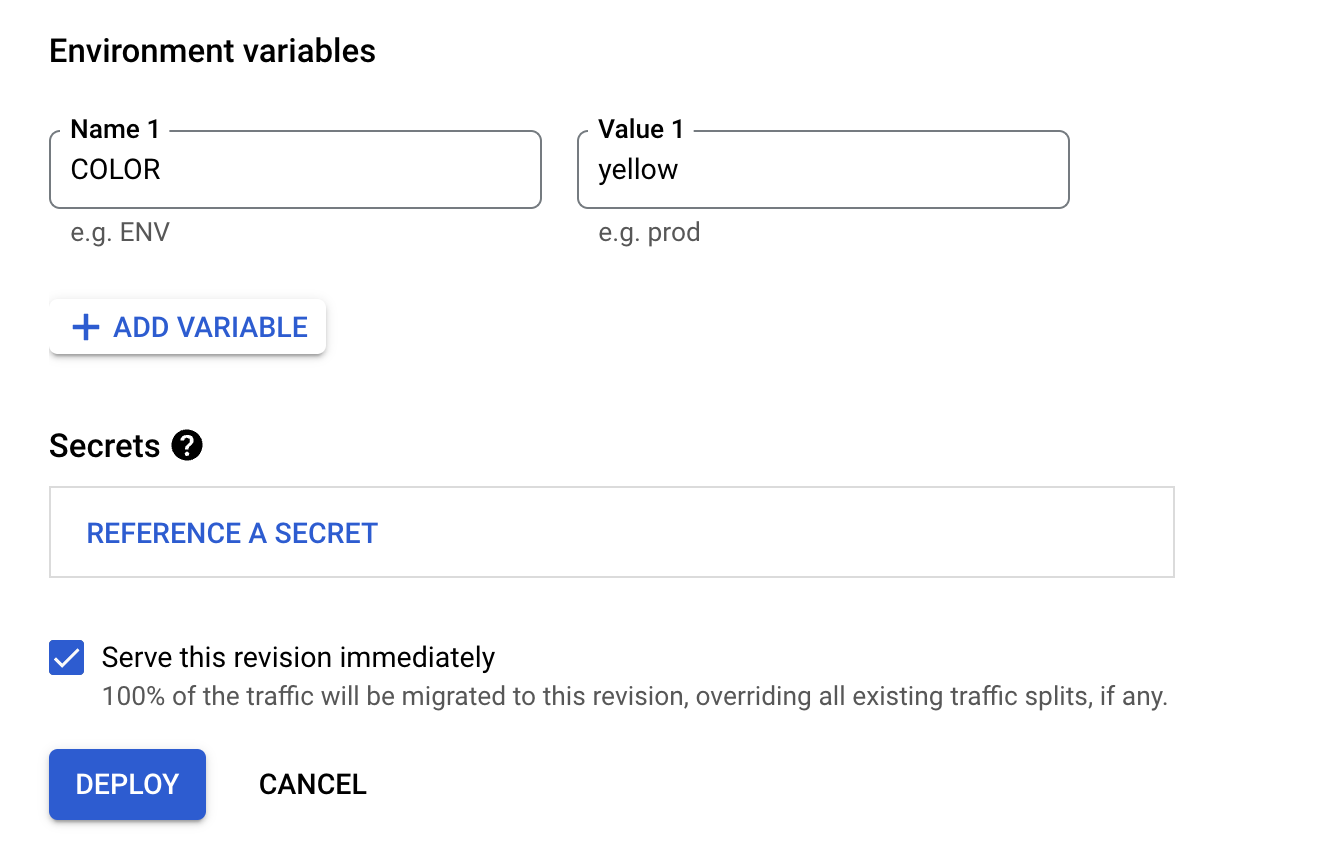
- Click Deploy.
Since this is the latest revision, if you test the function by opening the Service URL in your browser, you should see Hello World with a yellow background:

Click Check my progress to verify the objective.
Deploy different revisions
Task 6. Set up minimum instances
In Cloud Run functions, one can specify a minimum number of function instances to be kept warm and ready to serve requests. This is useful in limiting the number of cold starts. In this section, you deploy a function with slow initialization. You observe the cold start problem. Then, you deploy the function with the minimum instance value set to 1 to get rid of the cold start.
Create
- Run the following command to create the folder and files for the app and navigate to the folder:
mkdir ~/min-instances && cd $_
touch main.go
touch go.mod
- Add the following code to the
min-instances/main.go file. This Go service has an init function that sleeps for 10 seconds to simulate a long initialization. It also has a HelloWorld function that responds to HTTP calls:
package p
import (
"fmt"
"net/http"
"time"
)
func init() {
time.Sleep(10 * time.Second)
}
func HelloWorld(w http.ResponseWriter, r *http.Request) {
fmt.Fprint(w, "Slow HTTP Go in GCF 2nd gen!")
}
- Add the following code to the
min-instances/go.mod file. This specifies the module path and Go language version:
module example.com/mod
go 1.26
Deploy
- Run the following command to deploy the first revision of the function with the default minimum instance value of zero:
gcloud run deploy slow-function \
--source . \
--function HelloWorld \
--base-image go126 \
--region {{{project_0.default_region|Region}}} \
--allow-unauthenticated \
--max-instances 4
- Test the function with these commands:
SLOW_URL="$(gcloud run services describe slow-function --region {{{project_0.default_region|Region}}} --format 'value(status.url)')"
curl $SLOW_URL
You should observe a 10 second delay (cold start) on the first call and then see the message. Subsequent calls should return immediately:
Slow HTTP Go in GCF 2nd gen!
Set minimum instances
To get rid of the cold start on the first request, redeploy the function with the --min-instances flag set to 1 as follows:
-
Navigate to the Cloud Run page in the console and click the slow-function service.
-
Click Edit & Deploy New Revision.
-
Under the Revision scaling section, set Minimum number of instances to 1 and Maximum number of instances to 4.
-
Leave the rest of the fields as their defaults and click Deploy.
Test
- Run the following command to test the function again:
curl $SLOW_URL
You should not see the 10 second delay anymore in the first request. The cold start problem for the first invocation (after a long time without) is gone, thanks to minimum instances! Refer to the using minimum instances documentation for more information.
Click Check my progress to verify the objective.
Set up minimum instances
Task 7. Create a function with concurrency
In Cloud Run functions, a function instance handles one concurrent request by default but you can specify the number of concurrent requests that can be processed simultaneously by an instance. This can also be useful in preventing cold starts because a new function instance does not need to be created for every parallel request.
In this section, you use the function with slow initialization from the previous step. You send it 10 requests and observe the cold start problem again as new function instances need to be created to handle the requests.
To fix the cold-start problem, you deploy another function with a concurrency value of 100. You observe that the 10 requests now do not cause the cold start problem and a single function instance can handle all of the requests.
Test without concurrency
- Use the following command to install
hey in Cloud Shell:
sudo apt install hey
- Run the following command to get the URL of the function and save it as an environment variable:
SLOW_URL=$(gcloud run services describe slow-function --region {{{project_0.default_region|Region}}} --format="value(status.url)")
- Use an open source benchmarking tool called
hey to send 10 concurrent requests to the slow function:
hey -n 10 -c 10 $SLOW_URL
You should see in the output of hey that some requests are taking long.
Output:
Summary:
Total: 10.9053 secs
Slowest: 10.9048 secs
Fastest: 0.4439 secs
Average: 9.7930 secs
Requests/sec: 0.9170
Total data: 310 bytes
Size/request: 31 bytes
Response time histogram:
0.444 [1] |■■■■
1.490 [0] |
2.536 [0] |
3.582 [0] |
4.628 [0] |
5.674 [0] |
6.720 [0] |
7.767 [0] |
8.813 [0] |
9.859 [0] |
10.905 [9] |■■■■■■■■■■■■■■■■■■■■■■■■■■■■■■■■■■■■■■■■
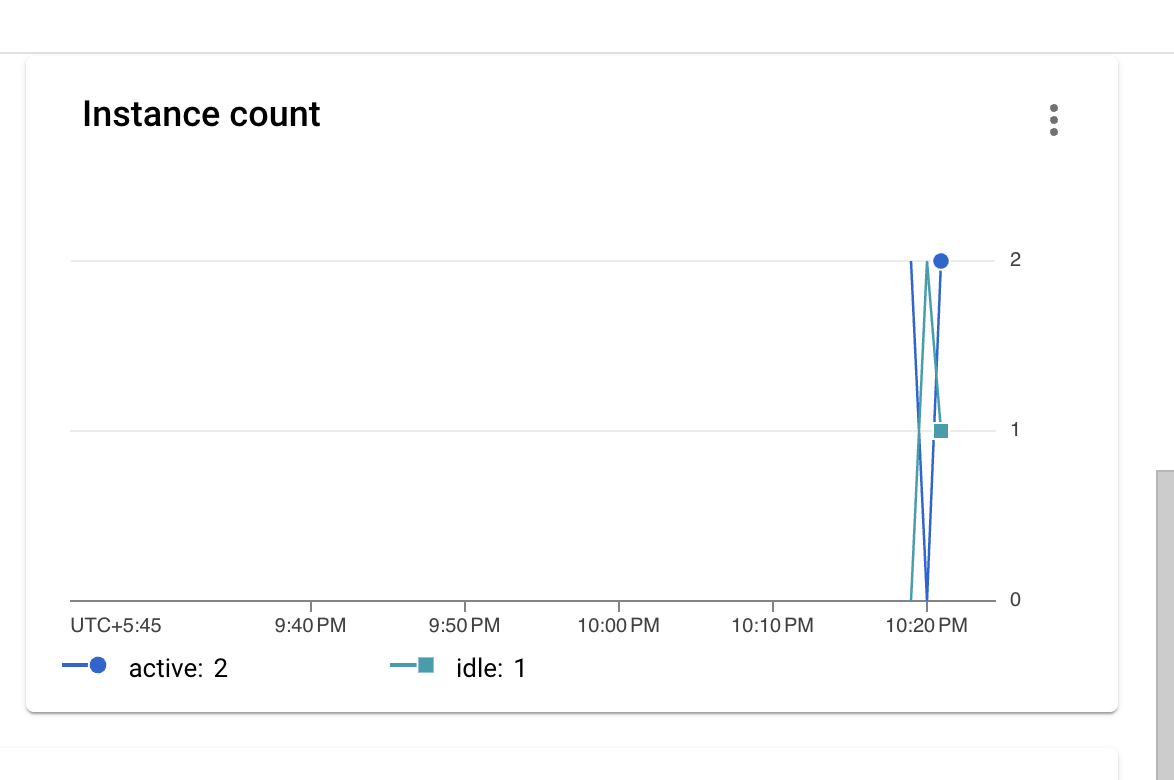
This is because more function instances are being created to handle the requests. If you check the active instances count for the function, you should also see that more than one instance was created at some point and these are causing the cold start problem.
- Run the following command to delete the function. Type
Y, when prompted, to confirm:
gcloud run services delete slow-function --region {{{project_0.default_region | "Region"}}}
Deploy
- Run the following command to deploy a new function identical to the previous function. Once deployed, you increase its concurrency:
gcloud run deploy slow-concurrent-function \
--source . \
--function HelloWorld \
--base-image go126 \
--region {{{project_0.default_region|Region}}} \
--allow-unauthenticated \
--min-instances 1 \
--max-instances 4
Set concurrency
Now you set the concurrency of the underlying Cloud Run service for the function to 100 (it can be a maximum of 1000). This ensures that at least 100 requests can be handled by a single function instance.
-
From the Navigation menu, go to Cloud Run.
-
Click the slow-concurrent-function service.
-
Click Edit & Deploy New Revision.
-
Under the Resources section, set the CPU to 1.
-
Under Requests, set the Maximum concurrent requests per instance to 100.
-
Under Revision scaling, set the Maximum number of instances to 4.
-
Leave the rest of the fields as their defaults and click Deploy.
Test with concurrency
- Once your function has deployed, run the following command to get the URL of the new function and save it as an environment variable:
SLOW_CONCURRENT_URL=$(gcloud run services describe slow-concurrent-function --region {{{project_0.default_region|Region}}} --format="value(status.url)")
- Now use
hey to send 10 concurrent requests:
hey -n 10 -c 10 $SLOW_CONCURRENT_URL
You should see in the output of hey that all requests are processed quickly.
Output:
Summary:
Total: 0.0652 secs
Slowest: 0.0651 secs
Fastest: 0.0619 secs
Average: 0.0636 secs
Requests/sec: 153.3751
Total data: 280 bytes
Size/request: 28 bytes
Response time histogram:
0.062 [1] |■■■■■■■■■■■■■■■■■■■■
0.062 [1] |■■■■■■■■■■■■■■■■■■■■
0.063 [0] |
0.063 [0] |
0.063 [0] |
0.063 [1] |■■■■■■■■■■■■■■■■■■■■
0.064 [2] |■■■■■■■■■■■■■■■■■■■■■■■■■■■■■■■■■■■■■■■■
0.064 [2] |■■■■■■■■■■■■■■■■■■■■■■■■■■■■■■■■■■■■■■■■
0.064 [2] |■■■■■■■■■■■■■■■■■■■■■■■■■■■■■■■■■■■■■■■■
0.065 [0] |
0.065 [1] |■■■■■■■■■■■■■■■■■■■■
A single function instance was able to handle all the requests and the cold start problem is gone, thanks to the increased concurrency! Refer to the concurrency documentation for more information.
Click Check my progress to verify the objective.
Create a function with concurrency
Congratulations!
In this lab, you deployed multiple Cloud Run functions that responded to HTTP calls, Cloud Storage events, and Cloud Audit Logs. You then deployed multiple revisions of the Cloud Run services running the functions and set concurrency values and got rid of cold starts with minimum instances.
Next steps / Learn more
For more information about Cloud Run functions, explore the following:
Google Cloud training and certification
...helps you make the most of Google Cloud technologies. Our classes include technical skills and best practices to help you get up to speed quickly and continue your learning journey. We offer fundamental to advanced level training, with on-demand, live, and virtual options to suit your busy schedule. Certifications help you validate and prove your skill and expertise in Google Cloud technologies.
Manual Last Updated on August 19, 2026
Lab Last Tested August 19, 2026
Copyright 2026 Google LLC. All rights reserved. Google and the Google logo are trademarks of Google LLC. All other company and product names may be trademarks of the respective companies with which they are associated.







