Lab setup instructions and requirements
Protect your account and progress. Always use a private browser window and lab credentials to run this lab.

Generate and Edit Images with Nano Banana (Gemini 2.5 Flash Image)

Lab 30 minutes universal_currency_alt 1 Credit show_chart Introductory
info This lab may incorporate AI tools to support your learning.
This content is not yet optimized for mobile devices.
For the best experience, please visit us on a desktop computer using a link sent by email.

GENAI131

Overview

In this lab, you will explore the image generation and editing capabilities of the new model, often referred to by its catchy codename: Nano Banana.

This model produces text and image outputs, and is quite popular for the degree of control it offers by allowing you to edit images by describing the changes you would like to see. Learn more about its capabilities from the model card.

Objectives

In this lab, you use the Google Gen AI SDK for Python to interact with Nano Banana to:

  • Generate images using the Vertex AI Studio UI.
  • Generate photorealistic images from code by using other images as inputs.
  • Generate non-photo images with text based on other images.

Setup and requirements

Before you click the Start Lab button

Read these instructions. Labs are timed and you cannot pause them. The timer, which starts when you click Start Lab, shows how long Google Cloud resources will be made available to you.

This Qwiklabs hands-on lab lets you do the lab activities yourself in a real cloud environment, not in a simulation or demo environment. It does so by giving you new, temporary credentials that you use to sign in and access Google Cloud for the duration of the lab.

What you need

To complete this lab, you need:

  • Access to a standard internet browser (Chrome browser recommended).
  • Time to complete the lab.

Note: If you already have your own personal Google Cloud account or project, do not use it for this lab.

Note: If you are using a Pixelbook, open an Incognito window to run this lab.

How to start your lab and sign in to the Google Cloud console

  1. Click the Start Lab button. If you need to pay for the lab, a dialog opens for you to select your payment method. On the left is the Lab Details pane with the following:

    • The Open Google Cloud console button
    • Time remaining
    • The temporary credentials that you must use for this lab
    • Other information, if needed, to step through this lab
  2. Click Open Google Cloud console (or right-click and select Open Link in Incognito Window if you are running the Chrome browser).

    The lab spins up resources, and then opens another tab that shows the Sign in page.

    Tip: Arrange the tabs in separate windows, side-by-side.

    Note: If you see the Choose an account dialog, click Use Another Account.
  3. If necessary, copy the Username below and paste it into the Sign in dialog.

    {{{user_0.username | "Username"}}}

    You can also find the Username in the Lab Details pane.

  4. Click Next.

  5. Copy the Password below and paste it into the Welcome dialog.

    {{{user_0.password | "Password"}}}

    You can also find the Password in the Lab Details pane.

  6. Click Next.

    Important: You must use the credentials the lab provides you. Do not use your Google Cloud account credentials. Note: Using your own Google Cloud account for this lab may incur extra charges.
  7. Click through the subsequent pages:

    • Accept the terms and conditions.
    • Do not add recovery options or two-factor authentication (because this is a temporary account).
    • Do not sign up for free trials.

After a few moments, the Google Cloud console opens in this tab.

Note: To access Google Cloud products and services, click the Navigation menu or type the service or product name in the Search field. Navigation menu icon and Search field

Task 1. Explore Nano Banana in the Vertex AI Studio UI

In this section, you will use the Vertex AI Studio UI to explore Nano Banana.

  1. In the Google Cloud console, from the Navigation menu (Navigation menu), select Vertex AI > Vertex AI Studio.

  2. In the chat input, type /model and press return to bring up the model settings.

  3. Select Nano Banana () from the Gemini tab

  4. In the prompt input box, click the + sign to add media and select Import from Cloud Storage.

  5. Select the bucket gs://-bucket/ and the image cymbal-shops-ui.png.

  6. Click Select.

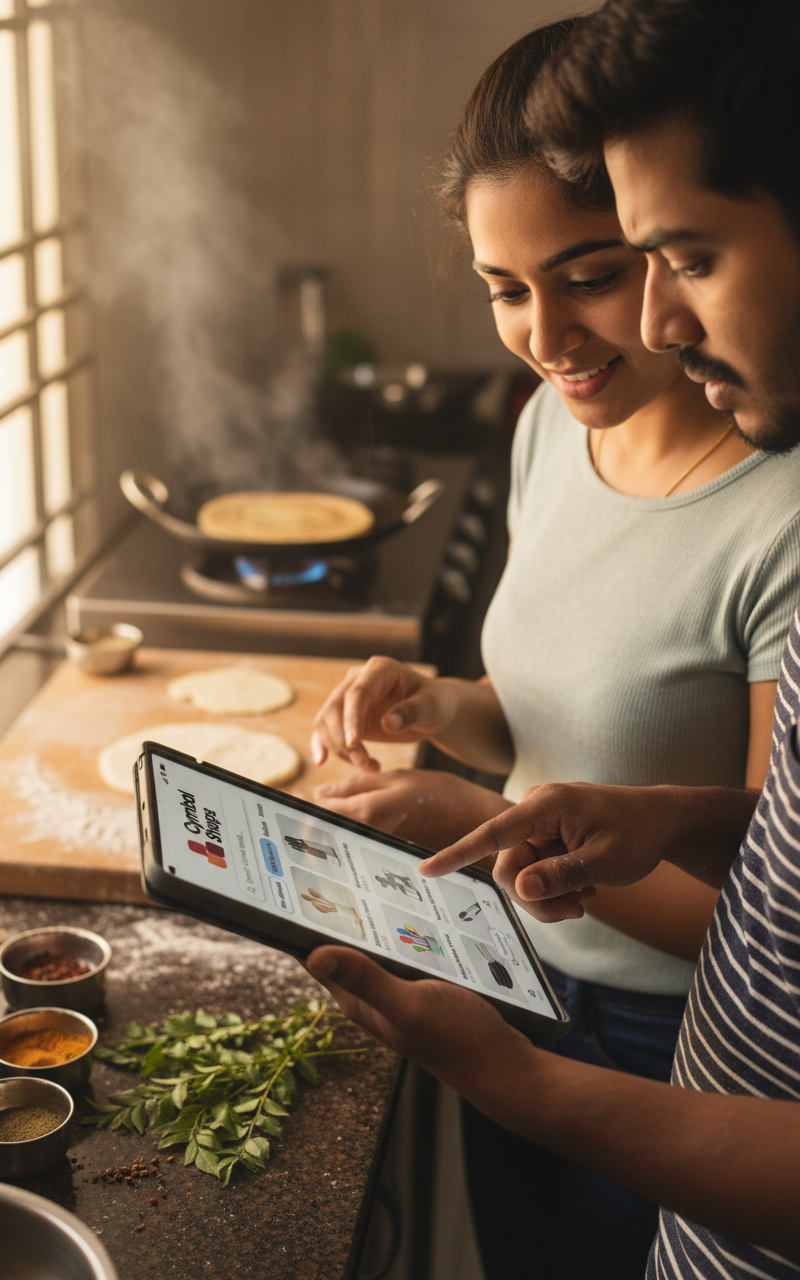
  7. Click the image that has appeared in the prompt to see a larger resolution version of the image. It is a UI of a new mobile website for Cymbal Shops.

    Select the image in the prompt
  8. Close the detailed image view.

  9. Enter the following text to accompany the image, then click the Submit arrow button.

    Create a closeup photo featuring a young couple from Thiruvananthapuram in a kitchen cooking Kerala Parotta and looking at this UI on a tablet screen. They should be holding the tablet in such a way that we can see the UI on the screen.

    Example Output (yours may be different):

    A couple in TVM viewing your UI Note: Not every image generated will be exactly as expected, but you can re-run generations to see different results.
  10. Follow up with the following prompt to see how Nano Banana can maintain consistency across images within a chat session:

    Show the same couple opening their own restaurant.

    Example Output (yours may be different):

    The couple opening their restaurant
  11. You can click New chat in the upper left of the studio and try the prompt again to see variations.

Click Check my progress to verify the objectives. Explore Nano Banana in the Vertex AI Studio UI.

Task 2. Set up a Colab Enterprise notebook environment

In this section, you will open a Colab Enterprise notebook to send requests to the Nano Banana model using the Python Google Gen AI SDK.

  1. In the Google Cloud console, from the Navigation menu (Navigation menu), select Vertex AI > Colab Enterprise.

  2. Click Create notebook.

  3. When the notebook has been created, use the File > Rename menu item to rename the notebook to:

    nano-banana.ipynb
  4. Click the Connect button in the upper right of the notebook UI to create a runtime environment and connect to it.

  5. Follow the prompts to authorize your notebook as your Qwiklabs student account.

  6. Creating the runtime will take a few minutes. When it is connected, you will notice this runtime monitoring display in the upper right.

    RAM and disk status display

    You can dismiss any pop-up guides or notifications that appear.

  7. When the runtime has become active, paste the following into the first cell, and run the cell by pressing Shift + Enter on your keyboard or selecting the play button to the left of the cell.

    !pip install --upgrade --quiet google-genai NOTE: Ignore any compatibility errors during installation of the libraries.
  8. When the code cell has finished running (indicated by a number in brackets ([1]) appearing to the left of the code cell), restart the kernel by using the menus to select Runtime > Restart session and selecting Yes.

  9. Paste the following into the next code cell to import packages and do some setup. Run the cell with Shift + Enter or by pressing the play icon to the left of the cell:

    from io import BytesIO from PIL import Image from google.cloud import storage from google import genai from google.genai import types storage_client = storage.Client() PROJECT_ID = "{{{project_0.project_id | YOUR_GCP_PROJECT_ID}}}" BUCKET_NAME = f"{PROJECT_ID}-bucket" NANO_BANANA = "{{{project_0.startup_script.gemini_flash_image_model_id | gemini-flash-image-model-id | disablehighlight}}}" client = genai.Client( vertexai=True, project=PROJECT_ID, location="global", )
  10. In the next cell, paste and run the following to define helper functions to display images in your notebook:

    def display_image(image_data): """Displays an image in a Colab notebook from PNG data.""" img = Image.open(BytesIO(image_data)) img.save('my_image.png') display(img) def display_img_from_gcs(bucket_name, img_path): """Downloads bytes and displays an image stored in GCS.""" bucket = storage_client.get_bucket(bucket_name) blob = bucket.get_blob(img_path) display_image(blob.download_as_bytes())

Click Check my progress to verify the objectives. Set up the Colab Enterprise notebook environment.

Task 3. Query Nano Banana from your notebook

  1. In a new cell, paste and run the following to preview an image of a jacket product you will work with:

    display_img_from_gcs(BUCKET_NAME, "product_jacket_932.png")
  2. In a new cell, paste and run the following to view another product image you will work with -- this time it's a dress:

    display_img_from_gcs(BUCKET_NAME, "product_dress_128.png")
  3. To send these to Gemini, paste and run the following to create a genai.types.Part for each image and a text prompt, then combine them into genai.types.Content identified as coming from the user that we can send to the model:

    image1 = types.Part.from_uri( file_uri=f"gs://{BUCKET_NAME}/product_dress_128.png", mime_type="image/png", ) image2 = types.Part.from_uri( file_uri=f"gs://{BUCKET_NAME}/product_jacket_932.png", mime_type="image/png", ) prompt = types.Part.from_text( text=("Create a photo featuring a young couple" "from Austin, TX wearing these clothing" "products on a walk through the Greenbelt.") ) content = [ types.Content( role="user", parts=[image1, image2, prompt] ) ]
  4. To use Nano Banana, you also need to specify that you expect a response including text and images. You do that by setting a genai.types.GenerateContentConfig with response_modalities set to ["TEXT", "IMAGE"]. Retry optins are also a good idea to include to handle resource errors due to the popularity of the model. Paste and run this code to create this configuration:

    gen_config = types.GenerateContentConfig( response_modalities = ["TEXT", "IMAGE"], http_options = types.HttpOptions( retry_options = types.HttpRetryOptions( attempts = 60, initial_delay = 1, exp_base = 2, max_delay = 4 ) ) )
  5. Now you can paste and run the following code to make a call to generate_content and then use one of the helper functions you defined earlier to display the image:

    response = client.models.generate_content( model = NANO_BANANA, contents = content, config = gen_config, ) for part in response.candidates[0].content.parts: if part.inline_data: image_data = part.inline_data.data display_image(image_data)

    Example Output (yours may be different):

    A couple in Austin wearing the products.

Click Check my progress to verify the objectives. Query Nano Banana from your notebook.

Task 4. Use Nano Banana to generate images that include text

  1. At the bottom of the notebook, mouse-over the space at the end of a cell and select the + Text button to add a Markdown text cell.

    Add a text cell
  2. Paste the following Markdown text and run the cell to render Markdown text, which can be useful to define structure in your notebook.

    ## Edit a UI with Nano Banana
  3. A new code cell will have been created for you after you have run the Markdown cell.

    In the new code cell, paste and run the following code to display another image you will edit using Nano Banana.

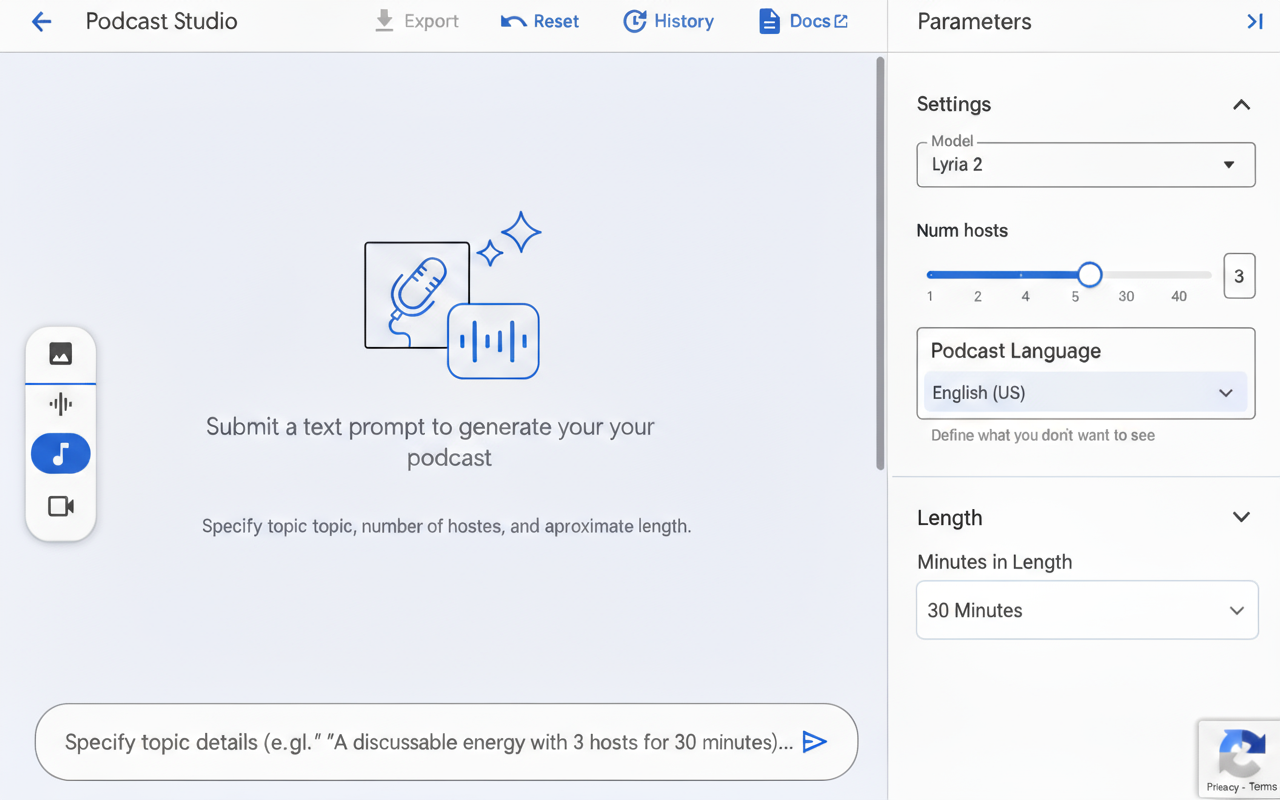
    This UI comes from the Google Cloud console -- specifically the Vertex AI Studio's Media Studio UI for music generation with the Lyria model.

    display_img_from_gcs(BUCKET_NAME, "lyria_ui.png")
  4. In a new code cell, paste and run the following code to generate a UI design in the same style, but with the purpose of generating podcasts.

    ui_img_part = types.Part.from_uri( file_uri=f"gs://{BUCKET_NAME}/lyria_ui.png", mime_type="image/png", ) text1 = types.Part.from_text( text=""" Create a UI in the same style. It should be called Podcast Studio. Include configuration options: - A UI slider to set the number of hosts (from 1 to max 4) - A UI slider to set the minutes in length (from 2 to max 40) The prompt input box should tell the user to specify details of the episode topic. """ ) contents = [ types.Content( role="user", parts=[ui_img_part, text1] ) ] response = client.models.generate_content( model = NANO_BANANA, contents = contents, config = gen_config, ) for part in response.candidates[0].content.parts: if part.inline_data: image_data = part.inline_data.data display_image(image_data)
  5. In a new code cell, paste and run the following code to upload and edit the previous image, replacing the "Advanced Options" section with a new configuration option to set the podcast's language:

    bucket = storage_client.get_bucket(BUCKET_NAME) blob = bucket.blob("original_ui.png") blob.upload_from_filename("my_image.png") original_ui_img_part = types.Part.from_uri( file_uri=f"gs://{BUCKET_NAME}/original_ui.png", mime_type="image/png", ) text = types.Part.from_text( text=""" Modify this image to remove the "Advanced Options" area. Keep current configuration options (Number of hosts and Minutes in Length) and add a new dropdown for Podcast Language. """ ) contents = [ types.Content( role="user", parts=[original_ui_img_part, text] ) ] response = client.models.generate_content( model = NANO_BANANA, contents = contents, config = gen_config, ) for part in response.candidates[0].content.parts: if part.inline_data: image_data = part.inline_data.data display_image(image_data)

    Example Output (yours may be different):

    Example output showing a Podcast Studio UI

Click Check my progress to verify the objectives. Generate images that include text using Nano Banana.

Optional: Keep Experimenting

You have now used Nano Banana from both the Vertex AI Studio and the Python SDK. This is a great time to experiment on your own and build more intuition for the model's capabilities. This section is not graded, so feel free to explore! Here are a few ideas:

  • In your Colab Notebook:

    • Try modifying the prompts in Task 3. What if the couple is in a different city or doing a different activity?
    • In Task 4, try changing the UI prompt to design a different kind of application. What about a weather app or a music player in the same style?
  • In Vertex AI Studio:

    • Return to the Studio (from Task 1) and open a New chat.
    • Try uploading the product or UI images from the lab (like product_jacket_932.png or lyria_ui.png) and use text prompts to generate new scenes or edits.
    • See if you can use follow-up prompts to refine your generated images.

Congratulations!

In this lab, you have successfully explored Nano Banana by instructing it to generate images using the Vertex AI Studio UI, generate photorealistic images from code by using other images as inputs, and generate non-photographic images that include text.

Manual Last Updated March 04, 2026

Lab Last Tested March 04, 2026

Copyright 2023 Google LLC All rights reserved. Google and the Google logo are trademarks of Google LLC. All other company and product names may be trademarks of the respective companies with which they are associated.

Before you begin

  1. Labs create a Google Cloud project and resources for a fixed time
  2. Labs have a time limit and no pause feature. If you end the lab, you'll have to restart from the beginning.
  3. On the top left of your screen, click Start lab to begin

Use private browsing

  1. Copy the provided Username and Password for the lab
  2. Click Open console in private mode

Sign in to the Console

  1. Sign in using your lab credentials. Using other credentials might cause errors or incur charges.
  2. Accept the terms, and skip the recovery resource page
  3. Don't click End lab unless you've finished the lab or want to restart it, as it will clear your work and remove the project

This content is not currently available

We will notify you via email when it becomes available

Great!

We will contact you via email if it becomes available

One lab at a time

Confirm to end all existing labs and start this one

Use private browsing to run the lab

Using an Incognito or private browser window is the best way to run this lab. This prevents any conflicts between your personal account and the Student account, which may cause extra charges incurred to your personal account.