Loading...
No results found.

Apply your skills in Google Cloud console

05

Building Batch Data Pipelines on Google Cloud

Get access to 700+ labs and courses

Serverless Data Analysis with Beam: MapReduce in Beam (Java)

Lab 1 hour 30 minutes universal_currency_alt 5 Credits show_chart Advanced
info This lab may incorporate AI tools to support your learning.
Get access to 700+ labs and courses

Overview

In this lab, you will identify Map and Reduce operations, execute the pipeline, and use command line parameters.

Objective

  • Identify Map and Reduce operations
  • Execute the pipeline
  • Use command line parameters

Setup

For each lab, you get a new Google Cloud project and set of resources for a fixed time at no cost.

  1. Sign in to Qwiklabs using an incognito window.

  2. Note the lab's access time (for example, 1:15:00), and make sure you can finish within that time.
    There is no pause feature. You can restart if needed, but you have to start at the beginning.

  3. When ready, click Start lab.

  4. Note your lab credentials (Username and Password). You will use them to sign in to the Google Cloud Console.

  5. Click Open Google Console.

  6. Click Use another account and copy/paste credentials for this lab into the prompts.
    If you use other credentials, you'll receive errors or incur charges.

  7. Accept the terms and skip the recovery resource page.

Activate Google Cloud Shell

Google Cloud Shell is a virtual machine that is loaded with development tools. It offers a persistent 5GB home directory and runs on the Google Cloud.

Google Cloud Shell provides command-line access to your Google Cloud resources.

  1. In Cloud console, on the top right toolbar, click the Open Cloud Shell button.

    Highlighted Cloud Shell icon

  2. Click Continue.

It takes a few moments to provision and connect to the environment. When you are connected, you are already authenticated, and the project is set to your PROJECT_ID. For example:

Project ID highlighted in the Cloud Shell Terminal

gcloud is the command-line tool for Google Cloud. It comes pre-installed on Cloud Shell and supports tab-completion.

  • You can list the active account name with this command:
gcloud auth list

Output:

Credentialed accounts: - @.com (active)

Example output:

Credentialed accounts: - google1623327_student@qwiklabs.net
  • You can list the project ID with this command:
gcloud config list project

Output:

[core] project =

Example output:

[core] project = qwiklabs-gcp-44776a13dea667a6 Note: Full documentation of gcloud is available in the gcloud CLI overview guide .

Launch Google Cloud Shell Code Editor

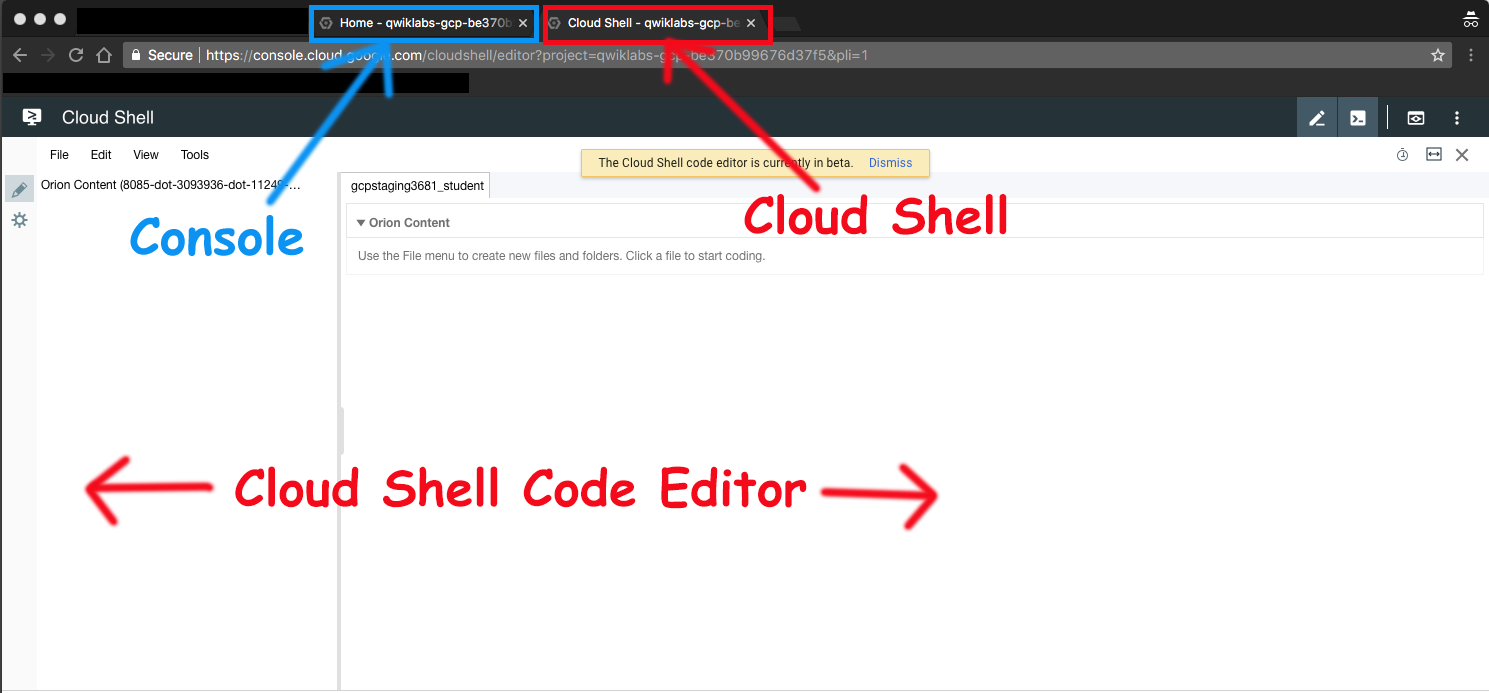
Use the Google Cloud Shell Code Editor to easily create and edit directories and files in the Cloud Shell instance.

  • Once you activate the Google Cloud Shell, click Open editor to open the Cloud Shell Code Editor.

Open Editor button

You now have three interfaces available:

  • The Cloud Shell Code Editor
  • Console (By clicking on the tab). You can switch back and forth between the Console and Cloud Shell by clicking on the tab.
  • The Cloud Shell Command Line (By clicking on Open Terminal in the Console)

Three interfaces: Cloud Shell Code Editor, Console, and Cloud Shell Command Line highlighted

Check project permissions

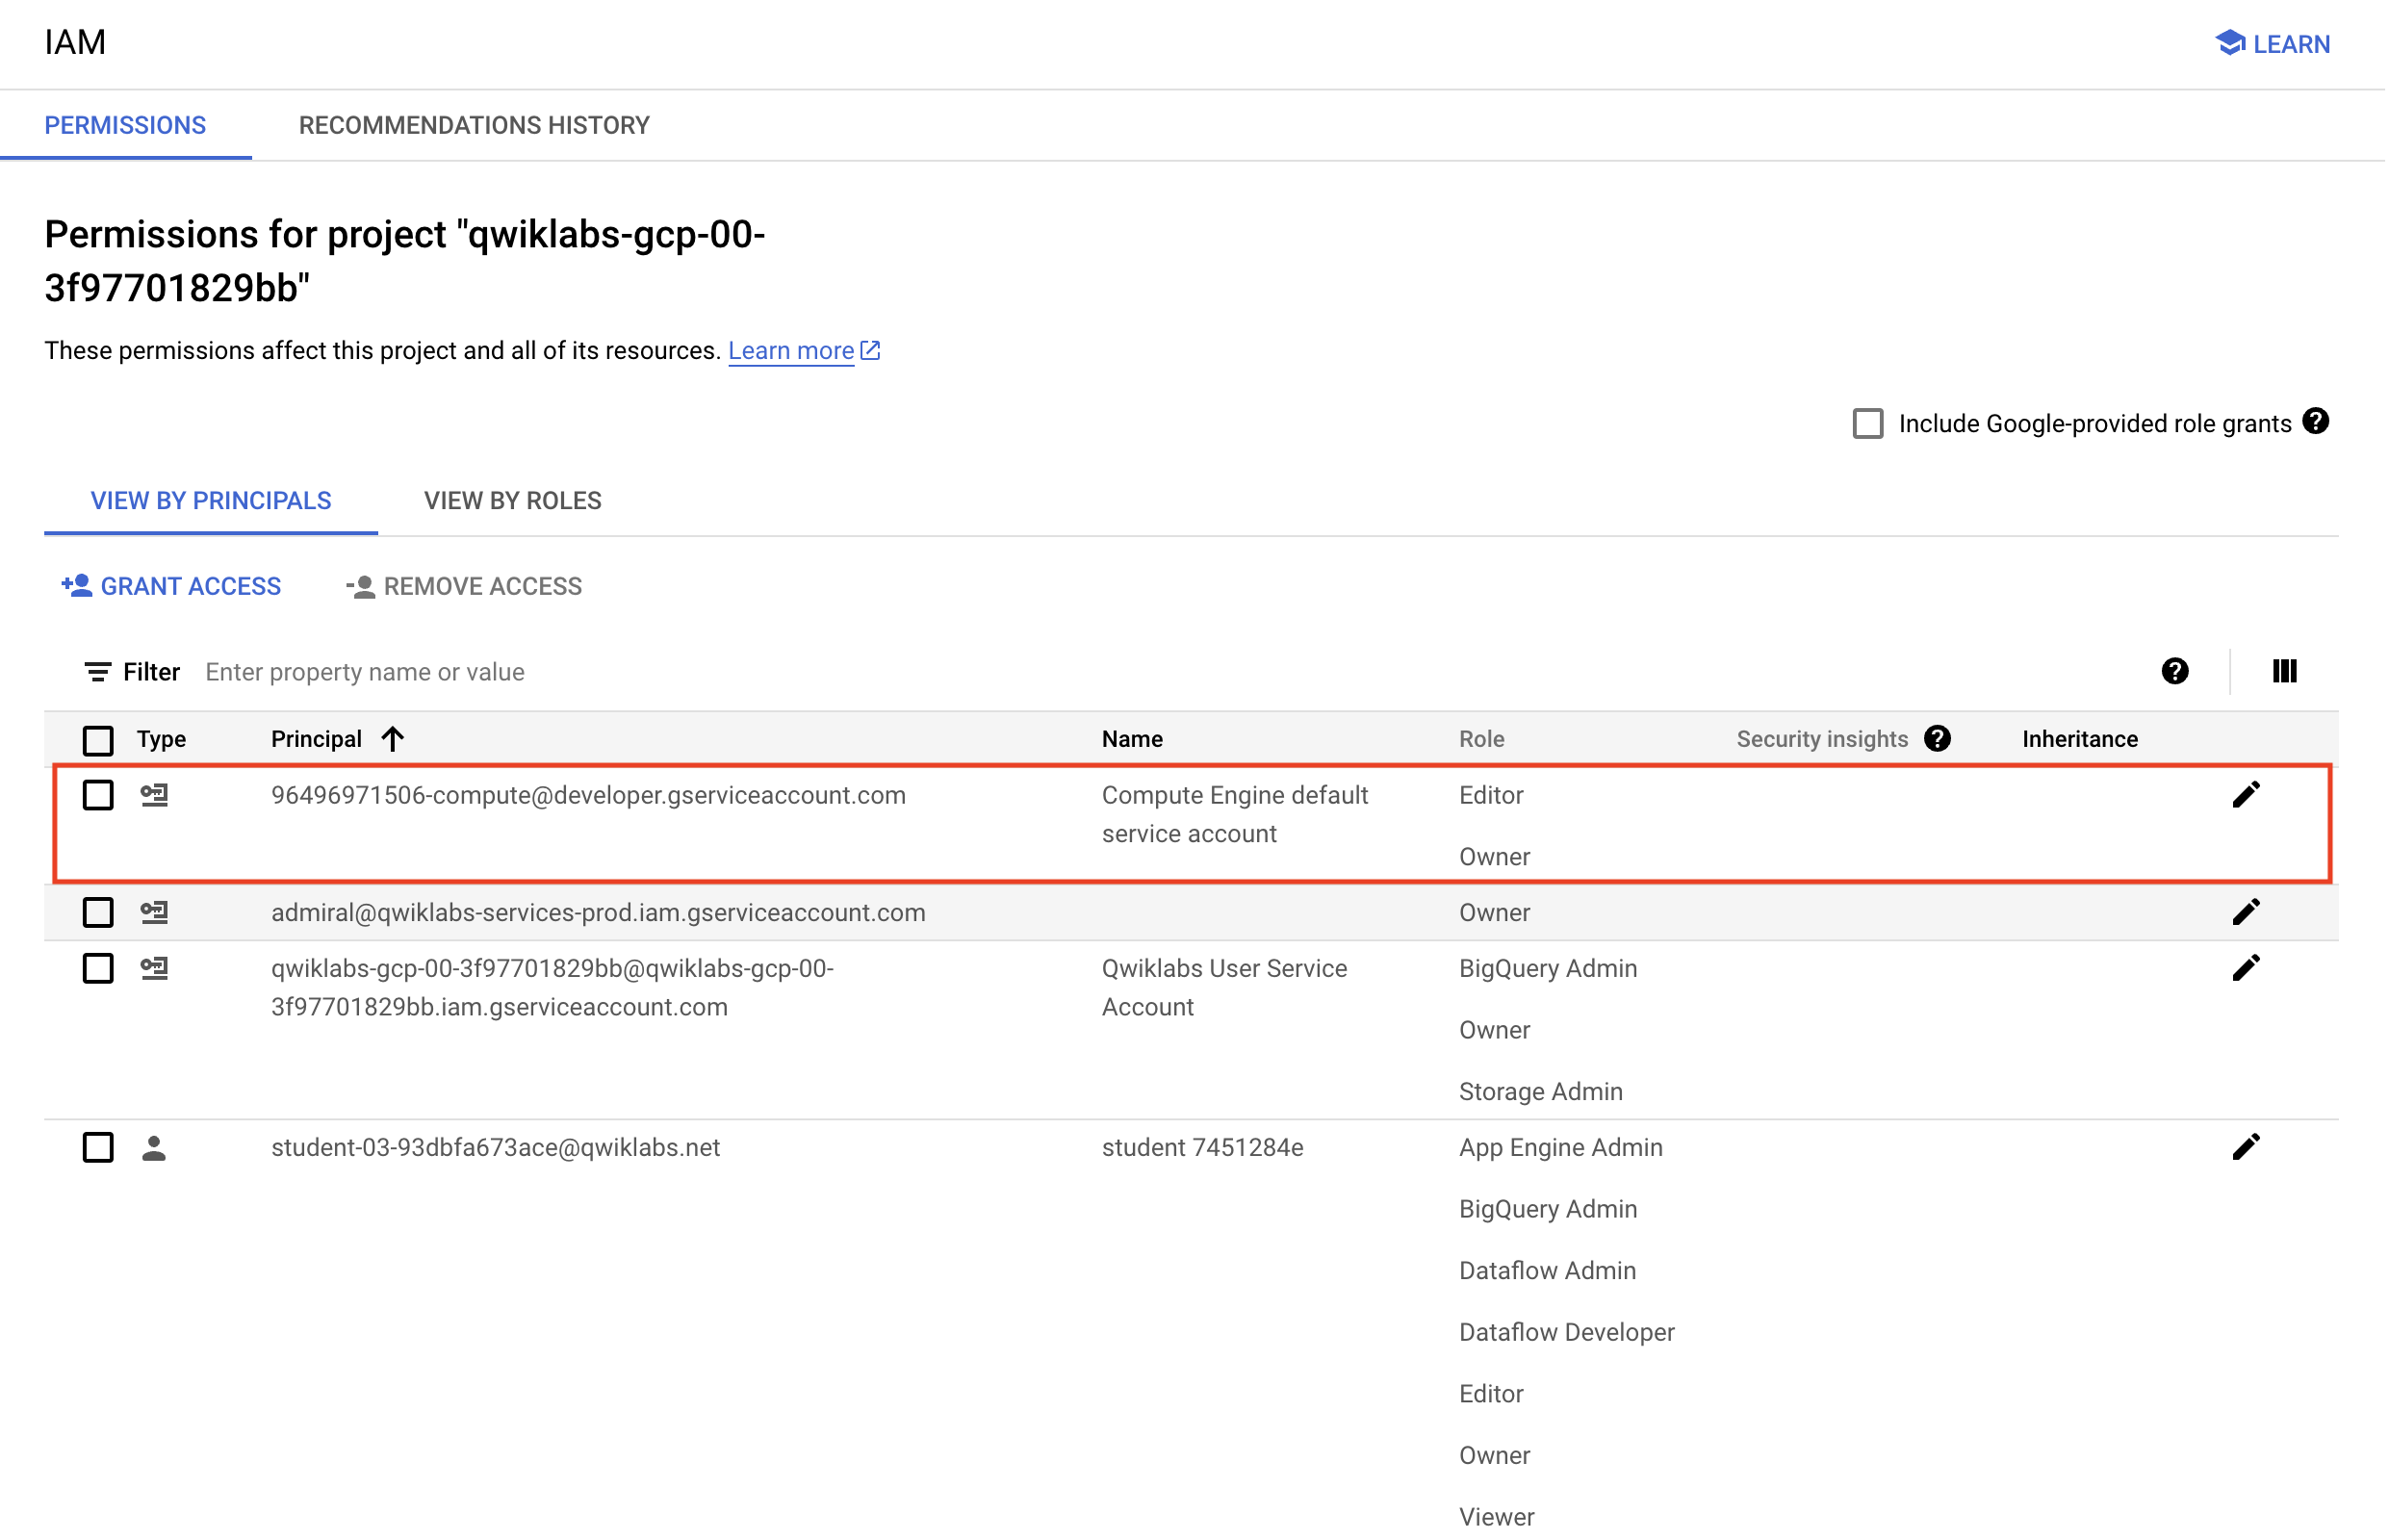
Before you begin your work on Google Cloud, you need to ensure that your project has the correct permissions within Identity and Access Management (IAM).

  1. In the Google Cloud console, on the Navigation menu (Navigation menu icon), select IAM & Admin > IAM.

  2. Confirm that the default compute Service Account {project-number}-compute@developer.gserviceaccount.com is present and has the editor role assigned. The account prefix is the project number, which you can find on Navigation menu > Cloud Overview > Dashboard.

Compute Engine default service account name and editor status highlighted on the Permissions tabbed page

Note: If the account is not present in IAM or does not have the editor role, follow the steps below to assign the required role.
  1. In the Google Cloud console, on the Navigation menu, click Cloud Overview > Dashboard.
  2. Copy the project number (e.g. 729328892908).
  3. On the Navigation menu, select IAM & Admin > IAM.
  4. At the top of the roles table, below View by Principals, click Grant Access.
  5. For New principals, type:
{project-number}-compute@developer.gserviceaccount.com
  1. Replace {project-number} with your project number.
  2. For Role, select Project (or Basic) > Editor.
  3. Click Save.

Task 1. Lab preparations

Specific steps must be completed to successfully execute this lab:

  1. Create Cloud Storage bucket (which was completed for you automatically when the lab environment started).

  2. On the Google Cloud Console title bar, click Activate Cloud Shell. If prompted, click Continue. Clone the lab code github repository using the following command:

git clone https://github.com/GoogleCloudPlatform/training-data-analyst

Task 2. Identify Map and Reduce operations

  • In the Cloud Shell code editor navigate to the directory /training-data-analyst/courses/data_analysis/lab2/javahelp/src/main/java/com/google/cloud/training/dataanalyst/javahelp and view the file IsPopular.java in the Cloud Shell editor.
Note: Do not make any changes to the code.

Alternatively, you could view the file with nano:

Note: Do not make any changes to the code. cd ~/training-data-analyst/courses/data_analysis/lab2/javahelp/src/main/java/com/google/cloud/training/dataanalyst/javahelp nano IsPopular.java Note: Normally, you would develop this Java code in an Integrated Development Environment such as Eclipse or IntelliJ (not in CloudShell).

Can you answer these questions about the file IsPopular.java?

  • What getX() methods are present in the class MyOptions?
  • What is the default output prefix?
  • How is the variable outputPrefix in main() set?
  • What are the key steps in the pipeline?
  • Which of these steps happen in parallel?
  • Which of these steps are aggregations?

Task 3. Execute the pipeline

  1. Copy and paste the following Maven command in Cloud Shell:
export PATH=/usr/lib/jvm/java-8-openjdk-amd64/bin/:$PATH cd ~/training-data-analyst/courses/data_analysis/lab2/javahelp mvn compile -e exec:java \ -Dexec.mainClass=com.google.cloud.training.dataanalyst.javahelp.IsPopular Note: It will take 4-5 mintues to complete the process.
  1. Examine the output file:
cat /tmp/output.csv

Task 4. Use command line parameters

  1. Change the output prefix from the default value:
mvn compile -e exec:java \ -Dexec.mainClass=com.google.cloud.training.dataanalyst.javahelp.IsPopular \ -Dexec.args="--outputPrefix=/tmp/myoutput"
  1. What will the name of the new .csv file that is written out be?
  2. Note that we now have a new file in the /tmp directory:
ls -lrt /tmp/*.csv

End your lab

When you have completed your lab, click End Lab. Google Cloud Skills Boost removes the resources you’ve used and cleans the account for you.

You will be given an opportunity to rate the lab experience. Select the applicable number of stars, type a comment, and then click Submit.

The number of stars indicates the following:

  • 1 star = Very dissatisfied
  • 2 stars = Dissatisfied
  • 3 stars = Neutral
  • 4 stars = Satisfied
  • 5 stars = Very satisfied

You can close the dialog box if you don't want to provide feedback.

For feedback, suggestions, or corrections, please use the Support tab.

Copyright 2022 Google LLC All rights reserved. Google and the Google logo are trademarks of Google LLC. All other company and product names may be trademarks of the respective companies with which they are associated.

Previous Next

Before you begin

  1. Labs create a Google Cloud project and resources for a fixed time
  2. Labs have a time limit and no pause feature. If you end the lab, you'll have to restart from the beginning.
  3. On the top left of your screen, click Start lab to begin

Use private browsing

  1. Copy the provided Username and Password for the lab
  2. Click Open console in private mode

Sign in to the Console

  1. Sign in using your lab credentials. Using other credentials might cause errors or incur charges.
  2. Accept the terms, and skip the recovery resource page
  3. Don't click End lab unless you've finished the lab or want to restart it, as it will clear your work and remove the project

This content is not currently available

We will notify you via email when it becomes available

Great!

We will contact you via email if it becomes available

One lab at a time

Confirm to end all existing labs and start this one

Use private browsing to run the lab

Use an Incognito or private browser window to run this lab. This prevents any conflicts between your personal account and the Student account, which may cause extra charges incurred to your personal account.
Preview