GSP649

Overview
In this lab, you use Cloud Run functions and Cloud Scheduler to identify and clean up wasted cloud resources. You trigger a Cloud Run function to migrate a storage bucket from a Cloud Monitoring alerting policy to a less expensive storage class.
Google Cloud provides storage object lifecycle rules that automatically moves objects to different storage classes based on a set of attributes, such as their creation date or live state. However, these rules can’t take into account whether the objects have been accessed. Sometimes, you might want to move newer objects to Nearline storage if they haven’t been accessed for a certain period of time.
Objectives
In this lab, you will learn how to:
- Create two storage buckets, add a file to the
serving-bucket, and generate traffic against it.
- Create a Cloud Monitoring dashboard to visualize bucket utilization.
- Deploy a Cloud Run function to migrate the idle bucket to a less expensive storage class, and trigger the function by using a payload intended to mock a notification received from a Cloud alerting policy.
Setup and requirements
Before you click the Start Lab button
Read these instructions. Labs are timed and you cannot pause them. The timer, which starts when you click Start Lab, shows how long Google Cloud resources are made available to you.
This hands-on lab lets you do the lab activities in a real cloud environment, not in a simulation or demo environment. It does so by giving you new, temporary credentials you use to sign in and access Google Cloud for the duration of the lab.
To complete this lab, you need:
- Access to a standard internet browser (Chrome browser recommended).
Note: Use an Incognito (recommended) or private browser window to run this lab. This prevents conflicts between your personal account and the student account, which may cause extra charges incurred to your personal account.
- Time to complete the lab—remember, once you start, you cannot pause a lab.
Note: Use only the student account for this lab. If you use a different Google Cloud account, you may incur charges to that account.
How to start your lab and sign in to the Google Cloud console
-
Click the Start Lab button. If you need to pay for the lab, a dialog opens for you to select your payment method.
On the right is the Lab setup and access panel with the following:
- The Open Google Cloud console button
- The temporary credentials (username and password) that you must use for this lab
- Other information, if needed, to step through this lab
Note that the lab timer is located near the top of the page, showing the remaining time.
-
Click Open Google Cloud console (or right-click and select Open Link in Incognito Window if you are running the Chrome browser).
The lab spins up resources, and then opens another tab that shows the Sign in page.
Tip: Arrange the tabs in separate windows, side-by-side.
Note: If you see the Choose an account dialog, click Use Another Account.
-
If necessary, copy the Username below and paste it into the Sign in dialog.
{{{user_0.username | "Username"}}}
You can also find the Username in the Lab setup and access panel.
-
Click Next.
-
Copy the Password below and paste it into the Welcome dialog.
{{{user_0.password | "Password"}}}
You can also find the Password in the Lab setup and access panel.
-
Click Next.
Important: You must use the credentials the lab provides you. Do not use your Google Cloud account credentials.
Note: Using your own Google Cloud account for this lab may incur extra charges.
-
Click through the subsequent pages:
- Accept the terms and conditions.
- Do not add recovery options or two-factor authentication (because this is a temporary account).
- Do not sign up for free trials.
After a few moments, the Google Cloud console opens in this tab.
Note: To access Google Cloud products and services, click the Navigation menu or type the service or product name in the Search field.

Activate Cloud Shell
Cloud Shell is a virtual machine that is loaded with development tools. It offers a persistent 5GB home directory and runs on the Google Cloud. Cloud Shell provides command-line access to your Google Cloud resources.
-
Click Activate Cloud Shell  at the top of the Google Cloud console.
-
Click through the following windows:
- Continue through the Cloud Shell information window.
- Authorize Cloud Shell to use your credentials to make Google Cloud API calls.
When you are connected, you are already authenticated, and the project is set to your Project_ID, . The output contains a line that declares the Project_ID for this session:
Your Cloud Platform project in this session is set to {{{project_0.project_id | "PROJECT_ID"}}}
gcloud is the command-line tool for Google Cloud. It comes pre-installed on Cloud Shell and supports tab-completion.
- (Optional) You can list the active account name with this command:
gcloud auth list
- Click Authorize.
Output:
ACTIVE: *
ACCOUNT: {{{user_0.username | "ACCOUNT"}}}
To set the active account, run:
$ gcloud config set account `ACCOUNT`
- (Optional) You can list the project ID with this command:
gcloud config list project
Output:
[core]
project = {{{project_0.project_id | "PROJECT_ID"}}}
Note: For full documentation of gcloud, in Google Cloud, refer to the gcloud CLI overview guide.
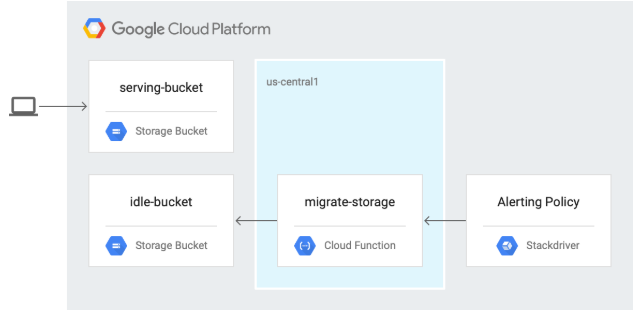
Architecture
In the following diagram, you trigger a Cloud Run function to migrate a storage bucket to a less expensive storage class from a Cloud Monitoring alerting policy.
Task 1. Enable APIs and download the source code
-
Click Activate Cloud Shell at the top of the Google Cloud console.
-
In Cloud Shell, enable the Cloud Scheduler API:
gcloud services enable cloudscheduler.googleapis.com
Click Check my progress to verify the objective.
Enable the Cloud Scheduler API
- Download the source code for the lab:
gcloud storage cp -r gs://spls/gsp649/* . && cd gcf-automated-resource-cleanup/
- Set environment variables and make the repository folder your $WORKDIR where you run all commands related to this lab:
export PROJECT_ID=$(gcloud config list --format 'value(core.project)' 2>/dev/null)
WORKDIR=$(pwd)
- Install Apache Bench, an open source load-generation tool:
sudo apt-get update
sudo apt-get install apache2-utils -y
Task 2. Create the Cloud Storage buckets and add a file
- In Cloud Shell, navigate to the
migrate-storage directory:
cd $WORKDIR/migrate-storage
- Create
serving-bucket, the Cloud Storage bucket. You use this later to change storage classes:
export PROJECT_ID=$(gcloud config list --format 'value(core.project)' 2>/dev/null)
gcloud storage buckets create gs://${PROJECT_ID}-serving-bucket -l {{{project_0.default_region|REGION}}}
Click Check my progress to verify the objective.
Create a Cloud Storage bucket
- Make the bucket public:
gcloud storage buckets add-iam-policy-binding gs://${PROJECT_ID}-serving-bucket --member=allUsers --role=roles/storage.objectViewer
- Add a text file to the bucket:
gcloud storage cp $WORKDIR/migrate-storage/testfile.txt gs://${PROJECT_ID}-serving-bucket
- Make the file public:
gcloud storage objects update gs://${PROJECT_ID}-serving-bucket/testfile.txt --add-acl-grant=entity=AllUsers,role=READER
- Confirm that you’re able to access the file:
curl http://storage.googleapis.com/${PROJECT_ID}-serving-bucket/testfile.txt
Your output will be:
this is a test
Click Check my progress to verify the objective.
Make cloud Storage bucket public
- Create a second bucket called idle-bucket that won’t serve any data:
gcloud storage buckets create gs://${PROJECT_ID}-idle-bucket -l {{{project_0.default_region|REGION}}}
export IDLE_BUCKET_NAME=$PROJECT_ID-idle-bucket
Click Check my progress to verify the objective.
Create another Cloud Storage bucket
Task 3. Create a monitoring dashboard
Create a Monitoring Metrics Scope
Set up a Monitoring Metrics Scope that's tied to your Google Cloud Project. The following steps create a new account that has a free trial of Monitoring.
- In the Cloud Console, click Navigation menu (
 ) > Monitoring.
When the Monitoring Overview page opens, your metrics scope project is ready.
-
In the left panel, click Dashboards > Create Custom Dashboard.
-
Name the Dashboard Bucket Usage.
-
Click +ADD WIDGET.
-
Click Line.
-
For Widget Title, type Bucket Access.
-
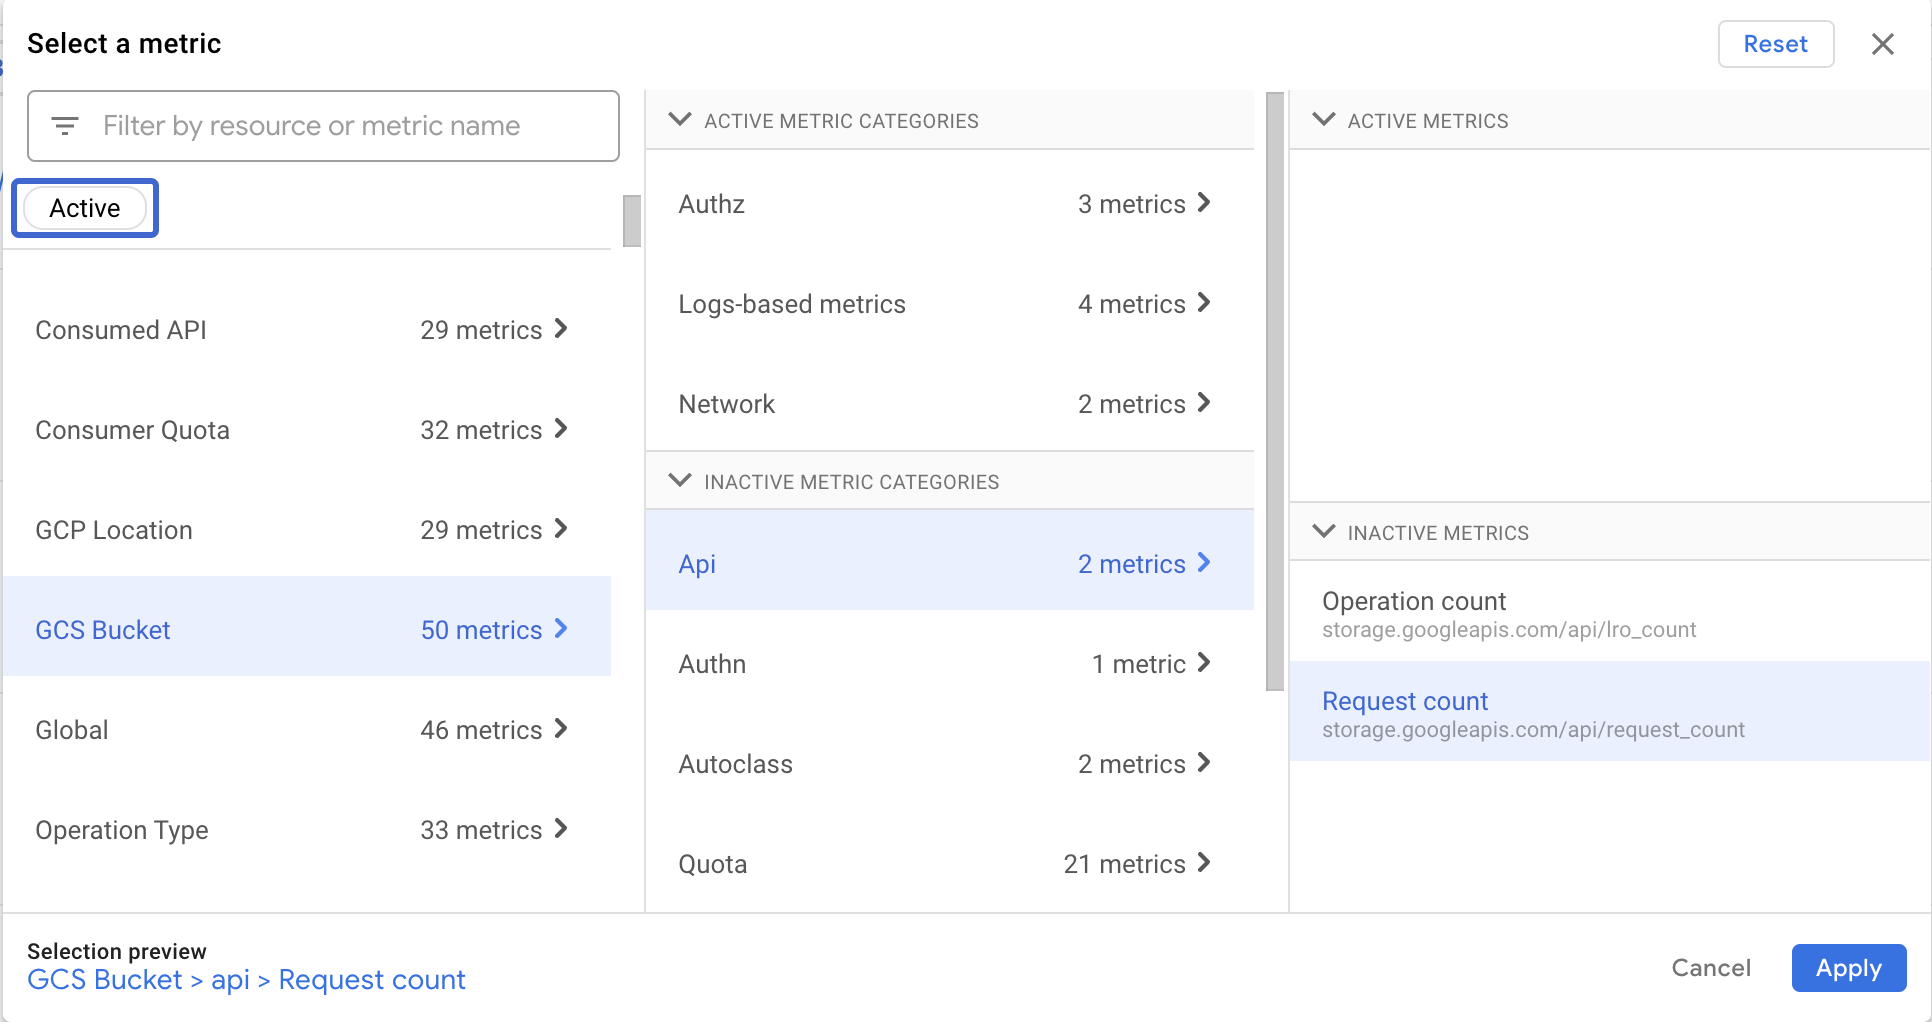
Click Select a metric > GCS Bucket > API > Request count metric and click Apply.
Note: If you cannot find the Request count metric, uncheck Active.
- Click + Add Filter.
To filter by the method name:
- For Filter By Metric Label, select method.
- In the dropdown next to method, select ReadObject.
- Click Apply.
- To group the metrics by bucket name, in the Group By drop-down list, select bucket_name.
You’ve configured Cloud Monitoring to observe object access in your buckets. There's no data in the chart because there's no traffic to the Cloud Storage buckets.
Task 4. Generate load on the serving bucket
Now that you configured monitoring, use Apache Bench to send traffic to serving-bucket.
- In Cloud Shell, send requests to the object in the serving bucket:
ab -n 10000 http://storage.googleapis.com/$PROJECT_ID-serving-bucket/testfile.txt
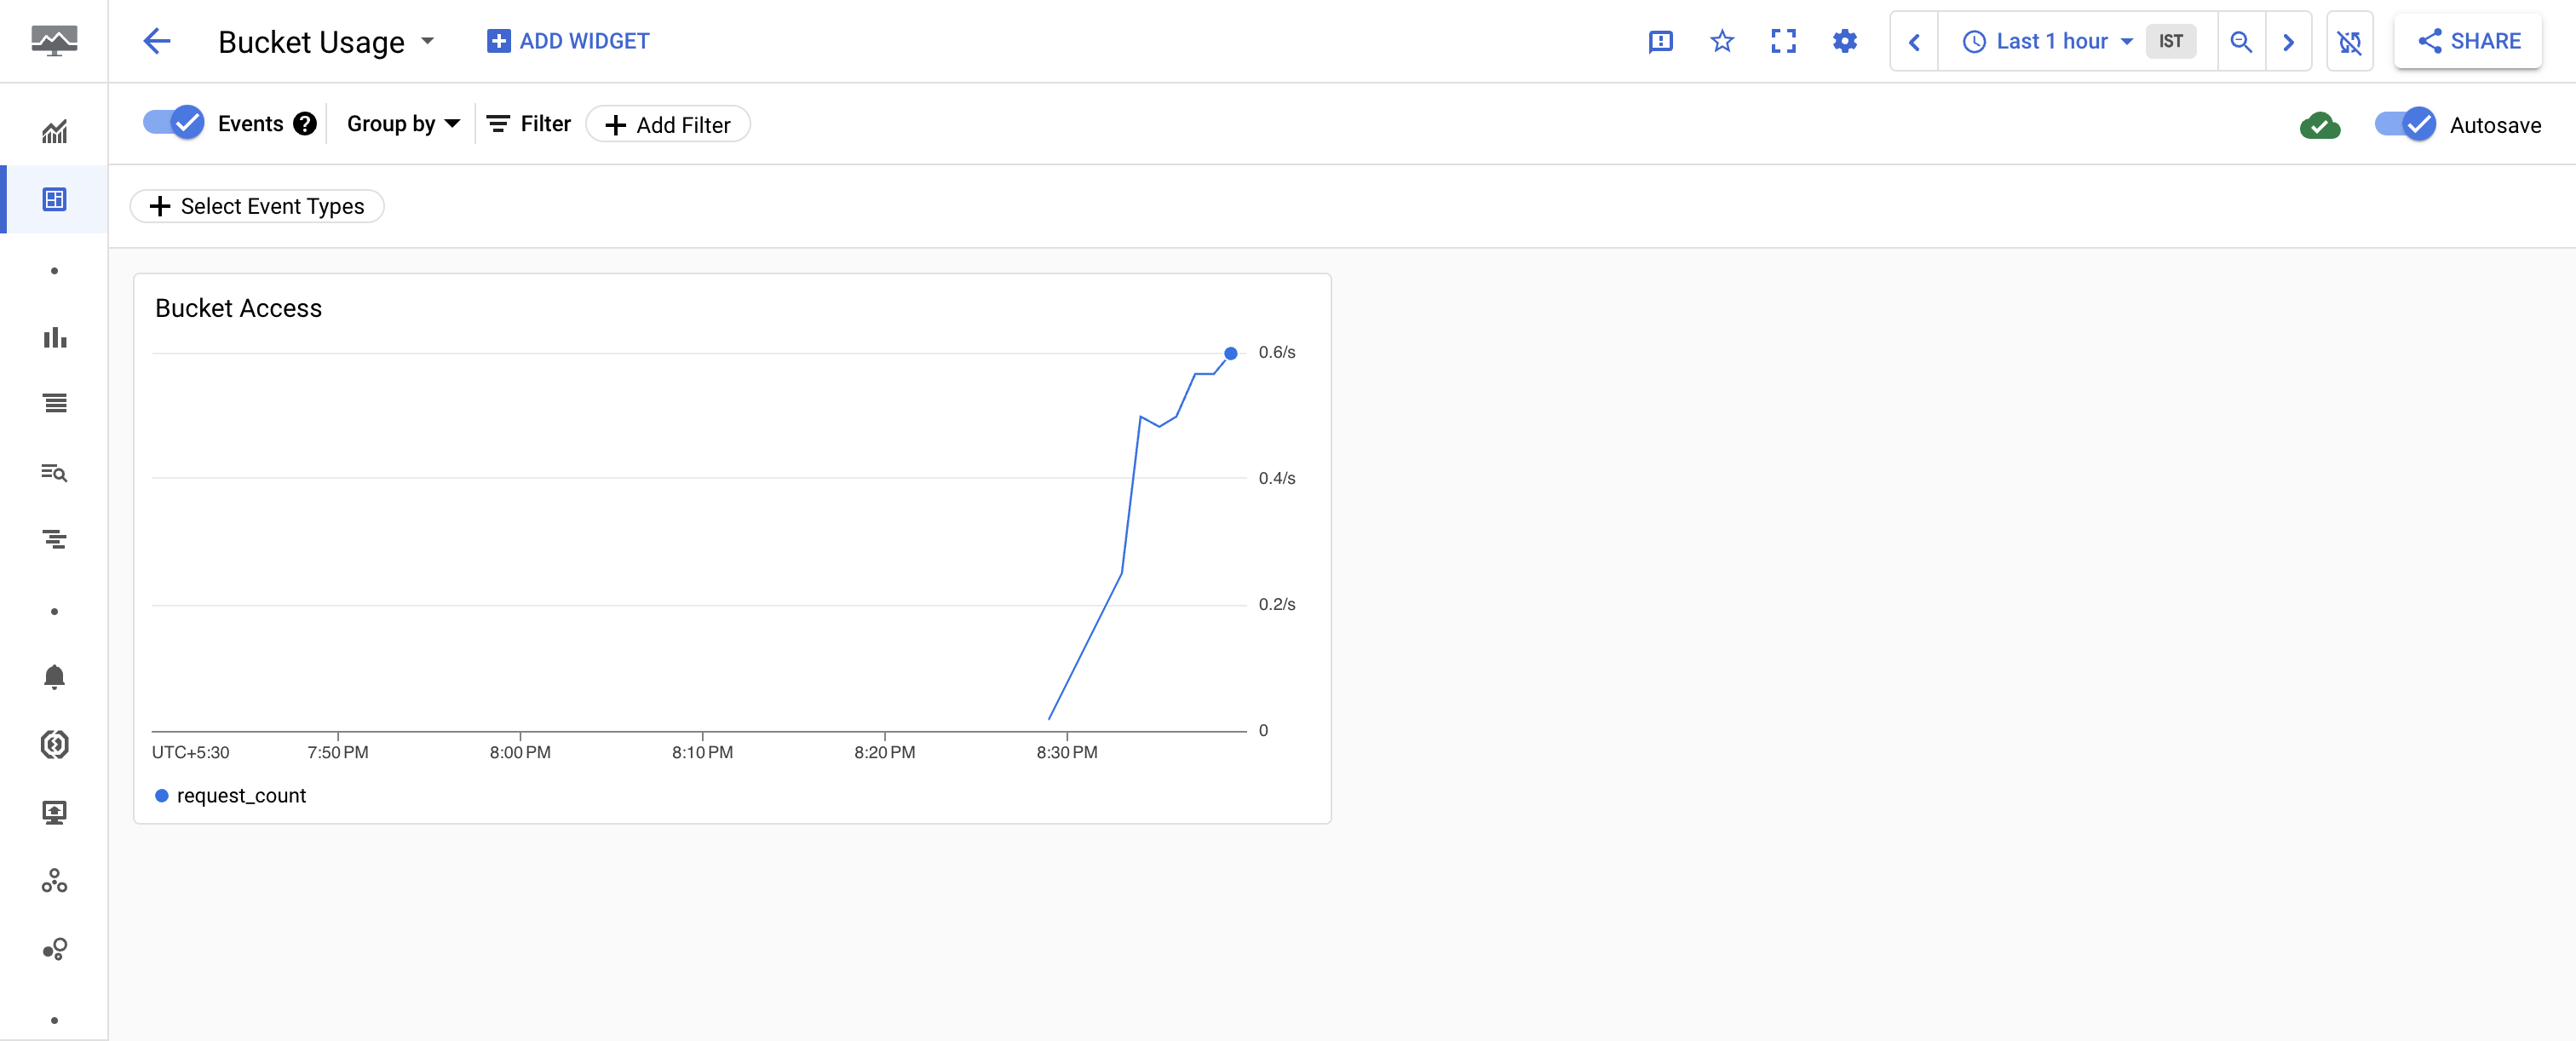
- In the left panel, click Dashboards and then click the name of your Dashboard that is Bucket Usage to see the Bucket Access chart.
Note: If you closed this tab earlier, select Navigation menu > Monitoring, and then in the left panel, click Dashboards > Bucket Usage.
Note: Need to wait for at least 1 minute for the graph to appear on the Bucket Usage dashboard.
- View traffic details.
You may need to enter CTRL-C to return to the command prompt.
Task 5. Review and deploy the Cloud Run function
- In Cloud Shell, enter the following command to view the Cloud Run function code that migrates a storage bucket to the Nearline storage class:
cat $WORKDIR/migrate-storage/main.py | grep "migrate_storage(" -A 15
The output is:
def migrate_storage(request):
request_json = request.get_json(force=True)
bucket_name = request_json['incident']['resource_name']
print(f"bucket_name: {bucket_name}") # Print the bucket name
if not bucket_name:
print("Error: bucket_name is empty")
return "Invalid bucket name", 400
storage_client = storage.Client(project)
bucket = storage_client.get_bucket(bucket_name)
bucket.storage_class = "NEARLINE"
bucket.patch()
return "Bucket migrated successfully", 200
Notice that the Cloud Run function uses the bucket name passed in the request to change it's storage class to Nearline.
- Update the Python script to use your Project ID:
sed -i "s/<project-id>/$PROJECT_ID/" $WORKDIR/migrate-storage/main.py
- Disable the Cloud Run functions API:
gcloud services disable cloudfunctions.googleapis.com
- Re-enable the Cloud Run functions API:
gcloud services enable cloudfunctions.googleapis.com
- Export the project number:
export PROJECT_NUMBER=$(gcloud projects describe $PROJECT_ID --format="value(projectNumber)")
- Add the
artifactregistry.reader permission for your developer service account:
gcloud projects add-iam-policy-binding $PROJECT_ID \
--member="serviceAccount:$PROJECT_NUMBER-compute@developer.gserviceaccount.com" \
--role="roles/artifactregistry.reader"
- Deploy the Cloud Run function:
gcloud functions deploy migrate_storage --gen2 --trigger-http --runtime=python310 --region {{{project_0.default_region | Region}}}
When prompted, enter Y to enable the API [run.googleapis.com] for the project and retry. Do the same for allowing unauthenticated invocations.
Note: If you see a permissions error, please wait a few minutes, and try the deployment again.
- Capture the trigger URL into an environment variable that you use in the next section:
export FUNCTION_URL=$(gcloud functions describe migrate_storage --format=json --region {{{project_0.default_region | Region}}} | jq -r '.url')
Click Check my progress to verify the objective.
Deploy the Cloud Run function
Task 6. Test and validate alerting automation
- Update the JSON file with the bucket name:
export IDLE_BUCKET_NAME=$PROJECT_ID-idle-bucket
sed -i "s/\\\$IDLE_BUCKET_NAME/$IDLE_BUCKET_NAME/" $WORKDIR/migrate-storage/incident.json
- Send a test notification to the Cloud Run function you deployed using the
incident.json file:
envsubst < $WORKDIR/migrate-storage/incident.json | curl -X POST -H "Content-Type: application/json" $FUNCTION_URL -d @-
The output is:
Bucket migrated successfully
The output isn’t terminated with a newline and therefore is immediately followed by the command prompt.
- Confirm that the idle bucket was migrated to Nearline:
gcloud storage buckets describe gs://$PROJECT_ID-idle-bucket \
--format="value(name,default_storage_class)" | awk '{print "gs://"$1": "$2}'
The output is:
gs://<project-id>-idle-bucket: NEARLINE
Click Check my progress to verify the objective.
Confirm the migration of bucket to Nearline
Congratulations!
Congratulations! In this lab, you successfully created two Cloud Storage buckets, added an object to one of them, configured Cloud Monitoring to track bucket access, reviewed and deployed a Cloud Run function to migrate objects to a Nearline bucket, and tested it using a Cloud Monitoring alert.
Google Cloud training and certification
...helps you make the most of Google Cloud technologies. Our classes include technical skills and best practices to help you get up to speed quickly and continue your learning journey. We offer fundamental to advanced level training, with on-demand, live, and virtual options to suit your busy schedule. Certifications help you validate and prove your skill and expertise in Google Cloud technologies.
Manual Last Updated on September 15, 2026
Lab Last Tested September 15, 2026
Copyright 2026 Google LLC. All rights reserved. Google and the Google logo are trademarks of Google LLC. All other company and product names may be trademarks of the respective companies with which they are associated.