
Before you begin
- Labs create a Google Cloud project and resources for a fixed time
- Labs have a time limit and no pause feature. If you end the lab, you'll have to restart from the beginning.
- On the top left of your screen, click Start lab to begin

Create an Agent Platform dataset
/ 20
Create an aspect type in Knowledge Catalog
/ 20
Add an aspect to the Agent Platform dataset
/ 10
Apply your skills by adding the same aspect to other assets
/ 10
Apply your skills by creating an aspect type for protected data
/ 20
Apply your skills by adding the aspect for protected data to assets
/ 20
Create an Agent Platform dataset
/ 20
Create an aspect type in Knowledge Catalog
/ 20
Add an aspect to the Agent Platform dataset
/ 10
Apply your skills by adding the same aspect to other assets
/ 10
Apply your skills by creating an aspect type for protected data
/ 20
Apply your skills by adding the aspect for protected data to assets
/ 20

Finding the right datasets and assets for machine learning workflows with Agent Platform can be tricky. It may not be easy to find datasets ready to use for model training and when you do, it may not be clear how to use the data.
Knowledge Catalog Universal Catalog can help! Knowledge Catalog is a centralized platform that unifies data assets distributed across an organization. It also supports data governance without the need to move or transfer data from its original location. Knowledge Catalog provides easy-to-use tools to discover, catalog, and manage data to power your analytics and machine learning workflows, while leveraging the security of IAM in Google Cloud.
In this lab, you walk through a typical use case for using Knowledge Catalog. Specifically, you catalog and discover data assets that you can use to train Agent Platform models.
This lab provides pre-created data assets across two Google Cloud projects. This includes data assets in BigQuery and Cloud Storage, which you use to create a new Agent Platform dataset in the first task.
| Project | Project ID | Assigned region | Available Data |
|---|---|---|---|
| 1 | Cloud Storage bucket named |
||
| 2 | Three BigQuery datasets: damaged_car_ownership (containing a table for owners of the damaged cars); damaged_car_image_info (containing a table with additional image information, such as owner ID and location/timestamp of the image); and damaged_car_image_metadata (an object dataset with metadata derived from the image files in Cloud Storage, such as storage path and updated date) |
First, you take on the role of the Data Engineer who is helping their organization get data into usable and accessible formats for machine learning workflows. In Project 1, you create an Agent Platform dataset from images in Cloud Storage, and then you create an aspect type and add it to an Agent Platform dataset (and other potentially useful data in BigQuery), so that it is easy for others in your organization to find it using Knowledge Catalog.
Then, you transition to the role of the Data Scientist or Machine Learning Engineer who is looking for existing data assets that they can use to train new models. In Project 2, you use the aspects applied by the Data Engineer to search for relevant data assets in Knowledge Catalog. Then, you create a new aspect type for personally identifiable information (PII) and add it to additional assets that can be useful for future modeling efforts.
| User | Goal | Username | Primary project |
|---|---|---|---|
| 1 - Data Engineer | Create and add aspects to assets to help others find available data for an Agent Platform model to be named damaged_car_parts across multiple projects. | ||
| 2 - Data Scientist or ML Engineer | Use aspects to search for Agent Platform assets to train the model to be named damaged_car_parts, and create and add a new aspect for PII to protected data assets. |
In this lab, you learn how to:
While not required, it is helpful to have some previous knowledge about how Knowledge Catalog and Agent Platform are commonly used within Google Cloud workflows. For an introduction to these tools before you begin this lab, complete the following labs:
Note: To begin this lab, follow the instructions below to log into Project 1:
Read these instructions. Labs are timed and you cannot pause them. The timer, which starts when you click Start Lab, shows how long Google Cloud resources are made available to you.
This hands-on lab lets you do the lab activities in a real cloud environment, not in a simulation or demo environment. It does so by giving you new, temporary credentials you use to sign in and access Google Cloud for the duration of the lab.
To complete this lab, you need:
Click the Start Lab button. If you need to pay for the lab, a dialog opens for you to select your payment method. On the right is the Lab setup and access panel with the following:
Note that the lab timer is located near the top of the page, showing the remaining time.
Click Open Google Cloud console (or right-click and select Open Link in Incognito Window if you are running the Chrome browser).
The lab spins up resources, and then opens another tab that shows the Sign in page.
Tip: Arrange the tabs in separate windows, side-by-side.
If necessary, copy the Username below and paste it into the Sign in dialog.
You can also find the Username in the Lab setup and access panel.
Click Next.
Copy the Password below and paste it into the Welcome dialog.
You can also find the Password in the Lab setup and access panel.
Click Next.
Click through the subsequent pages:
After a few moments, the Google Cloud console opens in this tab.

Cloud Shell is a virtual machine that is loaded with development tools. It offers a persistent 5GB home directory and runs on the Google Cloud. Cloud Shell provides command-line access to your Google Cloud resources.
Click Activate Cloud Shell 
Click through the following windows:
When you are connected, you are already authenticated, and the project is set to your Project_ID,
gcloud is the command-line tool for Google Cloud. It comes pre-installed on Cloud Shell and supports tab-completion.
Output:
Output:
gcloud, in Google Cloud, refer to the gcloud CLI overview guide.
For this task, be sure that you have logged into Project 1 (
In a typical workflow to create a new Agent Platform dataset for image classification, you create a CSV input file, in which each row contains a URL image path to a training image and the associated label for that image.
In this lab, this CSV file has been pre-created for you in Cloud Storage as:
gs://
In this task, begin by updating the image paths in data.csv with your bucket name, and then uploading the revised CSV file back to your Cloud Storage bucket. Then, use this file when you create a new Agent Platform dataset to connect the dataset to the training images in that Cloud Storage bucket.
Remember that you get help by expanding the hint boxes as you need them!
Start by downloading the data.csv file locally to Cloud Shell, so you can update the image paths and upload the revised file back to Cloud Storage.
data.csv from your pre-created bucket, so that you can easily update the image paths with your bucket name:If prompted, click Authorize.
The results display the current path (gs://damaged-car-parts-vertex-dataset/), which you update in the next step.
data.csv with your bucket name and subdirectory:The results display the updated paths that begin with gs://{{{project_0.project_id}}}-bucket/damaged-car-images/.
data.csv back to your Cloud Storage bucket:Although it's not a required step of this workflow, it's a good idea to check that the data.csv file has been uploaded to the desired location and successfully updated.
Check that data.csv was updated in your bucket using any method you already know, or expand the hint below for some helpful steps.
Full solution (Expand to see all of the steps!)
Next, create a new managed dataset in Agent Platform for single label image classification.
Navigate to Agent Platform in the Google Cloud console by clicking on the Navigation menu (
Click Enable APIs and then confirm Enable.
In the Agent Platform navigation menu, click Models > Datasets.
These first three steps got you to the appropriate location in your Google Cloud project.
If the option to select a region is null, you can assume that it will default to the assigned for this lab.
Expand the hints below for some helpful steps!
Option 1: Review the docs
Option 2: Adapt steps from a related lab
Full solution (Expand to see all of the steps!)
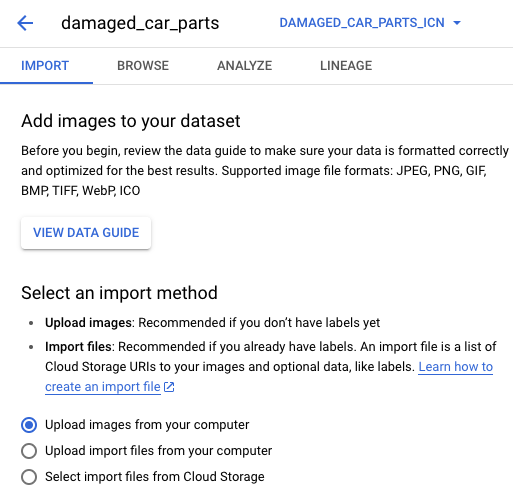
When you have successfully created the dataset, the page refreshes and provides new options for selecting an import method, which you use in the next section.
Now, use your updated data.csv to import the image files of damaged car parts to the Agent Platform dataset.
For Select an import method, click Select import files from Cloud Storage.
In the Select import files from Cloud Storage section, click Browse, and navigate to data.csv in your Cloud Storage bucket (gs://
Click Select.
Once you've selected an appropriate file, a green checkbox appears to the left of the file path.
Click Continue.
Click Check my progress to verify the objective.
For this task, stay logged into Project 1 (
Now that you have created the Agent Platform dataset, it is time to add an aspect to it, so that others can easily find it in Knowledge Catalog Universal Catalog.
In this task, begin by creating an aspect type for Agent Platform model names. Then, you add that aspect to the Agent Platform dataset and associate it with the model name for damaged_car_parts.
Start by creating an aspect type for associated model names.
In the Google Cloud console title bar, type Knowledge Catalog in the Search field, and then click Knowledge Catalog from the search results.
In the left pane, under Manage metadata, click Metadata types.
In the Aspect types tab, click + Create.
Enter the required information below to define the aspect type:
| Property | Value |
|---|---|
| Display Name | VertexAI_Data |
| Aspect type ID | Leave it as default |
| Location |
| Property | Value |
|---|---|
| Display Name | Related Models |
| Type | Text |
| Text Type | Rich Text |
Select the Is Required checkbox.
Click Done.
Click Save.
Click Check my progress to verify the objective.
Next, find the Agent Platform dataset that you created using filters for systems and data types in Knowledge Catalog.
In the Knowledge Catalog menu, under Discover, click Search.
In the Natural language search console, click Go to Legacy Data Catalog Search at the bottom of the console.
Click the Knowledge Catalog tab.
For Filters > Systems, enable the checkbox for Vertex AI.
Click the damaged_car_parts dataset.
Now, add an aspect to the Agent Platform dataset to associate it with the model name damaged_car_parts.
Scroll down to the Aspects section. Next to Optional aspects, click Add.
Type VertexAI_Data in the Filter field, and then click the VertexAI_Data aspect from the results.
For Related Models, type damaged_car_parts.
Click Save.
Remain on this details page for the damaged_car_parts dataset.
Click Check my progress to verify the objective.
Adding an overview for a dataset asset in Knowledge Catalog helps others understand the intended purpose of the data and how it can or should be used.
Using the available options on the current page for the damaged_car_parts dataset, add an overview for the dataset that can be useful to others when they discover this dataset.
For example, the text can be something like: This Agent Platform dataset contains images of damaged car parts including bumpers, windshields, etc. Each image has been assigned a single label to categorize the images by these car part types.
Full solution (Expand to see all of the steps!)
For this task, stay logged into Project 1 (
In the previous task, you created a reusable aspect type that you can add to multiple data assets with associated model names.
Expand the hints below for some helpful steps!
Option 1: Review Task 2
Option 2: Adapt steps from a related lab
Full solution (Expand to see all of the steps!)
Click Check my progress to verify the objective.
For this task, log into Project 2 (
Expand the hint below for help with switching to a new project and user.
Full solution (Expand to see all of the steps!)
Now that the Data Engineer (you as Username 1!) has created an aspect type and added the aspect to assets, you can experience being the data scientist or machine learning engineer that benefits from these useful aspects to search for relevant data assets and view their lineage.
In the Knowledge Catalog menu, under Discover, click Search.
Click on Go to Legacy Data Catalog Search and then click Knowledge Catalog tab.
For Filters > Aspects, enable the checkbox for VertexAI_Data.
Click on an asset name to see more details (such as the damaged_car_parts dataset).
Now that you have the steps to search for assets using aspects, search for the three data assets that you previously added.
Expand to see the answer
Last, review the lineage of some of these assets to learn more about when and how they were created.
In the Knowledge Catalog search options, click damaged_car_parts > Lineage.
Then, click the asset name for damaged_car_parts on the Graph tab.
In addition to the date and time that the dataset was created, you can also see that it was created in a different project (
Now, return to the Search page, and search for damaged_car_image_metadata using its full name.
Click damaged_car_image_metadata > Entry list.
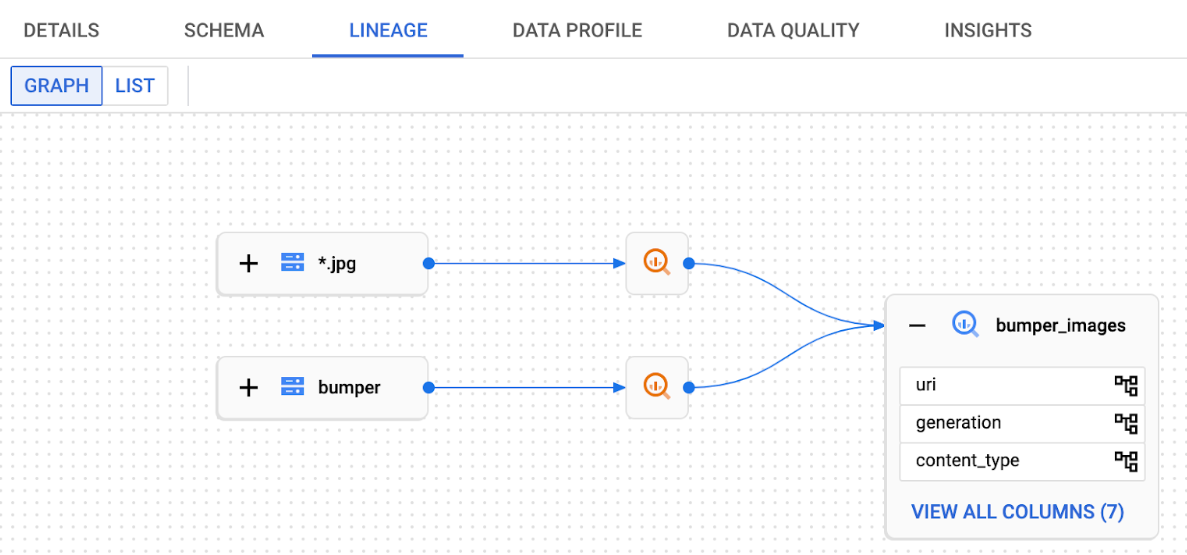
Click the table name for bumper_images, and then click Lineage.
Click the asset name for bumper_images on the Graph tab.
Similar to damaged_car_parts, you can see the created date, time, project ID, and region in which the asset was created.
With more elasped time, Knowledge Catalog lineage can also populate more information, in which case you would see the full lineage of the bumper_images table in the object dataset: .jpg files from a Cloud Storage directory named bumper are used in simple data pipeline to create the resulting bumper_images metadata table.
For this task, stay logged into Project 2 (
While working with the data assets, you notice that there are additional aspect types that need to be created. Specifically, the BigQuery dataset with ownership information for the damaged cars contains personally identifiable information (PII) that should be handled carefully.
Apply your skills to create an aspect type for PII that you can apply to specific columns in the BigQuery table named owner_info in the damaged_car_ownership dataset.
You already created an aspect type in Task 2. You can use those steps as a starting point and modify them to the specifications provided below.
Remember that you get help by expanding the hint boxes as you need them!
Begin by creating a new public aspect type called Protected Data with one enumerated field called Protected Data Flag with YES and NO values. Be sure to create the aspect in the assigned region for Project 2 (
Option 1: Review the docs
Option 2: Adapt steps from a related lab
Full solution (Expand to see all of the steps!)
Note: If the progress check is not successful after implementing the full solution, check that you are logged into Project 2
Click Check my progress to verify the objective.
Add the aspect for Protected Data to the BigQuery table named owner_info in the damaged_car_ownership dataset.
You decide not to identify the columns for owner_id, state, and age as PII (as they cannot be used to identify specific individuals), and instead focus on adding the aspect to the following columns:
Option 1: Review the docs
Option 2: Adapt steps from a related lab
Full solution (Expand to see all of the steps!)
Click Check my progress to verify the objective.
Last, use the aspect to search for data identified as containing PII.
Remember that you searched for assets using aspects in Task 4. Repeat those steps to find data assets identified as containing PII, or expand a hint below for some helpful steps.
Option 1: Ask Gemini
Option 2: Adapt steps from a related lab
Full solution (Expand to see all of the steps!)
In this lab, you learned how to create an Agent Platform managed dataset, create aspect types in Knowledge Catalog, add aspects to Agent Platform assets, search for Agent Platform assets using filters and aspects, and view lineage of Agent Platform assets. Now you have what it takes to start cataloging and discovering models and datasets in your organization's projects using Knowledge Catalog!
...helps you make the most of Google Cloud technologies. Our classes include technical skills and best practices to help you get up to speed quickly and continue your learning journey. We offer fundamental to advanced level training, with on-demand, live, and virtual options to suit your busy schedule. Certifications help you validate and prove your skill and expertise in Google Cloud technologies.
Manual Last Updated on July 23, 2026
Lab Last Tested July 23, 2026
Copyright 2026 Google LLC. All rights reserved. Google and the Google logo are trademarks of Google LLC. All other company and product names may be trademarks of the respective companies with which they are associated.



This content is not currently available
We will notify you via email when it becomes available

Great!
We will contact you via email if it becomes available


One lab at a time
Confirm to end all existing labs and start this one