

Build simple a REST API

Check my progress

/ 20

Create a Revision for Cloud Run

Check my progress

/ 20

Create two cloud storage buckets

Check my progress

/ 10

Create a Pub/Sub topic for receiving notification from storage bucket

Check my progress

/ 10

Create a Pub/Sub subscription

Check my progress

/ 10

Create another build for REST API

Check my progress

/ 15

Create a new Revision

Check my progress

/ 15

This lab may incorporate AI tools to support your learning.
This content is not yet optimized for mobile devices.
For the best experience, please visit us on a desktop computer using a link sent by email.

GSP644

Google Cloud self-paced labs Pet Theory logo

Overview

Twelve years ago, Lily started the Pet Theory chain of veterinary clinics. Pet Theory currently sends invoices in DOCX format to clients, but many clients complain that they cannot open them. To improve customer satisfaction, Lily asks Patrick in IT to investigate an alternative solution.

Pet Theory's Ops team is a single person, so they want to invest in a cost-efficient solution that doesn't require extensive ongoing maintenance. After analyzing the various processing options, Patrick decides to use Cloud Run.

Cloud Run is serverless, so it abstracts away infrastructure management and lets you focus on building your application instead of managing overhead. As a Google Cloud serverless product, Cloud Run can scale to zero, so it doesn't incur charges when not in use. Cloud Run also supports custom binary packages in containers, which makes it straightforward to build consistent, isolated artifacts.

In this lab, you build a PDF converter web app on Cloud Run that automatically converts files stored in Cloud Storage into PDFs stored in separate folders.

Architecture

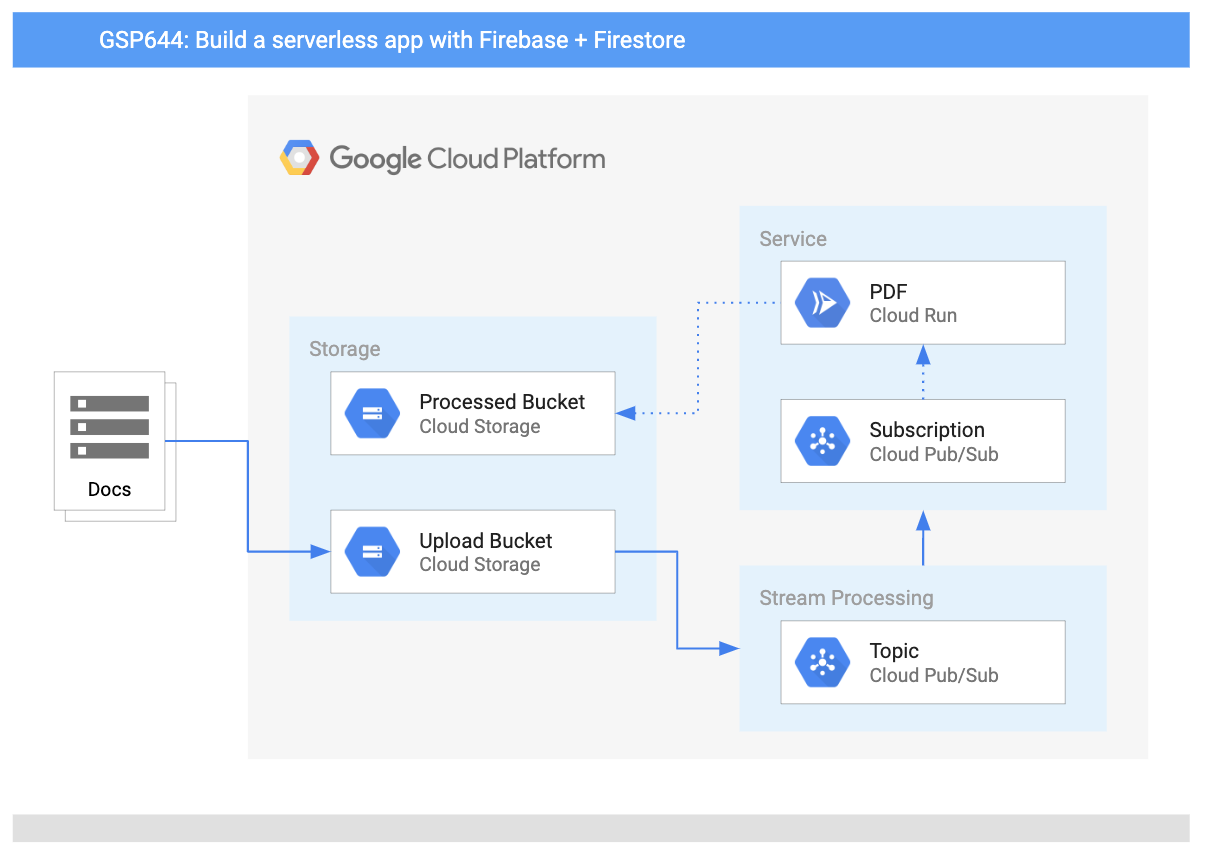
The following diagram shows an overview of the services that you use in this lab and how they connect to one another:

Architecture diagram

Objectives

In this lab, you learn how to perform the following tasks:

  • Convert a Node.js application to a container.
  • Build containers with Cloud Build.
  • Create a Cloud Run service that converts files to PDF files in the cloud.
  • Use event processing with Cloud Storage.

Prerequisites

This is an intermediate-level lab that assumes familiarity with the Google Cloud console and shell environments. Experience with Firebase is helpful, but not required. Before taking this lab, complete the following Google Skills labs:

When you're ready, follow the steps in the next section to set up your lab environment.

Setup and requirements

Before you click the Start Lab button

Read these instructions. Labs are timed and you cannot pause them. The timer, which starts when you click Start Lab, shows how long Google Cloud resources are made available to you.

This hands-on lab lets you do the lab activities in a real cloud environment, not in a simulation or demo environment. It does so by giving you new, temporary credentials you use to sign in and access Google Cloud for the duration of the lab.

To complete this lab, you need:

  • Access to a standard internet browser (Chrome browser recommended).
Note: Use an Incognito (recommended) or private browser window to run this lab. This prevents conflicts between your personal account and the student account, which may cause extra charges incurred to your personal account.
  • Time to complete the lab—remember, once you start, you cannot pause a lab.
Note: Use only the student account for this lab. If you use a different Google Cloud account, you may incur charges to that account.

How to start your lab and sign in to the Google Cloud console

  1. Click the Start Lab button. If you need to pay for the lab, a dialog opens for you to select your payment method. On the right is the Lab setup and access panel with the following:

    • The Open Google Cloud console button
    • The temporary credentials (username and password) that you must use for this lab
    • Other information, if needed, to step through this lab

    Note that the lab timer is located near the top of the page, showing the remaining time.

  2. Click Open Google Cloud console (or right-click and select Open Link in Incognito Window if you are running the Chrome browser).

    The lab spins up resources, and then opens another tab that shows the Sign in page.

    Tip: Arrange the tabs in separate windows, side-by-side.

    Note: If you see the Choose an account dialog, click Use Another Account.
  3. If necessary, copy the Username below and paste it into the Sign in dialog.

    {{{user_0.username | "Username"}}}

    You can also find the Username in the Lab setup and access panel.

  4. Click Next.

  5. Copy the Password below and paste it into the Welcome dialog.

    {{{user_0.password | "Password"}}}

    You can also find the Password in the Lab setup and access panel.

  6. Click Next.

    Important: You must use the credentials the lab provides you. Do not use your Google Cloud account credentials. Note: Using your own Google Cloud account for this lab may incur extra charges.
  7. Click through the subsequent pages:

    • Accept the terms and conditions.
    • Do not add recovery options or two-factor authentication (because this is a temporary account).
    • Do not sign up for free trials.

After a few moments, the Google Cloud console opens in this tab.

Note: To access Google Cloud products and services, click the Navigation menu or type the service or product name in the Search field. Navigation menu icon and Search field

Activate Cloud Shell

Cloud Shell is a virtual machine that is loaded with development tools. It offers a persistent 5GB home directory and runs on the Google Cloud. Cloud Shell provides command-line access to your Google Cloud resources.

  1. Click Activate Cloud Shell Activate Cloud Shell icon at the top of the Google Cloud console.

  2. Click through the following windows:

    • Continue through the Cloud Shell information window.
    • Authorize Cloud Shell to use your credentials to make Google Cloud API calls.

When you are connected, you are already authenticated, and the project is set to your Project_ID, . The output contains a line that declares the Project_ID for this session:

Your Cloud Platform project in this session is set to {{{project_0.project_id | "PROJECT_ID"}}}

gcloud is the command-line tool for Google Cloud. It comes pre-installed on Cloud Shell and supports tab-completion.

  1. (Optional) You can list the active account name with this command:
gcloud auth list
  1. Click Authorize.

Output:

ACTIVE: * ACCOUNT: {{{user_0.username | "ACCOUNT"}}} To set the active account, run: $ gcloud config set account `ACCOUNT`
  1. (Optional) You can list the project ID with this command:
gcloud config list project

Output:

[core] project = {{{project_0.project_id | "PROJECT_ID"}}} Note: For full documentation of gcloud, in Google Cloud, refer to the gcloud CLI overview guide.

Task 1. Understand the task

Pet Theory wants to convert their invoices into PDFs so that customers can open them reliably. The team wants to perform this conversion automatically to minimize the workload for Lisa, the office manager.

Ruby, Pet Theory's computer consultant, receives a message from Patrick in IT:

Patrick

Patrick, IT Administrator

Hi Ruby,

I've done some research and found that LibreOffice is good at converting many different file formats to PDF.

Would it be possible to run LibreOffice in the cloud without having to maintain the servers?

Patrick

RubyRuby, Software Consultant

Hey Patrick,

I think I have just the thing for this type of situation.

I just watched a great video from Next 19 about Cloud Run on YouTube. It looks like we can run LibreOffice in a serverless environment with Cloud Run. No server maintenance is needed!

I'll send over some resources that will help you get set up.

Ruby

Help Patrick set up and deploy Cloud Run.

Task 2. Enable the Cloud Run API

  1. In the Google Cloud console, on the Navigation menu (Navigation menu icon), click APIs & Services > Library.

  2. In the search bar, type Cloud Run, and then click Cloud Run Admin API in the results list.

  3. If the API isn't already enabled, click Enable, and then click the browser Back button twice.

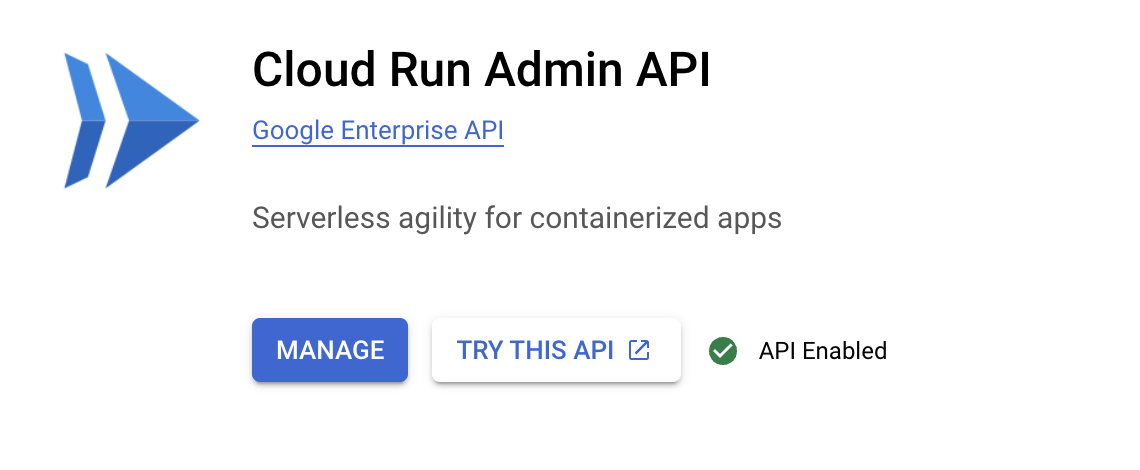
    The Google Cloud console should now resemble the following:

Cloud Run API result

Task 3. Deploy a simple Cloud Run service

Ruby has developed a Cloud Run prototype and wants Patrick to deploy it on Google Cloud. Help Patrick deploy the PDF Cloud Run service for Pet Theory.

  1. Open a new Cloud Shell session and run the following command to clone the Pet Theory repository:
git clone https://github.com/rosera/pet-theory.git
  1. Change your current working directory to lab03:
cd pet-theory/lab03
  1. Open package.json in Cloud Shell Editor, and in the scripts section, add "start": "node index.js", as shown in the following snippet:
... "scripts": { "start": "node index.js", "test": "echo \"Error: no test specified\" && exit 1" }, ...
  1. Run the following commands in Cloud Shell to install the packages that your conversion script uses:
npm install express npm install body-parser npm install child_process npm install @google-cloud/storage
  1. Open the lab03/index.js file and review the code.

    You deploy the application as a Cloud Run service that accepts HTTP POST requests. If a POST request is a Pub/Sub notification about an uploaded file, the service writes the file details to the log. Otherwise, the service returns the string "OK".

  2. Review the lab03/Dockerfile file.

    This Dockerfile manifest provides a recipe for Docker to build an image. Each line begins with an instruction that tells Docker how to process the following information:

    • The first line specifies node as the base image template to create the container image.
    • The last line specifies the startup command to run, which is npm start.
  3. Run the following command to build the container image for the REST API using Cloud Build:

gcloud builds submit \ --tag gcr.io/$GOOGLE_CLOUD_PROJECT/pdf-converter

The command builds a container image with your code and stores it in Artifact Registry in your project.

  1. In the Google Cloud console, on the Navigation menu (Navigation menu icon), click View all products.

  2. For CI/CD, click Artifact Registry > Repositories.

  3. Click the gcr.io repository to view your hosted container image:

Artifact Registry with pdf-converter listed

Test completed task

Click Check my progress to verify the objective.

Build simple a REST API
  1. Return to Cloud Shell and run the following command to deploy your application:
gcloud run deploy pdf-converter \ --image gcr.io/$GOOGLE_CLOUD_PROJECT/pdf-converter \ --region {{{ project_0.default_region | Region }}} \ --no-allow-unauthenticated \ --max-instances=1

When the deployment finishes, the terminal displays a message similar to the following:

Service [pdf-converter] revision [pdf-converter-00001] has been deployed and is serving 100 percent of traffic at https://pdf-converter-[hash].a.run.app
  1. Create the $SERVICE_URL environment variable so that you can easily access your service:
SERVICE_URL=$(gcloud run services describe pdf-converter --region {{{ project_0.default_region | Lab Region }}} --format="value(status.url)")
  1. Print the value of $SERVICE_URL to verify it:
echo $SERVICE_URL

Test completed task

Click Check my progress to verify the objective.

Create a Revision for Cloud Run
  1. Send an anonymous POST request to your new service:
curl -X POST $SERVICE_URL

This command returns the error message "Your client does not have permission to get the URL." This error confirms that anonymous users cannot call the service.

  1. Invoke the service as an authorized user:
curl -X POST -H "Authorization: Bearer $(gcloud auth print-identity-token)" $SERVICE_URL

If you receive the response "OK", you have successfully deployed the Cloud Run service.

Task 4. Trigger your Cloud Run service on file upload

Now that you have deployed the Cloud Run service, Ruby wants Patrick to create a staging area to convert the data. The Cloud Storage bucket uses an event trigger to notify the application when a user uploads a file for processing.

  1. Run the following command to create a Cloud Storage bucket for the uploaded documents:
gcloud storage buckets create gs://$GOOGLE_CLOUD_PROJECT-upload
  1. Run the following command to create a second bucket for the processed PDFs:
gcloud storage buckets create gs://$GOOGLE_CLOUD_PROJECT-processed
  1. In the Google Cloud console, on the Navigation menu (Navigation menu icon), click Cloud Storage > Buckets, and verify that your new buckets appear in the list (the list also includes buckets that the platform uses).

Test completed task

Click Check my progress to verify the objective.

Create two cloud storage buckets
  1. In Cloud Shell, run the following command to configure Cloud Storage to send a Pub/Sub notification whenever a new file finishes uploading to the upload bucket:
gcloud storage buckets notifications create -t new-doc -f json -e OBJECT_FINALIZE gs://$GOOGLE_CLOUD_PROJECT-upload

Cloud Storage labels the notifications with the new-doc topic.

Test completed task

Click Check my progress to verify the objective.

Create a Pub/Sub topic for handling notifications from storage bucket
  1. Create a service account that Pub/Sub uses to trigger the Cloud Run service:
Note: The lab environment pre-creates the pubsub-cloud-run-invoker service account with appropriate scoped permissions. If this command reports that the service account already exists, proceed to the next step. gcloud iam service-accounts create pubsub-cloud-run-invoker --display-name "PubSub Cloud Run Invoker"
  1. Grant the service account permission to invoke the PDF converter service:
gcloud run services add-iam-policy-binding pdf-converter --member=serviceAccount:pubsub-cloud-run-invoker@$GOOGLE_CLOUD_PROJECT.iam.gserviceaccount.com --role=roles/run.invoker --region {{{ project_0.default_region | Lab Region }}}
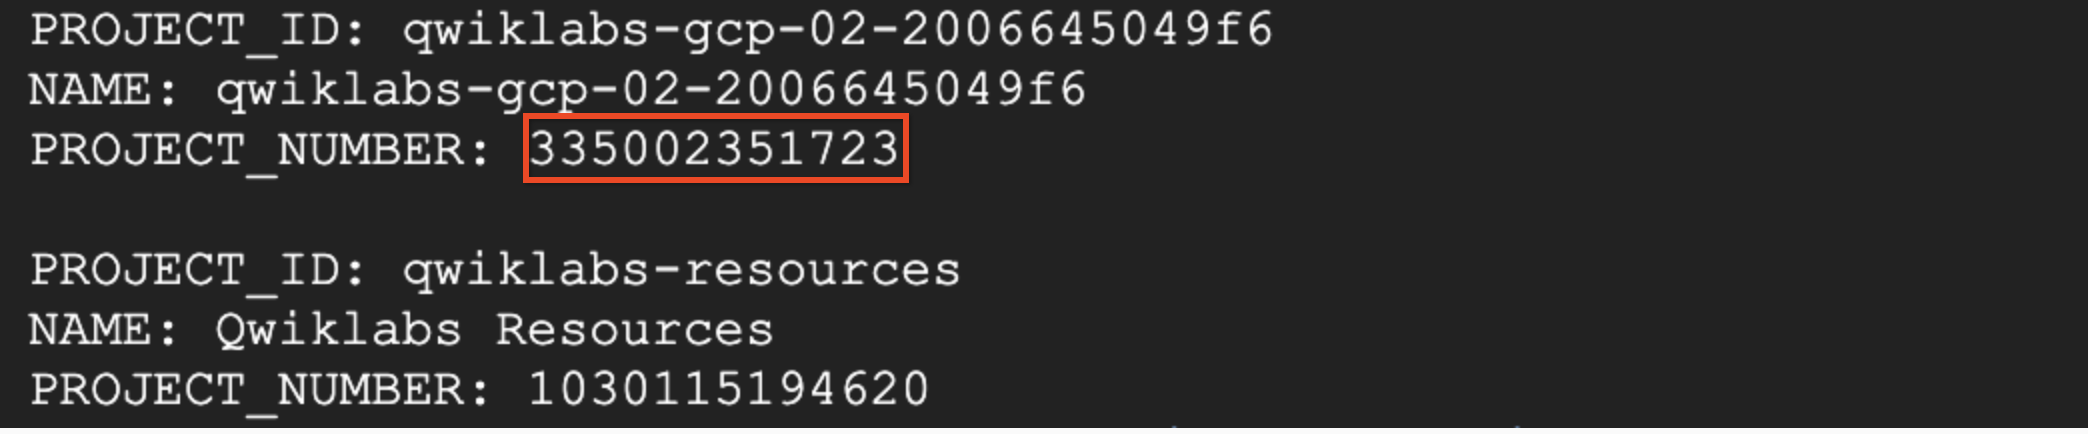
  1. Find your project number by running the following command:
gcloud projects list

Locate the project whose ID starts with qwiklabs-gcp-. You use the PROJECT_NUMBER value in the next command:

Project number highlighted in output

  1. Create a PROJECT_NUMBER environment variable, replacing [project number] with the project number from the previous command:
PROJECT_NUMBER=[project number]
  1. Enable the Pub/Sub API by running the following command:
gcloud services enable pubsub.googleapis.com --project={{{ project_0.project_id | Project }}}
  1. Create the Pub/Sub service identity by running the following command:
gcloud beta services identity create \ --service=pubsub.googleapis.com \ --project="$GOOGLE_CLOUD_PROJECT"
  1. Grant the Pub/Sub service agent permission to create authentication tokens:
Note: The lab environment pre-configures the roles/iam.serviceAccountTokenCreator role for the Pub/Sub service agent. If this command returns an existing binding status, proceed to the next step. gcloud projects add-iam-policy-binding $GOOGLE_CLOUD_PROJECT --member=serviceAccount:service-$PROJECT_NUMBER@gcp-sa-pubsub.iam.gserviceaccount.com --role=roles/iam.serviceAccountTokenCreator
  1. Create a Pub/Sub push subscription so that the PDF converter runs whenever Cloud Storage publishes a message to the new-doc topic:
gcloud pubsub subscriptions create pdf-conv-sub --topic new-doc --push-endpoint=$SERVICE_URL --push-auth-service-account=pubsub-cloud-run-invoker@$GOOGLE_CLOUD_PROJECT.iam.gserviceaccount.com

Test completed task

Click Check my progress to verify the objective.

Create a Pub/Sub subscription

Task 5. Verify that Cloud Storage uploads trigger the Cloud Run service

To verify that the application works as expected, Ruby asks Patrick to upload test data to the Cloud Storage bucket and check Cloud Logging.

  1. Copy the test files into your upload bucket:
gcloud storage cp gs://spls/gsp644/* gs://$GOOGLE_CLOUD_PROJECT-upload
  1. After the upload finishes, in the Google Cloud console, on the Navigation menu (Navigation menu icon), click View all products.

  2. In Observability, click Logging.

  3. In the All resources drop-down menu, select Cloud Run Revision, and then click Apply.

  4. Click Run query.

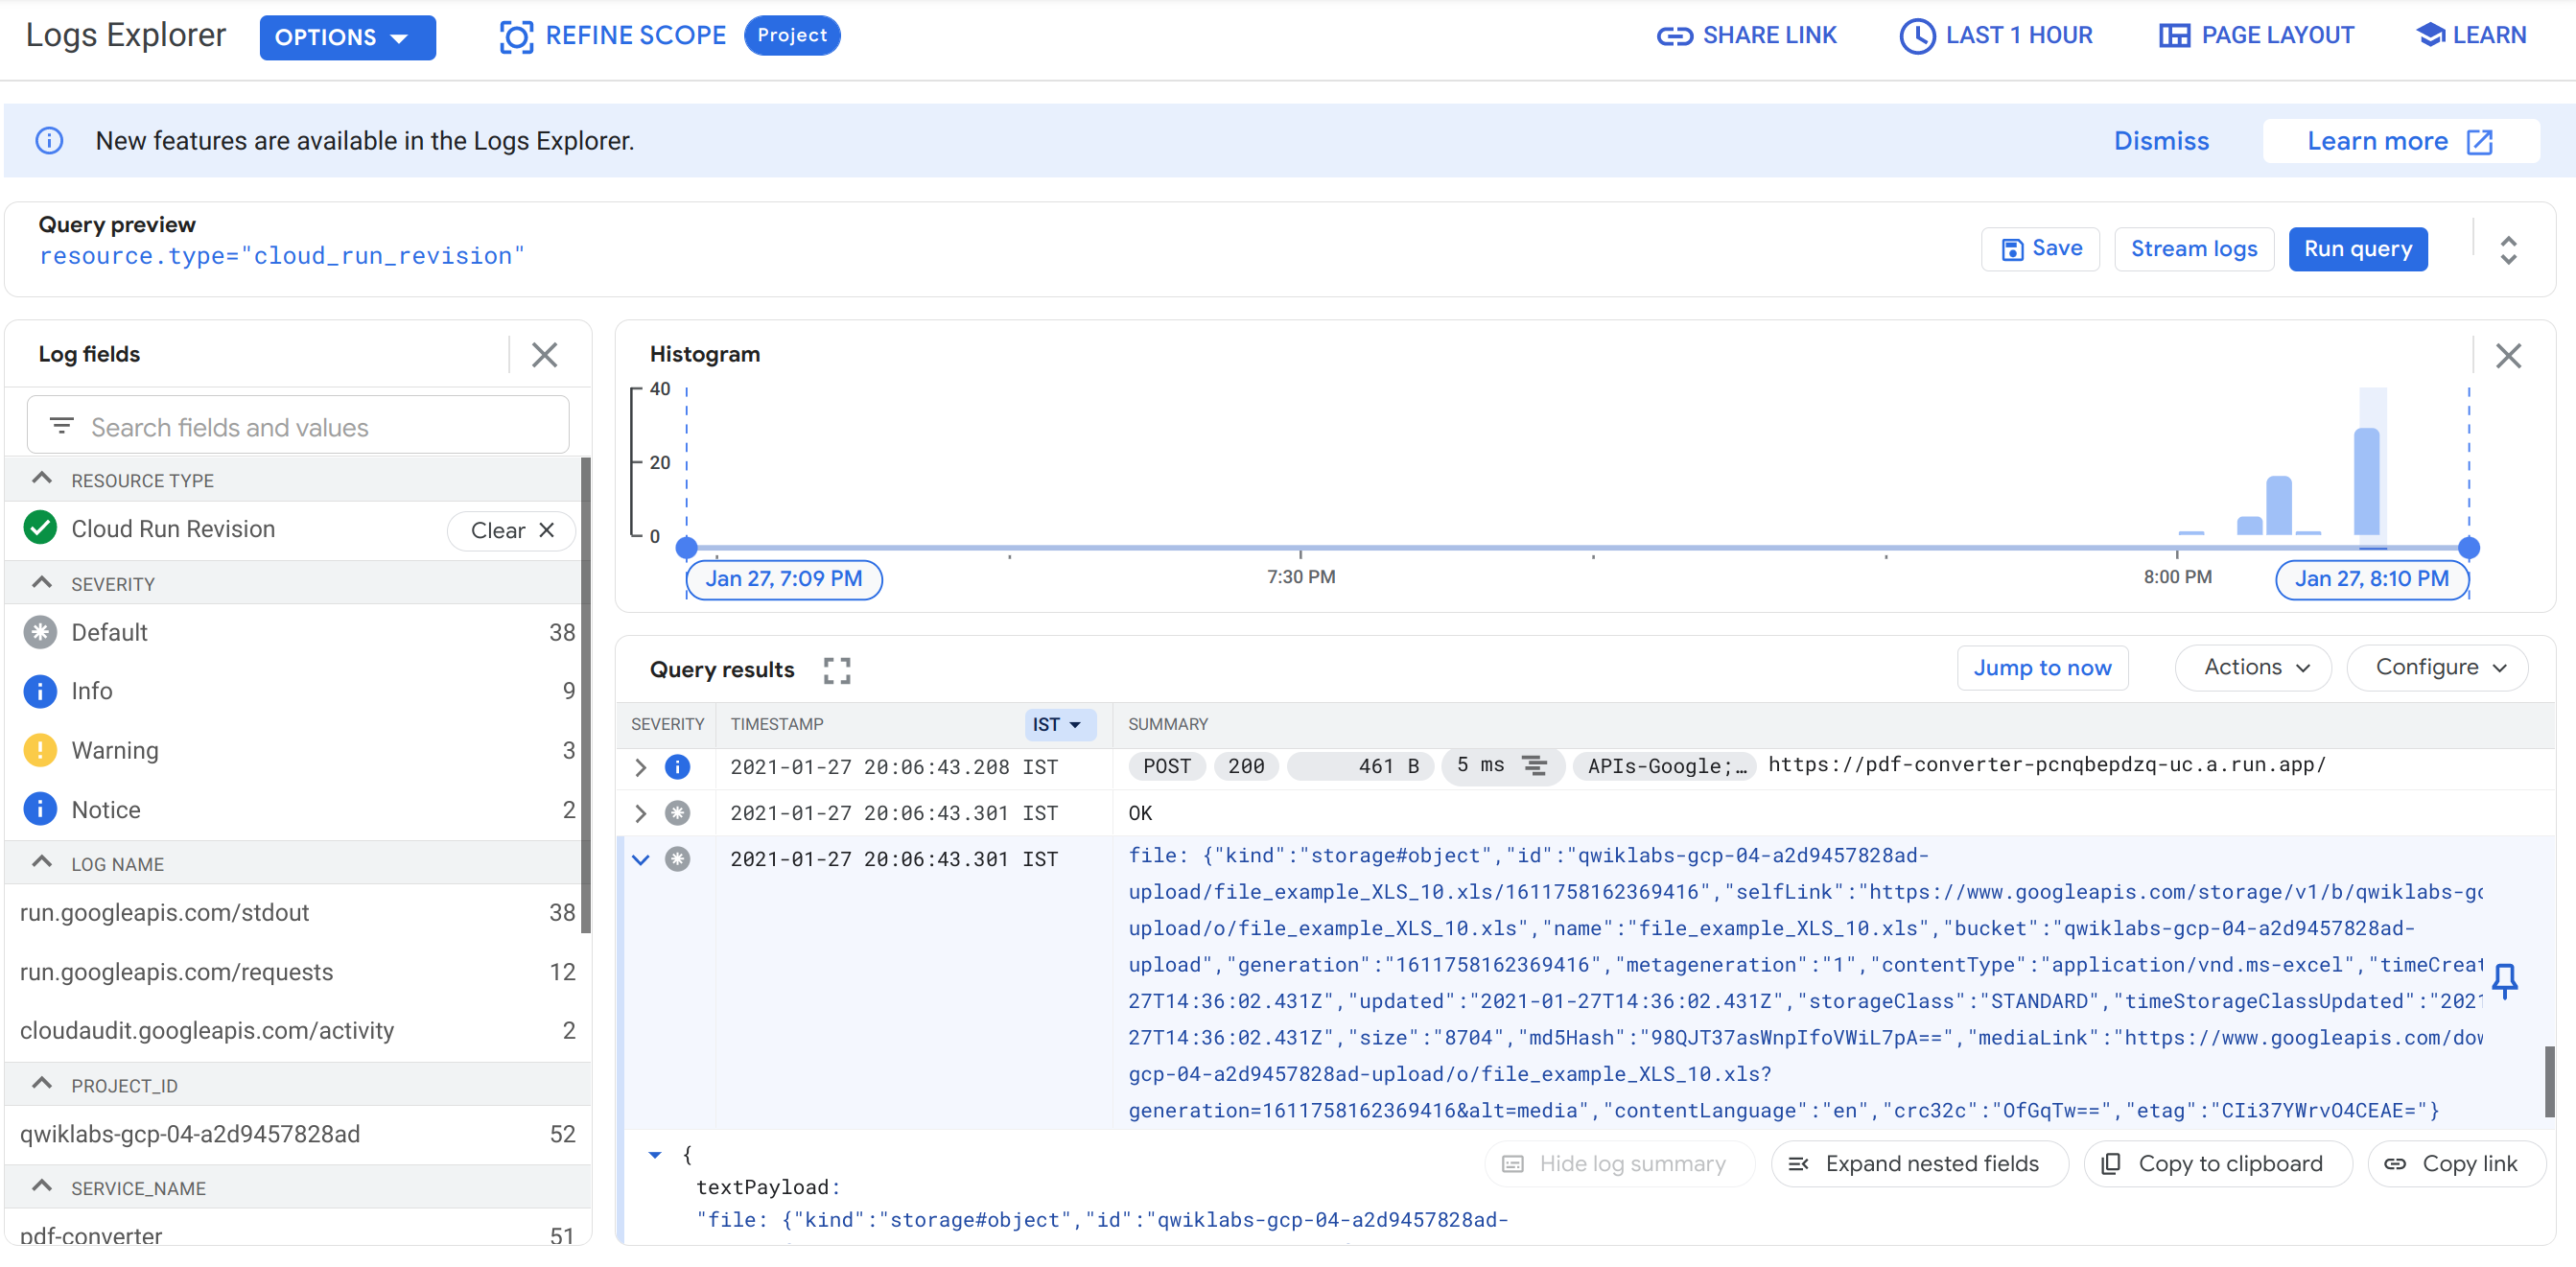
  5. In Query results, click a log entry that starts with file:.

    The entry displays the file metadata that Pub/Sub sends to your Cloud Run service when you upload a new file. Locate the name field in the payload to confirm the uploaded filename:

Query results

Note: If you don't see any log entries that begin with file:, click Load newer logs.
  1. Return to Cloud Shell and run the following command to delete the test files from your upload bucket:
gcloud storage rm gs://$GOOGLE_CLOUD_PROJECT-upload/*

Task 6. Update the container with LibreOffice

Patrick needs to convert a backlog of invoices to PDFs so that all customers can open them. He emails Ruby for help:

Patrick

Patrick, IT Administrator

Hi Ruby

Based on your findings, I think we can automate this process and also move to using PDF as the invoice format.

I spent a bit of time yesterday coding a solution and built a Node.js script to do what we need. Could you take a look?

Patrick

Patrick sends Ruby the code fragment he wrote to produce a PDF from a file:

const { promisify } = require("util"); const exec = promisify(require("child_process").exec); const cmd = "libreoffice --headless --convert-to pdf --outdir " + `/tmp "/tmp/${fileName}"`; const { stdout, stderr } = await exec(cmd); if (stderr) { throw stderr; }

Ruby responds to Patrick:

Ruby

Ruby, Software Consultant
Hi Patrick

Cloud Run uses containers, so we need to provide your application in this format. For the next step we need to create a Dockerfile manifest for the application.

Your code uses LibreOffice. Can you send me the command for installing that software? I will need to include it in the container.

Ruby

Patrick

Patrick, IT Administrator

Hi Ruby

Awesome, here is how I usually install LibreOffice on servers in the office:

apt-get update -y && apt-get install -y libreoffice && apt-get clean

Let me know if you need any more information.

Patrick

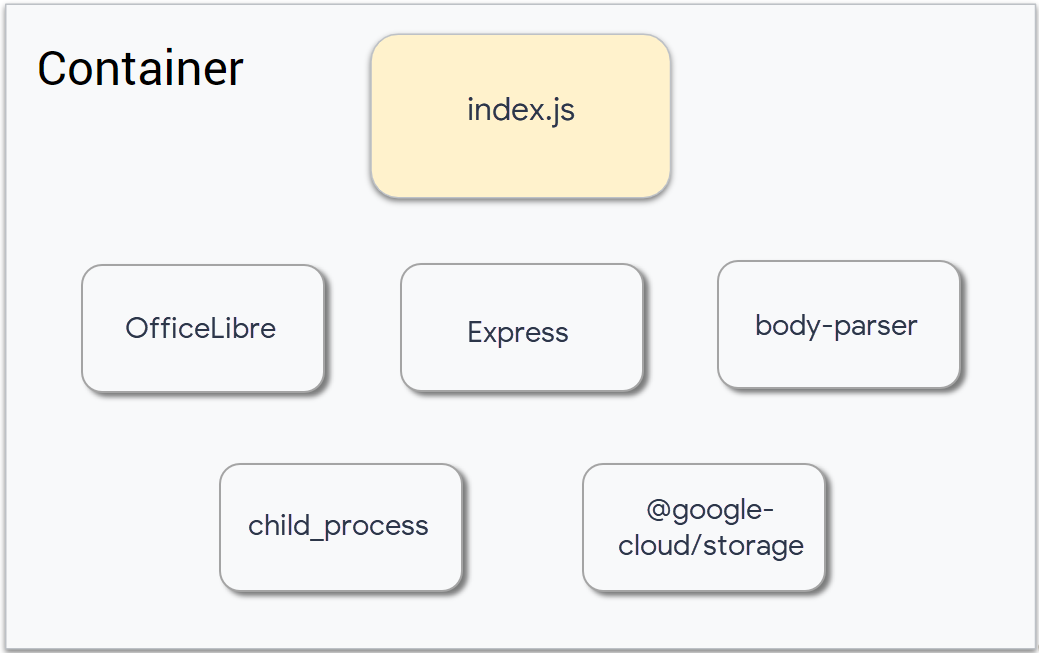
Building the container requires integrating several components:

Components: index.js, LibreOffice, Express, body-parser, child_process, and @google-cloud/storage

Update the manifest

With all required files identified, you can update the manifest. Help Ruby configure and deploy the container.

Because the container doesn't yet include the LibreOffice package, you need to add it. Patrick provided the commands to install LibreOffice, and Ruby adds them as a RUN instruction in the Dockerfile.

  • Open the Dockerfile manifest and add the RUN apt-get update -y && apt-get install -y libreoffice && apt-get clean instruction as shown in the following file:
FROM {{{ project_0.startup_script.node_docker_image | node_docker_image }}} RUN apt-get update -y \ && apt-get install -y libreoffice \ && apt-get clean WORKDIR /usr/src/app COPY package.json package*.json ./ RUN npm install --only=production COPY . . CMD [ "npm", "start" ]

Deploy the new version of the pdf-conversion service

  1. Open the index.js file and add the following package requirements at the top of the file:
const { promisify } = require("util"); const { Storage } = require("@google-cloud/storage"); const exec = promisify(require("child_process").exec); const storage = new Storage();
  1. Replace the app.post('/', async (req, res) handler with the following code:
app.post("/", async (req, res) => { try { const file = decodeBase64Json(req.body.message.data); await downloadFile(file.bucket, file.name); const pdfFileName = await convertFile(file.name); await uploadFile(process.env.PDF_BUCKET, pdfFileName); await deleteFile(file.bucket, file.name); } catch (ex) { console.log(`Error: ${ex}`); } res.set("Content-Type", "text/plain"); res.send("\n\nOK\n\n"); });
  1. Add the following helper functions that process LibreOffice documents at the bottom of the file:
// Helper function to check file existence (using fs.promises for async) async function fileExists(filePath) { try { await fs.promises.access(filePath); // Throws an error if the file doesn't exist return true; } catch (err) { return false; } } async function downloadFile(bucketName, fileName) { // 1. Check if the file exists const fileExistsLocally = await fileExists(`/tmp/${fileName}`); // 2. Delete if present if (fileExistsLocally) { console.log(`File exists locally. Deleting: ${fileName}`); await fs.promises.unlink(`/tmp/${fileName}`); // Use fs.promises for async file operations console.log(`File deleted.`); } else { console.log(`File does not exist locally: ${fileName}`); } // 3. Download from the storage bucket const options = { destination: `/tmp/${fileName}` }; await storage.bucket(bucketName).file(fileName).download(options); console.log(`File downloaded: ${fileName}`); } async function convertFile(fileName) { const cmd = "libreoffice --headless --convert-to pdf --outdir /tmp " + `"/tmp/${fileName}"`; console.log(cmd); const { stdout, stderr } = await exec(cmd); if (stderr) { throw stderr; } console.log(stdout); pdfFileName = fileName.replace(/\.\w+$/, ".pdf"); return pdfFileName; } async function deleteFile(bucketName, fileName) { await storage.bucket(bucketName).file(fileName).delete(); } async function uploadFile(bucketName, fileName) { await storage.bucket(bucketName).upload(`/tmp/${fileName}`); }
  1. Ensure that your index.js file matches the following complete example:
Note: To avoid formatting errors, replace all code in your index.js file with this example code. const { promisify } = require("util"); const { Storage } = require("@google-cloud/storage"); const exec = promisify(require("child_process").exec); const storage = new Storage(); const express = require("express"); const bodyParser = require("body-parser"); const app = express(); app.use(bodyParser.json()); const port = process.env.PORT || 8080; app.listen(port, () => { console.log("Listening on port", port); }); app.post("/", async (req, res) => { try { const file = decodeBase64Json(req.body.message.data); await downloadFile(file.bucket, file.name); const pdfFileName = await convertFile(file.name); await uploadFile(process.env.PDF_BUCKET, pdfFileName); await deleteFile(file.bucket, file.name); } catch (ex) { console.log(`Error: ${ex}`); } res.set("Content-Type", "text/plain"); res.send("\n\nOK\n\n"); }); function decodeBase64Json(data) { return JSON.parse(Buffer.from(data, "base64").toString()); } // Helper function to check file existence (using fs.promises for async) async function fileExists(filePath) { try { await fs.promises.access(filePath); // Throws an error if the file doesn't exist return true; } catch (err) { return false; } } async function downloadFile(bucketName, fileName) { // 1. Check if the file exists const fileExistsLocally = await fileExists(`/tmp/${fileName}`); // 2. Delete if present if (fileExistsLocally) { console.log(`File exists locally. Deleting: ${fileName}`); await fs.promises.unlink(`/tmp/${fileName}`); // Use fs.promises for async file operations console.log(`File deleted.`); } else { console.log(`File does not exist locally: ${fileName}`); } // 3. Download from the storage bucket const options = { destination: `/tmp/${fileName}` }; await storage.bucket(bucketName).file(fileName).download(options); console.log(`File downloaded: ${fileName}`); } async function convertFile(fileName) { const cmd = "libreoffice --headless --convert-to pdf --outdir /tmp " + `"/tmp/${fileName}"`; console.log(cmd); const { stdout, stderr } = await exec(cmd); if (stderr) { console.log(`Conversion Failed: ${stderr}`); throw stderr; } console.log(`Conversion Success: ${stdout}`); pdfFileName = fileName.replace(/\.\w+$/, ".pdf"); return pdfFileName; } async function deleteFile(bucketName, fileName) { await storage.bucket(bucketName).file(fileName).delete(); } async function uploadFile(bucketName, fileName) { await storage.bucket(bucketName).upload(`/tmp/${fileName}`); }

The following lines contain the main conversion logic:

const file = decodeBase64Json(req.body.message.data); await downloadFile(file.bucket, file.name); const pdfFileName = await convertFile(file.name); await uploadFile(process.env.PDF_BUCKET, pdfFileName); await deleteFile(file.bucket, file.name);

Whenever a user uploads a file, Cloud Storage triggers this service, which performs the following tasks in order:

  • Extracts the file details from the Pub/Sub notification.
  • Downloads the file from Cloud Storage to the local /tmp directory (an in-memory filesystem that behaves like a local disk).
  • Converts the downloaded file to PDF.
  • Uploads the PDF file to Cloud Storage. The process.env.PDF_BUCKET environment variable specifies the target Cloud Storage bucket. You assign a value to this variable when you deploy the service in the next steps.
  • Deletes the original file from Cloud Storage.

The rest of index.js implements the helper functions that this top-level code calls.

Now you can deploy the updated service, set the PDF_BUCKET environment variable, and allocate 2 GiB of memory for LibreOffice using the --memory option.

  1. Run the following command to build the container:
gcloud builds submit \ --tag gcr.io/$GOOGLE_CLOUD_PROJECT/pdf-converter Note: If prompted to enable the Cloud Build API, type Y and press ENTER. Building the container might take a few minutes.

Test completed task

Click Check my progress to verify the objective.

Create another build for REST API
  1. Deploy the latest version of your application:
gcloud run deploy pdf-converter \ --image gcr.io/$GOOGLE_CLOUD_PROJECT/pdf-converter \ --region {{{ project_0.default_region | Lab Region }}} \ --memory=2Gi \ --no-allow-unauthenticated \ --max-instances=1 \ --set-env-vars PDF_BUCKET=$GOOGLE_CLOUD_PROJECT-processed

With LibreOffice included in the container, this deployment takes longer than the previous one. Wait a few minutes for the deployment to finish.

Click Check my progress to verify the objective.

Create a new Revision

Task 7. Test the pdf-conversion service

  1. After the deployment finishes, run the following command to verify that your service responds properly:
curl -X POST -H "Authorization: Bearer $(gcloud auth print-identity-token)" $SERVICE_URL

If you receive the response "OK", you have successfully deployed the updated Cloud Run service. LibreOffice can convert many file formats to PDF, including DOCX, XLSX, JPG, PNG, and GIF.

  1. Create a script to upload the test files:
cat <<'EOF' > copy_files.sh #!/bin/bash SOURCE_BUCKET="gs://spls/gsp644" DESTINATION_BUCKET="gs://${GOOGLE_CLOUD_PROJECT}-upload" # Replace with your actual bucket name DELAY=5 # Get a list of files in the source bucket files=$(gcloud storage ls "$SOURCE_BUCKET") # Loop through the files for file in $files; do # Construct the full path of the source file source_file_path="$file" # Copy the file to the destination bucket gcloud storage cp "$source_file_path" "$DESTINATION_BUCKET" # Check if the copy was successful if [ $? -eq 0 ]; then # $? is the exit status of the previous command echo "Copied: $source_file_path to $DESTINATION_BUCKET" else echo "Failed to copy: $source_file_path" fi # Sleep for 5 seconds sleep $DELAY done echo "All files copied!" EOF
  1. Run the following command to upload the example files:
bash copy_files.sh
  1. In the Google Cloud console, on the Navigation menu (Navigation menu icon), click Cloud Storage > Buckets.

  2. Click the -upload bucket, and then click Refresh several times to observe how the service deletes each file after converting it to a PDF.

  3. In the left navigation pane, click Buckets, and then click the bucket whose name ends in -processed.

  4. Verify that the bucket contains PDF versions of all uploaded files, and open a PDF file to confirm that the service converted it properly.

Note: Re-run the command if you don't see all converted PDF files in the -processed bucket.

Congratulations!

Pet Theory now has a system to convert their archive of files to PDFs. When someone uploads files to the -upload bucket, the pdf-converter service converts them and writes the resulting PDFs to the -processed bucket.

Continue your serverless journey in the Serverless Cloud Run Development course. In this course, you read through a fictitious business scenario and assist the characters with their serverless migration plan.

Google Cloud training and certification

...helps you make the most of Google Cloud technologies. Our classes include technical skills and best practices to help you get up to speed quickly and continue your learning journey. We offer fundamental to advanced level training, with on-demand, live, and virtual options to suit your busy schedule. Certifications help you validate and prove your skill and expertise in Google Cloud technologies.

Manual Last Updated November 4, 2026

Lab Last Tested November 4, 2026

Copyright 2026 Google LLC. All rights reserved. Google and the Google logo are trademarks of Google LLC. All other company and product names may be trademarks of the respective companies with which they are associated.

Before you begin

  1. Labs create a Google Cloud project and resources for a fixed time
  2. Labs have a time limit and no pause feature. If you end the lab, you'll have to restart from the beginning.
  3. On the top left of your screen, click Start lab to begin

Use private browsing

  1. Copy the provided Username and Password for the lab
  2. Click Open console in private mode

Sign in to the Console

  1. Sign in using your lab credentials. Using other credentials might cause errors or incur charges.
  2. Accept the terms, and skip the recovery resource page
  3. Don't click End lab unless you've finished the lab or want to restart it, as it will clear your work and remove the project

This content is not currently available

We can notify you via email when it becomes available
Great!

We can contact you via email if it becomes available

One lab at a time

Confirm to end all existing labs and start this one

Use private browsing to run the lab

Using an Incognito or private browser window is the best way to run this lab. This prevents any conflicts between your personal account and the Student account, which may cause extra charges incurred to your personal account.