


Before you begin
- Labs create a Google Cloud project and resources for a fixed time
- Labs have a time limit and no pause feature. If you end the lab, you'll have to restart from the beginning.
- On the top left of your screen, click Start lab to begin
Setup the data environment
/ 15
Run your pipeline from the command line
/ 10

In this lab you:
<Row> objectBasic familiarity with Java
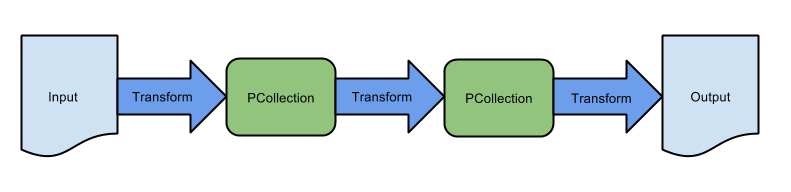
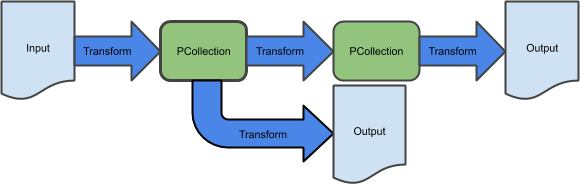
In the previous lab, you created a basic extract-transform-load sequential pipeline and used an equivalent Dataflow Template to ingest batch data storage on Google Cloud Storage. This pipeline consists of a sequence of transformations:
Many pipelines will not exhibit such simple structure though. In this lab, you build a more sophisticated, non-sequential pipeline.
The use case here is to optimize resource consumption. Products vary with respect to how they consume resources. Additionally, not all data is used in the same way within a business; some data will be regularly queried, for example, within analytic workloads, and some data will only be used for recovery.
In this lab, you optimize the pipeline from the first lab for resource consumption, by storing only data that analysts will use in BigQuery while archiving other data in a very-low-cost highly durable storage service, Coldline storage in Google Cloud Storage.
For each lab, you get a new Google Cloud project and set of resources for a fixed time at no cost.
Sign in to Google Skills using an incognito window.
Note the lab's access time (for example, 1:15:00), and make sure you can finish within that time.
There is no pause feature. You can restart if needed, but you have to start at the beginning.
When ready, click Start lab.
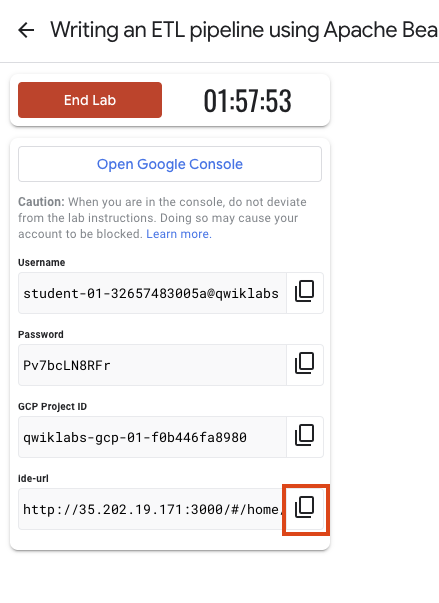
Note your lab credentials (Username and Password). You will use them to sign in to the Google Cloud Console.
Click Open Google Console.
Click Use another account and copy/paste credentials for this lab into the prompts. If you use other credentials, you'll receive errors or incur charges.
Accept the terms and skip the recovery resource page.
Google Cloud Shell is a virtual machine that is loaded with development tools. It offers a persistent 5GB home directory and runs on the Google Cloud.
Google Cloud Shell provides command-line access to your Google Cloud resources.
In Cloud console, on the top right toolbar, click the Open Cloud Shell button.
Click Continue.
It takes a few moments to provision and connect to the environment. When you are connected, you are already authenticated, and the project is set to your PROJECT_ID. For example:
gcloud is the command-line tool for Google Cloud. It comes pre-installed on Cloud Shell and supports tab-completion.
Output:
Example output:
Output:
Example output:
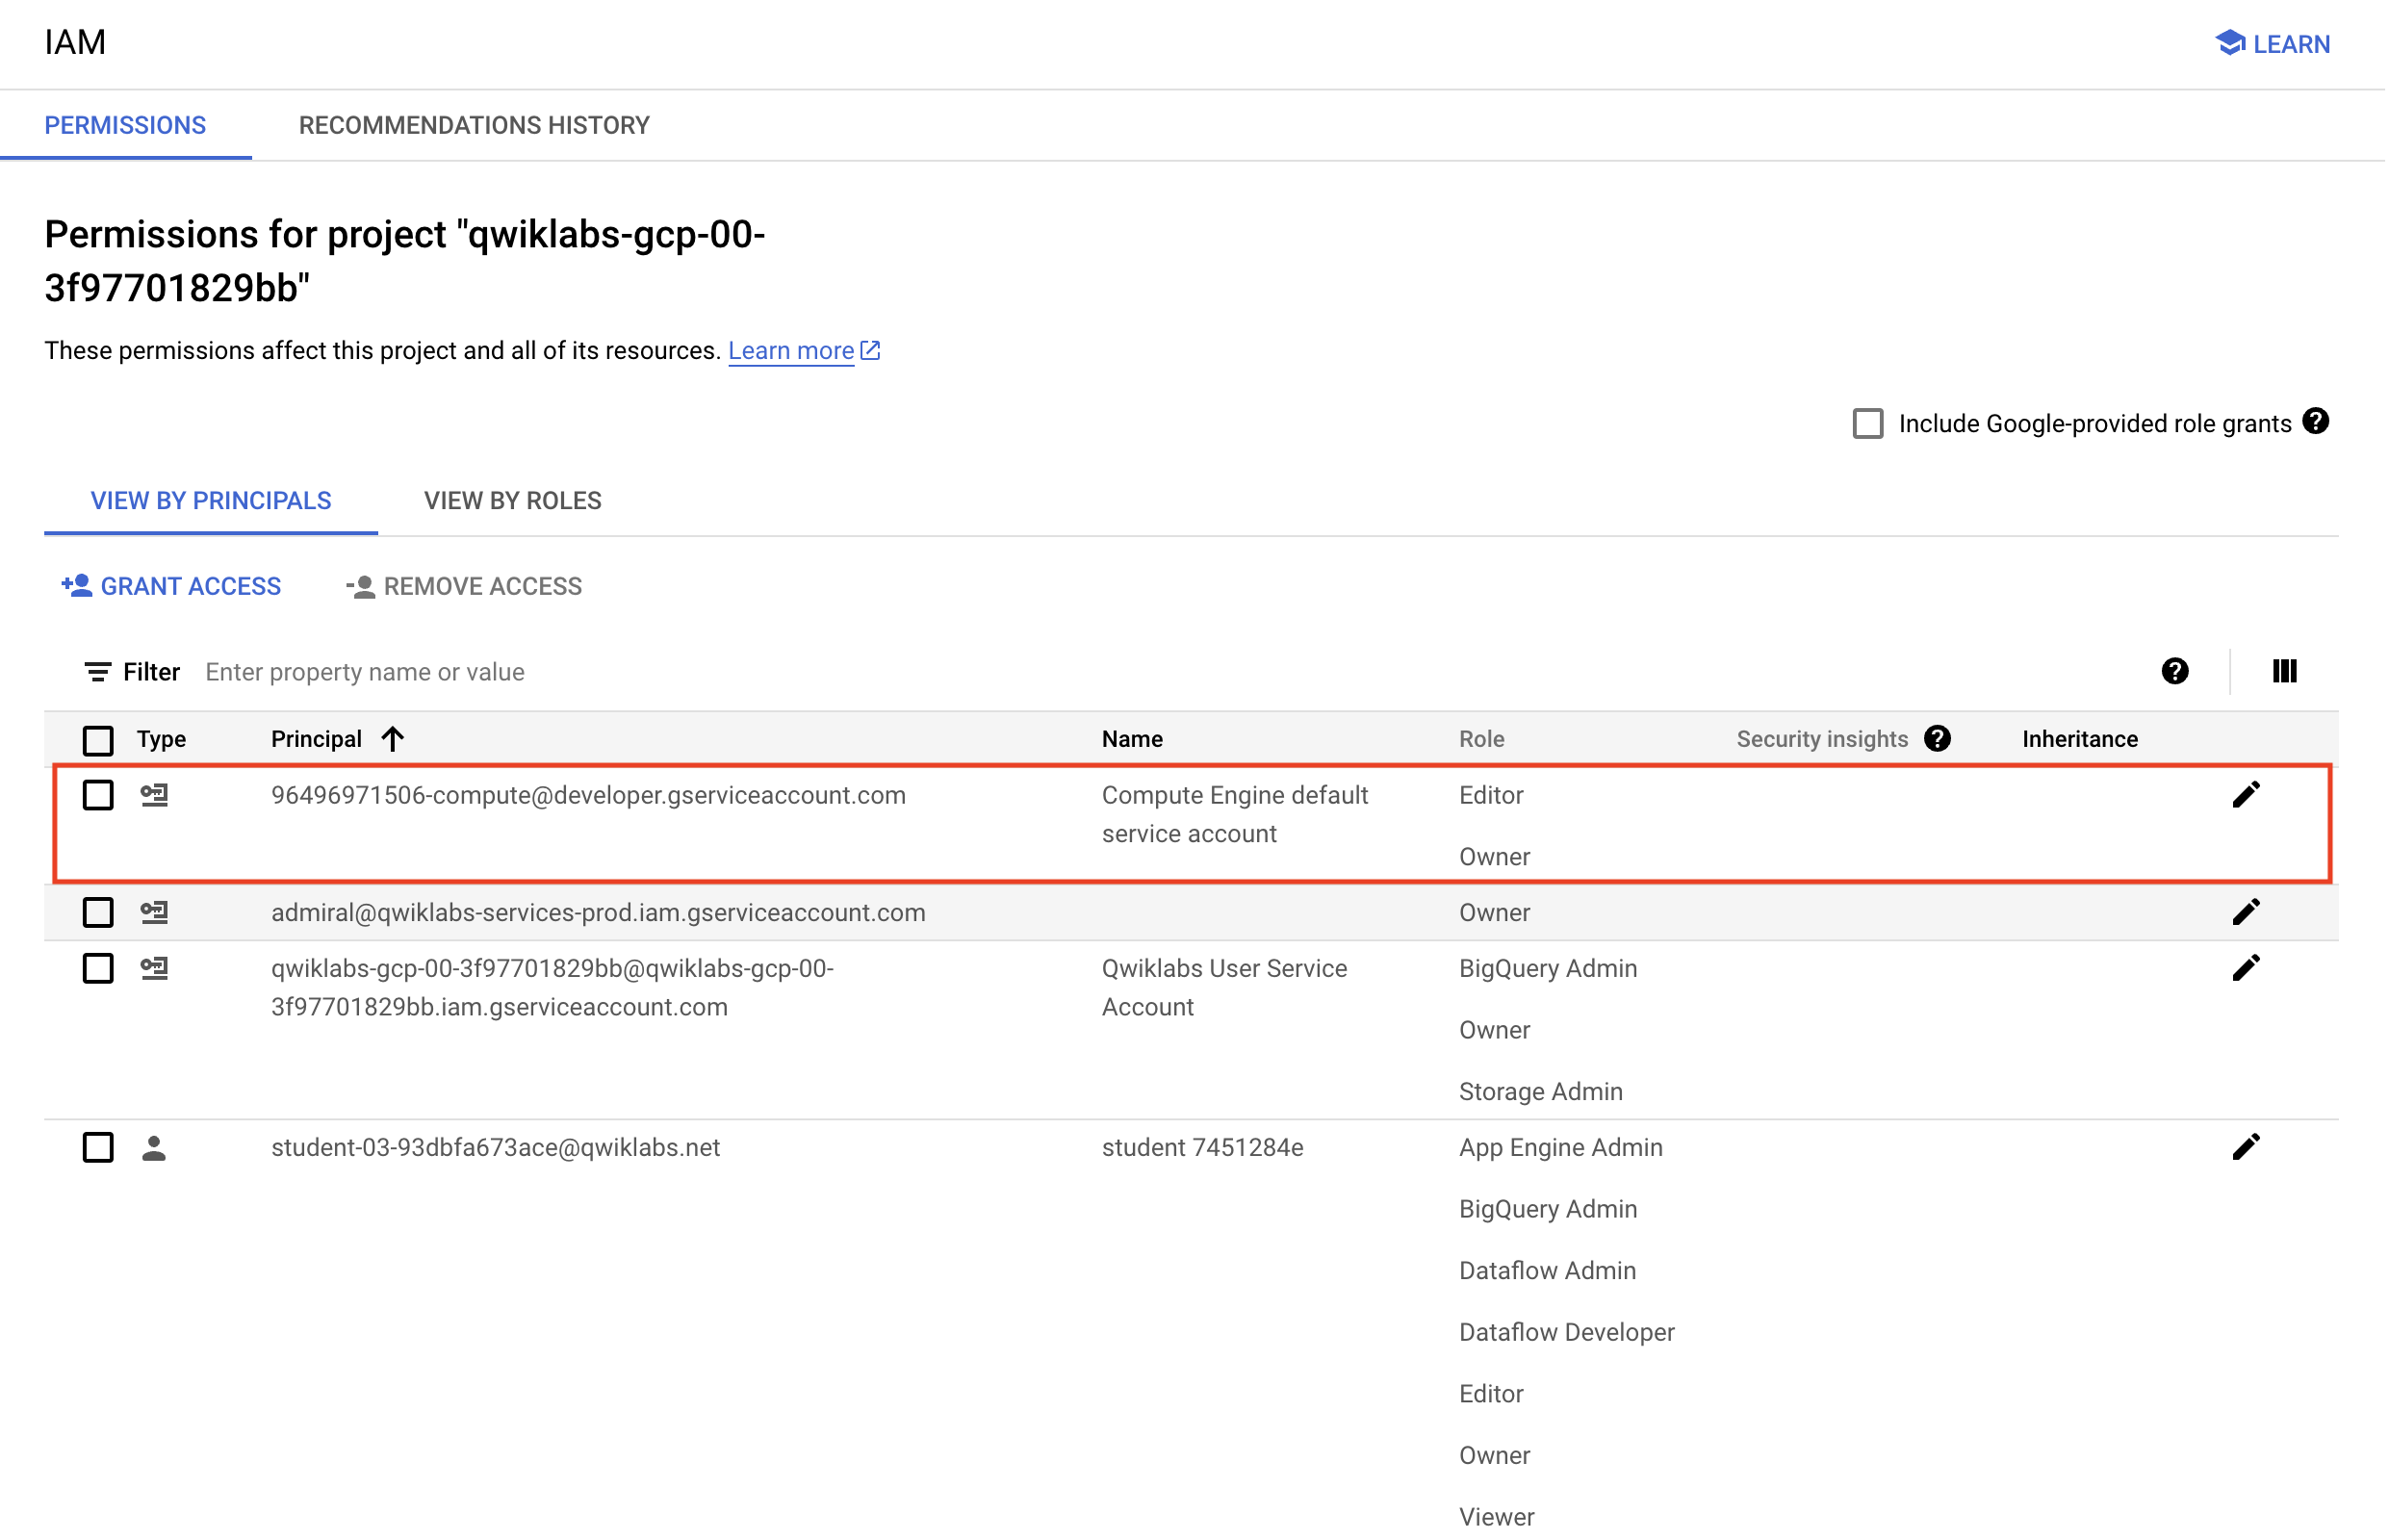
Before you begin your work on Google Cloud, you need to ensure that your project has the correct permissions within Identity and Access Management (IAM).
In the Google Cloud console, on the Navigation menu (
Confirm that the default compute Service Account {project-number}-compute@developer.gserviceaccount.com is present and has the editor role assigned. The account prefix is the project number, which you can find on Navigation menu > Cloud Overview > Dashboard.
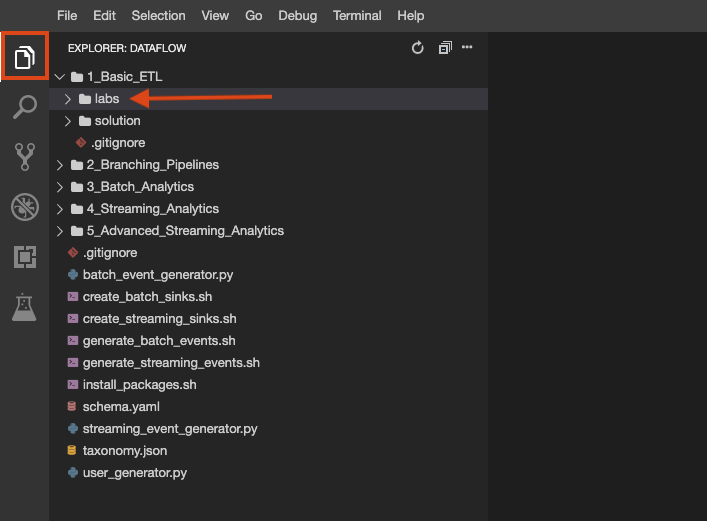
editor role, follow the steps below to assign the required role.729328892908).{project-number} with your project number.For the purposes of this lab, you will mainly be using a Theia Web IDE hosted on Google Compute Engine. It has the lab repo pre-cloned. There is java langauge server support, as well as a terminal for programmatic access to Google Cloud APIs via the gcloud command line tool, similar to Cloud Shell.
The lab repo has been cloned to your environment. Each lab is divided into a labs folder with code to be completed by you, and a solution folder with a fully workable example to reference if you get stuck.
File Explorer button to look:You can also create multiple terminals in this environment, just as you would with cloud shell:
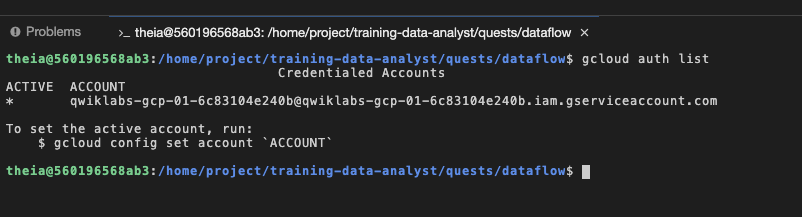
You can see with by running gcloud auth list on the terminal that you're logged in as a provided service account, which has the exact same permissions are your lab user account:
If at any point your environment stops working, you can try resetting the VM hosting your IDE from the GCE console like this:
In this lab, you write a branching pipeline that writes data to both Google Cloud Storage and to BigQuery. One way of writing a branching pipeline is to apply two different transforms to the same PCollection, resulting in two different PCollections.
If you get stuck in this or later sections, refer to the solution.
To complete this task, modify an existing pipeline by adding a branch that writes to Cloud Storage.
Click Check my progress to verify the objective.
MyPipeline.java in your IDE, which can be found in 2_Branching_Pipelines/labs/src/main/java/com/mypackage/pipeline.<CommonLog>.If you get stuck in this or later sections, refer to the solution, which can be found in the training-data-analyst file
Schemas provide us a type-system for Beam records that is independent of any specific programming-language type. There might be multiple Java classes that all have the same schema (for example a Protocol-Buffer class or a POJO class), and Beam will allow us to seamlessly convert between these types. Schemas also provide a simple way to reason about types across different programming-language APIs.
A PCollection with a schema does not need to have a Coder specified, as Beam knows how to encode and decode Schema rows. Beam uses a special coder to encode schema types. Before the introduction of the Schema API, Beam would have to know how to encode all objects in the pipeline.
At the moment, the new pipeline doesn’t actually consume less resources, since all data are being stored twice. To start improving resource consumption, we need to reduce the amount of duplicated data. The Google Cloud Storage bucket is intended to function as archival and backup storage, so it’s important that all data be stored there. However, not all data needs to be sent to BigQuery.
Let’s assume that data analysts often look at what resources users access on the website, and how those access patterns differ as a function of geography and time. Only a subset of the fields would be necessary.
While you could write a DoFn that transforms each object and only returns a subset of the fields, Apache Beam provides a rich variety of relational transforms for PCollections that have a schema. The fact that each record is composed of named fields allows for simple and readable aggregations that reference fields by name, similar to the aggregations in a SQL expression.
Select and DropFields are two of these transforms:
Important: Each of these examples will return PCollection<Row> instead of PCollection<MyClass>. The Row class can support any schema and can be considered a generic schematized object. Any PCollection with a schema can be cast as a PCollection of rows.
Both of the above transforms will not return a full CommonLog object, since fields are being removed, and the transform will thus revert to returning a Row. While you could create a new named schema or register an intermediate POJO schema, it's easier to just use Row for the time being.
Remember: If you already have the BigQueryIO.<CommonLog>write() method chained, you will need to change it to <Row> because of the new type.
There are many ways of filtering in Apache Beam. The previous task demonstrated one method: using a Schema Transform. In this implementation, you filtered out parts of each element, resulting in a new Row object with a schema and a subset of the fields remaining. You can just as easily be used to filter out entire elements, as in the example below:
The pipeline currently has a number of parameters hard-coded into it, including the path to the input and the location of the table in BigQuery. However, the pipeline would be more useful if it could read any json file in Cloud Storage. Adding this feature requires adding to the set of command-line parameters.
The pipeline currently uses a PipelineOptionsFactory to generate an instance of a custom class called Options, but this class doesn’t change anything from the PipelineOptions class, so it is effectively an instance of PipelineOptions:
The PipelineOptions class interprets command-line arguments that follow the format:
However, it is a small set of predefined parameters; you can see the get- functions here.
To add a custom parameter, do two things.
PipelineOptionsFactory inside the main() method and then pass the interface when creating the PipelineOptions object. When you register your interface with PipelineOptionsFactory, the --help can find your custom options interface and add it to the output of the --help command. PipelineOptionsFactory will also validate that your custom options are compatible with all other registered options.The following example code shows how to register your custom options interface with PipelineOptionsFactory:
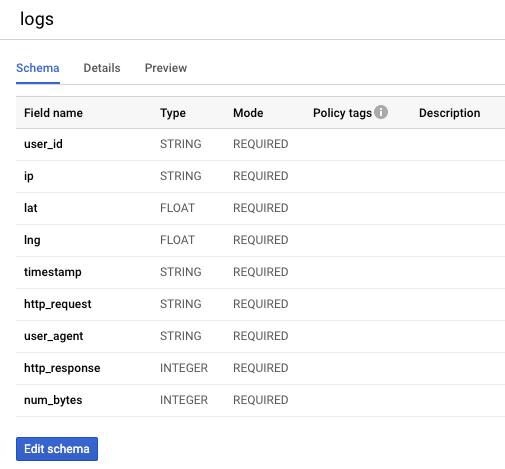
You may have noticed that the BigQuery table created in the last lab had a schema with all REQUIRED fields like this:
It may be desirable to create an Apache Beam schema with NULLABLE fields where data is missing, both for the pipeline execution itself and then a resulting BigQuery table with a schema that reflects this.
Javax notations can be added to your Class definition, which are then incorporated into the Apache Beam schema like this:
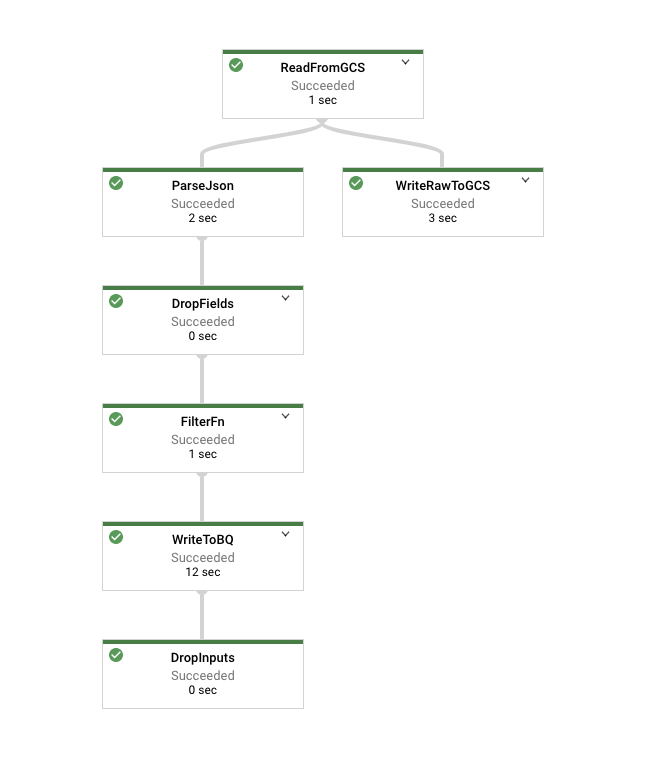
lat and lon fields as nullable in the class definition.Click on the node representing your Filter function, which in the above picture is called FilterFn. In the panel that appears on the right hand side, you should see that more elements were added as inputs than were written as outputs.
Now click on the node representing the write to Cloud Storage. Since all elements were written, this number should agree with the number of elements in the input to the Filter function.
Once pipeline has finished, examine the results in BigQuery by querying your table. Note that the number of records in the table should agree with the number of elements that were output by the Filter function.
Click Check my progress to verify the objective.
When you have completed your lab, click End Lab. Google Skills removes the resources you’ve used and cleans the account for you.
You will be given an opportunity to rate the lab experience. Select the applicable number of stars, type a comment, and then click Submit.
The number of stars indicates the following:
You can close the dialog box if you don't want to provide feedback.
For feedback, suggestions, or corrections, please use the Support tab.
Copyright 2026 Google LLC All rights reserved. Google and the Google logo are trademarks of Google LLC. All other company and product names may be trademarks of the respective companies with which they are associated.


This content is not currently available
We will notify you via email when it becomes available

Great!
We will contact you via email if it becomes available

One lab at a time
Confirm to end all existing labs and start this one