
Before you begin
- Labs create a Google Cloud project and resources for a fixed time
- Labs have a time limit and no pause feature. If you end the lab, you'll have to restart from the beginning.
- On the top left of your screen, click Start lab to begin
Create a Cloud SQL instance
/ 50
Create a database and configure a proxy on a Virtual Machine
/ 50
Create a Cloud SQL instance
/ 50
Create a database and configure a proxy on a Virtual Machine
/ 50
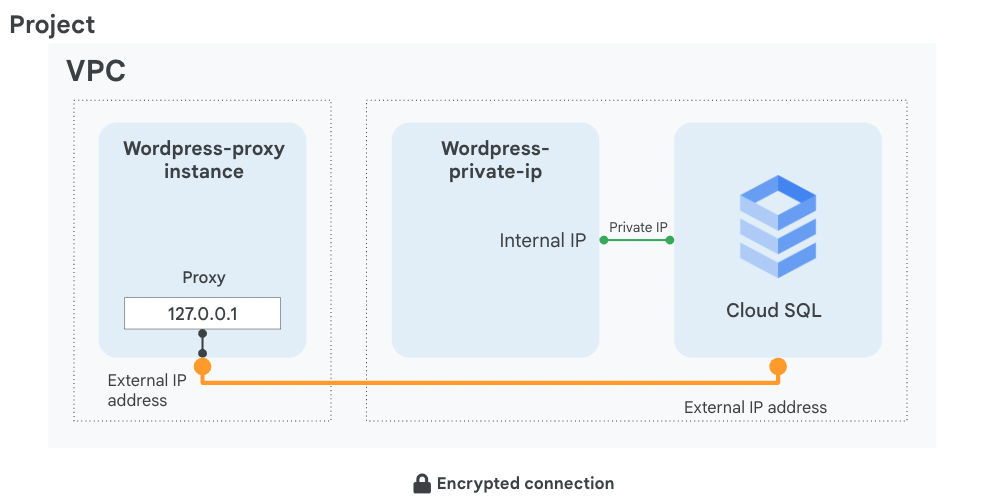
In this lab, you configure a Cloud SQL server and learn how to connect an application to it via a proxy over an external connection. You also configure a connection over a Private IP link that offers performance and security benefits. The app we chose to demonstrate in this lab is Wordpress, but the information and best practices are applicable to any application that needs SQL Server.
By the end of this lab, you will have 2 working instances of the Wordpress frontend connected over 2 different connection types to their SQL instance backend, as shown in this diagram:
In this lab, you learn how to perform the following tasks:
For each lab, you get a new Google Cloud project and set of resources for a fixed time at no cost.
Click the Start Lab button. If you need to pay for the lab, a pop-up opens for you to select your payment method. On the right is the Lab setup and access panel with the following:
Note that the lab timer is located near the top of the page, showing the remaining time.
Click Open Google Cloud console (or right-click and select Open Link in Incognito Window if you are running the Chrome browser).
The lab spins up resources, and then opens another tab that shows the Sign in page.
Tip: Arrange the tabs in separate windows, side-by-side.
If necessary, copy the Username below and paste it into the Sign in dialog.
You can also find the Username in the Lab setup and access panel.
Click Next.
Copy the Password below and paste it into the Welcome dialog.
You can also find the Password in the Lab setup and access panel.
Click Next.
Click through the subsequent pages:
After a few moments, the Google Cloud console opens in this tab.

In this task, you configure a SQL server according to Google Cloud best practices and create a Private IP connection.
 ), click Cloud SQL.
| Property | Value |
|---|---|
| Choose a Cloud SQL edition | Enterprise |
| Database Version | MySQL 8.0 |
| Instance ID | wordpress-db |
| Root password | type a password |
| Region | |
| Zone | Select Single zone and in Primary zone, select |
Expand Show configuration options.
Expand the Machine configuartion section.
Provision the right amount of vCPU and memory. To choose a Machine configuration, click the dropdown menu, and then explore your options.
Note: A few points to consider:
For this lab, select General purpose - Dedicated core from the dropdown menu, and then select 1 vCPU, 3.75 GB.
Next, expand the Storage section and then choose Storage type and Storage capacity.
Note: A few points to consider:
Expand the Connections section.
Select Private IP.
In the Network dropdown, select default.
For Network setup confirmation required, click the Confirm network setup.
Expand Security, and then click Allow unencrypted network traffic (not recommended).
Click Check my progress to verify the objective.
In this task, you configure a proxy on a virtual machine named wordpress-proxy to securely connect to a Cloud SQL instance named wordpress-db.
When your application does not reside in the same VPC connected network and region as your Cloud SQL instance, use a proxy to secure its external connection.
In order to configure the proxy, you need the Cloud SQL instance connection name.
In the Google Cloud console, in the Navigation menu (
Click SSH next to wordpress-proxy.
Download the Cloud SQL Proxy and make it executable:
In order to start the proxy, you need the connection name of the Cloud SQL instance. Keep your SSH window open and return to the Cloud console.
On the Navigation menu (
Click wordpress-db and wait for a green checkmark next to its name, which indicates that it is operational (this could take a couple of minutes).
Note the connection name it will be used later and referred to as [SQL_CONNECTION_NAME].
In addition, for the application to work, you need to create a table. Click Databases.
Click Create database, type wordpress, which is the name the application expects, and then click Create.
Return to the SSH window and save the connection name in an environment variable, replacing [SQL_CONNECTION_NAME] with the unique name you copied in a previous step:
The connection name should be printed out.
The expected output is:
Click Check my progress to verify the objective.
In this task, you connect a sample application to the Cloud SQL instance.
Click Let's go.
Specify the following, replacing [ROOT_PASSWORD] with the password you configured upon machine creation, and leave the remaining settings as their defaults:
| Property | Value |
|---|---|
| Database Name | wordpress |
| Username | root |
| Password | [ROOT_PASSWORD] |
| Database Host | 127.0.0.1 |
Click Submit.
When a connection has been made, click Run the installation to instantiate Wordpress and its database in your Cloud SQL. This might take a few moments to complete.
Populate your demo site's information with random information and click Install Wordpress. You won't have to remember or use these details.
In this task, you configure your application to connect to a Cloud SQL instance named wordpress-db using its Private IP address.
If you can host your application in the same region and VPC connected network as your Cloud SQL, you can leverage a more secure and performant configuration using Private IP.
By using Private IP, you will increase performance by reducing latency and minimize the attack surface of your Cloud SQL instance because you can communicate with it exclusively over internal IPs.
), click Cloud SQL.Copy the external IP address of wordpress-private-ip, paste it in a browser window, and press ENTER.
Click Let's Go.
Specify the following, and leave the remaining settings as their defaults:
| Property | Value |
|---|---|
| Database Name | wordpress |
| Username | root |
| Password | type the [ROOT_PASSWORD] configured when the Cloud SQL instance was created |
| Database Host | [SQL_PRIVATE_IP] |
Click Run the installation.
An 'Already Installed!' window is displayed, which means that your application is connected to the Cloud SQL server over private IP.
In your web browser's address bar, remove the text after the IP address and press ENTER.
You'll be presented with a working Wordpress Blog!
In this lab, you created a Cloud SQL database and configured it to use both an external connection over a secure proxy and a Private IP address, which is more secure and performant. Remember that you can only connect via Private IP if the application and the Cloud SQL server are collocated in the same region and are part of the same VPC network. If your application is hosted in another region, VPC, or even project, use a proxy to secure its connection over the external connection.
When you have completed your lab, click End Lab. Google Skills removes the resources you’ve used and cleans the account for you.
You will be given an opportunity to rate the lab experience. Select the applicable number of stars, type a comment, and then click Submit.
The number of stars indicates the following:
You can close the dialog box if you don't want to provide feedback.
For feedback, suggestions, or corrections, please use the Support tab.
Copyright 2026 Google LLC All rights reserved. Google and the Google logo are trademarks of Google LLC. All other company and product names may be trademarks of the respective companies with which they are associated.


This content is not currently available
We will notify you via email when it becomes available

Great!
We will contact you via email if it becomes available

One lab at a time
Confirm to end all existing labs and start this one
Complete this quick step to start your lab.