Overview
In this lab, you investigate Virtual Private Cloud (VPC) networks and create firewall rules to allow and deny access to a network and instances.
You begin by creating an automatic VPC network, a custom VPC network, and some VPC instances in those networks. You verify that the default-allow-ssh firewall rule is working and then compare this to the user created custom network to verify no ingress is allowed without custom firewall rules.
After deleting the default network, you use firewall rule priorities,to allow both ingress and egress of network traffic to your VMs.
Objectives
In this lab, you will learn how to:
- Create an auto-mode network, a custom-mode network, and associated subnetworks.
- Investigate firewall rules in the default network and then delete the default network.
- Use features of firewall rules for more precise and flexible control of connections.
Setup and requirements
For each lab, you get a new Google Cloud project and set of resources for a fixed time at no cost.
-
Click the Start Lab button. If you need to pay for the lab, a pop-up opens for you to select your payment method.
On the left is the Lab Details panel with the following:
- The Open Google Cloud console button
- Time remaining
- The temporary credentials that you must use for this lab
- Other information, if needed, to step through this lab
-
Click Open Google Cloud console (or right-click and select Open Link in Incognito Window if you are running the Chrome browser).
The lab spins up resources, and then opens another tab that shows the Sign in page.
Tip: Arrange the tabs in separate windows, side-by-side.
Note: If you see the Choose an account dialog, click Use Another Account.
-
If necessary, copy the Username below and paste it into the Sign in dialog.
{{{user_0.username | "Username"}}}
You can also find the Username in the Lab Details panel.
-
Click Next.
-
Copy the Password below and paste it into the Welcome dialog.
{{{user_0.password | "Password"}}}
You can also find the Password in the Lab Details panel.
-
Click Next.
Important: You must use the credentials the lab provides you. Do not use your Google Cloud account credentials.
Note: Using your own Google Cloud account for this lab may incur extra charges.
-
Click through the subsequent pages:
- Accept the terms and conditions.
- Do not add recovery options or two-factor authentication (because this is a temporary account).
- Do not sign up for free trials.
After a few moments, the Google Cloud console opens in this tab.
Note: To view a menu with a list of Google Cloud products and services, click the Navigation menu at the top-left, or type the service or product name in the Search field.

Activate Google Cloud Shell
Google Cloud Shell is a virtual machine that is loaded with development tools. It offers a persistent 5GB home directory and runs on the Google Cloud.
Google Cloud Shell provides command-line access to your Google Cloud resources.
-
In Cloud console, on the top right toolbar, click the Open Cloud Shell button.

-
Click Continue.
It takes a few moments to provision and connect to the environment. When you are connected, you are already authenticated, and the project is set to your PROJECT_ID. For example:

gcloud is the command-line tool for Google Cloud. It comes pre-installed on Cloud Shell and supports tab-completion.
- You can list the active account name with this command:
gcloud auth list
Output:
Credentialed accounts:
- @.com (active)
Example output:
Credentialed accounts:
- google1623327_student@qwiklabs.net
- You can list the project ID with this command:
gcloud config list project
Output:
[core]
project =
Example output:
[core]
project = qwiklabs-gcp-44776a13dea667a6
Note:
Full documentation of gcloud is available in the
gcloud CLI overview guide
.
Task 1. Create VPC networks and instances
In this task, you create an automatic VPC network and custom VPC network, and some initial VPC instances in those networks.
- On the Google Cloud console title bar, click Activate Cloud Shell (
 ) to open Cloud Shell. If prompted, click Continue.
- To create the network mynetwork with auto subnets, run the following command:
gcloud compute networks create mynetwork --subnet-mode=auto
Note: When an auto mode VPC network is created, one subnet from each region is automatically created within it. These automatically created subnets use a set of predefined IP ranges that fit within the 10.128.0.0/9 CIDR block.
You will now create a network with custom subnets. You can choose any private RFC 1918 CIDR block for the primary IP address range of the subnets.
- To create the network privatenet with custom subnets, run the following command:
gcloud compute networks create privatenet \
--subnet-mode=custom
- To create a custom subnet in the privatenet network, run the following command:
gcloud compute networks subnets create privatesubnet \
--network=privatenet --region={{{project_0.default_region|Region}}} \
--range=10.0.0.0/24 --enable-private-ip-google-access
- To create some instances to use later for testing in all networks, run these commands:
gcloud compute instances create default-vm-1 \
--machine-type e2-micro \
--zone={{{project_0.default_zone | Zone 1}}} --network=default
gcloud compute instances create mynet-vm-1 \
--machine-type e2-micro \
--zone={{{project_0.default_zone | Zone 1}}} --network=mynetwork
gcloud compute instances create mynet-vm-2 \
--machine-type e2-micro \
--zone={{{project_0.default_zone_2| Zone 2}}} --network=mynetwork
gcloud compute instances create privatenet-bastion \
--machine-type e2-micro \
--zone={{{project_0.startup_script.gcp_region_zone2| Zone }}} --subnet=privatesubnet --can-ip-forward
gcloud compute instances create privatenet-vm-1 \
--machine-type e2-micro \
--zone={{{project_0.startup_script.gcp_region_zone3| Zone }}} --subnet=privatesubnet
Click Check my progress to verify the objective.
Create VPC networks and instances
Task 2. Investigate the default network
In this task, you explore the default network and verify that the default-allow-ssh firewall rule is working. Later, you delete the default-vm-1 instance and default network because you no longer need it.
Return to the Cloud console and view the firewall rules.
- On the Navigation menu, click VPC network > Firewall.
The following four default rules are created for the default network:
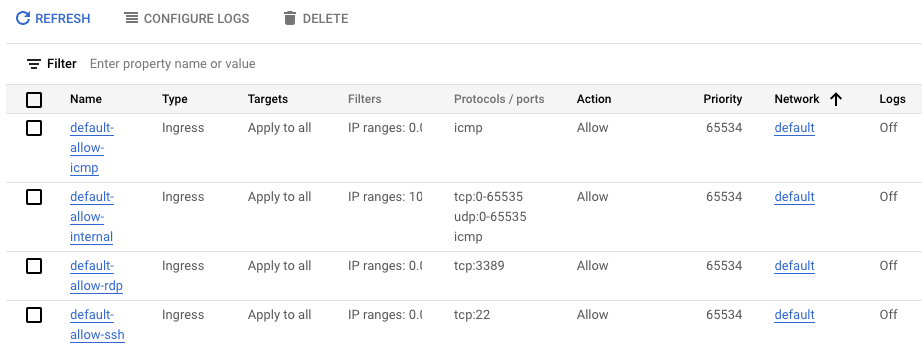
Remember, all networks also have the following 2 rules, which are not displayed in the console:

To check that the default-allow-ssh firewall rule is working, ssh into the default-vm-1 instance in the default network and test it.
-
On the Navigation menu, click Compute Engine > VM instances to display a list of VM instances.
-
In the row for the default-vm-1 instance, click SSH.
You should connect successfully via SSH to the instance because of the default-allow-ssh rule. You can ping www.google.com to test the egress connectivity. Press Ctrl+C to stop the ping.
Delete the default-vm-1 instance
Now delete the default-vm-1 instance because you no longer need it.
-
In the Navigation menu, click Compute Engine > VM instances, select the default-vm-1 instance and then click Delete.
-
In the confirmation box, click Delete.
Delete the default network
Note: Because the default network allows relatively open access, we recommend that you delete it for production projects.
-
On the Navigation menu, click VPC network > VPC networks to display the list of VPC networks in the Cloud console.
-
Click the default network to view the network details.
-
Click Delete VPC Network.
-
In the confirmation box, click Delete.
-
Wait for the network to be deleted and verify that the default network is no longer displayed on the VPC Networks page.
Task 3. Investigate the user-created networks
In this task, you explore the user-created networks to verify no ingress is allowed without custom firewall rules.
Verify that no ingress is allowed without custom firewall rules
Remember, all networks have the following 2 rules (which will not be displayed in the Console) to block all incoming traffic and allow all outgoing traffic. Unlike the default network, user-created networks do not have any other rules by default, so currently no inbound traffic is allowed.
-
On the Navigation menu, click Compute Engine > VM instances to display a list of VM instances.
-
In the row for mynet-vm-1 or mynet-vm-2, click SSH.
You should NOT be able to connect via SSH to the instances.
You will now try to SSH into an instance from the Cloud Shell.
-
Switch back to or reopen Cloud Shell.
-
To try to ssh into the mynet-vm-2 instance, run the following command:
gcloud compute ssh qwiklabs@mynet-vm-2 --zone {{{project_0.default_zone_2| Zone 2}}}
If prompted, type Y and press Enter twice to proceed.
We should NOT be able to connect via SSH to the instances. There is currently no inbound access allowed.
Igonre the error message ERROR: (gcloud.compute.ssh) [/usr/bin/ssh] exited with return code [255]
Task 4. Create custom ingress firewall rules
In this task, you use Cloud Shell as your client host to test SSH connectivity to the instances. The external IP address of the Cloud Shell instance can be easily retrieved.
However, the IP address of your Cloud Shell instance can change if you close and reopen it, or if it is recycled due to inactivity. This should not be a problem during this lab. For a "real" project, you would allow the IP address of your SSH client host and there should not be a problem.
Note: As you just verified, the browser-based console SSH feature used to connect to VM instances does not currently work. If you want to allow that, you need a firewall rule that allows the source IP address. However, source IP addresses for browser-based SSH sessions are dynamically allocated by the Cloud console and can vary from session to session.
For the feature to work, you must allow connections either from any IP address, or from Google's IP address range, which you can retrieve using public SPF records. Either of these options may pose unacceptable risks, depending on your requirements. Instead, you would allow the IP address of the SSH clients you are using to connect.
Allow SSH access from Cloud Shell
-
Switch back to or reopen Cloud Shell.
-
To retrieve the external IP address of the Cloud Shell instance, run the following commands:
ip=$(curl -s https://api.ipify.org)
echo "My External IP address is: $ip"
Sample output (your IP will be different):
My External IP address is: 35.229.72.135
- To add a firewall rule that allows port 22 (SSH) traffic from the Cloud Shell IP address, run the following command:
gcloud compute firewall-rules create \
mynetwork-ingress-allow-ssh-from-cs \
--network mynetwork --action ALLOW --direction INGRESS \
--rules tcp:22 --source-ranges $ip --target-tags=lab-ssh
This firewall rule is also given a target tag of lab-ssh, which means it applies only to instances that are tagged with the lab-ssh tag.
- To view the firewall rule in the Cloud console, on the Navigation menu, click VPC network > Firewall.
It will look similar to the following, but your IP address will be different:

This firewall rule will be applied only to instances tagged with lab-ssh. It is currently not being applied to any instances.
Note: You have just created and applied a firewall rule using a tag. One issue with tags is that they must be added to instances and could possibly be added or removed inadvertently. Firewall rules can also be applied to instances by the service account used. These rules will be applied automatically to all instances that use the specified service account.
- To add the lab-ssh network tag to the mynet-vm-2 and mynet-vm-1 instances, run the following commands in Cloud Shell:
gcloud compute instances add-tags mynet-vm-2 \
--zone {{{project_0.default_zone_2| Zone 2}}} \
--tags lab-ssh
gcloud compute instances add-tags mynet-vm-1 \
--zone {{{project_0.default_zone | Zone 1}}} \
--tags lab-ssh
Stateful firewalls
In VPC networks, firewall rules are stateful. So for each initiated connection tracked by allow rules in one direction, the return traffic is automatically allowed, regardless of any rules.
- To ssh into the mynet-vm-2 instance, run the following command in Cloud Shell:
gcloud compute ssh qwiklabs@mynet-vm-2 --zone {{{project_0.default_zone_2| Zone 2}}}
It will take several seconds to negotiate the SSH keys, but the connection should succeed. This verifies that the firewall rule is allowing the traffic.
-
Type exit to log off the mynet-vm-2 instance.
-
To ssh into the mynet-vm-1 instance, run the following command in Cloud Shell:
gcloud compute ssh qwiklabs@mynet-vm-1 --zone {{{project_0.default_zone | Zone 1}}}
This connection should also succeed because the mynet-vm-1 instance is in the same network, and the firewall rule you created is allowing access to all instances.
Allow all instances on the same network to communicate via ping
- While still logged in to the mynet-vm-1 instance, try pinging the mynet-vm-2 instance with the command shown below. (Replace the [PROJECT_ID] with the PROJECT_ID for your lab exercise.)
ping mynet-vm-2.{{{project_0.default_zone_2| Zone 2}}}.c.[PROJECT_ID].internal
The ping command will not succeed. Even though the mynet-vm-1 and the mynet-vm-2 instances are in the same VPC network, all traffic is blocked by default unless there is a firewall rule allowing it.
-
Press Ctrl+C to stop ping if needed. Do not log out of the mynet-vm-1 instance yet.
-
To open a new Cloud Shell window, click Open a new tab (+).
-
To add a firewall rule that allows ALL instances in the mynetwork VPC to ping each other, run the following command:
gcloud compute firewall-rules create \
mynetwork-ingress-allow-icmp-internal --network \
mynetwork --action ALLOW --direction INGRESS --rules icmp \
--source-ranges 10.128.0.0/9
Note: This firewall rule does not use a target-tag and therefore applies to all instances in the network by default. There is no need to tag any instances for this firewall to take effect. This kind of firewall rule is useful if all instances in a network need the same rule, but should also be used with caution because they affect all instances.
- Switch back to the first Cloud Shell session that is connected to mynet-vm-1 and run the ping again. This time it should work.
ping mynet-vm-2.{{{project_0.default_zone_2| Zone 2}}}.c.[PROJECT_ID].internal
Notice that the hostname mynet-vm-2 resolved to the internal IP address of the instance. The internal IP will start with 10.132.0 (for example, 10.132.0.2). Google Cloud resolves internal hostnames for you.
-
Press Ctrl+C to stop ping.
-
You can also try pinging the internal IP address directly and that will also work. Press Ctrl+C to stop ping.
-
To locate the external IP address of mynet-vm-2, on the Navigation menu, click Compute Engine > VM instances.
-
Click on mynet-vm-2, locate and copy the external IP address of the instance.
-
From the Cloud Shell session that is connected to mynet-vm-1, try to ping the external IP address of the mynet-vm-2 instance:
ping
This should NOT work. When you ping the external IP address, the connection goes through the internet gateway, which causes the request to be NATed. The request is now coming from the external IP address of the mynet-vm-1 instance. The firewall rule is to only allow ICMP requests that come from internal IP addresses.
- Press Ctrl+C to stop ping.
Click Check my progress to verify the objective.
Create custom ingress firewall rules
Task 5. Set the firewall rule priority
In this task, you set the firewall rule priority to deny ICMP traffic. You then verify that any traffic that does not match the rule priority is denied.
So far, all the rules created have been ingress allow rules, so the priority has not been important. Firewall rules can be both allow and deny, can specify ingress and egress, and have a priority from 0 to 65,535. If you do not set a priority, the default is 1,000. Rules are evaluated based on priority, starting from the lowest value. The first rule that matches gets applied.
- In the first Cloud Shell session, verify that you are still connected to the mynet-vm-1 instance. You can tell because the prompt will be:
qwiklabs@mynet-vm-1:~$.
If not connected, use the following command to reconnect:
gcloud compute ssh qwiklabs@mynet-vm-1 --zone {{{project_0.default_zone | Zone 1}}}
- Verify that you can still ping the mynet-vm-2 instance:
ping mynet-vm-2.{{{project_0.default_zone_2| Zone 2}}}.c.[PROJECT_ID].internal
-
Press Ctrl+C to stop ping.
-
Switch to your second Cloud Shell window (or open a new one).
-
In the second Cloud Shell, create a firewall ingress rule to deny ICMP traffic from any IP with a priority of 500:
gcloud compute firewall-rules create \
mynetwork-ingress-deny-icmp-all --network \
mynetwork --action DENY --direction INGRESS --rules icmp \
--priority 500
- Switch back to the first Cloud Shell connected to the mynet-vm-1 instance, and try to ping the mynet-vm-2 instance:
ping mynet-vm-2.{{{project_0.default_zone_2| Zone 2}}}.c.[PROJECT_ID].internal
It should no longer work. This new rule has a priority of 500, where the allow rule is 1,000.
- Press Ctrl+C to stop ping.
Now change the deny rule to a priority of 2,000.
- In the second Cloud Shell, modify the firewall rule just created and change the priority to
2000:
gcloud compute firewall-rules update \
mynetwork-ingress-deny-icmp-all \
--priority 2000
- Switch back to the first Cloud Shell connected to the mynet-vm-1 instance, and try to ping the mynet-vm-2 instance again:
ping mynet-vm-2.{{{project_0.default_zone_2| Zone 2}}}.c.[PROJECT_ID].internal
This time it will work because the deny rule has a lower priority, so the allow rule is the first matching rule.
- Press Ctrl+C to stop ping.
Task 6. Configure egress firewall rules
In this task, you create an egress firewall rule and set the priority to 10,000. You then verify that both ingress and egress rule allow that traffic.
- From the second Cloud Shell window, list all the current firewall rules:
gcloud compute firewall-rules list \
--filter="network:mynetwork"
Currently, the VMs are still able to ping each other because the rule that denies ICMP has a higher priority than the allow ICMP rule.
Now try an egress rule.
- Create a firewall egress rule to block ICMP traffic from any IP with a priority of
10000:
gcloud compute firewall-rules create \
mynetwork-egress-deny-icmp-all --network \
mynetwork --action DENY --direction EGRESS --rules icmp \
--priority 10000
- List all the current firewall rules again:
gcloud compute firewall-rules list \
--filter="network:mynetwork"
Notice that the egress rule priority is set to 10,000, which is much higher than the rules created earlier.
- Switch back to the first Cloud Shell connected to the mynet-vm-1 instance and try to ping the mynet-vm-2 instance:
ping mynet-vm-2.{{{project_0.default_zone_2| Zone 2}}}.c.[PROJECT_ID].internal
It should no longer work. Even though the egress rule has a much higher priority of 10,000, it is still blocking traffic. This is because for traffic to be allowed, there must be both an ingress and egress rule allowing that traffic. The priority of ingress rules does not affect the priority of egress rules.
- Press Ctrl+C to stop ping.
Click Check my progress to verify the objective.
Create a firewall rule with priority and egress firewall rule.
Congratulations!
In this lab, you did the following:
- Created an auto-mode network, a custom-mode network, and associated subnetworks.
- Investigated firewall rules in the default network, and then deleted the default network.
- Used firewall rule features for more precise and flexible control of connections.
End your lab
When you have completed your lab, click End Lab. Google Cloud Skills Boost removes the resources you’ve used and cleans the account for you.
You will be given an opportunity to rate the lab experience. Select the applicable number of stars, type a comment, and then click Submit.
The number of stars indicates the following:
- 1 star = Very dissatisfied
- 2 stars = Dissatisfied
- 3 stars = Neutral
- 4 stars = Satisfied
- 5 stars = Very satisfied
You can close the dialog box if you don't want to provide feedback.
For feedback, suggestions, or corrections, please use the Support tab.
Copyright 2022 Google LLC All rights reserved. Google and the Google logo are trademarks of Google LLC. All other company and product names may be trademarks of the respective companies with which they are associated.


