


시작하기 전에
- 실습에서는 정해진 기간 동안 Google Cloud 프로젝트와 리소스를 만듭니다.
- 실습에는 시간 제한이 있으며 일시중지 기능이 없습니다. 실습을 종료하면 처음부터 다시 시작해야 합니다.
- 화면 왼쪽 상단에서 실습 시작을 클릭하여 시작합니다.
Gone are the bots of the past which interpreted inquiries incorrectly or couldn't maintain context within a conversation. Google's Contact Center as a Service (CCaaS) provides all the tools, services, and APIs you'll need to build your Conversational agent so you can hold intelligent conversations with customers reaching out to you for assistance. In this course, you'll learn how to utilize Conversational Agents built in features to test, debug, and improve your agent. We will show you how to create and maintain test cases, use the validations tool to improve agent functionality, review conversation history logs, and use the console to test and debug.
In this lab, you'll explore some of the testing and logging tools available for developing an agent in Conversational Agents. By the end of this module, you'll be able to:
The following are some resources that may help you complete the lab components of this course:
For each lab, you get a new Google Cloud project and set of resources for a fixed time at no cost.
Make sure you signed into Qwiklabs using an incognito window.
Note the lab's access time (for example, 
When ready, click 
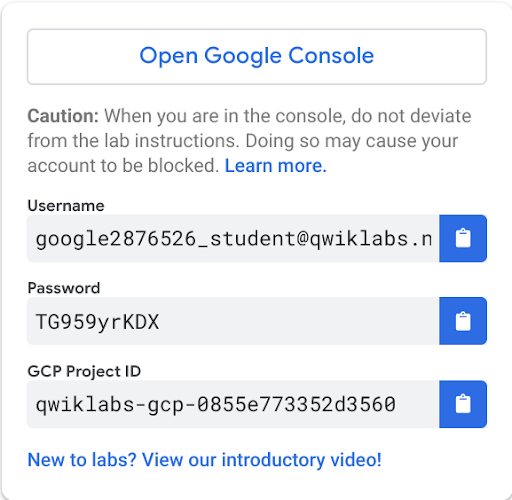
Note your lab credentials. You will use them to sign in to the Google Cloud Console.
Click Open Google Console.
Click Use another account and copy/paste credentials for this lab into the prompts.
Assumption: You've already logged into Google Cloud before continuing with the steps below.
In the Google Cloud Console, enable the Dialogflow API.
Navigate to AI Applications and click on Continue and activate the API.
To create a new conversational agent, go to the AI Applications Apps Console and scroll down to the Conversation agents section and then choose Conversational agent as the app type, and click Create.
A new page for Conversational Agents opens. If a project selection pop-up appears, choose your Project ID
Select Build your own on the Get started with Conversational Agents popup.
On the Create agent page, for the agent Display name enter Cloudio-cx.
Select location as
Ensure the time zone and default language are set appropriately. Set the Conversation start to Flow, and then click on Create button.
Once the agent is created, you will see the design and configuration portion of the Conversational Agents UI.
In this task, you can import the conversational agent you worked on for an earlier lab or you can import the conversational agent quick start. Choose the option you feel will help you get the most out of this lab.
In this task, you'll create a new test case and save it so that you can run it again later without typing in everything all over again.
Let's start by viewing the Test Cases section in the Conversational Agents.
To create the test case, click on Toggle Simulator to open the Simulator pane.
In the Enter text field type, I want to upgrade my tier, for the ChangeTier intent and press Enter.
The Conversational Agent should respond with Which tier do you want?
In Enter text field type gold and press Enter.
The Conversational Agent should respond with What's the phone number on your account?
In Enter text field type 4155551212 and press Enter.
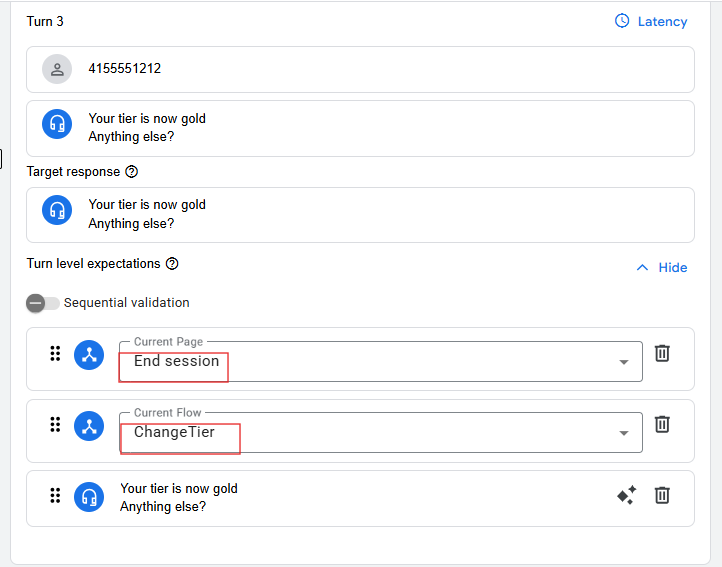
The Conversational Agent should respond with Your tier is now gold. Anything else?.
Click the Create test case button above the simulator (in the upper right of the Simulator pane).
Enter the following in the Create Test Case pop-up window:
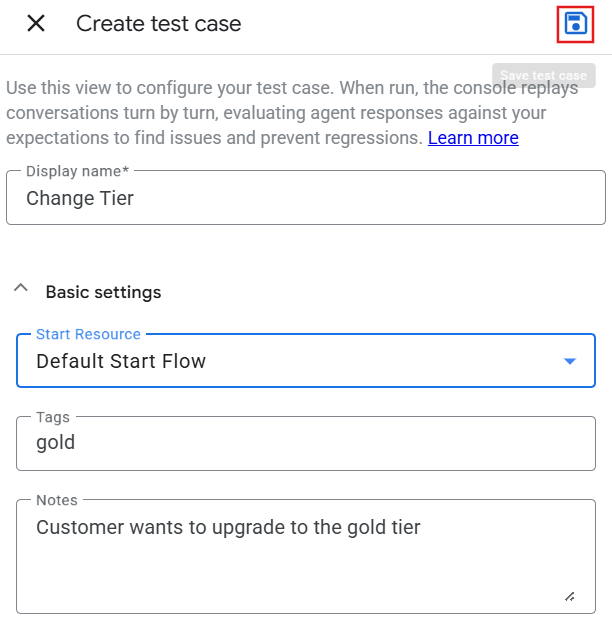
Enter the Display name as Change Tier.
Expand the Basic Settings section and enter the Tags as gold.
In Notes field enter Customer wants to upgrade to the gold tier.
Click Basic Settings to close the expanded section.
Scroll down the page and, under Turn 3, expand the Show dropdown and set Current Page to End session and Current Flow to Change Tier.
Click the Save test case button above the simulator.
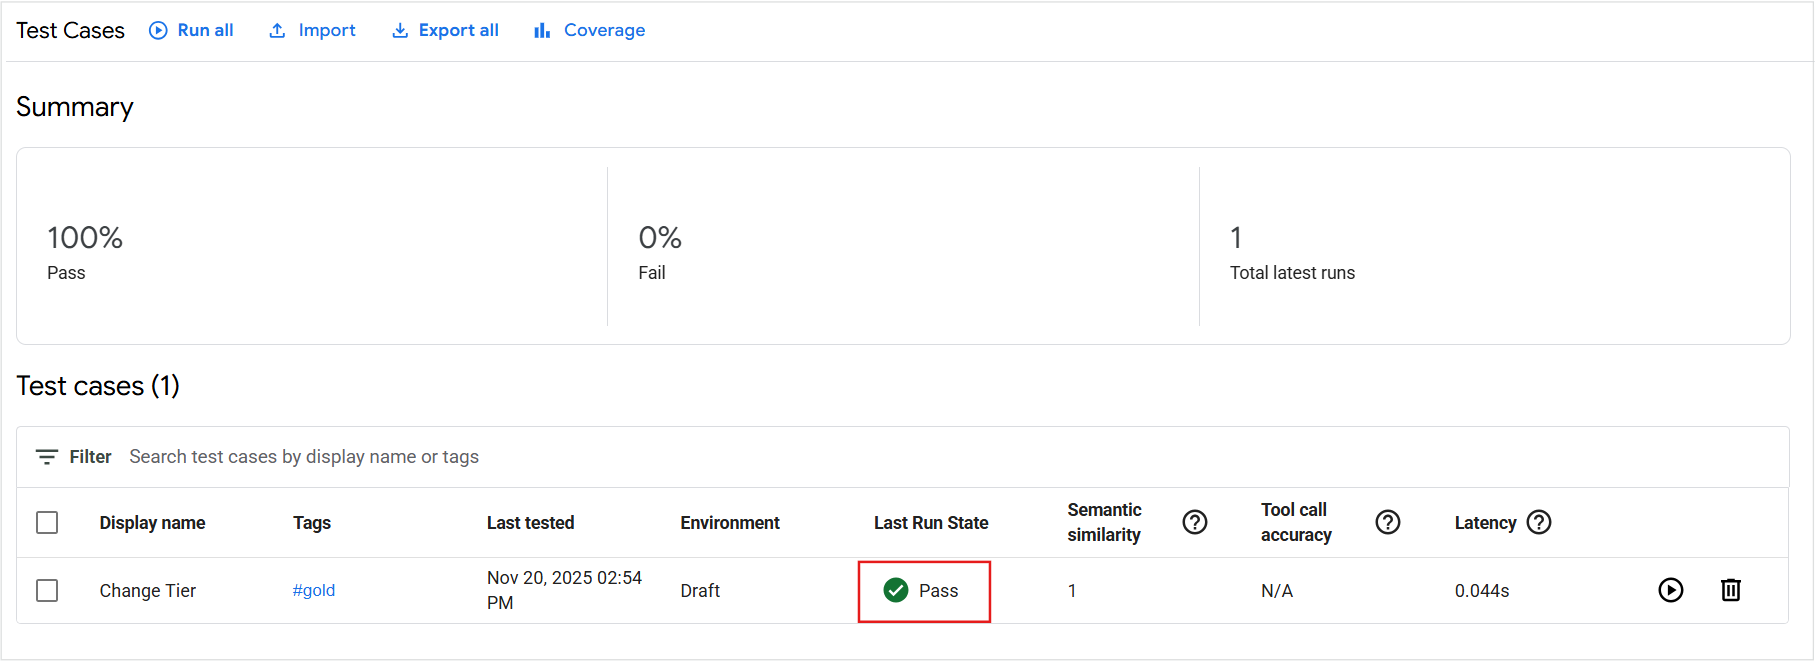
From the left navigation menu, navigate to Test cases under the TEST & EVALUATE tab.
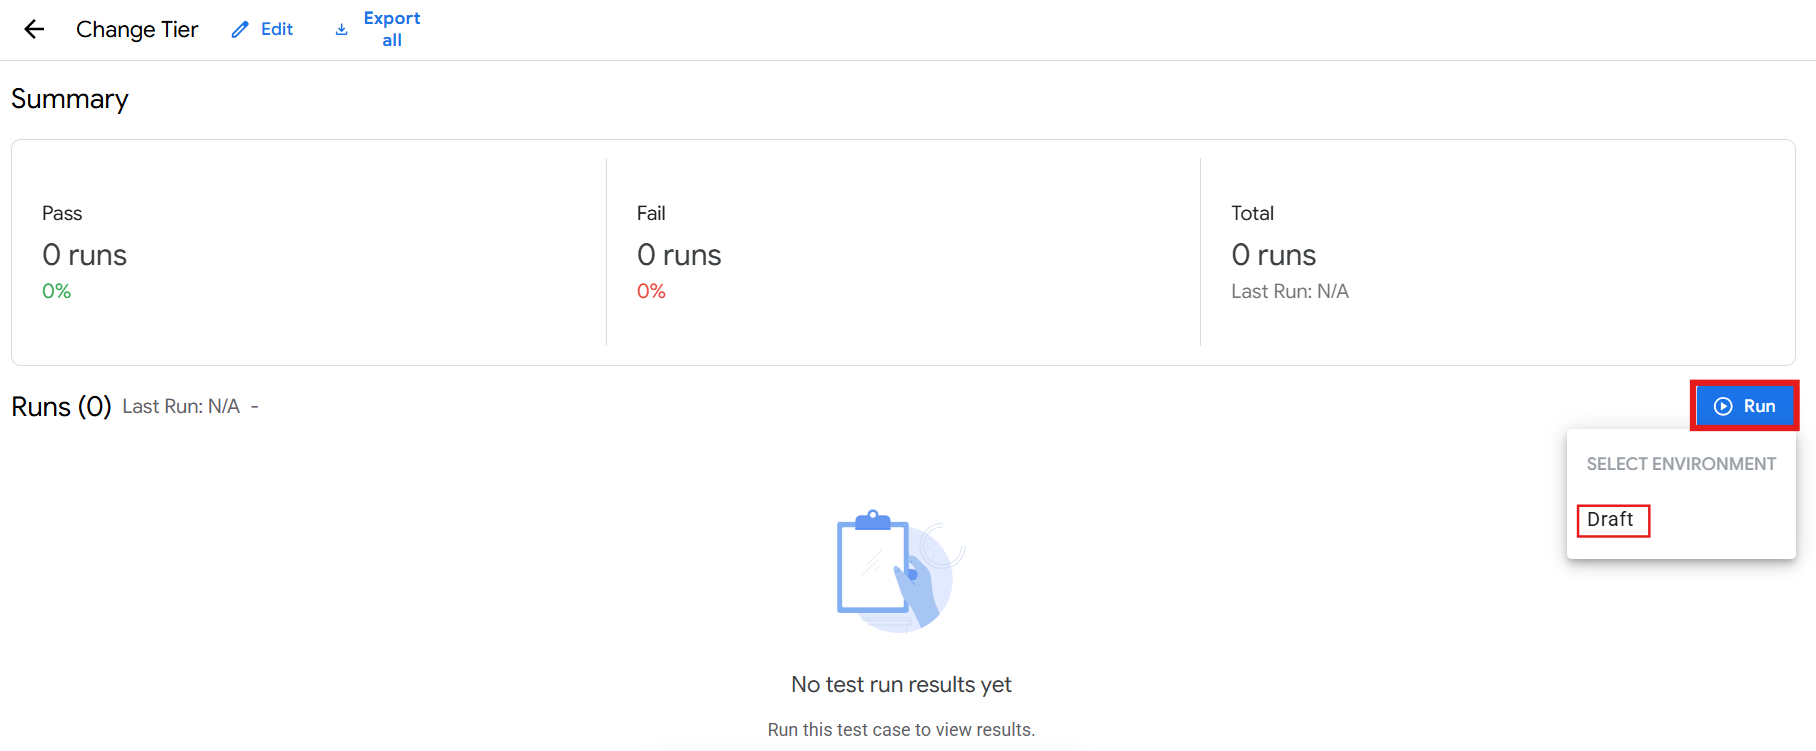
Click on your test case named Change Tier from the list.
However, the Last Run pane shows N/A. To execute your test case, click the Run button and select the Draft environment.
Click the back arrow ← located before Change Tier to return to the all Test Cases page.
Notice the Last tested pane is now populated with the test you just ran. The Last Run State now shows Pass. The timestamp is more recent than your first test.
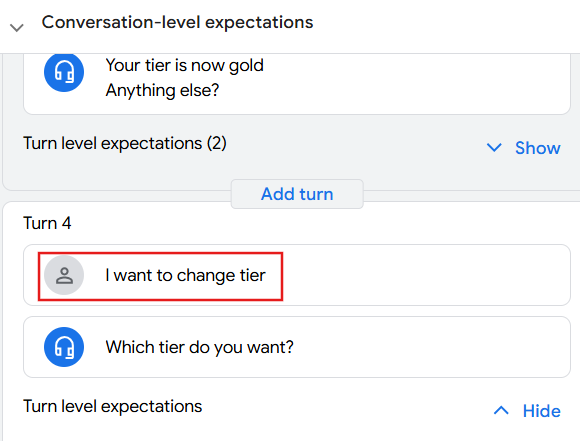
Notice below the Conversation-level expectations script contains all of the conversation details you entered into the simulator.
Now navigate to the Turn 1, click on Add parameter and then select Test case turn.
Under Turn 4, type I want to change tier in the Enter text field and press Enter.
Turn 4, expand the Show dropdown. Click Add expectation, select Current Page, and then choose Get Tier from the Current Page field.Click Save test case.
What does this do? You're probably thinking, correctly, that Conversational Agents might potentially match a different intent if it find a training phrase that more closely matches the customer utterance.
In this particular case, it's ok. Conversational Agent runs through the test case and matches it to the ChangeTier intent just as before.
This is an easy way for you to make simple modifications to your test cases without rebuilding them, but you'll want to be careful not to make changes that result in a different scenario entirely.
In this task, you'll look at execution logs generated for your Conversational Agent which will help you to debug any issues.
In the Google Cloud console, type "Logging" in the search bar, and then click Logging in the resulting options.
If a pop-up window appears, close it.
The Logging Explorer opens by default. Don't worry if you don't see much there yet. There will be once we do some more testing.
Click on Last 1 hour (or if it says Last, click on that).
In Relative time field enter 15m and press Enter.
Under All severities, look for Debug type logs if you have them. If not, try another log severity type (for instance, Info type).
Notice in the Query pane, you can construct a query to include only logs with specific type or other criteria. For instance,
This filters out everything except INFO type logs.
You may want to inspect DEBUG type log for webhooks in your Conversational Agent to see what the parameters were and how long they took.
Sometimes you'll see DEBUG level logs that give you an indication of simple typos in your code. For example, let's say you forgot to set the value of the tier parameter in your cloud function.
You might get a log such as the following indicating your cloud function crashed:
Compare the above with an example of a properly executed Cloud Function log:
Some debugging efforts are best done in the Conversational Agents simulator pane and good old fashioned detective work.
In the Conversational Agents console, navigate to the Flows > Build tab, then click on the ChangeTier flow.
Click on the Get Tier page.
Click on the phone-number parameter to bring up the configuration pane.
Deselect Required.
Click Save.
Next, you'll run your Change Tier test case that you created earlier in this lab.
Navigate to Test cases under the TEST & EVALUATE tab.
Click on your Change Tier test case.
Click on the Run button and choose environment Draft.
Did the test case show a status of Fail?
In this scenario, your test case was expecting a valid value for the phone-number but you never actually got a phone-number from the user. Your test case proved that the new scenario will not work for your Conversational Agent.
Navigate to the ChangeTier flow under Flows > Build tab and click on Get Tier page and enable Required option for the phone-number parameter and then click on Save.
Rerun your Change Tier test case.
Did it work this time?
Excellent! You're well on your way to using logs as well as test cases to debug your conversational agent.
You've created a simple agent in Conversational Agents. In the next section, we'll go over slightly more complex scenarios and build out more of the Cloudio functionality.
In this lab you may not have created any new functionality for your Conversational Agent, but you've seen what things could look like when they're not working.
In the Agent dropdown at the top, choose View all agents.
Click on the ellipsis menu (three vertical dots) on the right next to your Conversational Agent.
Select Export.
Your Conversational Agent will be downloaded to your local machine as a *.blob type file. You can use the Restore option to import it later.
In the Cloud Console, sign out of the Google account.
Close the browser tab.
When you have completed your lab, click End Lab. Qwiklabs removes the resources you’ve used and cleans the account for you.
You will be given an opportunity to rate the lab experience. Select the applicable number of stars, type a comment, and then click Submit.
The number of stars indicates the following:
You can close the dialog box if you don't want to provide feedback.
For feedback, suggestions, or corrections, please use the Support tab.
Copyright 2023 Google LLC All rights reserved. Google and the Google logo are trademarks of Google LLC. All other company and product names may be trademarks of the respective companies with which they are associated.


현재 이 콘텐츠를 이용할 수 없습니다
이용할 수 있게 되면 이메일로 알려드리겠습니다.

감사합니다
이용할 수 있게 되면 이메일로 알려드리겠습니다.

한 번에 실습 1개만 가능
모든 기존 실습을 종료하고 이 실습을 시작할지 확인하세요.
실습을 시작하려면 이 간단한 단계를 완료하세요.