總覽
Gemini 是 Google 開發的生成式 AI 模型系列,專為多模態用途而設計。Gemini API 提供多種適合特定用途的模型。Gemini Pro 模型功能強大,回覆準確率和效能皆極為優異;Gemini Flash 是多模態模型,不僅效能更佳,延遲時間也極短;Gemini Flash-lite 模型則經過最佳化調整,延遲時間短且成本效益高。如要進一步瞭解這些模型變化版本,請參閱說明文件。
在 Google Cloud 中,Vertex AI Gemini API 提供統一的 Gemini 模型互動介面,支援多模態提示詞輸入 (包括音訊、圖像、影片、文字),並能輸出文字、圖像和音訊等內容。Imagen 模型則可根據文字生成圖像。
您可以透過機器學習 (ML) 平台 Vertex AI 訓練及部署 ML 模型和 AI 應用程式,以及將自訂後的大型語言模型 (LLM) 運用於 AI 輔助應用程式。Vertex AI 可讓您自訂 Gemini、完全掌控資料,並透過更多 Google Cloud 功能保障企業安全性與隱私權,以及強化資料治理與法規遵循機制。如要進一瞭解 Vertex AI,請參閱本實驗室結尾的「後續步驟」。
在本實驗室中,您將透過 Vertex AI SDK for Python 呼叫 Vertex AI Gemini API。
目標
本實驗室將說明如何執行下列工作:
- 運用 Streamlit 框架開發 Python 應用程式。
- 安裝 Vertex AI SDK for Python。
- 使用 Vertex AI Gemini API 編寫程式碼,用來與 Gemini 模型 (gemini-2.0-flash) 互動。
- 將應用程式容器化,並在 Cloud Run 部署和測試。
設定
每個實驗室都會提供新的 Google Cloud 專案和一組資源,讓您在時限內免費使用。
-
請以無痕視窗登入 Google Skills。
-
請記下實驗室時間限制 (例如 1:15:00),務必在時限內完成作業。
研究室不提供暫停功能。如有需要,您可以重新開始,但原先的進度恕無法保留。
-
準備就緒後,請按一下「Start lab」。
-
請記下研究室憑證 (使用者名稱和密碼),這組資訊將用於登入 Google Cloud 控制台。
-
按一下「Open Google Console」。
-
按一下「Use another account」,然後複製這個研究室的憑證,並貼入提示訊息。
如果使用其他憑證,系統會顯示錯誤或向您收取費用。
-
接受條款,然後略過資源復原頁面。
啟用 Cloud Shell
Cloud Shell 是含有多項開發工具的虛擬機器,提供永久的 5 GB 主目錄,並在 Google Cloud 中運作。Cloud Shell 可讓您透過指令列存取 Google Cloud 資源。gcloud 是 Google Cloud 的指令列工具,已預先安裝於 Cloud Shell,並支援 Tab 鍵完成功能。
-
在控制台的右上方,點按「啟用 Cloud Shell」按鈕  。
。
-
點按「繼續」。
請稍候片刻,等待系統完成佈建作業並連線至環境。連線建立後,即代表您已通過驗證,且專案已設為「PROJECT_ID」。
指令範例
gcloud auth list
輸出內容
Credentialed accounts:
- <myaccount>@<mydomain>.com (active)
輸出內容範例
Credentialed accounts:
- google1623327_student@qwiklabs.net
gcloud config list project
輸出內容
[core]
project = <project_ID>
輸出內容範例
[core]
project = qwiklabs-gcp-44776a13dea667a6
注意:如需 gcloud 的完整說明,請參閱 gcloud CLI 總覽指南。
工作 1:設定環境與專案
-
使用實驗室憑證登入 Google Cloud 控制台,然後開啟 Cloud Shell 終端機視窗。
-
執行下列指令,在 Cloud Shell 設定專案 ID 和區域環境變數:
PROJECT_ID=$(gcloud config get-value project)
REGION={{{project_0.default_region|set at lab start}}}
echo "PROJECT_ID=${PROJECT_ID}"
echo "REGION=${REGION}"
-
如要在本實驗室使用各種 Google Cloud 服務,您必須啟用幾個 API:
gcloud services enable cloudbuild.googleapis.com cloudfunctions.googleapis.com run.googleapis.com logging.googleapis.com storage-component.googleapis.com aiplatform.googleapis.com
點選「Check my progress」,確認目標已達成。
啟用相關 API。
工作 2:設定應用程式環境
在這項工作中,您會設定 Python 虛擬環境,並安裝應用程式依附元件。
確認 Cloud Shell 已獲得授權
-
在 Cloud Shell 執行下列指令,確認 Cloud Shell 已獲得授權:
gcloud auth list
-
如果系統提示您為 Cloud Shell 提供授權,請點選「授權」。
建立應用程式目錄
-
執行下列指令,建立應用程式目錄:
mkdir ~/gemini-app
-
切換到 ~/gemini-app 目錄:
cd ~/gemini-app
應用程式檔案會在 ~/gemini-app 目錄中建立。本實驗室後續步驟會用到的檔案,都可在這個目錄中找到,包括 Python 應用程式來源檔案、依附元件及 Docker 檔案。
設定 Python 虛擬環境
在現有的 Python 安裝位置建立虛擬環境,區隔在此環境中安裝的套件和基礎環境中的套件。在虛擬環境中使用 pip 等安裝工具時,Python 套件會安裝到虛擬環境中,不會影響到基礎環境。
-
執行下列指令,在 gemini-app 資料夾建立 Python 虛擬環境:
python3 -m venv gemini-streamlit
「venv」模組會建立簡便的虛擬環境,具備專屬的獨立 Python 套件。
-
啟用 Python 虛擬環境:
source gemini-streamlit/bin/activate
安裝應用程式依附元件
Python requirements 檔案是簡易的文字檔案,會列出專案所需的依附元件。首先,requirements 檔案中需要有三個模組。
我們的應用程式是以 Streamlit 編寫,這是一個開放原始碼 Python 程式庫,用來建立機器學習與數據資料學的網頁應用程式。應用程式會使用 Vertex AI SDK for Python 程式庫,與 Gemini API 及模型互動。Cloud Logging 用於記錄應用程式資訊。
-
執行下列指令,建立 requirements 檔案:
cat > ~/gemini-app/requirements.txt <<EOF
streamlit
google-cloud-aiplatform==1.38.1
google-cloud-logging==3.6.0
EOF
-
安裝應用程式依附元件:
pip install -r requirements.txt
pip 是 Python 適用的套件安裝程式。
請等所有套件都安裝完畢後,再繼續下一項工作。
工作 3:開發應用程式
應用程式原始碼將以多個 .py 來源檔案編寫。讓我們從 app.py 的主要進入點開始。
編寫應用程式主要進入點
-
執行下列指令,建立 app.py 進入點程式碼:
cat > ~/gemini-app/app.py <<EOF
import os
import streamlit as st
from app_tab1 import render_story_tab
from vertexai.preview.generative_models import GenerativeModel
import vertexai
import logging
from google.cloud import logging as cloud_logging
# configure logging
logging.basicConfig(level=logging.INFO)
# attach a Cloud Logging handler to the root logger
log_client = cloud_logging.Client()
log_client.setup_logging()
PROJECT_ID = os.environ.get('PROJECT_ID') # Your Qwiklabs Google Cloud Project ID
LOCATION = os.environ.get('REGION') # Your Qwiklabs Google Cloud Project Region
vertexai.init(project=PROJECT_ID, location=LOCATION)
@st.cache_resource
def load_models():
text_model = GenerativeModel("gemini-2.0-flash")
multimodal_model = GenerativeModel("gemini-2.0-flash")
return text_model, multimodal_model
st.header("Vertex AI Gemini API", divider="rainbow")
text_model, multimodal_model = load_models()
tab1, tab2, tab3, tab4 = st.tabs(["Story", "Marketing Campaign", "Video Playground", "Image Playground"])
with tab1:
render_story_tab(text_model)
EOF
-
查看 app.py 檔案內容:
cat ~/gemini-app/app.py
應用程式會使用 streamlit 在 UI 建立幾個分頁。在應用程式初始版本中,我們會建構第一個分頁「Story」,其中含有生成一篇故事的功能,接著在實驗室的後續工作中逐步建構其他分頁。
應用程式會先初始化 Vertex AI SDK,傳入 PROJECT_ID 的值及 REGION 環境變數。
接著使用代表 Gemini 模型的 GenerativeModel 類別,載入 gemini-2.0-flash 模型。這個類別包含多種方法,可根據文字、圖像及影片生成內容。
應用程式會在 UI 中建立 4 個分頁,分別為「Story」、「Marketing Campaign」、「Image Playground」 和「Video Playground」。
接著叫用 render_tab1() 函式,在應用程式 UI 為「Story」分頁建立 UI。
開發第 1 個分頁 -「Story」
-
執行下列指令來編寫程式碼,在應用程式 UI 轉譯「Story」分頁:
cat > ~/gemini-app/app_tab1.py <<EOF
import streamlit as st
from vertexai.preview.generative_models import GenerativeModel
from response_utils import *
import logging
# create the model prompt based on user input.
def generate_prompt():
# Story character input
character_name = st.text_input("Enter character name: \n\n",key="character_name",value="Mittens")
character_type = st.text_input("What type of character is it? \n\n",key="character_type",value="Cat")
character_persona = st.text_input("What personality does the character have? \n\n",
key="character_persona",value="Mitten is a very friendly cat.")
character_location = st.text_input("Where does the character live? \n\n",key="character_location",value="Andromeda Galaxy")
# Story length and premise
length_of_story = st.radio("Select the length of the story: \n\n",["Short","Long"],key="length_of_story",horizontal=True)
story_premise = st.multiselect("What is the story premise? (can select multiple) \n\n",["Love","Adventure","Mystery","Horror","Comedy","Sci-Fi","Fantasy","Thriller"],key="story_premise",default=["Love","Adventure"])
creative_control = st.radio("Select the creativity level: \n\n",["Low","High"],key="creative_control",horizontal=True)
if creative_control == "Low":
temperature = 0.30
else:
temperature = 0.95
prompt = f"""Write a {length_of_story} story based on the following premise: \n
character_name: {character_name} \n
character_type: {character_type} \n
character_persona: {character_persona} \n
character_location: {character_location} \n
story_premise: {",".join(story_premise)} \n
If the story is "short", then make sure to have 5 chapters or else if it is "long" then 10 chapters.
Important point is that each chapter should be generated based on the premise given above.
First start by giving the book introduction, chapter introductions and then each chapter. It should also have a proper ending.
The book should have a prologue and an epilogue.
"""
return temperature, prompt
# function to render the story tab, and call the model, and display the model prompt and response.
def render_story_tab (text_model: GenerativeModel):
st.subheader("Generate a story")
temperature, prompt = generate_prompt()
config = {
"temperature": temperature,
"max_output_tokens": 2048,
}
generate_t2t = st.button("Generate my story", key="generate_t2t")
if generate_t2t and prompt:
# st.write(prompt)
with st.spinner("Generating your story using Gemini..."):
first_tab1, first_tab2 = st.tabs(["Story response", "Prompt"])
with first_tab1:
response = get_gemini_text_response(text_model, prompt, generation_config=config)
if response:
st.write("Your story:")
st.write(response)
logging.info(response)
with first_tab2:
st.text(prompt)
EOF
-
查看 app_tab1.py 檔案內容:
cat ~/gemini-app/app_tab1.py
render_story_tab 函式叫用的函式會轉譯文字輸入欄位及其他選項,在分頁生成 UI 控制項。
generate_prompt 函式會生成提供給 Gemini API 的文字提示詞。使用者在分頁 UI 為故事角色輸入值並選好選項後,系統會串連這些內容來建立提示詞字串。選項包括故事長度 (短、長)、創意程度 (低、高) 和故事前提。
該函式也會根據指定的故事創意程度傳回 temperature 值。這個值會做為 temperature 設定參數提供給模型,用於決定模型預測結果的隨機程度。max_output_tokens 設定參數會指定每則訊息生成的詞元數量上限。
系統會在分頁 UI 建立按鈕,供使用者點選生成回覆。使用者點選按鈕後,系統會叫用 get_gemini_text_response 函式,我們會在實驗室的下個步驟編寫此程式碼。
開發 response_utils
response_utils.py 檔案包含生成模型回覆的函式。
-
執行下列指令碼,編寫生成模型文字回覆的程式碼:
cat > ~/gemini-app/response_utils.py <<EOF
from vertexai.preview.generative_models import (Content,
GenerationConfig,
GenerativeModel,
GenerationResponse,
Image,
HarmCategory,
HarmBlockThreshold,
Part)
def get_gemini_text_response( model: GenerativeModel,
prompt: str,
generation_config: GenerationConfig,
stream=True):
safety_settings={
HarmCategory.HARM_CATEGORY_HARASSMENT: HarmBlockThreshold.BLOCK_NONE,
HarmCategory.HARM_CATEGORY_HATE_SPEECH: HarmBlockThreshold.BLOCK_NONE,
HarmCategory.HARM_CATEGORY_SEXUALLY_EXPLICIT: HarmBlockThreshold.BLOCK_NONE,
HarmCategory.HARM_CATEGORY_DANGEROUS_CONTENT: HarmBlockThreshold.BLOCK_NONE,
}
responses = model.generate_content(prompt,
generation_config = generation_config,
safety_settings = safety_settings,
stream=True)
final_response = []
for response in responses:
try:
final_response.append(response.text)
except IndexError:
final_response.append("")
continue
return " ".join(final_response)
EOF
-
查看 response_utils.py 檔案內容:
cat ~/gemini-app/response_utils.py
get_gemini_text_response 函式會使用 Vertex AI SDK for Python 中 vertexai.preview.generative_models 套件內的 GenerativeModel 和其他類別。系統會根據傳至該類別 generate_content 方法的文字提示詞生成回覆。
safety_settings 物件也會傳遞至此方法,封鎖不安全的內容來控制模型的回覆。本實驗室中,程式碼範例使用的安全性設定值會指示模型一律傳回內容,即使內容可能不安全。如果應用程式需要限制較多的設定,您可以評估生成內容,再調整這些設定。詳情請參閱安全設定說明文件。
工作 4:在本機執行與測試應用程式
在這項工作中,您會使用 streamlit 在本機執行應用程式,並測試應用程式功能。
執行應用程式
-
執行下列指令,在本機、Cloud Shell 執行應用程式:
streamlit run app.py \
--browser.serverAddress=localhost \
--server.enableCORS=false \
--server.enableXsrfProtection=false \
--server.port 8080
應用程式會啟動,並提供您存取應用程式的網址。
-
如要在瀏覽器中開啟應用程式首頁,請前往 Cloud Shell 選單列,依序點選「網頁預覽」和「透過以下通訊埠預覽:8080」。
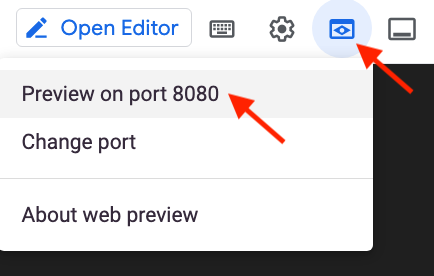
您也可以複製應用程式網址,並貼到不同的瀏覽器分頁來存取應用程式。
測試應用程式 -「Story」分頁
輸入內容來生成故事、查看提示詞及 Gemini 模型生成的回覆。
-
保留「Story」分頁預設設定,然後點選「Generate my story」,即可生成故事。
-
等待系統生成回覆,然後點選「Story response」分頁標籤。
-
點選「Prompt」分頁標籤,查看用來生成回覆的提示詞。
點選「Check my progress」,確認目標已達成。
已開發應用程式「Story」分頁。
工作 5:生成行銷廣告活動
在這項工作中,您會使用 Gemini 2.0 Flash 模型,為公司生成行銷廣告活動。您還會開發程式碼,在應用程式中加入第二個分頁。
開發第 2 個分頁 -「Marketing Campaign」
-
在 Cloud Shell 的選單列點選「+」圖示,開啟第二個終端機視窗。
-
執行下列指令來編寫程式碼,在應用程式 UI 轉譯「Marketing Campaign」分頁:
cat > ~/gemini-app/app_tab2.py <<EOF
import streamlit as st
from vertexai.preview.generative_models import GenerativeModel
from response_utils import *
import logging
# create the model prompt based on user input.
def generate_prompt():
product_name = st.text_input("What is the name of the product? \n\n",key="product_name",value="ZomZoo")
product_category = st.radio("Select your product category: \n\n",["Clothing","Electronics","Food","Health & Beauty","Home & Garden"],key="product_category",horizontal=True)
st.write("Select your target audience: ")
target_audience_age = st.radio("Target age: \n\n",["18-24","25-34","35-44","45-54","55-64","65+"],key="target_audience_age",horizontal=True)
# target_audience_gender = st.radio("Target gender: \n\n",["male","female","trans","non-binary","others"],key="target_audience_gender",horizontal=True)
target_audience_location = st.radio("Target location: \n\n",["Urban", "Suburban","Rural"],key="target_audience_location",horizontal=True)
st.write("Select your marketing campaign goal: ")
campaign_goal = st.multiselect("Select your marketing campaign goal: \n\n",["Increase brand awareness","Generate leads","Drive sales","Improve brand sentiment"],key="campaign_goal",default=["Increase brand awareness","Generate leads"])
if campaign_goal is None:
campaign_goal = ["Increase brand awareness","Generate leads"]
brand_voice = st.radio("Select your brand voice: \n\n",["Formal","Informal","Serious","Humorous"],key="brand_voice",horizontal=True)
estimated_budget = st.radio("Select your estimated budget ($): \n\n",["1,000-5,000","5,000-10,000","10,000-20,000","20,000+"],key="estimated_budget",horizontal=True)
prompt = f"""Generate a marketing campaign for {product_name}, a {product_category} designed for the age group: {target_audience_age}.
The target location is this: {target_audience_location}.
Aim to primarily achieve {campaign_goal}.
Emphasize the product's unique selling proposition while using a {brand_voice} tone of voice.
Allocate the total budget of {estimated_budget}.
With these inputs, make sure to follow following guidelines and generate the marketing campaign with proper headlines: \n
- Briefly describe the company, its values, mission, and target audience.
- Highlight any relevant brand guidelines or messaging frameworks.
- Provide a concise overview of the campaign's objectives and goals.
- Briefly explain the product or service being promoted.
- Define your ideal customer with clear demographics, psychographics, and behavioral insights.
- Understand their needs, wants, motivations, and pain points.
- Clearly articulate the desired outcomes for the campaign.
- Use SMART goals (Specific, Measurable, Achievable, Relevant, and Time-bound) for clarity.
- Define key performance indicators (KPIs) to track progress and success.
- Specify the primary and secondary goals of the campaign.
- Examples include brand awareness, lead generation, sales growth, or website traffic.
- Clearly define what differentiates your product or service from competitors.
- Emphasize the value proposition and unique benefits offered to the target audience.
- Define the desired tone and personality of the campaign messaging.
- Identify the specific channels you will use to reach your target audience.
- Clearly state the desired action you want the audience to take.
- Make it specific, compelling, and easy to understand.
- Identify and analyze your key competitors in the market.
- Understand their strengths and weaknesses, target audience, and marketing strategies.
- Develop a differentiation strategy to stand out from the competition.
- Define how you will track the success of the campaign.
- Use relevant KPIs to measure performance and return on investment (ROI).
Provide bullet points and headlines for the marketing campaign. Do not produce any empty lines. Be very succinct and to the point.
"""
return prompt
# function to render the story tab, and call the model, and display the model prompt and response.
def render_mktg_campaign_tab (text_model: GenerativeModel):
st.subheader("Generate a marketing campaign")
prompt = generate_prompt()
config = {
"temperature": 0.8,
"max_output_tokens": 2048,
}
generate_t2m = st.button("Generate campaign", key="generate_t2m")
if generate_t2m and prompt:
# st.write(prompt)
with st.spinner("Generating a marketing campaign using Gemini..."):
first_tab1, first_tab2 = st.tabs(["Campaign response", "Prompt"])
with first_tab1:
response = get_gemini_text_response(text_model, prompt, generation_config=config)
if response:
st.write("Marketing campaign:")
st.write(response)
logging.info(response)
with first_tab2:
st.text(prompt)
EOF
修改應用程式主要進入點
測試應用程式 -「Marketing campaign」分頁
輸入內容來生成行銷廣告活動、查看提示詞及 Gemini 模型生成的回覆。
-
請重新整理應用程式的瀏覽器分頁或視窗,以重新載入及查看更新後的應用程式 UI。
-
保留「Marketing campaign」分頁預設設定,然後點選「Generate campaign」,生成行銷廣告活動。
-
等待系統生成回覆,然後點選「Campaign response」分頁標籤。
-
點選「Prompt」分頁標籤,查看用來生成回覆的提示詞。
-
重複上述步驟,即可透過產品類別、目標對象、地區及廣告活動目標等不同的參數值,生成行銷廣告活動。
點選「Check my progress」,確認目標已達成。
已開發應用程式「Marketing Campaign」分頁。
工作 6:生成影片園地
在這項工作中,您會使用 Gemini 2.0 Flash 模型處理影片,並根據提供給模型的影片生成標記和資訊。
開發第 3 個分頁 -「Video Playground」
Gemini 2.0 Flash 模型也能說明影片內容。在這項子工作中,您會實作「Video Playground」分頁的程式碼,以及與模型互動的程式碼,藉此生成影片說明。
-
執行下列指令來編寫程式碼,在應用程式 UI 轉譯「Video Playground」分頁:
cat > ~/gemini-app/app_tab3.py <<EOF
import streamlit as st
from vertexai.preview.generative_models import GenerativeModel, Part
from response_utils import *
import logging
# render the Video Playground tab with multiple child tabs
def render_video_playground_tab(multimodal_model: GenerativeModel):
video_desc, video_tags, video_highlights, video_geoloc = st.tabs(["Video description", "Video tags", "Video highlights", "Video geolocation"])
with video_desc:
video_desc_uri = "gs://cloud-training/OCBL447/gemini-app/videos/mediterraneansea.mp4"
video_desc_url = "https://storage.googleapis.com/"+video_desc_uri.split("gs://")[1]
video_desc_vid = Part.from_uri(video_desc_uri, mime_type="video/mp4")
st.video(video_desc_url)
st.write("Generate a description of the video.")
prompt = """Describe what is happening in the video and answer the following questions: \n
- What am I looking at?
- Where should I go to see it?
- What are other top 5 places in the world that look like this?
"""
tab1, tab2 = st.tabs(["Response", "Prompt"])
video_desc_description = st.button("Generate video description", key="video_desc_description")
with tab1:
if video_desc_description and prompt:
with st.spinner("Generating video description"):
response = get_gemini_vision_response(multimodal_model, [prompt, video_desc_vid])
st.markdown(response)
logging.info(response)
with tab2:
st.write("Prompt used:")
st.write(prompt,"\n","{video_data}")
EOF
-
查看 app_tab3.py 檔案內容:
cat ~/gemini-app/app_tab3.py
render_video_playground_tab 函式建構的 UI,能讓應用程式使用者與 Gemini 模型互動。該函式會在 UI 建立一系列分頁:「Video description」、「Video tags」、「Video highlights」和「Video geolocation」。您會在本實驗室的子工作中,為其餘分頁編寫程式碼。
在「Video description」分頁中,模型會根據提示詞及影片內容來生成說明,並找出與片中場景類似的其他地點。
更新 response_utils
response_utils.py 檔案包含生成模型回覆的函式。
修改應用程式主要進入點
測試應用程式 -「Video Playground」分頁
-
請重新整理應用程式的瀏覽器分頁或視窗,以重新載入及查看更新後的應用程式 UI。
-
依序點選「Video Playground」和「Video description」。
-
分頁會顯示某地點的影片。點選即可播放影片。
等到影片播放完畢後,再繼續進行下一步。
-
點選「Generate video description」。
如果發生以下錯誤:google.api_core.exceptions.FailedPrecondition: 400 Service agents are being provisioned (https://cloud.google.com/vertex-ai/docs/general/access-control#service-agents). Service agents are needed to read the Cloud Storage file provided. So please try again in a few minutes.,請稍候幾分鐘,然後再次點選「Generate video description」。
-
查看模型的回覆。
這當中包含片中地點說明,以及其他 5 個類似地點。
點選「Check my progress」,確認目標已達成。
已開發應用程式「Video Playground」和「Video description」分頁。
工作 7:生成影片標記
在這項工作中,您會使用 Gemini 2.0 Flash 模型,根據影片內容生成標記。
更新「Video Playground」分頁 - 影片標記
測試應用程式 -「Video Playground」-「Video tags」分頁
-
請重新整理應用程式的瀏覽器分頁或視窗,以重新載入及查看更新後的應用程式 UI。
-
依序點選「Video Playground」和「Video tags」。
-
分頁會顯示用於提示模型的影片。點選即可播放影片。
-
點選「Generate video tags」。
-
查看模型的回覆。
模型會以表格形式,輸出提示詞中的問題及對應的答案,並附上 5 個標記。
點選「Check my progress」,確認目標已達成。
已開發「Video Playground」和「Video tags」分頁。
工作 8:生成影片重點
在這項工作中,您會使用 Gemini 2.0 Flash 模型,根據影片內容生成重點,擷取出與片中物品、人物和情境相關的資訊。
更新「Video Playground」分頁 - 影片重點
測試應用程式 -「Video Playground」-「Video highlights」分頁
-
請重新整理應用程式的瀏覽器分頁或視窗,以重新載入及查看更新後的應用程式 UI。
-
依序點選「Video Playground」和「Video highlights」。
-
分頁會顯示用於提示模型的影片。點選即可播放影片。
-
點選「Generate video highlights」。
-
查看模型的回覆。
模型會針對提示詞中的問題提供答案,列出影片內容的特點,例如女生的職業及使用的手機功能,並簡單描述片中場景。
點選「Check my progress」,確認目標已達成。
已開發「Video Playground」和「Video highlights」分頁。
工作 9:生成影片地理位置
在這項工作中,您會使用 Gemini 2.0 Flash 模型判斷影片場景的拍攝地點。
更新「Video Playground」分頁 - 影片地理位置
測試應用程式 -「Video Playground」-「Video geolocation」分頁
-
請重新整理應用程式的瀏覽器分頁或視窗,以重新載入及查看更新後的應用程式 UI。
-
依序點選「Video Playground」和「Video geolocation」。
-
分頁會顯示用於提示模型的影片。點選即可播放影片。
-
點選「Generate」。
-
查看模型的回覆。
模型會針對提示詞中的問題提供答案,並按照要求提供地點資訊。
點選「Check my progress」,確認目標已達成。
已開發「Video Playground」和「Video geolocation」分頁。
工作 10:生成圖像園地
在這項工作中,您會使用 Gemini 2.0 Flash 模型處理圖像,並根據提供給模型的圖像生成建議及相關資訊。
開發第 4 個分頁 -「Image Playground」
在這項子工作中,您會實作「Image Playground」分頁的程式碼,以及與模型互動的程式碼,根據圖像生成建議。
-
執行下列指令來編寫程式碼,在應用程式 UI 轉譯「Image Playground」分頁:
cat > ~/gemini-app/app_tab4.py <<EOF
import streamlit as st
from vertexai.preview.generative_models import GenerativeModel, Part
from response_utils import *
import logging
# render the Image Playground tab with multiple child tabs
def render_image_playground_tab(multimodal_model: GenerativeModel):
recommendations, screens, diagrams, equations = st.tabs(["Furniture recommendation", "Oven instructions", "ER diagrams", "Math reasoning"])
with recommendations:
room_image_uri = "gs://cloud-training/OCBL447/gemini-app/images/living_room.jpeg"
chair_1_image_uri = "gs://cloud-training/OCBL447/gemini-app/images/chair1.jpeg"
chair_2_image_uri = "gs://cloud-training/OCBL447/gemini-app/images/chair2.jpeg"
chair_3_image_uri = "gs://cloud-training/OCBL447/gemini-app/images/chair3.jpeg"
chair_4_image_uri = "gs://cloud-training/OCBL447/gemini-app/images/chair4.jpeg"
room_image_url = "https://storage.googleapis.com/"+room_image_uri.split("gs://")[1]
chair_1_image_url = "https://storage.googleapis.com/"+chair_1_image_uri.split("gs://")[1]
chair_2_image_url = "https://storage.googleapis.com/"+chair_2_image_uri.split("gs://")[1]
chair_3_image_url = "https://storage.googleapis.com/"+chair_3_image_uri.split("gs://")[1]
chair_4_image_url = "https://storage.googleapis.com/"+chair_4_image_uri.split("gs://")[1]
room_image = Part.from_uri(room_image_uri, mime_type="image/jpeg")
chair_1_image = Part.from_uri(chair_1_image_uri,mime_type="image/jpeg")
chair_2_image = Part.from_uri(chair_2_image_uri,mime_type="image/jpeg")
chair_3_image = Part.from_uri(chair_3_image_uri,mime_type="image/jpeg")
chair_4_image = Part.from_uri(chair_4_image_uri,mime_type="image/jpeg")
st.image(room_image_url,width=350, caption="Image of a living room")
st.image([chair_1_image_url,chair_2_image_url,chair_3_image_url,chair_4_image_url],width=200, caption=["Chair 1","Chair 2","Chair 3","Chair 4"])
st.write("Our expectation: Recommend a chair that would complement the given image of a living room.")
prompt_list = ["Consider the following chairs:",
"chair 1:", chair_1_image,
"chair 2:", chair_2_image,
"chair 3:", chair_3_image, "and",
"chair 4:", chair_4_image, "\n"
"For each chair, explain why it would be suitable or not suitable for the following room:",
room_image,
"Only recommend for the room provided and not other rooms. Provide your recommendation in a table format with chair name and reason as columns.",
]
tab1, tab2 = st.tabs(["Response", "Prompt"])
generate_image_description = st.button("Generate recommendation", key="generate_image_description")
with tab1:
if generate_image_description and prompt_list:
with st.spinner("Generating recommendation using Gemini..."):
response = get_gemini_vision_response(multimodal_model, prompt_list)
st.markdown(response)
logging.info(response)
with tab2:
st.write("Prompt used:")
st.text(prompt_list)
EOF
-
查看 app_tab4.py 檔案內容:
cat ~/gemini-app/app_tab4.py
render_image_playground_tab 函式建構的 UI,能讓應用程式使用者與 Gemini 模型互動。該函式會在 UI 建立一系列分頁:「Furniture recommendation」、「Oven instructions」、「ER diagrams」和「Math reasoning」。您會在本實驗室的子工作中,為其餘分頁編寫程式碼。
在「Furniture recommendation」分頁中,程式碼會將客廳場景和一組椅子圖像提供給模型,供模型解讀影像並推薦可搭配該客廳場景的椅子。

程式碼會使用多個文字提示詞及客廳和椅子圖片,並以清單提供給模型。系統會使用 Part 類別,從託管於 Cloud Storage bucket 的多部分內容 URI 取得圖像。提示詞也會指定模型以表格形式輸出內容,並附上推薦理由。
修改應用程式主要進入點
測試應用程式 -「Image Playground」分頁
-
請重新整理應用程式的瀏覽器分頁或視窗,以重新載入及查看更新後的應用程式 UI。
-
依序點選「Image Playground」和「Furniture recommendation」。
分頁會顯示「客廳」和「椅子」的圖片。
-
點選「Generate recommendation」。
如果發生以下錯誤:google.api_core.exceptions.FailedPrecondition: 400 Service agents are being provisioned (https://cloud.google.com/vertex-ai/docs/general/access-control#service-agents). Service agents are needed to read the Cloud Storage file provided. So please try again in a few minutes.,請稍候幾分鐘,然後再次點選「Generate recommendation」。
-
查看模型的回覆。
模型會依提示詞的要求以表格形式提供回覆,推薦四張椅子中的其中兩張,並附上理由。
點選「Check my progress」,確認目標已達成。
已開發應用程式「Image Playground」和「Furniture recommendation」分頁。
工作 11:分析圖像版面配置
在這項工作中,您會使用 Gemini 2.0 Flash 模型分析圖像中的圖示和文字配置,並擷取相關資訊。
更新「Image Playground」分頁 - 烤箱操作說明
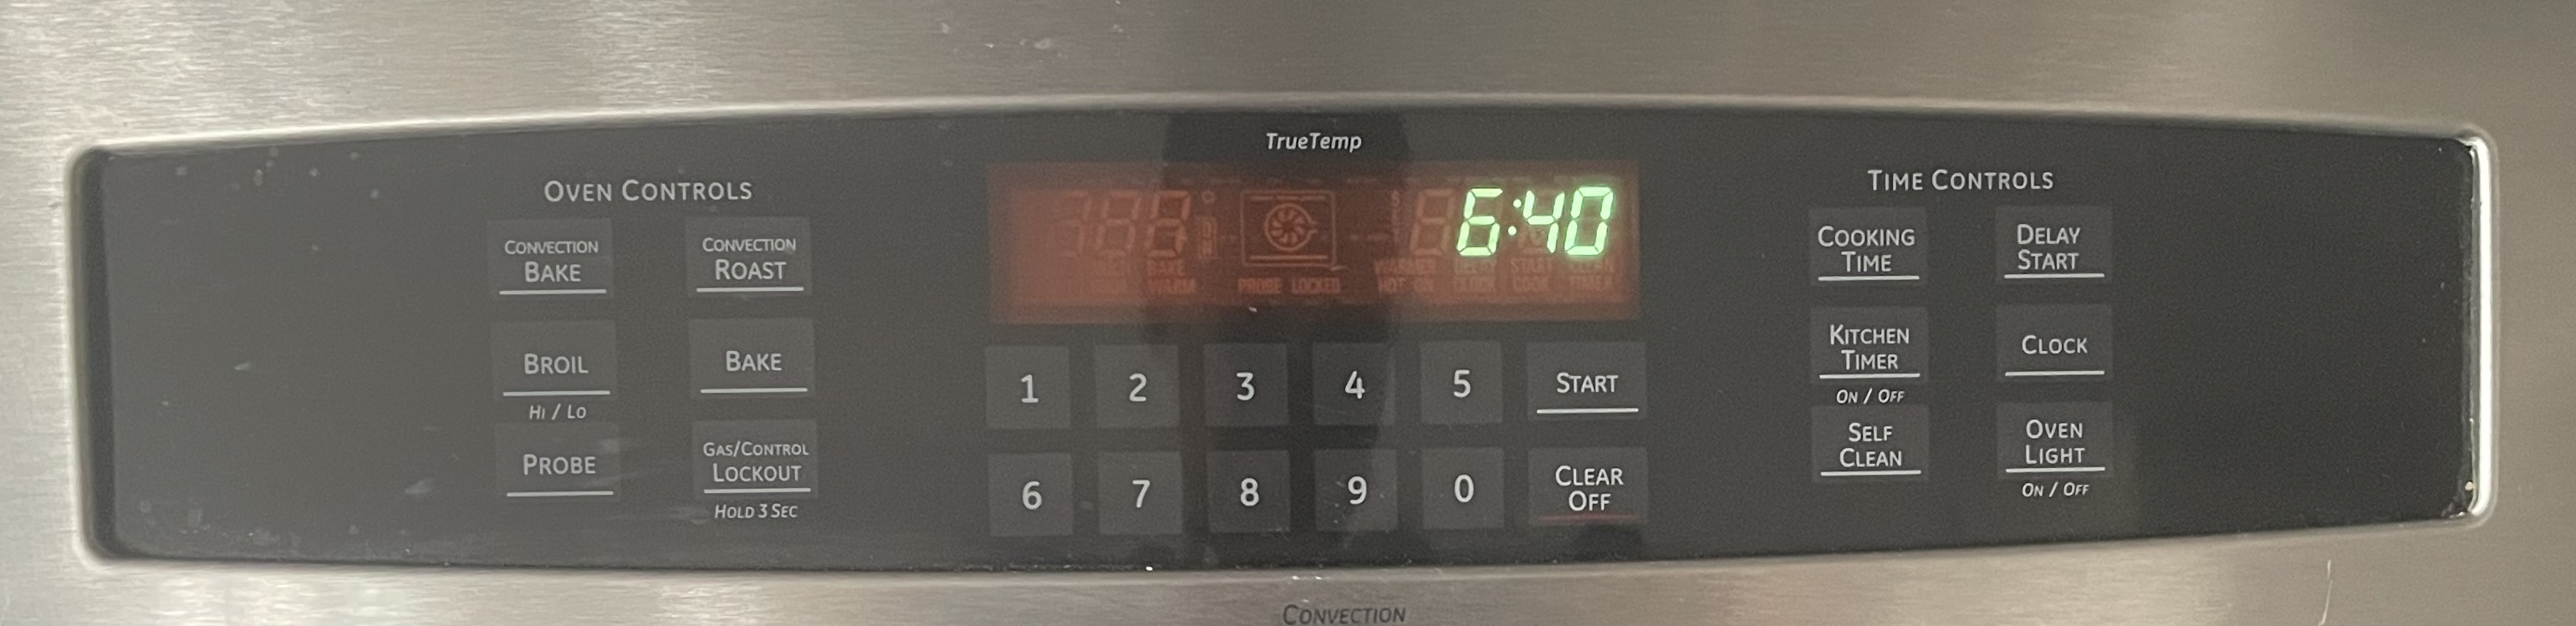
Gemini 能夠從畫面上的圖像元素擷取資訊,分析螢幕截圖、圖示及配置來全面解讀描繪的場景。在這項工作中,您會提供廚房烤箱控制面板的圖片給模型,並提示模型生成特定功能的操作說明。
測試應用程式 -「Image playground」-「Oven instructions」分頁
-
請重新整理應用程式的瀏覽器分頁或視窗,以重新載入及查看更新後的應用程式 UI。
-
依序點選「Image Playground」和「Oven instructions」。
分頁會顯示烤箱控制面板的圖片。
-
點選「Generate instructions」。
-
查看模型的回覆。
回覆包含在烤箱控制面板上重設時鐘的步驟,以及按鈕的位置指示,展現模型分析圖像中面板配置的能力。
點選「Check my progress」,確認目標已達成。
已開發「Image Playground」和「Oven instructions」分頁。
工作 12:分析實體關係圖
Gemini 具備多模態功能,因此能解讀圖表並採取可行步驟,例如生成文件或程式碼。在這項工作中,您會使用 Gemini 2.0 Flash 模型分析實體關係圖,並根據圖表中的實體與關係生成說明文件。
更新「Image Playground」分頁 - 實體關係圖
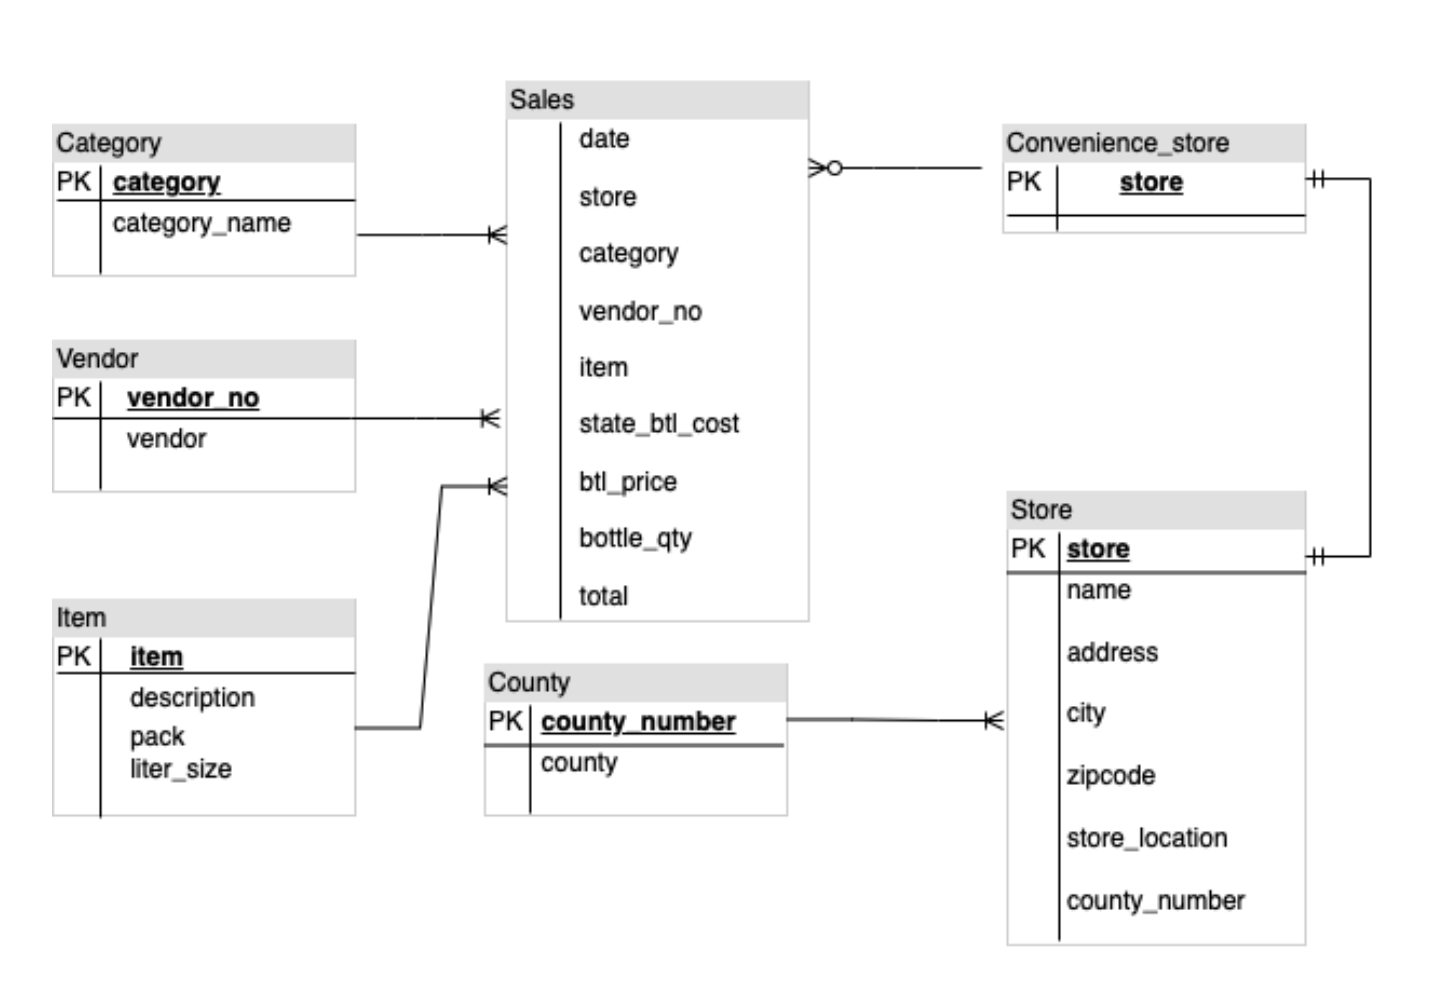
在這項工作中,您會提供實體關係圖表的圖片給模型,並提示模型生成說明文件。
測試應用程式 -「Image Playground」-「ER diagrams」分頁
-
請重新整理應用程式的瀏覽器分頁或視窗,以重新載入及查看更新後的應用程式 UI。
-
依序點選「Image Playground」和「ER diagrams」。
分頁會顯示實體關係圖表的圖片。
-
點選「Generate documentation」。
-
查看模型的回覆。
回覆會列出圖表中的實體,以及實體之間的關係。
點選「Check my progress」,確認目標已達成。
已開發「Image Playground」和「ER diagrams」分頁。
工作 13:數學推論
Gemini 2.0 Flash 也能辨識數學公式和方程式,並從中擷取特定資訊,特別適合用來生成數學題的解題說明。
更新「Image Playground」分頁 - 數學推論
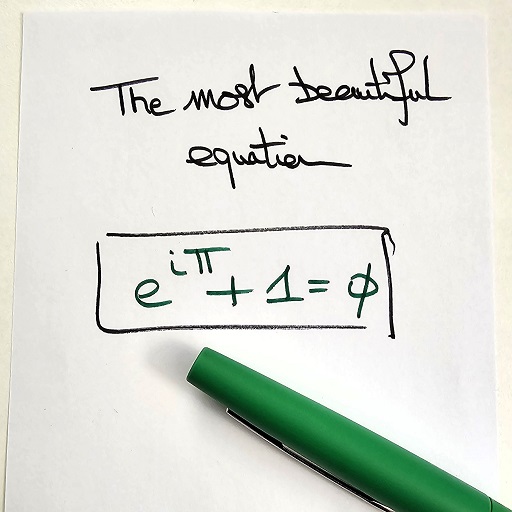
在這項工作中,您會使用 Gemini 2.0 Flash 模型,從圖像中擷取數學公式並加以解讀。
測試應用程式 -「Image Playground」-「Math reasoning」分頁
-
請重新整理應用程式的瀏覽器分頁或視窗,以重新載入及查看更新後的應用程式 UI。
-
依序點選「Image Playground」和「Math reasoning」。
分頁會顯示含有數學方程式的圖片。
-
點選「Generate answers」。
-
查看模型的回覆。
模型會針對提示詞中的問題,提供對應的答案。
-
前往原本的 Cloud Shell 視窗,按下 Ctrl + C 結束應用程式並返回命令提示字元。
點選「Check my progress」,確認目標已達成。
已開發「Image Playground」和「Math reasoning」分頁。
工作 14:將應用程式部署至 Cloud Run
在本機測試應用程式後,即可部署至 Google Cloud 的 Cloud Run 供其他人使用。Cloud Run 是代管運算平台,能讓您在 Google 可擴充的基礎架構上執行應用程式容器。
設定環境
-
確認您位於 app 目錄:
cd ~/gemini-app
-
確認已設定 PROJECT_ID 和 REGION 環境變數:
echo "PROJECT_ID=${PROJECT_ID}"
echo "REGION=${REGION}"
-
如果尚未設定上述環境變數,請執行下列指令:
PROJECT_ID=$(gcloud config get-value project)
REGION={{{project_0.default_region|set at lab start}}}
echo "PROJECT_ID=${PROJECT_ID}"
echo "REGION=${REGION}"
-
為服務和構件存放區設定環境變數:
SERVICE_NAME='gemini-app-playground' # Name of your Cloud Run service.
AR_REPO='gemini-app-repo' # Name of your repository in Artifact Registry that stores your application container image.
echo "SERVICE_NAME=${SERVICE_NAME}"
echo "AR_REPO=${AR_REPO}"
建立 Docker 存放區
-
執行下列指令,在 Artifact Registry 建立存放區:
gcloud artifacts repositories create "$AR_REPO" --location="$REGION" --repository-format=Docker
Artifact Registry 是 Google Cloud 服務,可讓您在同一位置儲存及管理軟體套件和 Docker 容器映像檔。
-
設定存放區驗證機制:
gcloud auth configure-docker "$REGION-docker.pkg.dev"
建構容器映像檔
我們會使用 Dockerfile 為應用程式建構容器映像檔。Dockerfile 是文字文件,包含使用者可透過指令列呼叫來建立容器映像檔的所有指令。這份文件會與 Docker 一起使用,Docker 是建構與執行容器映像檔的容器平台。
-
執行下列指令,建立 Dockerfile:
cat > ~/gemini-app/Dockerfile <<EOF
FROM python:3.8
EXPOSE 8080
WORKDIR /app
COPY . ./
RUN pip install -r requirements.txt
ENTRYPOINT ["streamlit", "run", "app.py", "--server.port=8080", "--server.address=0.0.0.0"]
EOF
-
執行下列指令,為應用程式建構容器映像檔:
gcloud builds submit --tag "$REGION-docker.pkg.dev/$PROJECT_ID/$AR_REPO/$SERVICE_NAME"
gcloud builds submit 指令會提交使用 Cloud Build 執行的建構作業。與 tag 旗標搭配使用時,Cloud Build 會用運 Dockerfile,透過來源目錄中的應用程式檔案建構容器映像檔。Cloud Build 服務可在 Google Cloud 根據規格執行建構作業,並產生 Docker 容器或 Java 封存檔等構件。
請等指令完成再繼續下一個步驟。
在 Cloud Run 部署和測試應用程式
最後一項工作是將服務部署至 Cloud Run,連同建構完成並推送至 Artifact Registry 存放區的映像檔。
-
執行下列指令,將應用程式部署至 Cloud Run:
gcloud run deploy "$SERVICE_NAME" \
--port=8080 \
--image="$REGION-docker.pkg.dev/$PROJECT_ID/$AR_REPO/$SERVICE_NAME" \
--allow-unauthenticated \
--region=$REGION \
--platform=managed \
--project=$PROJECT_ID \
--set-env-vars=PROJECT_ID=$PROJECT_ID,REGION=$REGION
-
部署服務後,上一個指令的輸出內容會包含服務的網址。如要在 Cloud Run 上測試應用程式,請在不同的瀏覽器分頁或視窗中前往該網址。
-
選擇要測試的應用程式功能。應用程式會提示 Vertex AI Gemini API 生成並顯示回覆。
點選「Check my progress」,確認目標已達成。
應用程式已部署至 Cloud Run。
關閉研究室
完成實驗室後,請按一下「End Lab」。Google Skills 會移除您使用的資源,並清除所用帳戶。
您可以為實驗室的使用體驗評分。請選取合適的星級評等並提供意見,然後按一下「Submit」。
星級評等代表您的滿意程度:
- 1 星 = 非常不滿意
- 2 星 = 不滿意
- 3 星 = 普通
- 4 星 = 滿意
- 5 星 = 非常滿意
如果不想提供意見回饋,您可以直接關閉對話方塊。
如有任何想法、建議或指教,請透過「Support」分頁提交。
恭喜!
在本實驗室中,您完成了下列工作:
- 運用 Streamlit 框架開發 Python 應用程式。
- 安裝 Vertex AI SDK for Python。
- 使用 Vertex AI Gemini API 開發程式碼,用來與 Gemini 2.0 Flash 模型互動。
- 透過文字提示詞生成故事和行銷廣告活動。
- 提供文字、圖像及影片,並請模型處理並擷取圖像和影片中的資訊。
- 在 Cloud Run 部署和測試應用程式。
後續步驟/瞭解詳情
Copyright 2026 Google LLC 保留所有權利。Google 和 Google 標誌是 Google LLC 的商標,其他公司和產品名稱則有可能是其關聯公司的商標。