GSP1154

Overview
Agent Platform is a comprehensive machine learning development platform that provides both predictive and generative AI capabilities. It allows you to train, evaluate, and deploy predictive machine learning models for forecasting purposes. Additionally, you can utilize the platform to discover, tune, and serve generative AI models to produce content. For instance, insurance companies constantly seek to improve efficiency in areas like claims processing and risk assessment. Agent Studio offers a powerful way to rapidly prototype generative AI solutions for such challenges.
Agent Studio lets you quickly test and customize generative AI models so you can leverage their capabilities in your applications. It provides a variety of tools and resources, including an intuitive user interface (UI), that make it easy to start with generative AI, even if you don't have an extensive background in machine learning.
This lab guides you through Agent Studio, where you'll unlock the potential of cutting-edge generative AI models like Gemini. You will step into the role of helping an insurance company prototype a risk analysis assistant. You'll learn how to take a prompt idea towards a deployable application, design sophisticated prompts to achieve specific generative outcomes, and use multimodal capabilities to analyze various types of data, including images—all directly in the Google Cloud console. No need for APIs or Python SDKs for these core tasks.
Objectives
In this lab, you learn how to:
- Create applications from prompts.
- Design effective prompts.
- Engineer and manage prompts.
- Use multimodal prompts.
Setup and requirements
Before you click the Start Lab button
Read these instructions. Labs are timed and you cannot pause them. The timer, which starts when you click Start Lab, shows how long Google Cloud resources are made available to you.
This hands-on lab lets you do the lab activities in a real cloud environment, not in a simulation or demo environment. It does so by giving you new, temporary credentials you use to sign in and access Google Cloud for the duration of the lab.
To complete this lab, you need:
- Access to a standard internet browser (Chrome browser recommended).
Note: Use an Incognito (recommended) or private browser window to run this lab. This prevents conflicts between your personal account and the student account, which may cause extra charges incurred to your personal account.
- Time to complete the lab—remember, once you start, you cannot pause a lab.
Note: Use only the student account for this lab. If you use a different Google Cloud account, you may incur charges to that account.
How to start your lab and sign in to the Google Cloud console
-
Click the Start Lab button. If you need to pay for the lab, a dialog opens for you to select your payment method.
On the left is the Lab Details pane with the following:
- The Open Google Cloud console button
- Time remaining
- The temporary credentials that you must use for this lab
- Other information, if needed, to step through this lab
-
Click Open Google Cloud console (or right-click and select Open Link in Incognito Window if you are running the Chrome browser).
The lab spins up resources, and then opens another tab that shows the Sign in page.
Tip: Arrange the tabs in separate windows, side-by-side.
Note: If you see the Choose an account dialog, click Use Another Account.
-
If necessary, copy the Username below and paste it into the Sign in dialog.
{{{user_0.username | "Username"}}}
You can also find the Username in the Lab Details pane.
-
Click Next.
-
Copy the Password below and paste it into the Welcome dialog.
{{{user_0.password | "Password"}}}
You can also find the Password in the Lab Details pane.
-
Click Next.
Important: You must use the credentials the lab provides you. Do not use your Google Cloud account credentials.
Note: Using your own Google Cloud account for this lab may incur extra charges.
-
Click through the subsequent pages:
- Accept the terms and conditions.
- Do not add recovery options or two-factor authentication (because this is a temporary account).
- Do not sign up for free trials.
After a few moments, the Google Cloud console opens in this tab.
Note: To access Google Cloud products and services, click the Navigation menu or type the service or product name in the Search field.

Task 1. Create applications from prompts
In this task, you'll see how quickly you can take an idea for a generative AI assistant and turn it into a working prototype using Agent Studio. You'll focus on our insurance use case: creating a prompt that helps an insurance professional summarize client information for a risk analysis report and then prepare this prompt as a simple application.
-
In the Google Cloud console, from the Navigation menu ( ), select Agent Platform > Studio.
-
On the top left, select + New > Chat. The prompt editor page opens.
The UI contains three main sections:
-
System instructions: a set of instructions that the model processes before it processes prompts. When a system instruction is set, it applies to the entire request. It works across multiple user and model turns when included in the prompt.
-
Model settings: This section allows you to select models (including 3rd party models), configure parameters, use Tools (such as grounding), and set advanced options.
-
Prompt: This section is where you draft your prompt that can utilize multimodal capabilities.
-
On the top right, click Untitled Prompt and rename your prompt to Insurance Risk Summary - Prototype.
-
In the System instructions box, enter the following to give your AI assistant a role relevant to our insurance scenario:
You are an expert AI assistant for an insurance underwriting department.
Your primary goal is to help underwriters by accurately and concisely summarizing client information and highlighting potential risk factors.
Maintain a professional and objective tone.
Focus only on the information provided in the prompt. Do not invent details.
-
In the main prompt area, paste the following:
Customer Notes for 'SafeHarbor Warehousing':
"The applicant is seeking coverage for their 50,000 sq ft warehouse. The business is 5 years old. The building is a concrete tilt-up structure, originally built in 2010. They store a variety of non-hazardous dry goods.
Fire safety measures include a full sprinkler system, a centrally monitored fire alarm, and documented annual inspections by a certified third party.
Security measures include a 24/7 centrally monitored burglar alarm, comprehensive security camera coverage of the interior and exterior, a fully fenced perimeter, and nightly patrols by a contracted security guard service.
The company reports no major property or liability losses in their 5-year history. They have specifically asked to ensure their new automated shelving and retrieval system, installed last month, is adequately covered under the policy."
Your Task:
1. Briefly summarize the key details of the 'SafeHarbor Warehousing' business and its existing safety measures.
2. Based *only* on the notes provided, identify any immediate questions an underwriter should ask or potential risk factors they should consider further.
Present the summary first, then the questions/risk factors as bullet points.
-
Click on the Model settings:
- Ensure the model is selected. You can click on the Model > Gemini > to change it.
- If not already set, select Global for Region.
-
Click the Submit (Enter) arrow button or press ENTER. Review the model's response.
Note: If you encounter a "429 Quota Exhausted" error, please wait for a minute and rerun the prompt.
-
On the top right, next to your prompt name, click the Save button.
-
In the Save prompt dialog, confirm the Region is correct () and click Save.
Note: it may take a few minutes for your first prompt to save.
-
Once your prompt has been saved, you'll explore how this drafted prompt can be turned into a prototype application.
-
At the top right menu that appears, click Deploy icon > Cloud Run > Deploy as app.
-
In the "Create a web app from the current prompt" dialog that appears:
- Check the Acknowledgement for publicly deploying your app.
- Click Create App.
-
The deployment process will begin and might take a few minutes. You may see status updates in the UI that resemble the following:
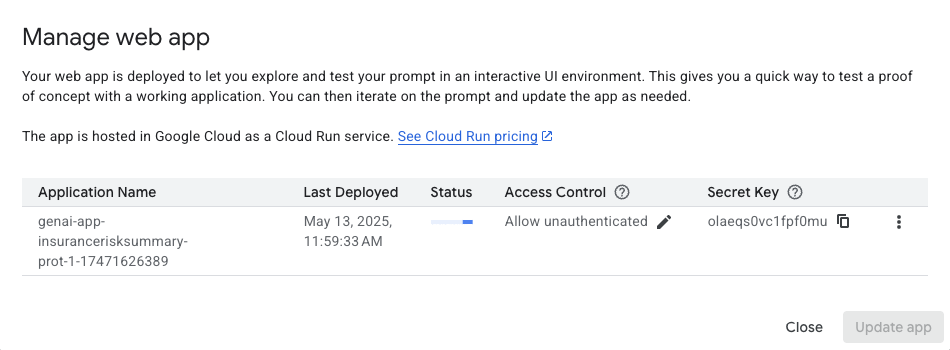
Note: The deployment process may occasionally fail on the first attempt. This typically happens if the underlying permissions for the build service have not fully propagated when the deployment starts. If you see a "Failed" status in the Manage web app dialog, please follow these steps to retry:
- Wait for approximately one minute to allow all services and permissions to initialize.
- In the "Manage web app" dialog, click the Update app button.
- A confirmation box will appear. Click Confirm to start the update process.
-
Once completed, click the Close button in the Manage web app box.
-
To open your newly deployed application, select Deploy > Cloud Run > Open app.
-
You should now see a page titled Welcome to Agent Platform Gen AI App! with your prompt title, Insurance Risk Summary - Prototype, displayed.
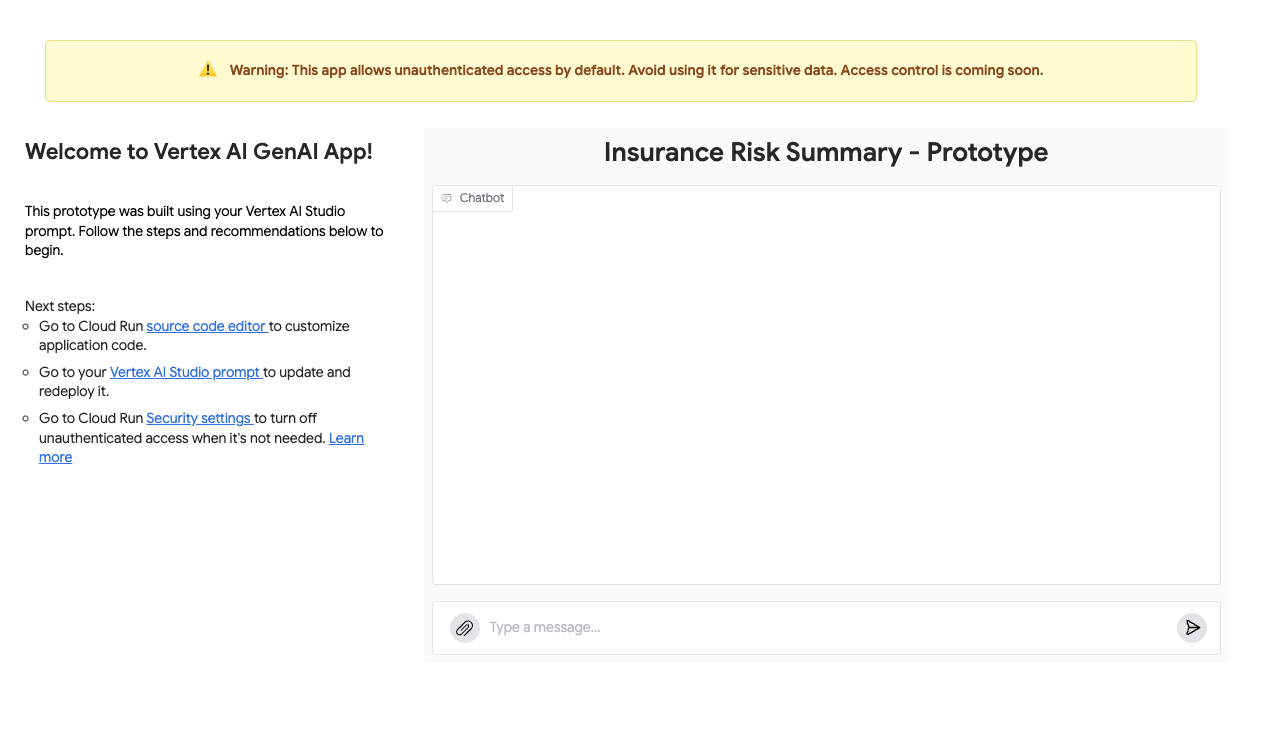
-
In the Chatbot section, in the "Type a message..." input field at the bottom, enter a new test message. For example:
New Customer Inquiry:
"Applicant 'Coastal Goods Delivery' has a fleet of 10 delivery vans, all equipped with GPS and telematics. They operate within a 100-mile radius of their depot. Drivers undergo annual safety training. They had one minor fender bender last year, no injuries, $1500 damages. What are the primary risk considerations?"
Please summarize key points and identify potential risks.
-
Click the submit arrow button to send your message to the application.
-
Observe the response from your deployed app. It should process your input based on the logic and system instructions you defined in Agent Studio.
Note: As indicated by the warning on the app page, this application allows unauthenticated access by default. In a production scenario, you would configure appropriate security settings. For this lab, the default is fine for exploration.
- You have now completed the full cycle:
- Designed a prompt in Agent Studio.
- Deployed it as a serverless application using Cloud Run with a few clicks.
- Directly opened and interacted with your generative AI model through a web interface.
This demonstrates the power of Agent Studio for rapid prototyping and deployment of generative AI capabilities.
Click Check my progress to verify the objectives.
Create a prompt application with Agent Studio.
Task 2. Design effective prompts
In Task 1, you prototyped an initial prompt. Now, you'll dive deeper into refining prompts to get more precise, controlled, and useful outputs from the generative models. This is a core skill in prompt engineering. You will continue with your insurance theme by trying to extract specific information from a claims document or improving the summarization quality.
For more information on types of prompts, check out this guide.
Zero-shot prompting
You'll start by creating a new prompt to explore detailed prompt design.
- Ensure you are in the main Agent Studio area. If you were viewing your deployed app from Task 1, close that browser tab to return to the Google Cloud console.
Note: If prompted, Exit without saving then click Continue.
-
On the top left, select New Chat. This will bring you to a new prompt editor page.
-
On the top right, click Untitled Prompt and rename it Insurance Claim Data Extraction.
-
Familiarize yourself with the scenario for this section: An insurance adjuster often receives unstructured notes or emails about a new claim and needs to quickly extract key pieces of information to enter into their claims management system.
-
In the System instructions box, enter the following:
You are an AI assistant specializing in parsing and extracting specific data points from unstructured insurance claim notifications.
Your goal is to identify and list key information accurately.
If a piece of information is not found, clearly state "Not found".
Output the extracted information in a key: value format, with each key on a new line.
-
In the main prompt area, paste the following example of an unstructured claim note:
Claim Notification Received:
"Hi team, just got a call from Mrs. Eleanor Vance, policy #POL458892. She reported a kitchen fire that occurred on May 12th, 2025, around 3 PM. The main damage seems to be to the oven and surrounding cabinets. She mentioned smoke damage in the kitchen and dining area too. She thinks the total damage might be around $7,500. Her contact is 555-0123. No injuries reported, thankfully."
Extract the following:
- Policy Number
- Claimant Name
- Date of Loss
- Time of Loss
- Type of Loss
- Brief Description of Damage
- Estimated Loss Amount
- Injuries Reported
-
Click on the Model settings:
- Ensure the model is selected.
- Set Temperature to
0.1 (for more factual, less creative extraction).
- Set Output token limit to a reasonable number, like
1024.
- Ensure the Region is Global.
-
Click the Submit (Enter) arrow button. Review the output. This first attempt without explicit examples is called zero-shot prompting.
Few-Shot prompting
Often, providing a few examples (few-shot prompting) can significantly improve the model's performance, especially for specific formatting or nuanced extraction.
-
On the top left, select New Chat.
-
On the bottom of the Prompt section, click the + button.
-
From the pop-up menu, select Example.
This will open a new window where you can add examples for the prompt.
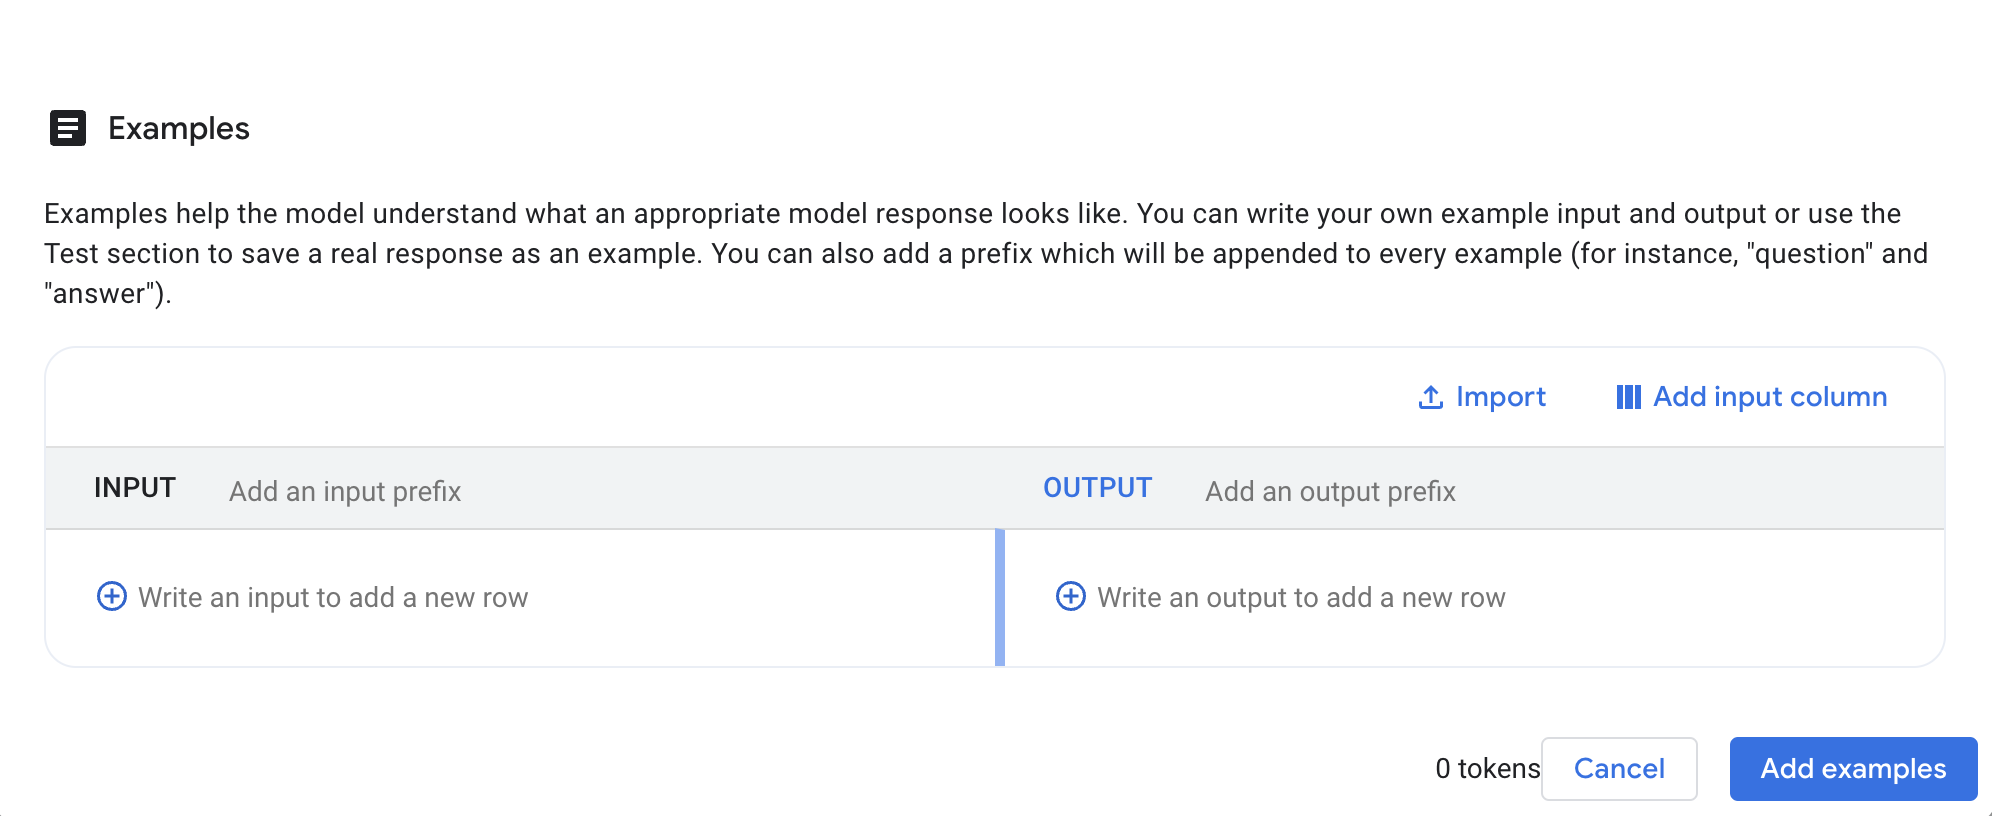
-
In the "Examples" interface that appears:
- For the INPUT of your first example, paste the following unstructured note:
Claim Notification Received:
"Email from John Sterling (policy POL77521) re: water damage at his shop. Happened sometime last night, May 10th, 2025. A pipe burst in the ceiling. Stockroom is flooded, some damage to inventory. He's not sure on the cost yet, maybe $5k-$10k? No one was there, so no injuries."
Extract the following:
- Policy Number
- Claimant Name
- Date of Loss
- Time of Loss
- Type of Loss
- Brief Description of Damage
- Estimated Loss Amount
- Injuries Reported
- For the OUTPUT of your first example, paste the following perfectly formatted extraction:
Policy Number: POL77521
Claimant Name: John Sterling
Date of Loss: May 10th, 2025
Time of Loss: Night
Type of Loss: Water damage
Brief Description of Damage: Pipe burst in ceiling, stockroom flooded, some damage to inventory.
Estimated Loss Amount: $5,000 - $10,000
Injuries Reported: No
- Click the Add examples button to save this example and return to the main prompt.
-
Re-add System Instructions: Since clearing the prompt also cleared the system instructions, paste them again into the System instructions box:
You are an AI assistant specializing in parsing and extracting specific data points from unstructured insurance claim notifications.
Your goal is to identify and list key information accurately.
If a piece of information is not found, clearly state "Not found".
Output the extracted information in a key: value format, with each key on a new line.
-
Provide the New Input and the Prompt:
- In the area labeled
{Input} Write value here, paste the original claim notification for Eleanor Vance that you want the model to process now:
Claim Notification Received:
"Hi team, just got a call from Mrs. Eleanor Vance, policy #POL458892. She reported a kitchen fire that occurred on May 12th, 2025, around 3 PM. The main damage seems to be to the oven and surrounding cabinets. She mentioned smoke damage in the kitchen and dining area too. She thinks the total damage might be around $7,500. Her contact is 555-0123. No injuries reported, thankfully."
-
In the area labeled Write a prompt (below the Input field), you need to provide the instruction for the model. This tells the model what to do with the (Input) text, using the Examples as a guide. Enter the following:
Extract the following data points from the provided claim notification:
- Policy Number
- Claimant Name
- Date of Loss
- Time of Loss
- Type of Loss
- Brief Description of Damage
- Estimated Loss Amount
- Injuries Reported
-
Click on the Model settings:
- Ensure the model is selected.
- Set Temperature to
0.1 (for more factual, less creative extraction).
- Set Output token limit to a reasonable number, like
1024.
- Ensure the Region is Global.
-
Click the Submit (Enter) arrow button again. Compare this new output to the previous zero-shot attempt. Note if the accuracy or formatting has improved significantly due to the few-shot example and the structured input method.
Experimenting with prompt configurations
Now, you'll explore how different parameters in the Model settings can affect the model's response. Ensure your "Insurance Claim Data Extraction" prompt with the few-shot example is active.
Note: Your "Insurance Claim Data Extraction" prompt is designed for accuracy and structure. To see parameters like Temperature and Top-P work, it's better to use a creative prompt.
First, create a new prompt to use for these experiments:
-
On the top left, select New Chat.
-
Title the prompt Insurance Story.
-
In the prompt text box, paste the following:
Write the *first paragraph* of a short story about a homeowner who just used a futuristic AI insurance app to file a claim. The claim was for a bizarre and unexpected incident.
Now, you'll experiment with the model settings.
Experiment with model settings
-
Experiment with Temperature:
-
Explanation: Temperature controls randomness. Lower values (e.g., 0.0-0.2) make the output more focused and deterministic. Higher values (e.g., 1.5-2) encourage more diverse or creative responses.
-
Try it: Change Temperature to
1.5. Click Submit (Enter) and note any changes. Then, change Temperature back to 0.1, use the same prompt, and click Submit (Enter) again.
-
Experiment with Output Token Limit:
-
Explanation: This sets the maximum number of tokens (parts of words) the model can generate for its response.
-
Try it: Set Output token limit to a very small number, like
500. Use the same prompt, and click Submit (Enter) and observe the truncated output. Reset it to the max (default) length 65535.
-
Experiment with Top-P:
-
Explanation: Top-P (nucleus sampling) also controls randomness. It considers only the most probable tokens whose combined probability mass exceeds the Top-P value. A value of
1.0 considers all tokens. Lowering Top-P (e.g., to 0.8) makes the output more focused, similar to lowering temperature.
-
Try it: With Temperature at
0.1 (or slightly higher, like 0.5, to better observe Top-P effects), set Top-P to 0.8. Use the same prompt and click Submit (Enter). Then set Top-P to 1.0, use the same prompt and click Submit (Enter), and observe if there are subtle differences.
-
Briefly review other settings in the Advanced Model Settings panel:
-
Safety Filter Settings: These are active by default to help block harmful content. For this lab, you'll use the default settings.
-
Thinking Budget: This parameter guides the model on the number of thinking tokens to use when generating a response. A higher token count generally allows for more detailed reasoning, which can be beneficial for tackling more complex tasks. It defaults to Auto, but can also be set to Off or Manual. When set to Manual, the model stops analyzing after reaching the specified token limit; you can set a lower limit for simpler tasks and a higher limit for more complex ones.
-
Structured output: Forces the model to generate a response that strictly follows a predefined schema (like JSON).
-
Grounding: Google Search: Connects the model to Google Search or Maps, enabling it to answer with real-time, public information.
-
Grounding: Your data: Allows the model to retrieve information from your own data sources (like Agent Platform Search or RAG Engine) to answer context-specific questions.
Click Check my progress to verify the objectives.
Prompt engineering in Agent Studio.
Task 3. Engineer and manage prompts
Once you have a working prompt, you'll often want to experiment with changes to the instructions or model configurations to see if you can improve the response. The "Compare" feature in Agent Studio is designed for this. For this section, you'll use the prompt we just created.
-
On the top left, select New Chat. This will bring you to a new prompt editor page.
-
Name this new prompt Insurance Risk Factor Identification.
-
Set up this simple base prompt:
- In the System instructions box, enter:
You are an insurance risk analyst assistant. Your task is to identify potential risk factors from a given scenario. Be concise.
- In the main prompt area, paste the following:
Scenario:
"The applicant, 'The Fiery Grill,' is a new upscale restaurant specializing in wood-fired oven pizzas and open-flame grilling. They have installed a brand new, custom-built fire suppression system for their cooking area, but it has not yet been certified by a third party. The restaurant plans to feature live acoustic music on weekend evenings and has a small, raised stage area. They also want to offer valet parking."
Based on this scenario, list three primary risk factors an underwriter should consider.
- Click on the Model settings:
- Ensure the model is selected.
- Set Temperature to
0.2.
- Ensure the Region is Global.
-
Click the Submit (Enter) arrow button. Review the model's initial response.
-
If your prompt has not been autosaved, click the Save button.
-
Now, with your Insurance Risk Factor Identification prompt and its response displayed, click the three dots on the top right next to your prompt name, and select Compare.
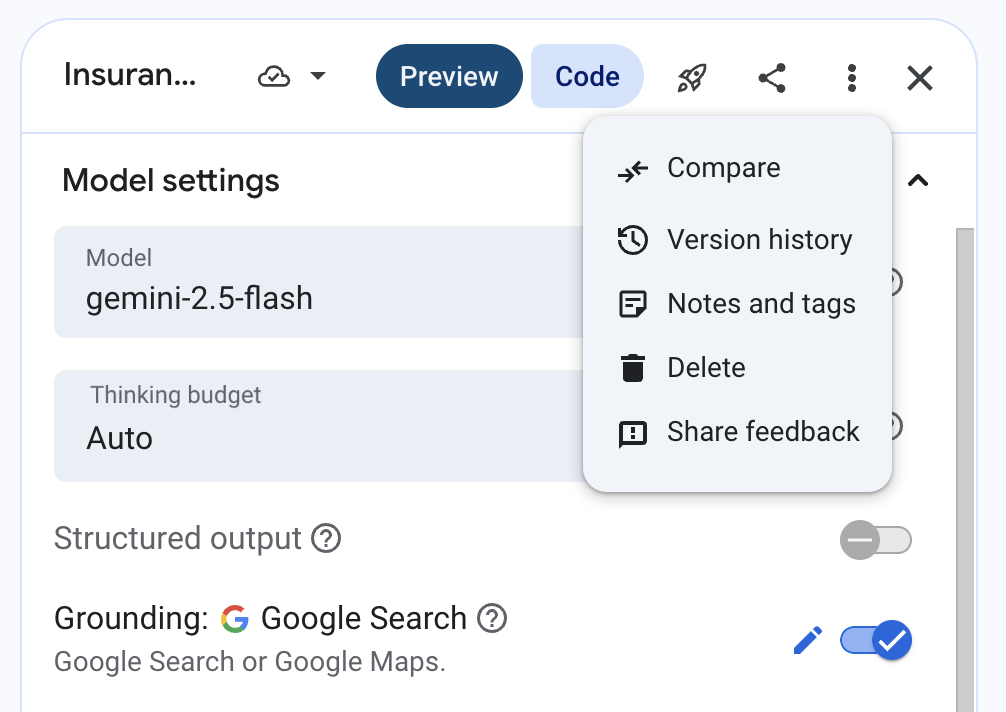
- The Compare interface will open. Your Insurance Risk Factor Identification prompt, its configurations, and its latest response will be duplicated on two sides of the page so you can easily compare different versions with differences in model settings and system instructions.
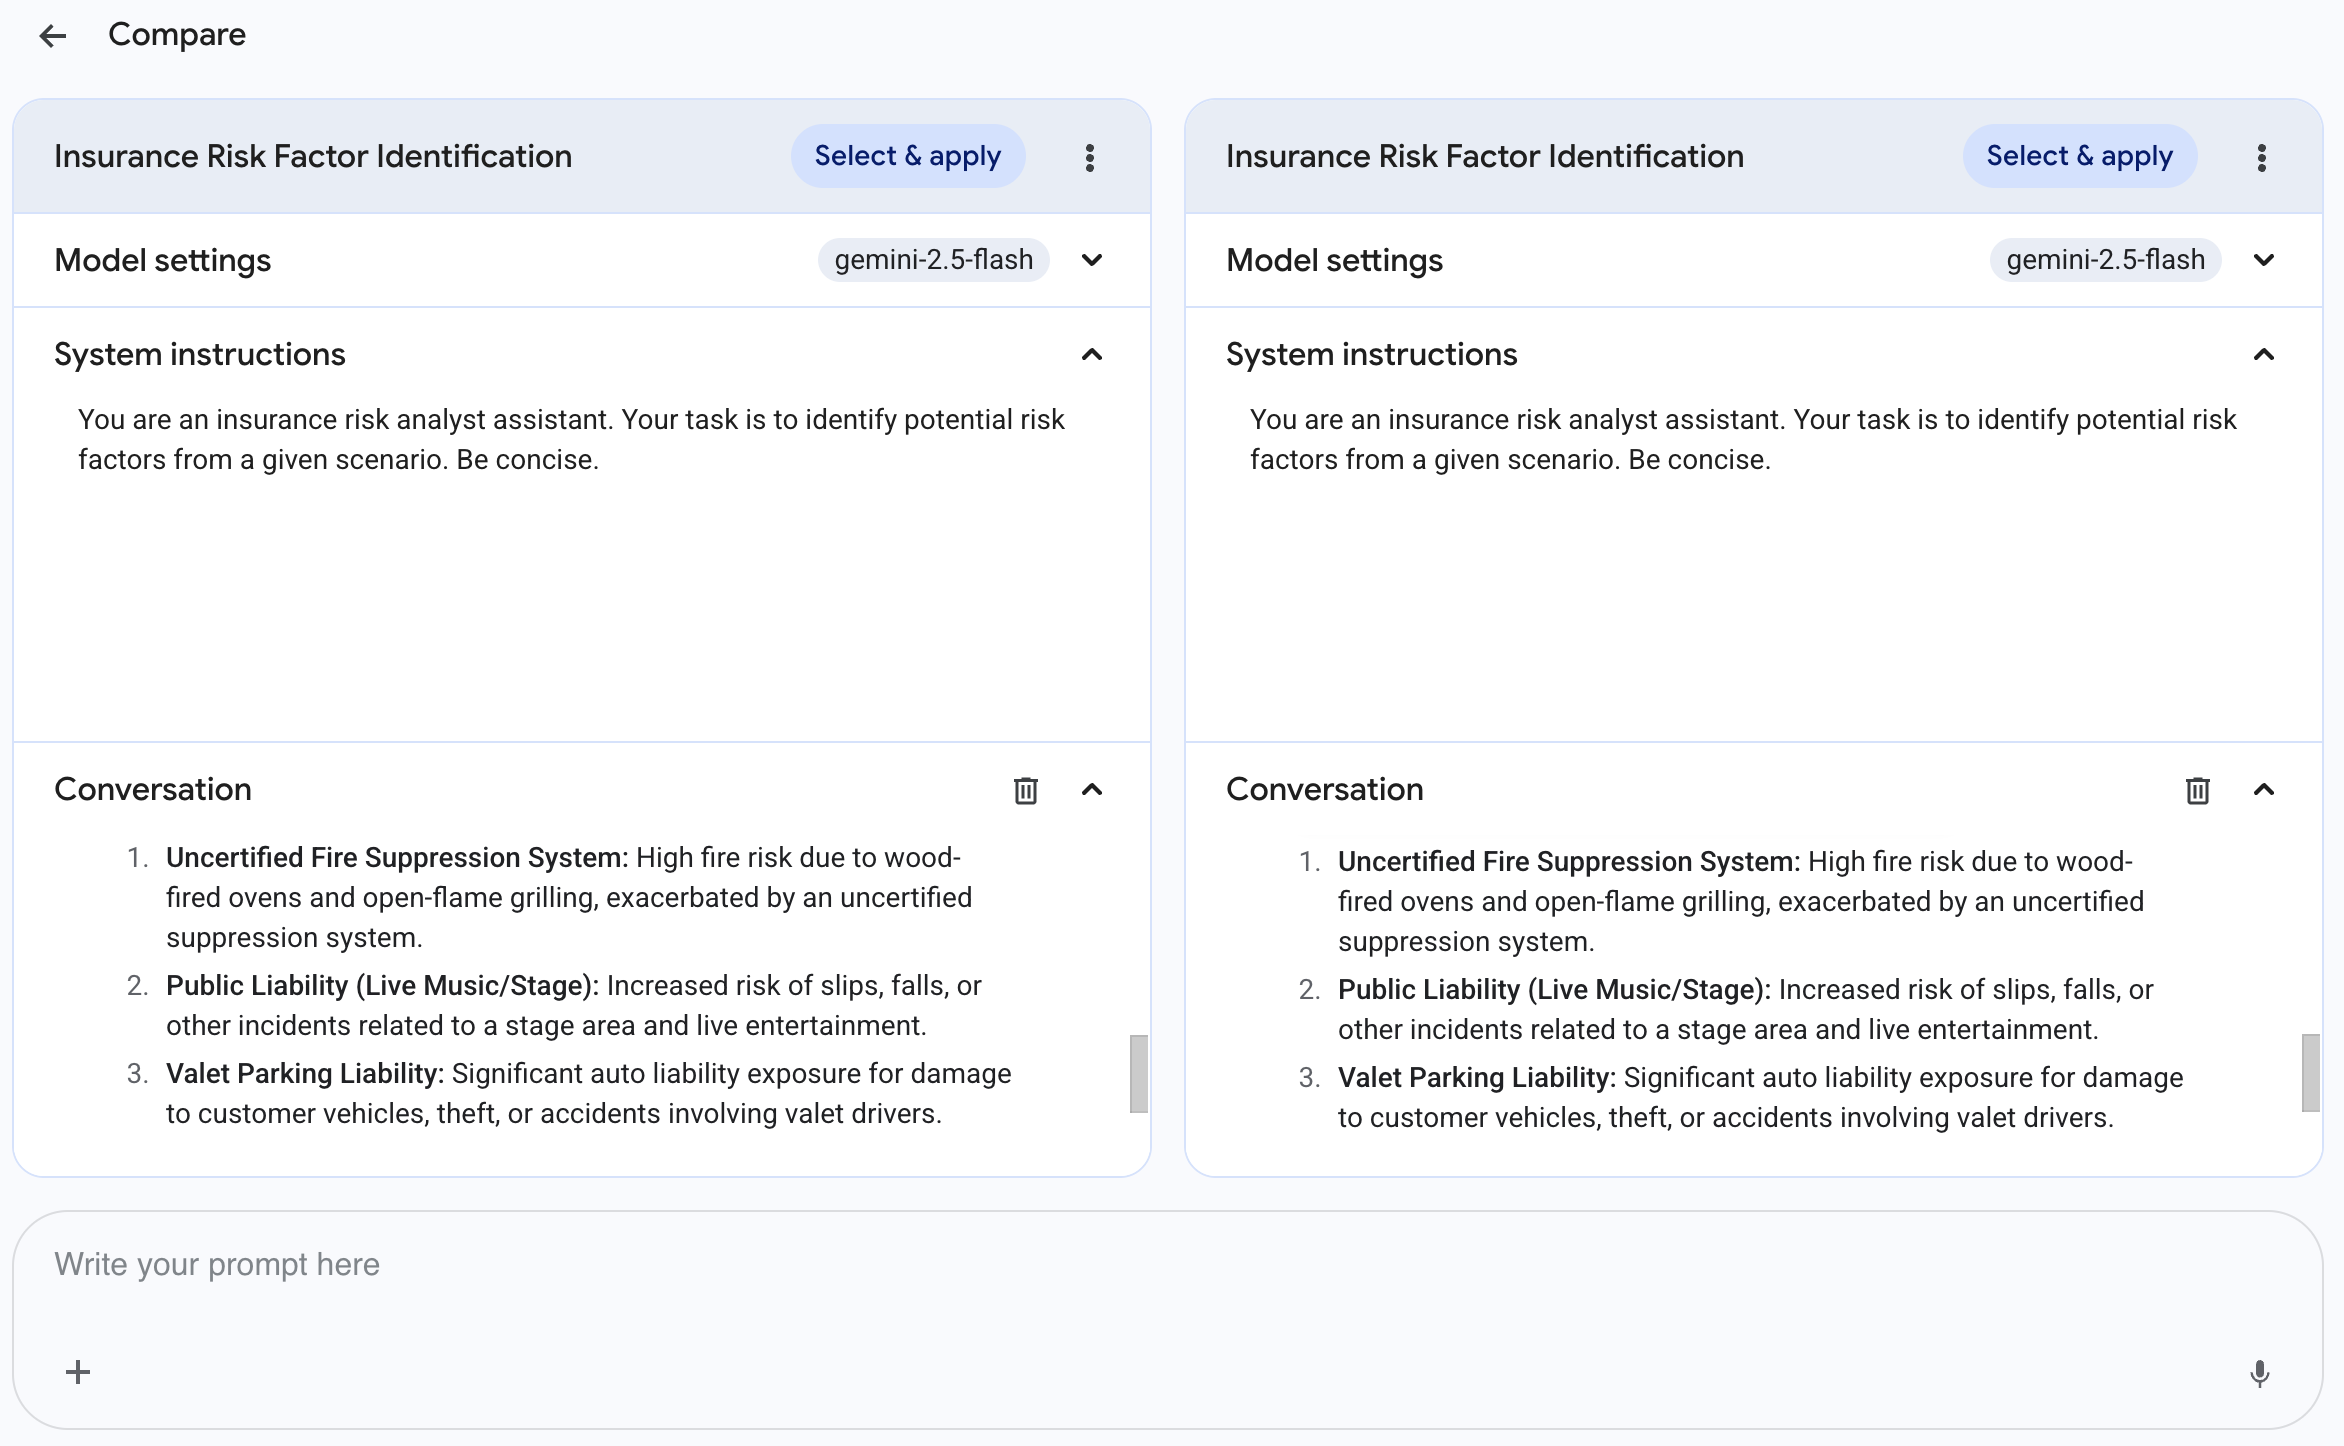
Comparing by modifying system instructions
You'll now see how changing the instructions affects the output for your prompt.
- Inside of the System instructions box (for the prompt on the right side), edit the existing system instructions for the prompt on the right. Update it with the following:
You are an expert insurance risk analyst assistant. Your task is to identify potential risk factors from a given scenario. For each risk factor, also briefly suggest a potential mitigation strategy or question for the underwriter. Be clear and structured.
- Keep the rest of the model settings the same, and submit the following prompt in the box at the bottom of the page:
Scenario:
"The applicant, 'The Fiery Grill,' is a new upscale restaurant specializing in wood-fired oven pizzas and open-flame grilling. They have installed a brand new, custom-built fire suppression system for their cooking area, but it has not yet been certified by a third party. The restaurant plans to feature live acoustic music on weekend evenings and has a small, raised stage area. They also want to offer valet parking."
Based on this scenario, list three primary risk factors an underwriter should consider.
- Wait for both prompts to generate responses. Review the two responses side-by-side. Does the second prompt now include mitigation strategies or questions, due to the modified instructions? Feel free to modify the system instructions further to see how it guides the model responses.
Comparing with a different temperature setting
Now, you'll use the comparison pane to test a different temperature.
- Inside of the System instructions box for the prompt on the right, revert it to be the same as the one on the left.
You are an insurance risk analyst assistant. Your task is to identify potential risk factors from a given scenario. Be concise.
-
For the prompt on the right side, open the Model settings pane, and change the Temperature to 2.0. Ensure the Model is still .
-
Submit the following prompt in the box at the bottom of the page:
Scenario:
"The applicant, 'The Fiery Grill,' is a new upscale restaurant specializing in wood-fired oven pizzas and open-flame grilling. They have installed a brand new, custom-built fire suppression system for their cooking area, but it has not yet been certified by a third party. The restaurant plans to feature live acoustic music on weekend evenings and has a small, raised stage area. They also want to offer valet parking."
Based on this scenario, list three primary risk factors an underwriter should consider.
- Observe the differences in the responses. Does the higher temperature (
2.0) in the second prompt cause the list of risk factors to be less focused, more speculative, or significantly different compared to the 0.2 temperature output?
Note: setting the temperature this high will likely result in less coherent or relevant output, but it demonstrates the extreme effect of the parameter.
Comparing different models and configurations
Now you will try comparing your base model with a different model and settings to observe differences in reasoning or output style.
-
For the prompt on the right side, open the Model settings pane and make the following changes:
- Ensure the Model is set to
- Set the Temperature to
0.2
-
For the prompt on the left side, open the Model settings pane and make the following changes:
- Ensure the Model is set to
- Set the Temperature to
0.2
- Turn the thinking budget Off.
-
Submit the following prompt in the box at the bottom of the page. This prompt is intentionally more complex to show the difference in capabilities between the models.
Scenario:
"The applicant, 'The Fiery Grill,' is an upscale restaurant specializing in wood-fired ovens and open-flame grilling. They have a brand new, custom-built fire suppression system, but it has not been certified by a third party. The restaurant will feature live acoustic music on a small, raised stage. They also want to offer valet parking, managed by their own staff. The applicant has no prior business history."
Underwriting Guidelines:
Priority Hierarchy: Liability risks are classed as:
- Class A (Critical): Fire, structural failure, failure of safety systems.
- Class B (Standard): General premises liability (e.g., slip-and-fall).
- Class C (Niche): Auto/Vehicle liability.
Compounding Factors: A "compounding risk" (a condition that makes another risk worse) must be elevated to the highest priority.
Inexperience: Lack of prior business history is a general negative factor but does not create a primary risk on its own.
Auto Liability: Class C risks (Valet) are only considered a primary risk if the applicant is using an unvetted, third-party contractor.
Task:
Based on the scenario and the underwriting guidelines, identify the single, #1 highest-priority risk. Then, write a 2-sentence justification that explains why it is the #1 risk, citing the specific guideline(s) that apply.
- Review the responses. Compare the output from (left pane) with
(right pane).
You should see a clear difference in precision. The model (left) will likely provide a fast but general answer, such as identifying the overall hazard ("Fire"). The model (right) should provide a more precise and actionable answer by isolating the specific risk ("The uncertified fire suppression system"). Notice how the Pro model's justification is more detailed, likely citing multiple guidelines to show its deeper reasoning.
Click Check my progress to verify the objectives.
Compare, evaluate, and manage prompts.
Task 4. Use multimodal prompts with Gemini
In this task, you'll use the main prompt interface in Agent Studio with the Gemini model to analyze an image and extract information from it. This demonstrates how to design prompts for various analytical tasks such as description, text extraction, and question answering based on visual content.
-
Navigate back to the Agent Studio page.
-
On the top left corner, click New Chat.
-
Change the name of the prompt to Timetable Image Analysis.
-
On the bottom left of the prompt box, click the + button, then select Import from Cloud Storage.
-
In the menu, select the pre-built Cloud Storage bucket, then the timetable.png file.
-
In the Model settings panel on the right:
- Ensure the model is selected.
- Ensure the Region is Global.
-
Now, you can ask the model to perform a few tasks on the image. Below the inserted image in the prompt input field, paste the following prompt:
1. Provide a concise title for this image (under 5 words).
2. Describe the image in one or two sentences.
3. Extract all visible text from the image. Present the flight schedule as a clearly formatted list with columns for "Time" and "City".
-
Submit (Enter) the prompt and review the model's response.
-
Next, you can ask a question that requires reasoning based on the extracted information. Submit the following prompt:
Based on the flight schedule shown in the image, what percentage of the listed flights depart before 11:30 AM? Show your calculation if possible.
-
Click the Submit (Enter) button and examine the response.
-
Briefly observe the effect of temperature. In the Model settings panel:
- Adjust the Temperature to
0.8.
- Resubmit the exact same prompt from step 9 ("Based on the flight schedule... percentage...").
- Note if the style, confidence, or detail of the explanation changes.
- After observing, set the Temperature back to a lower value like
0.2 for more predictable responses.
Note: Temperature controls randomness. Lower values (e.g., 0.0-0.2) are good for factual responses, while higher values (e.g., 0.7+) can lead to more diverse or creative outputs, which might be less suitable for precise data extraction or analysis.
Click Check my progress to verify the objectives.
Analyze images with Gemini in Agent Studio.
Task 5. Generate media in Agent Studio
Beyond text, Agent Studio offers powerful tools for generating various media types directly from text prompts or by refining existing media. In this task, you'll explore generating images and voice.
Generating an Image with Imagen
You'll start by generating an image.
- On the top left corner, click dropdown next to New Chat then select Image then click Generate media > Image.
-
In the text prompt area at the bottom, enter a descriptive prompt:
A close-up, photorealistic image of a single honeybee collecting pollen from a vibrant purple lavender flower, with a softly blurred garden background.
-
In the Settings panel on the right:
- Ensure the Model is set to
Imagen 4 (or the latest available Imagen model).
- For Aspect ratio, select
1:1.
- Set Number of results to
4 for this first generation.
- Review the Safety settings (e.g., Person generation, Safety filter threshold) and leave them at their defaults or adjust as preferred for this non-person-focused prompt.
-
Click the Run button to submit your prompt.
-
After a few moments, your generated images will appear in the main area.
-
Click on one of the generated image thumbnails to open the detail view.
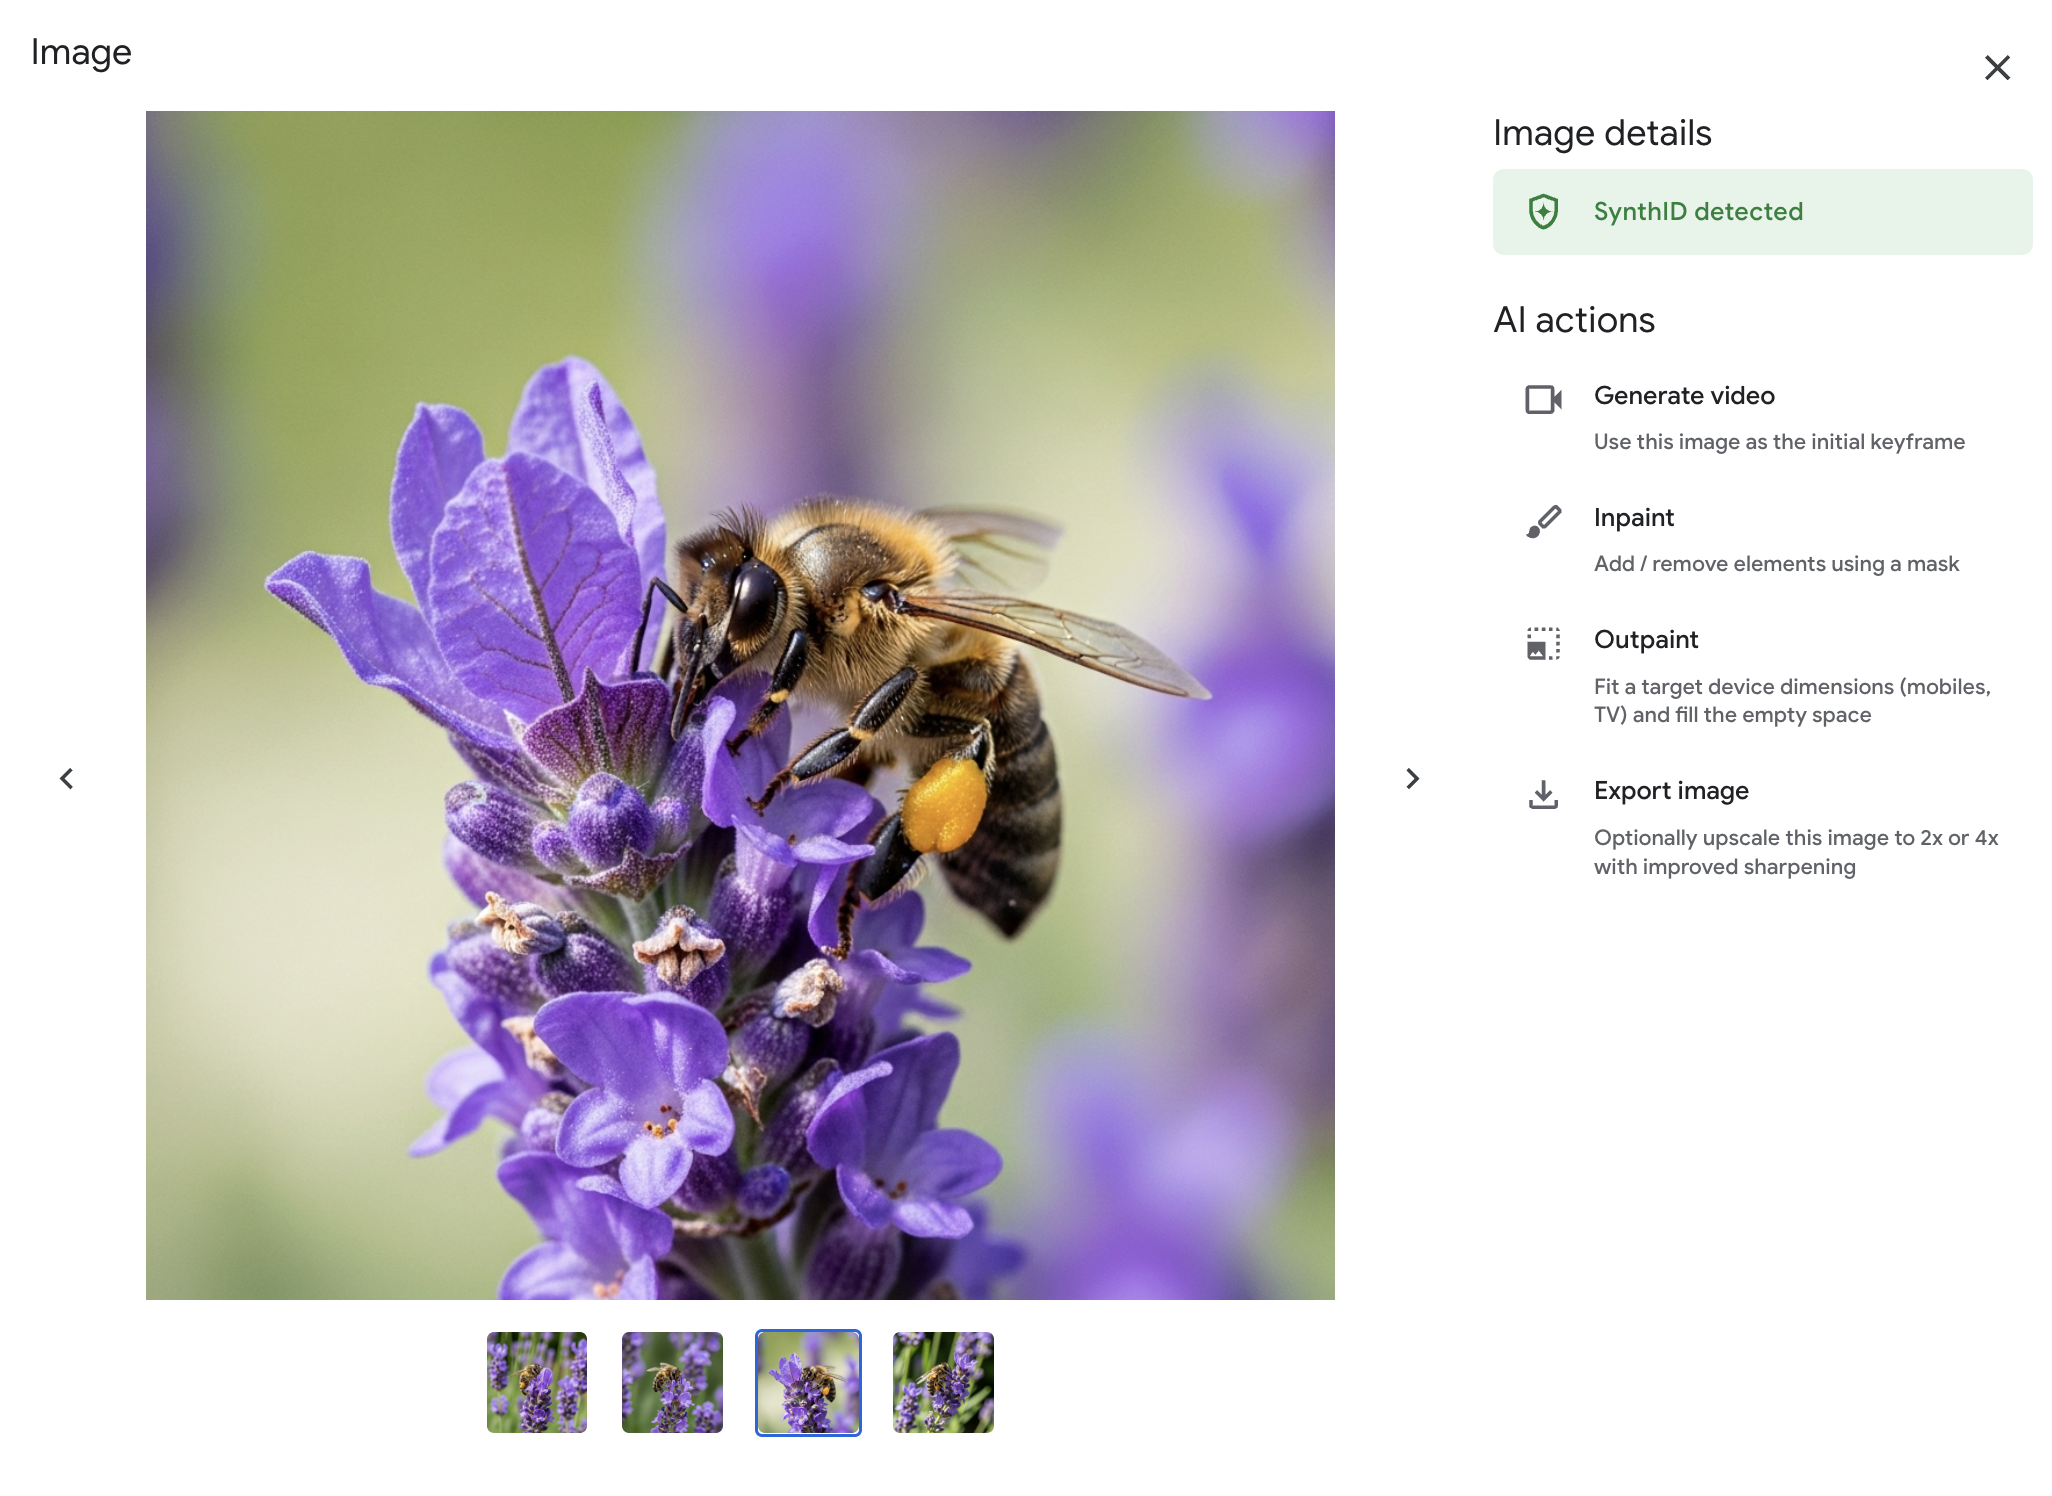
- In the Image details pane on the right:
- Observe the available AI actions such as
Inpaint (to add/remove elements using a mask), Outpaint (to extend the image), and Export image (which may offer upscaling).
- Notice if SynthID detected is displayed with a green checkmark.
- (Optional): select one of the options
Inpaint or Outpaint and play around with them to see the capabilities of Imagen.
What is SynthID?
SynthID is a technology developed by Google DeepMind that embeds a digital watermark directly into the pixels of AI-generated images. This watermark is designed to be imperceptible to the human eye but detectable by an algorithm. Its purpose is to help identify images as AI-generated, promoting transparency and responsible AI practices, even if the image is later modified (e.g., compressed, filtered).
Click Check my progress to verify the objectives.
Explore Agent Platform Media Studio.
Generating Voice with Chirp (Optional)
If you wish to explore AI-generated voice:
-
In the small vertical toolbar on top, click the Speech icon (it looks like a microphone) to switch to the voice generation tool. This opens the Chirp interface.
-
You might be prompted to enable the Cloud Text-to-Speech API if it's not already active for your project. If so, click Enable and wait for the API to be enabled (this might take a moment).
-
Once the interface is ready, in the text prompt area at the bottom, enter the text you want to synthesize. For example:
Welcome to the world of generative AI on Google Cloud
-
In the Settings panel on the right:
- Select a Model (e.g.,
Chirp 3. HD Voices).
- Choose your desired Language (e.g.,
English (United States)).
- Select a Voice from the dropdown list. You can try a few different ones to hear their characteristics.
- Explore any Advanced options if available and desired.
-
Click the Run button.
-
After processing, you should be able to play the generated audio directly in the interface.
Congratulations!
Congratulations! In this lab, you successfully navigated Agent Studio to prototype a generative AI application for an insurance scenario, from initial design and deployment to advanced prompt engineering and comparison. You practiced refining text outputs for specific analytical tasks and explored the exciting multimodal capabilities for generating images and voice. These foundational skills will empower you to build even more sophisticated generative AI solutions on Google Cloud.
Next steps / learn more
Google Cloud training and certification
...helps you make the most of Google Cloud technologies. Our classes include technical skills and best practices to help you get up to speed quickly and continue your learning journey. We offer fundamental to advanced level training, with on-demand, live, and virtual options to suit your busy schedule. Certifications help you validate and prove your skill and expertise in Google Cloud technologies.
Manual Last Updated May 7, 2026
Lab Last Tested April 23, 2026
Copyright 2026 Google LLC. All rights reserved. Google and the Google logo are trademarks of Google LLC. All other company and product names may be trademarks of the respective companies with which they are associated.


