GSP649

개요
이 실습에서는 Cloud Run Functions와 Cloud Scheduler를 사용하여, 낭비되는 클라우드 리소스를 식별하고 정리합니다. Cloud Monitoring 알림 정책의 스토리지 버킷을 더 저렴한 스토리지 클래스로 마이그레이션하는 Cloud Run 함수를 트리거합니다.
Google Cloud에서는 해당 생성 날짜나 활성 상태 같은 속성 집합을 기준으로 객체를 자동으로 서로 다른 스토리지 클래스로 옮기는 스토리지 객체 수명 주기 규칙을 제공합니다. 하지만 이러한 규칙은 객체 액세스 여부를 고려하지 못합니다. 특정 기간 동안 액세스되지 않은 새 객체를 Nearline Storage로 옮겨야 할 때도 있습니다.
목표
이 실습에서는 다음 작업을 수행하는 방법을 배웁니다.
- 스토리지 버킷 2개를 만들고
serving-bucket에 파일을 추가한 후 이에 대한 트래픽을 생성합니다.
- Cloud Monitoring 대시보드를 만들어 버킷 사용률을 시각화합니다.
- 유휴 버킷을 더 저렴한 스토리지 클래스로 마이그레이션하는 Cloud Run 함수를 배포하고, Cloud 알림 정책에서 수신된 알림을 모방하도록 설계된 페이로드를 사용하여 함수를 트리거합니다.
설정 및 요건
실습 시작 버튼을 클릭하기 전에
다음 안내를 확인하세요. 실습에는 시간 제한이 있으며 일시중지할 수 없습니다. 실습 시작을 클릭하면 타이머가 시작됩니다. 이 타이머는 Google Cloud 리소스를 사용할 수 있는 시간이 얼마나 남았는지를 표시합니다.
실무형 실습을 통해 시뮬레이션이나 데모 환경이 아닌 실제 클라우드 환경에서 실습 활동을 진행할 수 있습니다. 실습 시간 동안 Google Cloud에 로그인하고 액세스하는 데 사용할 수 있는 새로운 임시 사용자 인증 정보가 제공됩니다.
이 실습을 완료하려면 다음을 준비해야 합니다.
- 표준 인터넷 브라우저 액세스 권한(Chrome 브라우저 권장)
참고: 이 실습을 실행하려면 시크릿 모드(권장) 또는 시크릿 브라우저 창을 사용하세요. 개인 계정과 학습자 계정 간의 충돌로 개인 계정에 추가 요금이 발생하는 일을 방지해 줍니다.
- 실습을 완료하기에 충분한 시간(실습을 시작하고 나면 일시중지할 수 없음)
참고: 이 실습에는 학습자 계정만 사용하세요. 다른 Google Cloud 계정을 사용하는 경우 해당 계정에 비용이 청구될 수 있습니다.
실습을 시작하고 Google Cloud 콘솔에 로그인하는 방법
-
실습 시작 버튼을 클릭합니다. 실습 비용을 결제해야 하는 경우 결제 수단을 선택할 수 있는 대화상자가 열립니다.
오른쪽에는 다음과 같은 항목이 포함된 실습 설정 및 액세스 패널이 있습니다.
-
Google Cloud 콘솔 열기 버튼
- 이 실습에 사용해야 하는 임시 사용자 인증 정보(사용자 이름 및 비밀번호)
- 필요한 경우 실습 진행을 위한 기타 정보
실습 타이머는 페이지 상단에 있으며 남은 시간을 표시합니다.
-
Google Cloud 콘솔 열기를 클릭합니다(Chrome 브라우저를 실행 중인 경우 마우스 오른쪽 버튼으로 클릭하고 시크릿 창에서 링크 열기를 선택합니다).
실습에서 리소스가 가동되면 다른 탭이 열리고 로그인 페이지가 표시됩니다.
팁: 두 개의 탭을 각각 별도의 창으로 나란히 정렬하세요.
참고: 계정 선택 대화상자가 표시되면 다른 계정 사용을 클릭합니다.
-
필요한 경우 아래의 사용자 이름을 복사하여 로그인 대화상자에 붙여넣습니다.
{{{user_0.username | "Username"}}}
실습 설정 및 액세스 패널에서도 사용자 이름을 확인할 수 있습니다.
-
다음을 클릭합니다.
-
아래의 비밀번호를 복사하여 시작하기 대화상자에 붙여넣습니다.
{{{user_0.password | "Password"}}}
실습 설정 및 액세스 패널에서도 비밀번호를 확인할 수 있습니다.
-
다음을 클릭합니다.
중요: 실습에서 제공하는 사용자 인증 정보를 사용해야 합니다. Google Cloud 계정 사용자 인증 정보를 사용하지 마세요.
참고: 이 실습에 자신의 Google Cloud 계정을 사용하면 추가 요금이 발생할 수 있습니다.
-
이후에 표시되는 페이지를 클릭하여 넘깁니다.
- 이용약관에 동의하세요.
- 임시 계정이므로 복구 옵션이나 2단계 인증을 추가하지 마세요.
- 무료 체험판을 신청하지 마세요.
잠시 후 Google Cloud 콘솔이 이 탭에서 열립니다.
참고: Google Cloud 제품 및 서비스에 액세스하려면 탐색 메뉴를 클릭하거나 검색창에 제품 또는 서비스 이름을 입력합니다.

Cloud Shell 활성화
Cloud Shell은 다양한 개발 도구가 탑재된 가상 머신으로, 5GB의 영구 홈 디렉터리를 제공하며 Google Cloud에서 실행됩니다. Cloud Shell을 사용하면 명령줄을 통해 Google Cloud 리소스에 액세스할 수 있습니다.
-
Google Cloud 콘솔 상단에서 Cloud Shell 활성화  를 클릭합니다.
-
다음 창을 클릭합니다.
- Cloud Shell 정보 창을 통해 계속 진행합니다.
- 사용자 인증 정보를 사용하여 Google Cloud API를 호출할 수 있도록 Cloud Shell을 승인합니다.
연결되면 사용자 인증이 이미 처리된 것이며 프로젝트가 학습자의 PROJECT_ID, (으)로 설정됩니다. 출력에 이 세션의 PROJECT_ID를 선언하는 줄이 포함됩니다.
Your Cloud Platform project in this session is set to {{{project_0.project_id | "PROJECT_ID"}}}
gcloud는 Google Cloud의 명령줄 도구입니다. Cloud Shell에 사전 설치되어 있으며 명령줄 자동 완성을 지원합니다.
- (선택사항) 다음 명령어를 사용하여 활성 계정 이름 목록을 표시할 수 있습니다.
gcloud auth list
-
승인을 클릭합니다.
출력:
ACTIVE: *
ACCOUNT: {{{user_0.username | "ACCOUNT"}}}
To set the active account, run:
$ gcloud config set account `ACCOUNT`
- (선택사항) 다음 명령어를 사용하여 프로젝트 ID 목록을 표시할 수 있습니다.
gcloud config list project
출력:
[core]
project = {{{project_0.project_id | "PROJECT_ID"}}}
참고: gcloud 전체 문서는 Google Cloud에서 gcloud CLI 개요 가이드를 참고하세요.
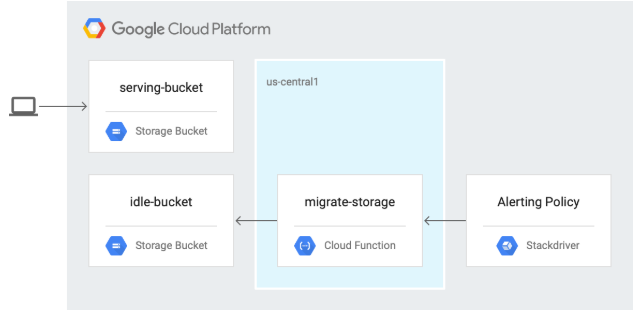
아키텍처
다음 다이어그램에서는 Cloud Monitoring 알림 정책에 따라 더 저렴한 스토리지 클래스로 스토리지 버킷을 마이그레이션하도록 Cloud Run 함수를 트리거합니다.
작업 1. API 사용 설정 및 소스 코드 다운로드
-
Google Cloud 콘솔 상단에서 Cloud Shell 활성화 를 클릭합니다.
-
Cloud Shell에서 Cloud Scheduler API를 사용 설정합니다.
gcloud services enable cloudscheduler.googleapis.com
내 진행 상황 확인하기를 클릭하여 목표를 확인합니다.
Cloud Scheduler API를 사용 설정
- 실습용 소스 코드를 다운로드합니다.
gcloud storage cp -r gs://spls/gsp649/* . && cd gcf-automated-resource-cleanup/
- 환경 변수를 설정하고, 저장소 폴더를 이 실습과 관련된 모든 명령어를 실행하는 $WORKDIR로 지정합니다.
export PROJECT_ID=$(gcloud config list --format 'value(core.project)' 2>/dev/null)
WORKDIR=$(pwd)
- 오픈소스 부하 생성 도구인 Apache Bench를 설치합니다.
sudo apt-get update
sudo apt-get install apache2-utils -y
작업 2. Cloud Storage 버킷 만들기 및 파일 추가
- Cloud Shell에서
migrate-storage 디렉터리로 이동합니다.
cd $WORKDIR/migrate-storage
- Cloud Storage 버킷인
serving-bucket을 만듭니다. 이 버킷은 나중에 스토리지 클래스를 변경하는 데 사용합니다.
export PROJECT_ID=$(gcloud config list --format 'value(core.project)' 2>/dev/null)
gcloud storage buckets create gs://${PROJECT_ID}-serving-bucket -l {{{project_0.default_region|REGION}}}
내 진행 상황 확인하기를 클릭하여 목표를 확인합니다.
Cloud Storage 버킷 만들기
- 버킷을 공개로 만듭니다.
gsutil acl ch -u allUsers:R gs://${PROJECT_ID}-serving-bucket
- 텍스트 파일을 버킷에 추가합니다.
gcloud storage cp $WORKDIR/migrate-storage/testfile.txt gs://${PROJECT_ID}-serving-bucket
- 파일을 공개로 만듭니다.
gsutil acl ch -u allUsers:R gs://${PROJECT_ID}-serving-bucket/testfile.txt
- 파일에 액세스할 수 있는지 확인합니다.
curl http://storage.googleapis.com/${PROJECT_ID}-serving-bucket/testfile.txt
출력은 다음과 같습니다.
this is a test
내 진행 상황 확인하기를 클릭하여 목표를 확인합니다.
Cloud Storage 버킷을 공개로 설정
- idle-bucket이라는 이름으로 데이터를 제공하지 않는 두 번째 버킷을 만듭니다.
gcloud storage buckets create gs://${PROJECT_ID}-idle-bucket -l {{{project_0.default_region|REGION}}}
export IDLE_BUCKET_NAME=$PROJECT_ID-idle-bucket
내 진행 상황 확인하기를 클릭하여 목표를 확인합니다.
다른 Cloud Storage 버킷 만들기
작업 3. 모니터링 대시보드 만들기
Monitoring 측정항목 범위 만들기
Google Cloud 프로젝트에 연결된 Monitoring 측정항목 범위를 설정합니다. 다음 단계에 따라 Monitoring 무료 체험이 포함된 새 계정을 만들 수 있습니다.
- Cloud 콘솔에서 탐색 메뉴(
 ) > Monitoring을 클릭합니다.
Monitoring 개요 페이지가 열리면 측정항목 범위 프로젝트가 준비되어 있습니다.
-
왼쪽 패널에서 대시보드 > 맞춤 대시보드 만들기를 클릭합니다.
-
대시보드 이름을 Bucket Usage로 지정합니다.
-
+위젯 추가를 클릭합니다.
-
선을 클릭합니다.
-
위젯 제목에 Bucket Access를 입력합니다.
-
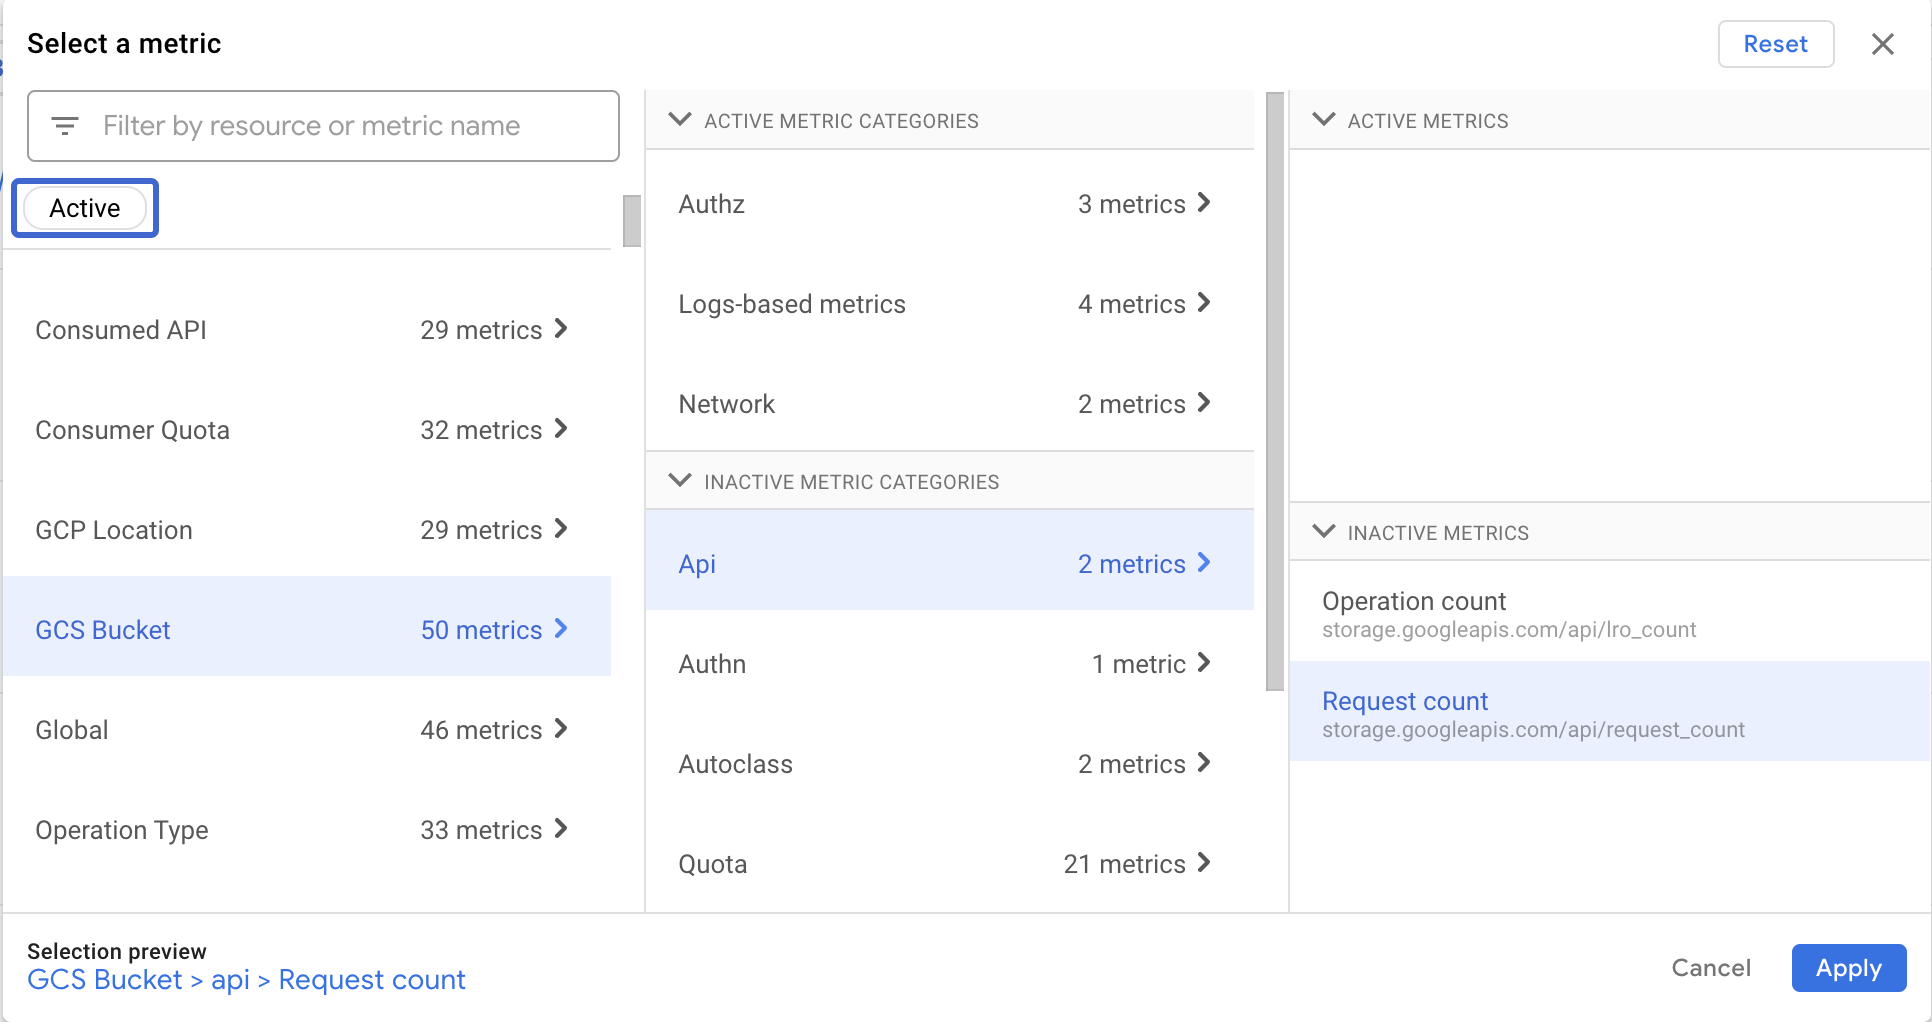
측정항목 선택 > GCS 버킷 > API > 요청 수 측정항목을 선택하고 적용을 클릭합니다.
참고: 요청 수 측정항목을 찾을 수 없는 경우 활성을 선택 해제합니다.
-
버킷 이름을 기준으로 측정항목을 그룹으로 묶으려면 그룹화 기준 드롭다운 목록에서 bucket_name을 선택합니다.
-
+ 필터 추가를 클릭합니다.
메서드 이름으로 필터링하려면 다음 단계를 따르세요.
-
측정항목 라벨로 필터링에서 메서드를 선택합니다.
-
메서드 옆의 드롭다운에서 ReadObject를 선택합니다.
-
적용을 클릭합니다.
버킷에서 객체 액세스를 모니터링하도록 Cloud Monitoring을 구성했습니다. Cloud Storage 버킷으로 가는 트래픽이 없기 때문에 차트에 데이터가 표시되지 않습니다.
작업 4. serving-bucket에서 부하 생성
모니터링을 구성했으므로 이제 Apache Bench를 사용하여 serving-bucket으로 트래픽을 전송할 수 있습니다.
- Cloud Shell에서 제공 버킷의 객체로 요청을 전송합니다.
ab -n 10000 http://storage.googleapis.com/$PROJECT_ID-serving-bucket/testfile.txt
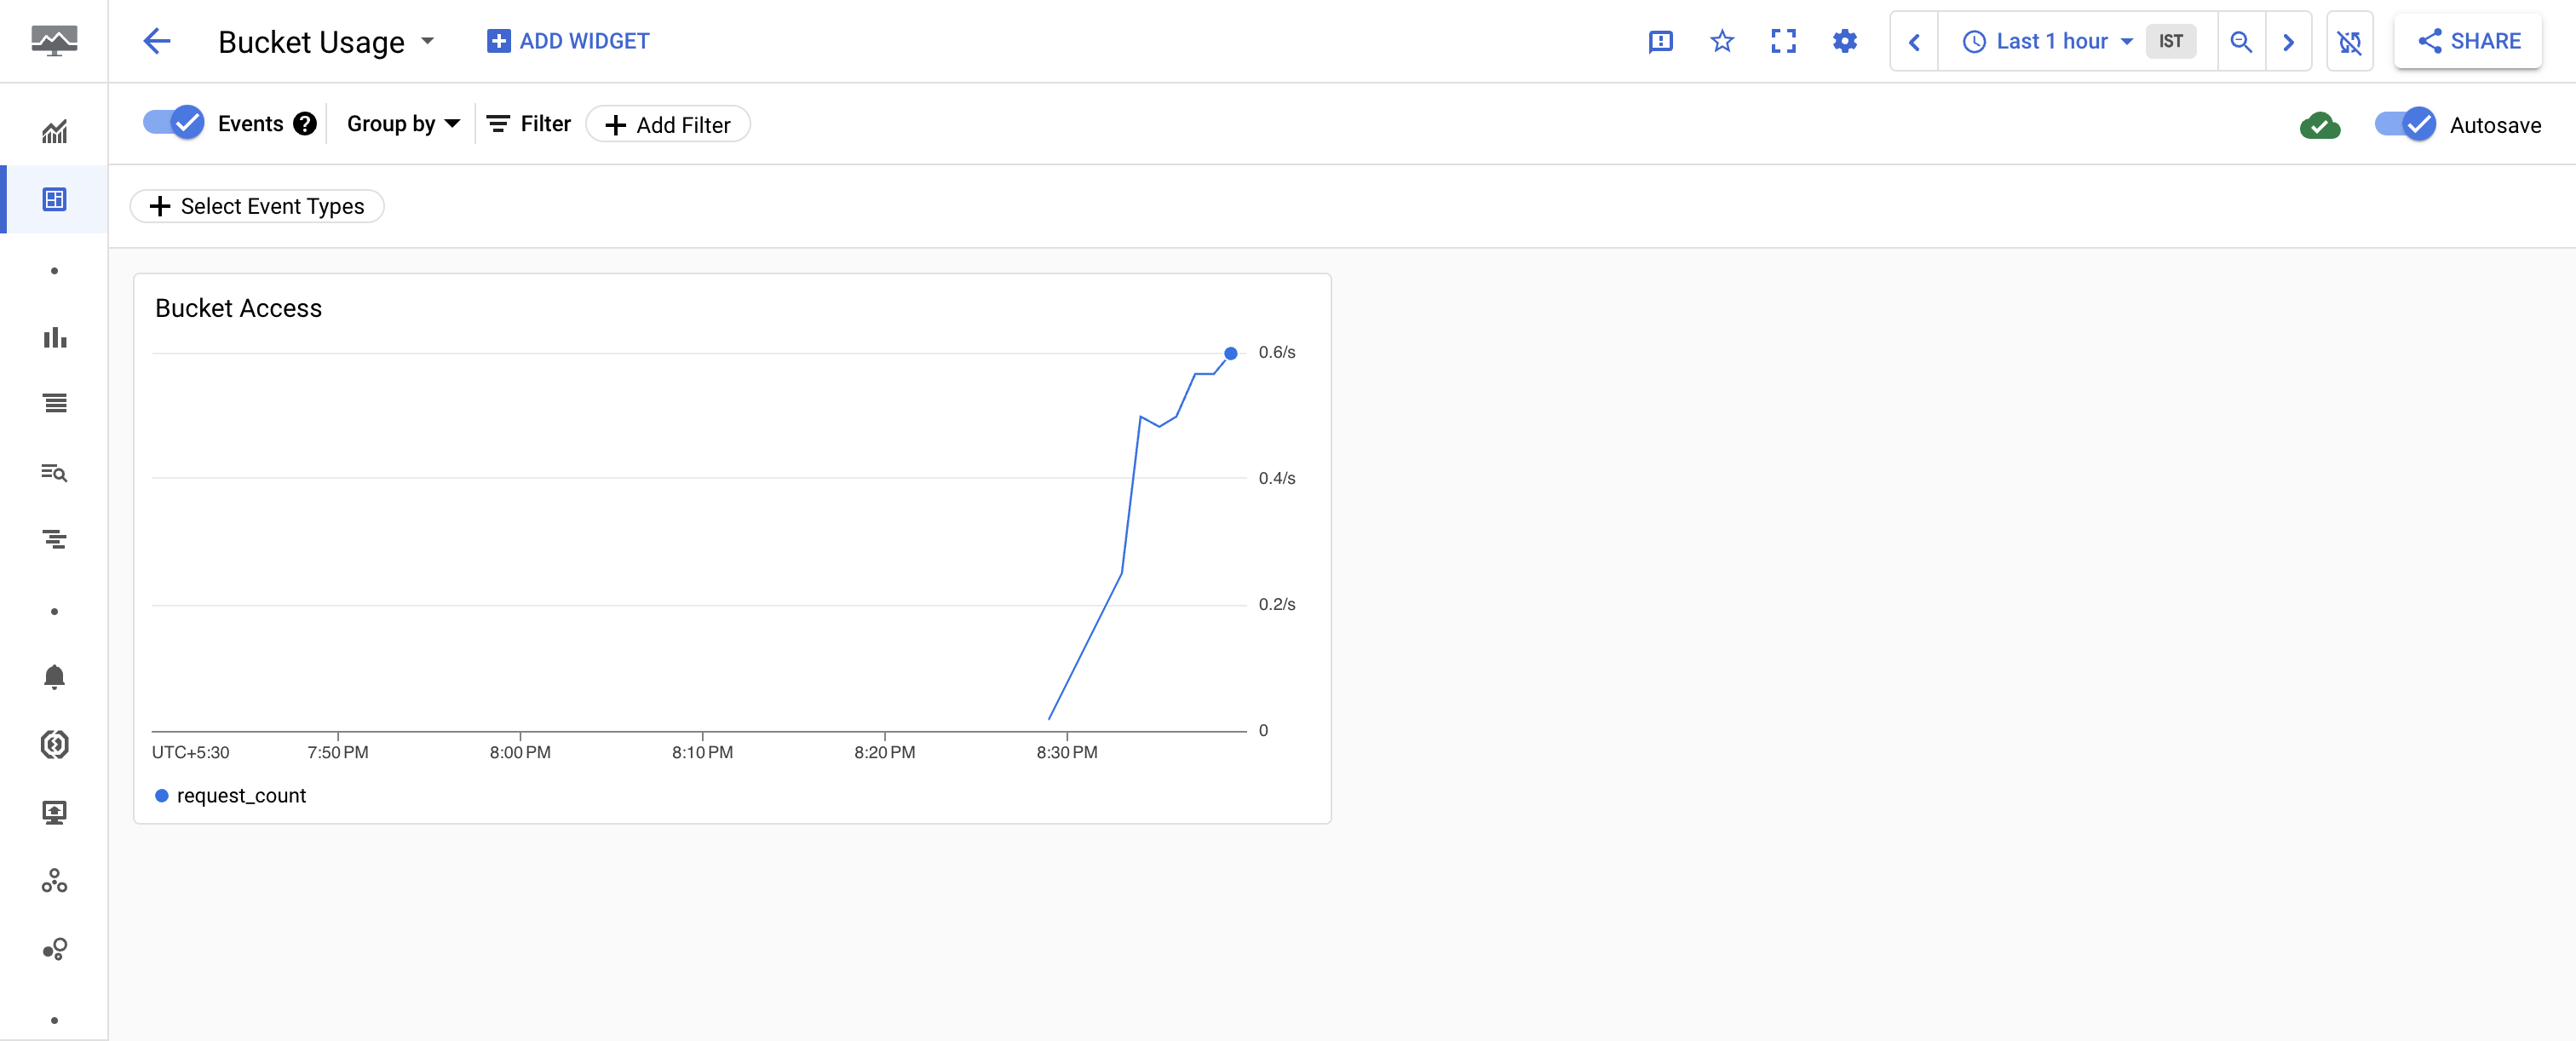
- 왼쪽 패널에서 대시보드를 클릭한 다음 버킷 사용량이라는 대시보드 이름을 클릭하여 버킷 액세스 차트를 확인합니다.
참고: 이 탭을 이전에 닫은 경우 탐색 메뉴 > 모든 제품 보기 > Observability > Monitoring을 선택한 다음, 왼쪽 패널에서 대시보드 > 버킷 사용량을 클릭합니다.
참고: 버킷 사용량 대시보드에 그래프가 표시되려면 최소한 1분 정도 기다려야 합니다.
- 트래픽 세부정보를 확인합니다.
CTRL-C를 눌러 명령 프롬프트로 돌아가야 할 수도 있습니다.
작업 5. Cloud Run 함수 검토 및 배포
- Cloud Shell에서 다음 명령어를 입력하여, 스토리지 버킷을 Nearline Storage 클래스로 마이그레이션하는 Cloud Run 함수 코드를 확인합니다.
cat $WORKDIR/migrate-storage/main.py | grep "migrate_storage(" -A 15
출력은 다음과 같습니다.
def migrate_storage(request):
request_json = request.get_json(force=True)
bucket_name = request_json['incident']['resource_name']
print(f"bucket_name: {bucket_name}") # Print the bucket name
if not bucket_name:
print("Error: bucket_name is empty")
return "Invalid bucket name", 400
storage_client = storage.Client(project)
bucket = storage_client.get_bucket(bucket_name)
bucket.storage_class = "NEARLINE"
bucket.patch()
return "Bucket migrated successfully", 200
Cloud Run 함수는 요청에 전달된 버킷 이름을 사용하여 스토리지 클래스를 Nearline으로 변경합니다.
- 프로젝트 ID를 사용하도록 Python 스크립트를 업데이트합니다.
sed -i "s/<project-id>/$PROJECT_ID/" $WORKDIR/migrate-storage/main.py
- Cloud Run Functions API를 사용 중지합니다.
gcloud services disable cloudfunctions.googleapis.com
- Cloud Run Functions API를 다시 사용 설정합니다.
gcloud services enable cloudfunctions.googleapis.com
- 프로젝트 번호를 내보냅니다.
export PROJECT_NUMBER=$(gcloud projects describe $PROJECT_ID --format="value(projectNumber)")
- 개발자 서비스 계정에
artifactregistry.reader 권한을 추가합니다.
gcloud projects add-iam-policy-binding $PROJECT_ID \
--member="serviceAccount:$PROJECT_NUMBER-compute@developer.gserviceaccount.com" \
--role="roles/artifactregistry.reader"
- Cloud Run 함수를 배포합니다.
gcloud functions deploy migrate_storage --gen2 --trigger-http --runtime=python310 --region {{{project_0.default_region | Region}}}
메시지가 표시되면 Y를 입력하여 프로젝트의 API [run.googleapis.com]를 사용 설정하고 다시 시도합니다. 인증되지 않은 호출을 허용하는 경우에도 동일한 작업을 수행합니다.
참고: 권한 오류가 표시되는 경우 몇 분 정도 기다린 후 배포를 다시 시도하세요.
- 트리거 URL을 다음 섹션에서 사용하는 환경 변수로 캡처합니다.
export FUNCTION_URL=$(gcloud functions describe migrate_storage --format=json --region {{{project_0.default_region | Region}}} | jq -r '.url')
내 진행 상황 확인하기를 클릭하여 목표를 확인합니다.
Cloud Run 함수 배포
작업 6. 알림 자동화 테스트 및 검사
- 버킷 이름으로 JSON 파일을 업데이트합니다.
export IDLE_BUCKET_NAME=$PROJECT_ID-idle-bucket
sed -i "s/\\\$IDLE_BUCKET_NAME/$IDLE_BUCKET_NAME/" $WORKDIR/migrate-storage/incident.json
-
incident.json 파일을 사용하여 배포한 Cloud Run 함수로 테스트 알림을 전송합니다.
envsubst < $WORKDIR/migrate-storage/incident.json | curl -X POST -H "Content-Type: application/json" $FUNCTION_URL -d @-
출력은 다음과 같습니다.
Bucket migrated successfully
출력이 줄바꿈으로 종료되지 않으며, 따라서 바로 다음에 명령 프롬프트가 옵니다.
- 유휴 버킷이 Nearline으로 마이그레이션되었는지 확인합니다.
gsutil defstorageclass get gs://$PROJECT_ID-idle-bucket
출력은 다음과 같습니다.
gs://<project-id>-idle-bucket: NEARLINE
내 진행 상황 확인하기를 클릭하여 목표를 확인합니다.
버킷이 Nearline으로 마이그레이션되었는지 확인
수고하셨습니다
수고하셨습니다. 이 실습에서는 Cloud Storage 버킷 2개를 만들고, 그중 하나에 객체를 추가하고, 버킷 액세스를 추적하도록 Cloud Monitoring을 구성하고, 객체를 Nearline 버킷으로 마이그레이션하는 Cloud Run 함수를 검토 및 배포하고, Cloud Monitoring 알림을 사용하여 이 함수를 테스트했습니다.
Google Cloud 교육 및 자격증
Google Cloud 기술을 최대한 활용하는 데 도움이 됩니다. Google 강의에는 빠른 습득과 지속적인 학습을 지원하는 기술적인 지식과 권장사항이 포함되어 있습니다. 기초에서 고급까지 수준별 학습을 제공하며 바쁜 일정에 알맞은 주문형, 실시간, 가상 옵션이 포함되어 있습니다. 인증은 Google Cloud 기술에 대한 역량과 전문성을 검증하고 입증하는 데 도움이 됩니다.
설명서 최종 업데이트: 2025년 11월 12일
실습 최종 테스트: 2025년 11월 12일
Copyright 2026 Google LLC. All rights reserved. Google 및 Google 로고는 Google LLC의 상표입니다. 기타 모든 회사명 및 제품명은 해당 업체의 상표일 수 있습니다.


