Vertex AI is now Gemini Enterprise Agent Platform! We are currently updating our content to reflect this change. Please bear with us if you encounter naming inconsistencies during this transition.
Applica le tue competenze nella console Google Cloud
Checkpoint
Create the VM with desired configurations
Controlla i miei progressi
/ 25
Download vulnerable web application files on the VM
Controlla i miei progressi
/ 25
Run a Web Security Scanner scan and detect application vulnerabilities
Controlla i miei progressi
/ 25
Correct vulnerabilities and rescan your application using Web Security Scanner
Controlla i miei progressi
/ 25
Istruzioni e requisiti di configurazione del lab
Proteggi il tuo account e i tuoi progressi. Per eseguire questo lab, utilizza sempre una finestra del browser privata e le credenziali del lab.
Identify Application Vulnerabilities with Security Command Center
Lab
1 ora 15 minuti
universal_currency_alt
1 credito
show_chart
Introduttivi
info
Questo lab potrebbe incorporare strumenti di AI a supporto del tuo apprendimento.
Questi contenuti non sono ancora ottimizzati per i dispositivi mobili.
Per un'esperienza ottimale, visualizza il sito su un computer utilizzando un link inviato via email.
GSP1262
Overview
Web Security Scanner (WSS) is one of Security Command Center's built-in services that can be used to identify security vulnerabilities in App Engine, Google Kubernetes Engine (GKE), and Compute Engine web applications.
This service crawls your application, following all links within the scope of your starting URLs, and attempts to exercise as many user inputs and event handlers as possible. It can automatically scan and detect four common vulnerabilities, including cross-site-scripting (XSS), flash injection, mixed content (HTTP in HTTPS), and outdated/insecure libraries.
Web Security Scanner enables early identification of vulnerabilities and delivers very low false positive rates. You can easily set up, run, schedule, and manage security scans.
In this lab, you use Web Security Scanner to scan a Python Flask application for vulnerabilities.
Objectives
In this lab, you learn how to perform the following tasks:
Launch a vulnerable Python Flask application on a Compute Engine instance.
Use Web Security Scanner to scan the application and find vulnerabilities.
Fix the application vulnerability.
Scan the application again and verify vulnerabilities no longer exist.
Setup and requirements
For each lab, you get a new Google Cloud project and set of resources for a fixed time at no cost.
Sign in to Google Skills using an incognito window.
Note the lab's access time (for example, 1:15:00), and make sure you can finish within that time.
There is no pause feature. You can restart if needed, but you have to start at the beginning.
When ready, click Start lab.
Note your lab credentials (Username and Password). You will use them to sign in to the Google Cloud Console.
Click Open Google Console.
Click Use another account and copy/paste credentials for this lab into the prompts.
If you use other credentials, you'll receive errors or incur charges.
Accept the terms and skip the recovery resource page.
Scenario
Cymbal Bank is an American retail bank with over 2,000 branches in all 50 states. It offers comprehensive debit and credit services that are built on top of a robust payments platform. Cymbal Bank is a digitally transforming legacy financial services institution.
Cymbal Bank was founded in 1920 under the name Troxler. Cymbal Group acquired the company in 1975 after it had been investing heavily in Cymbal Group's proprietary ATMs. As the bank grew into a national leader, they put strategic emphasis on modernizing the customer experience both in-person at their branches and digitally through an app they released in 2014. Cymbal Bank employs 42,000 people nationwide and, in 2019, reported $24 billion in revenue.
Cymbal Bank is interested in developing a new banking application for their corporate clients using Google Cloud technology. Application security is critical, and the CTO wants to see how Google Cloud can identify and mitigate application security vulnerabilities. As a Cloud Security Engineer, you are tasked with demonstrating Security Command Center's cutting-edge application vulnerability scanning features.
Task 1. Launch a virtual machine and create a firewall rule for WSS
In this task, you set up the infrastructure to demonstrate an application vulnerability to Cymbal Bank's CTO. More specifically, you deploy a virtual machine and open a firewall rule for Web Security Scanner to be able to access the vulnerable application that you intend to deploy.
On the Google Cloud console title bar, click Activate Cloud Shell (). If prompted, click Continue.
Create a static IP address that can be used for scanning a vulnerable web application by running the following command:
The startup script installs python-flask, a Web Application Framework, which is used for running a simple Python application demonstrating cross-site scripting (XSS) vulnerability, which is a common web application security vulnerability.
Run the following command to open a firewall rule for Web Security Scanner to access a vulnerable application. Note the source ranges from which Web Security Scanner scans applications.
Click Check my progress to verify the objective.
Create the VM with desired configurations
Task 2. Deploy a vulnerable application to trigger an XSS vulnerability
In this task, you obtain the application code and introduce a vulnerability for Web Security Scanner to detect. This is in the form of an application, which is a simple form that receives a user's input and outputs it without any changes.
In the Cloud console, on the Navigation menu (), click Compute Engine>VM Instances.
This may take a minute to initialize for the first time.
Then click on the SSH button next to your instance:
A pop-up may appear, asking you to allow SSH in-browser to connect to VMs. Click Authorize.
This opens an SSH connection to your VM instance in a new window.
In this SSH window (Not in Cloud Shell), run the following command to download and extract the vulnerable web application files:
gsutil cp gs://cloud-training/GCPSEC-ScannerAppEngine/flask_code.tar . && tar xvf flask_code.tar
Now run the following command to deploy your application:
python3 app.py
Soon after, you should receive a message that indicates your application is up and running.
Output:
* Serving Flask app "app" (lazy loading)
* Environment: production
WARNING: This is a development server. Do not use it in a production deployment.
Use a production WSGI server instead.
* Debug mode: off
* Running on http://0.0.0.0:8080/ (Press CTRL+C to quit)
Find the static IP address of the VM you copied into your notepad earlier.
Replace YOUR_EXTERNAL_IP in the URL field below with that IP address, and open the URL in a new browser tab:
http://<YOUR_EXTERNAL_IP>:8080
Note: You can also find the external IP address in the Google Cloud console, where it's listed as a field associated with your VM instance.Note: If you get a pop-up indicating that the external IP doesn't support a secure connection, click Continue to site.
A Cymbal Bank corporate banking portal with a web form should appear.
In the web form, enter the following string:
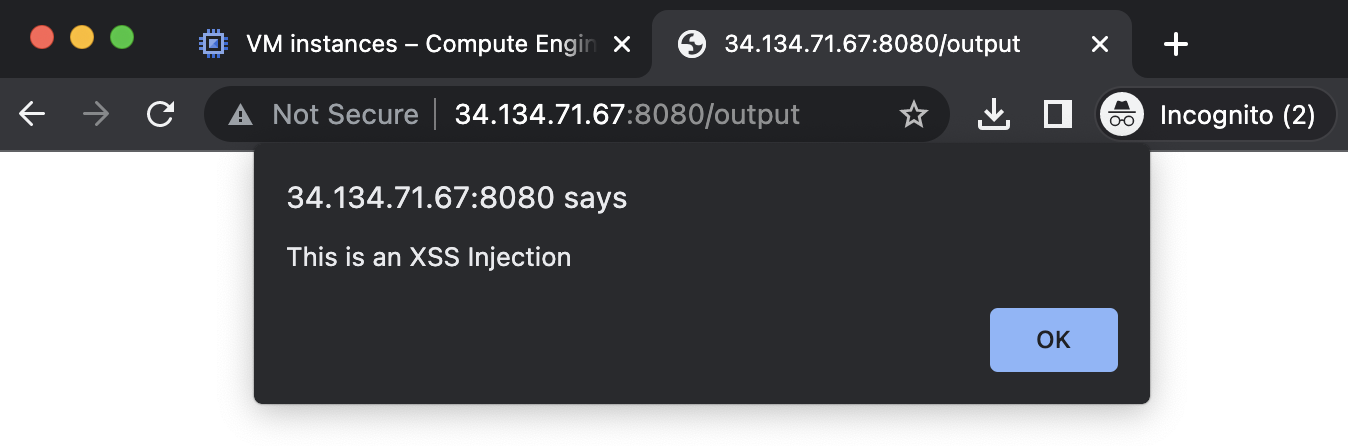
<script>alert('This is an XSS Injection')</script>
Now click the POST button.
You should receive the following alert window.
This is a common vulnerability in web applications: a cross-site scripting vulnerability. Cross-site scripting (XSS) is a vulnerability that enables attackers to run malicious scripts in users' browsers in the context of your application. Your browser interprets a string as a legitimate Javascript and executes it.
An attacker who uses an XSS bug to inject JavaScript into an HTML page gains virtually unlimited access to the logged-in sessions of the victims who visit the page: they may steal user data, tamper with it, change privacy or security settings, or even completely alter the way the product looks and operates. Even more, an XSS vulnerability in one application, no matter how inconsequential, may jeopardize other content within the same domain.
This is one of many application vulnerabilities that Web Security Scanner can help you identify.
Click Check my progress to verify the objective.
Download vulnerable web application files on the VM
Task 3. Enable the Web Security Scanner API
Now that the vulnerable application is launched, it's time to demonstrate Web Security Scanner's abilities to the CTO. But first, you need to configure the API that WSS uses to run.
Switch back to the Cloud console browser tab.
From the Navigation menu (), select APIs & Services>Library.
In the Search for APIs and services field, type Web Security Scanner and press Enter.
Select the Web Security Scanner API.
Click Enable to enable the Web Security Scanner API.
Task 4. Scan the deployed application with WSS
In this task, you configure and set up a scan of the application to check if it finds security vulnerabilities.
Open the Navigation menu (), and select Security>Web Security Scanner.
Click + New Scan.
In the Starting URLs section, the Starting URL 1 field should be pre-populated with your static IP address.
Add the port number 8080, so that the Starting URL resembles the following:
http://<EXTERNAL_IP>:8080
If present, delete Starting URL 2.
Take a minute to review the remaining fields on the Create a new scan screen:
Authentication: a property that can be used to provide application credentials to allow the scanner to authenticate to an app while scanning.
Schedule: a property that can be used to schedule scans to run automatically.
Export to Security Command Center: a property that allows you to automatically export scan configurations and scan results to Cloud Security Command Center after scans are finished.
Verify the Authentication is still set to None and that Schedule is set to Never.
Click Show More to investigate the remaining settings.
Click Save to create the scan.
Note: This creates the scan, but do not run it yet. It must currently be run manually since you did not create a schedule yet.
Click Run to start the scan
Note: Given the number of possible tests, this can take a little over 10 minutes to scan.
Return to your SSH session in your separate browser window.
If the session timed out, run the following command to restart your application:
python3 app.py
In your SSH Window, you should start to see logs generated similar to the example below—this is Web Security Scanner testing all possible URLs for potential vulnerabilities.
While the scan is running, feel free to explore the Results, URLs Crawled, and Details tabs. You can also check out this getting started video, or this vulnerability scanning video to learn more about Web Security Scanner.
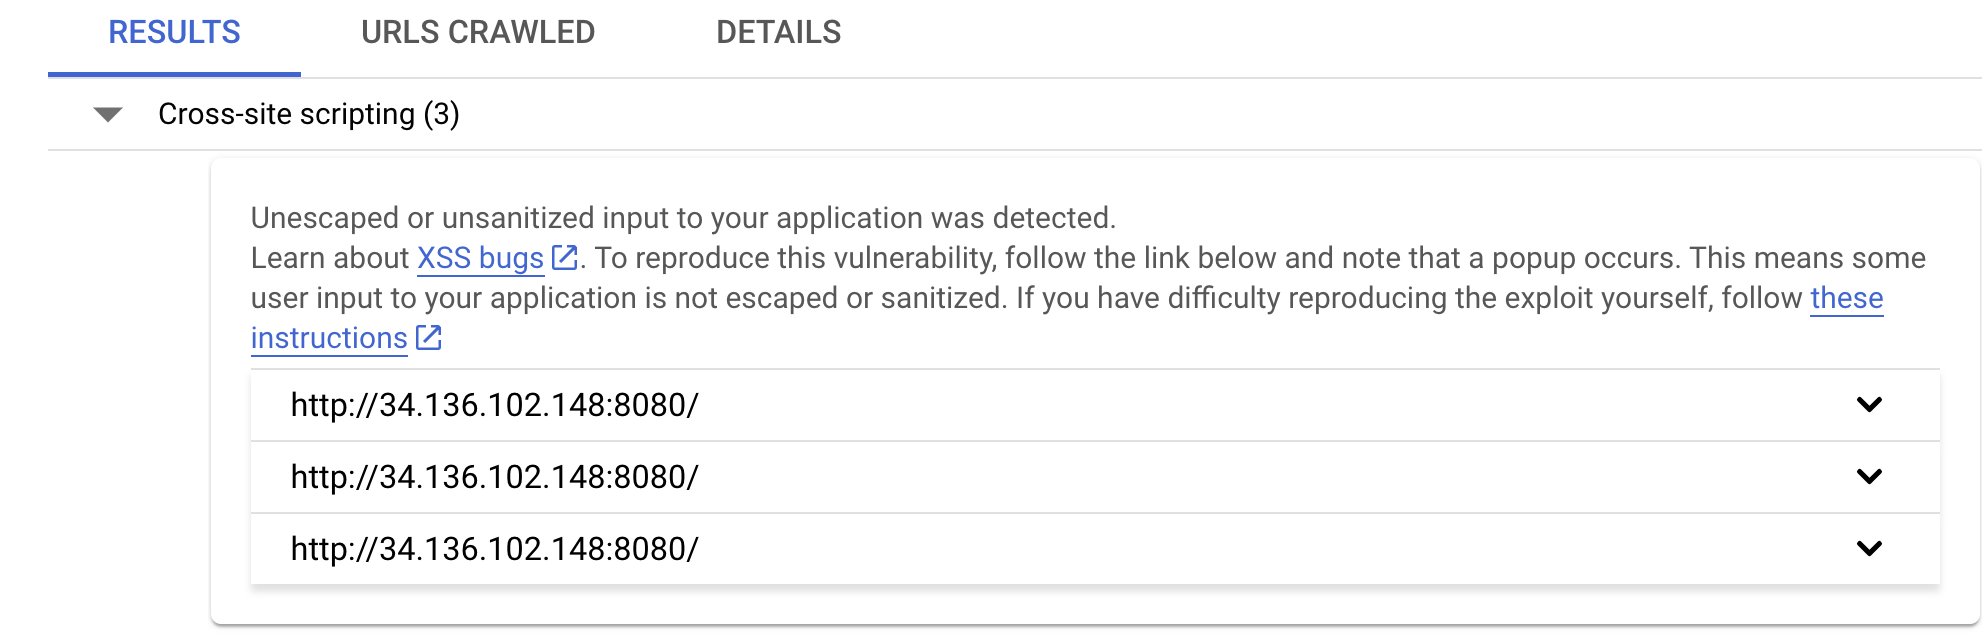
When the scan is done running, the Results tab should indicate the cross-site vulnerabilities.
The Web Security Scanner was able to scan all starting URLs and detect the XSS vulnerabilities in Cymbal Bank's application. The ability to automate the detection of these critical vulnerabilities is a major benefit for security-minded organizations like Cymbal Bank.
Click Check my progress to verify the objective.
Run a Web Security Scanner scan and detect application vulnerabilities
Task 5. Correct the vulnerability and scan again
Now that you have demonstrated Web Security Scanner can detect a XSS vulnerability, you remediate the vulnerability and run the application scan again.
Return to your SSH window that's connected to your VM instance.
Stop the running application by pressing CTRL + C.
Edit the app.py file using the nano editor by running the following command:
nano app.py
Locate the two lines that set the output string:
# output_string = "".join([html_escape_table.get(c, c) for c in input_string])
output_string = input_string
Remove the # symbol from the first line and add it to the beginning of the next line (ensure that you indent your code properly!)
Your final lines must resemble the following:
@app.route('/output')
def output():
output_string = "".join([html_escape_table.get(c, c) for c in input_string])
# output_string = input_string
return flask.render_template("output.html", output=output_string)
Note:html_escape_table is a dictionary that contains one-to-one pairings of special HTML characters like "<" to their text representation. You use this table to escape special HTML characters so your form ingests and interprets submissions as raw text only. You can refer to this What is HTML Escape? documentation for more information.
Now type CTRL+X, Y, and Enter to save your changes.
Re-run the application:
python3 app.py
Return to the Google Cloud console browser tab (you should still have the Web Security Scanner page open):
Click Run at the top of the page.
In your SSH Window, you should start to see logs where Web Security Scanner tests application URLs for potential vulnerabilities.
While you are waiting for the results of the scan, login to the URL http://<EXTERNAL_IP>:8080 using your browser in a separate tab.
The web form displays once again.
In the web form, enter the same string that you entered in before:
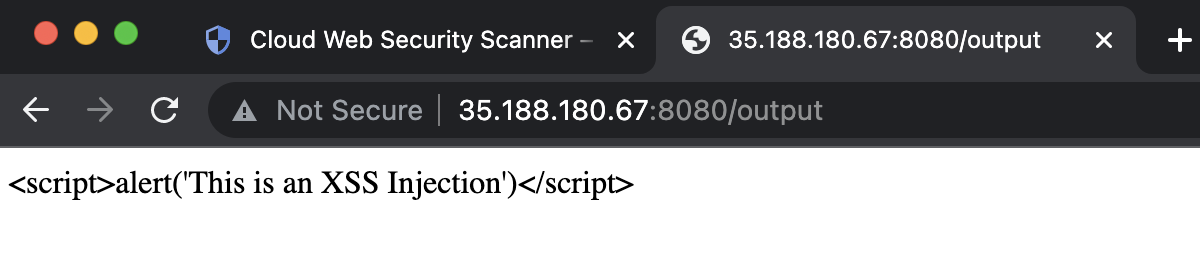
<script>alert('This is an XSS Injection')</script>
Now click the POST button.
Verify that this time you receive the following string in the browser:
Note: Although this technique works in this simple scenario, for proper protection of your web application you need to use more advanced techniques and frameworks which are out of scope of this lab. Explore the links below for more resources:
Return to the Google Cloud console, where you left off on the Web Security Scanner page.
Click Run at the top of the page to re-scan your application.
Soon after, you should notice that the results yield no more XSS vulnerabilities.
Click Check my progress to verify the objective.
Correct vulnerabilities and rescan your application using Web Security Scanner
Congratulations!
You have successfully demonstrated to the Cymbal Bank CTO how to identify and remediate XSS vulnerabilities with Google Cloud's powerful Web Security Scanner solution.
End your lab
When you have completed your lab, click End Lab. Google Skills removes the resources you’ve used and cleans the account for you.
You will be given an opportunity to rate the lab experience. Select the applicable number of stars, type a comment, and then click Submit.
The number of stars indicates the following:
1 star = Very dissatisfied
2 stars = Dissatisfied
3 stars = Neutral
4 stars = Satisfied
5 stars = Very satisfied
You can close the dialog box if you don't want to provide feedback.
For feedback, suggestions, or corrections, please use the Support tab.
Google Cloud training and certification
...helps you make the most of Google Cloud technologies. Our classes include technical skills and best practices to help you get up to speed quickly and continue your learning journey. We offer fundamental to advanced level training, with on-demand, live, and virtual options to suit your busy schedule. Certifications help you validate and prove your skill and expertise in Google Cloud technologies.
Manual Last Updated January 06, 2026
Lab Last Tested January 06, 2026
Copyright 2026 Google LLC All rights reserved. Google and the Google logo are trademarks of Google LLC. All other company and product names may be trademarks of the respective companies with which they are associated.
I lab creano un progetto e risorse Google Cloud per un periodo di tempo prestabilito
I lab hanno un limite di tempo e non possono essere messi in pausa. Se termini il lab, dovrai ricominciare dall'inizio.
In alto a sinistra dello schermo, fai clic su Inizia il lab per iniziare
Utilizza la navigazione privata
Copia il nome utente e la password forniti per il lab
Fai clic su Apri console in modalità privata
Accedi alla console
Accedi utilizzando le tue credenziali del lab. L'utilizzo di altre credenziali potrebbe causare errori oppure l'addebito di costi.
Accetta i termini e salta la pagina di ripristino delle risorse
Non fare clic su Termina lab a meno che tu non abbia terminato il lab o non voglia riavviarlo, perché il tuo lavoro verrà eliminato e il progetto verrà rimosso
Questi contenuti non sono al momento disponibili
Ti invieremo una notifica via email quando sarà disponibile
Bene.
Ti contatteremo via email non appena sarà disponibile
Un lab alla volta
Conferma per terminare tutti i lab esistenti e iniziare questo
Utilizza la navigazione privata per eseguire il lab
Il modo migliore per eseguire questo lab è utilizzare una finestra del browser in incognito o privata. Ciò evita eventuali conflitti tra il tuo account personale e l'account studente, che potrebbero causare addebiti aggiuntivi sul tuo account personale.
In this lab, you will use Web Security Scanner—one of Security Command Center's built-in services—to scan a Python Flask application for vulnerabilities.
Durata:
Configurazione in 0 m
·
Accesso da 75 m
·
Completamento in 75 m


 ). If prompted, click Continue.
 ), click Compute Engine > VM Instances.