GSP1139

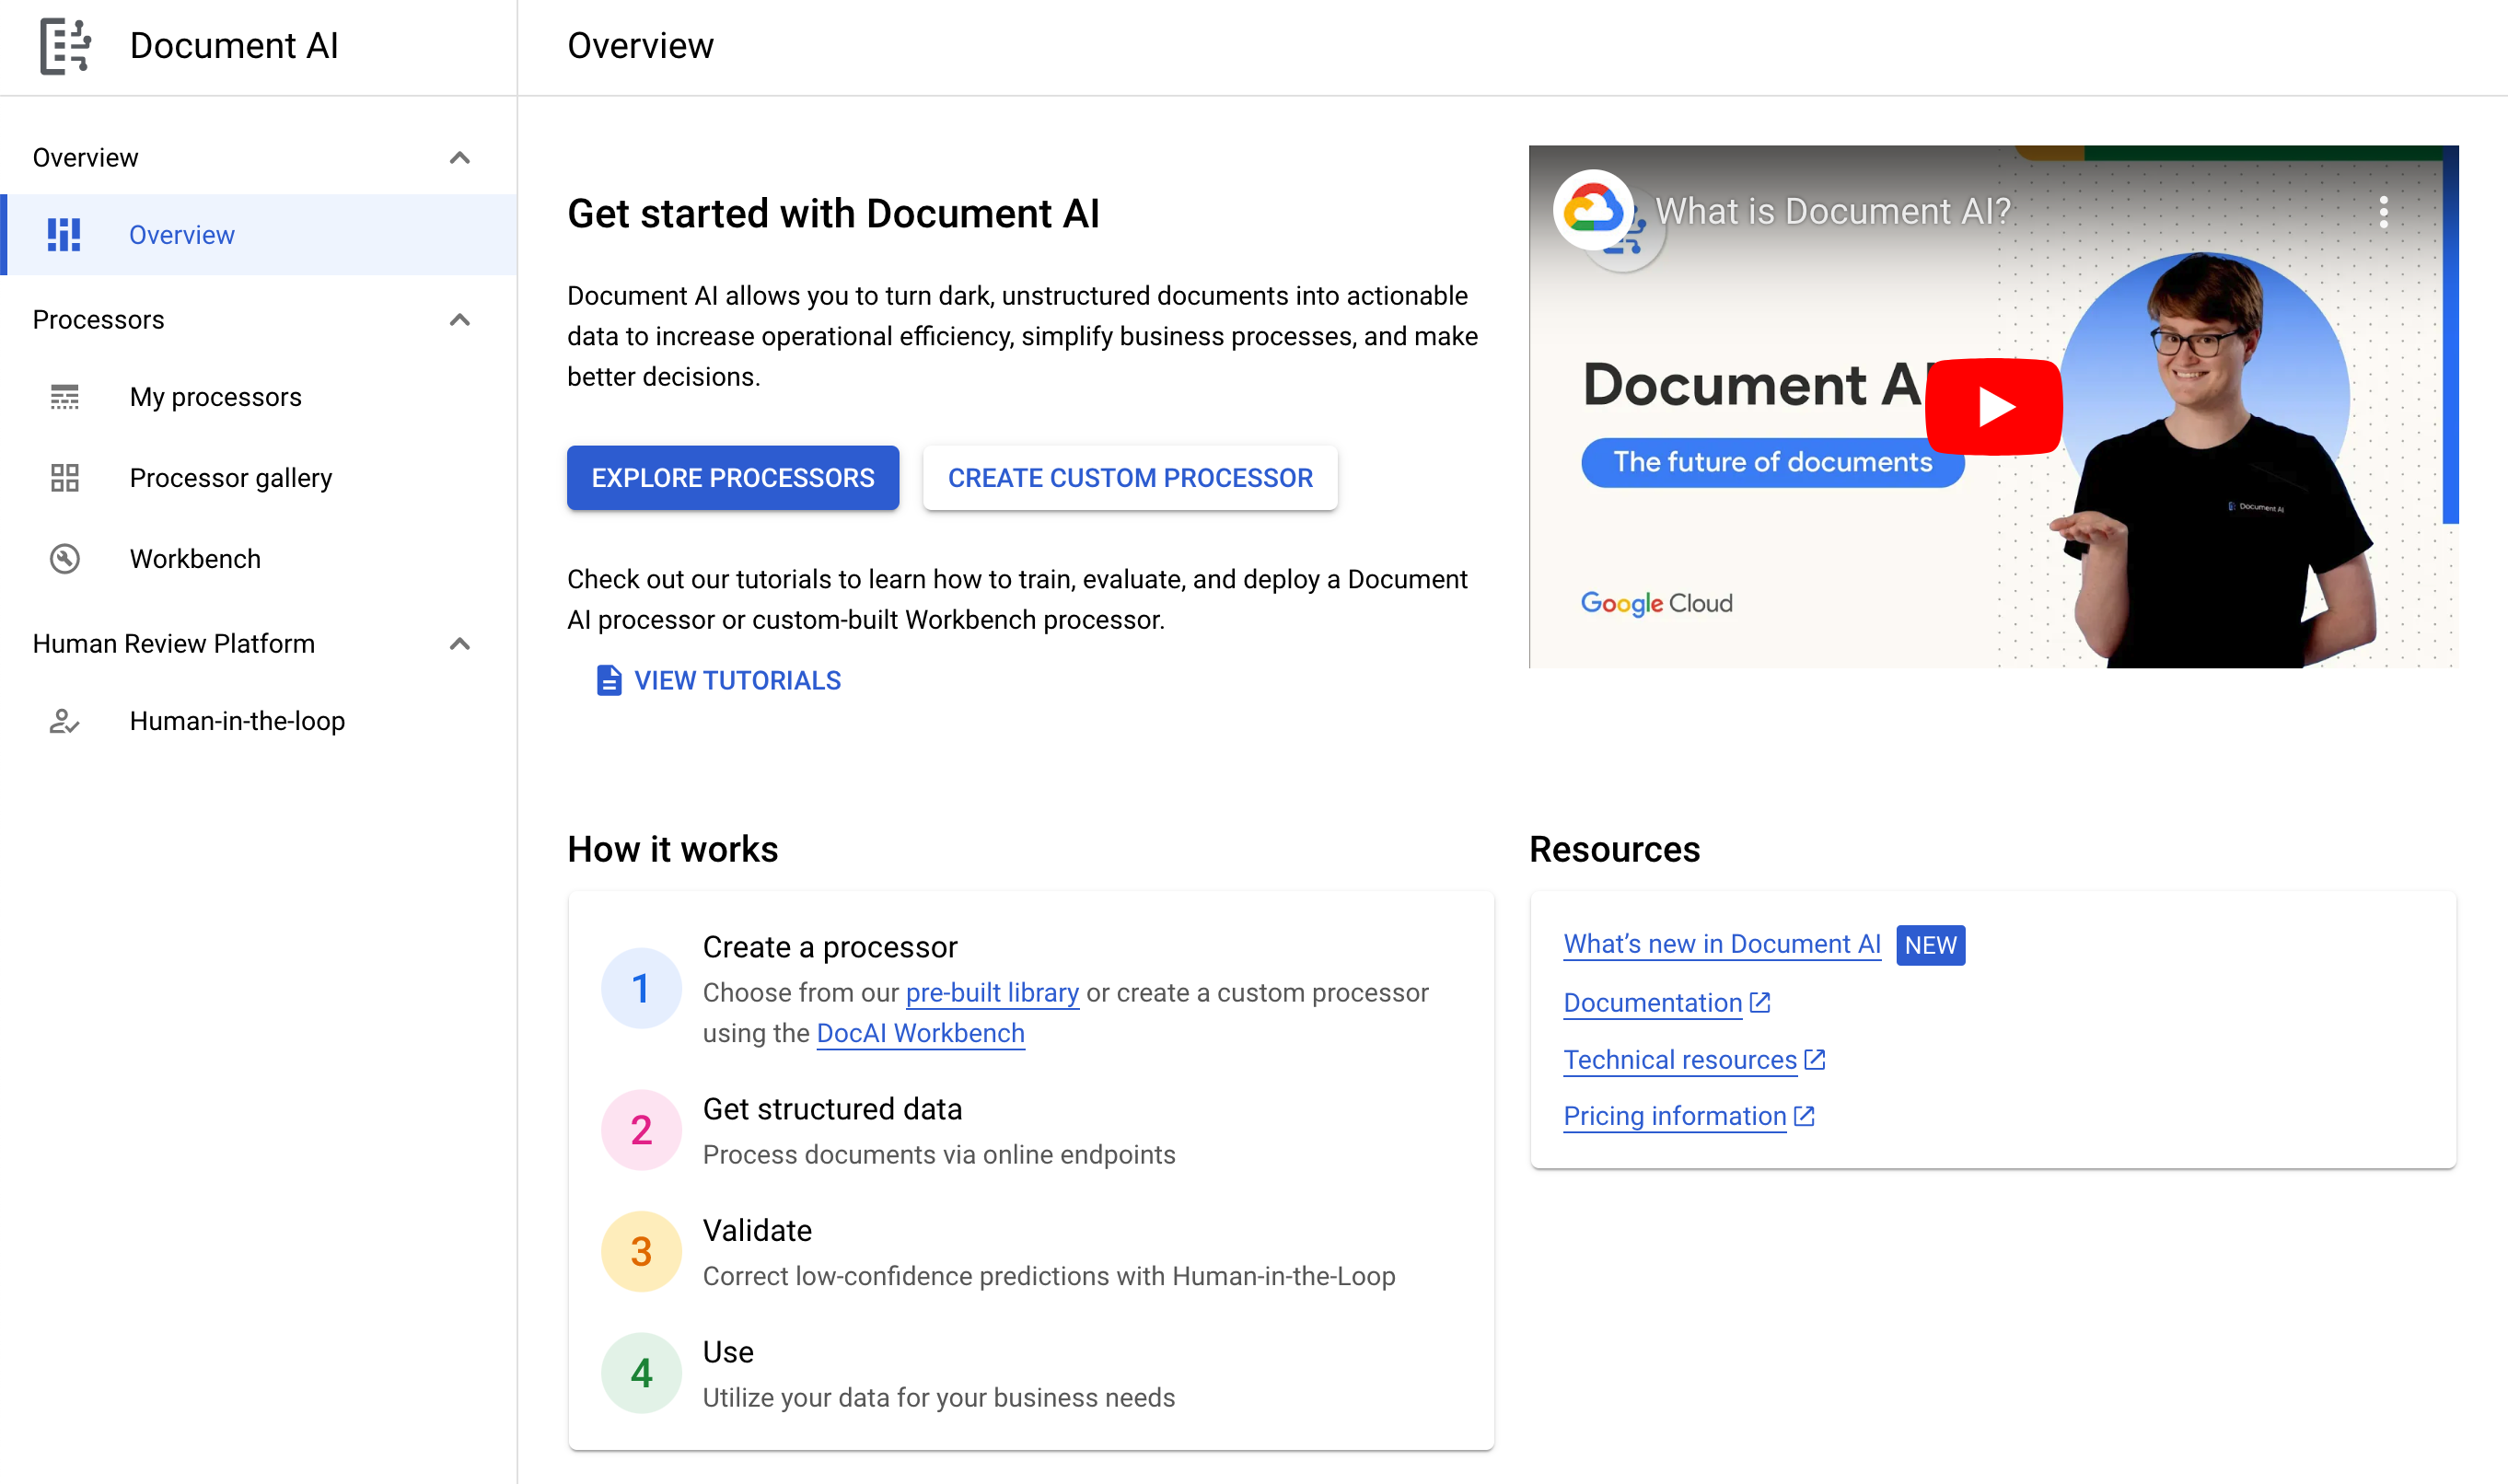
總覽
Document AI 是文件解讀解決方案,可擷取並處理文件、電子郵件、帳單和表單等非結構化資料,方便您解讀、分析和使用。Document AI API 會透過內容分類、實體擷取、進階搜尋等功能,將文件轉換成結構化資料。
在本實驗室中,您將瞭解如何使用 Document AI 表單剖析器,透過 Python 剖析手寫表單。我們將以簡單的病患資料登記表為例,但這個程序也適用 DocAI 支援的任何一般表單。
目標
在本實驗室中,您將瞭解如何執行下列工作:
- 使用 Document AI 表單剖析器從表單掃描檔中擷取資料
- 使用 Document AI 表單剖析器從表單擷取鍵/值組合
- 使用 Document AI 表單剖析器從表單擷取並匯出 CSV 資料
設定和需求
瞭解以下事項後,再點選「Start Lab」按鈕
請詳閱以下操作說明。實驗室活動會計時,且中途無法暫停。點選「Start Lab」後就會開始計時,顯示可使用 Google Cloud 資源的時間。
您將在真正的雲端環境完成實作實驗室活動,而不是模擬或示範環境。為此,我們會提供新的暫時憑證,供您在實驗室活動期間登入及存取 Google Cloud。
為了順利完成這個實驗室,請先確認:
- 可以使用標準的網際網路瀏覽器 (Chrome 瀏覽器為佳)。
注意事項:請使用無痕模式 (建議選項) 或私密瀏覽視窗執行此實驗室,這可以防止個人帳戶和學員帳戶之間的衝突,避免個人帳戶產生額外費用。
- 是時候完成實驗室活動了!別忘了,活動一旦開始將無法暫停。
注意事項:務必使用實驗室專用的學員帳戶。如果使用其他 Google Cloud 帳戶,可能會產生額外費用。
如何開始實驗室及登入 Google Cloud 控制台
-
按一下「Start Lab」按鈕。如果實驗室會產生費用,請在開啟的對話方塊中選取付款方式。右側的「Lab setup and access」面板會顯示下列項目:
- 「Open Google Cloud console」按鈕
- 此實驗室所需的臨時憑證 (使用者名稱和密碼)
- 完成此實驗室所需的其他資訊 (如有)
請注意,實驗室計時器位於頁面頂端附近,會顯示剩餘時間。
-
按一下「Open Google Cloud console」。如果使用 Chrome 瀏覽器,也可以按一下滑鼠右鍵,選取「在無痕視窗中開啟連結」。
接著,實驗室會啟動相關資源,並開啟另一個分頁,顯示「登入」頁面。
提示:您可以在不同的視窗並排開啟分頁。
注意:頁面顯示「選擇帳戶」對話方塊時,請點選「使用其他帳戶」。
-
如有必要,請將下方的 Username 貼到「登入」對話方塊。
{{{user_0.username | "Username"}}}
您也可以在「Lab setup and access」面板找到「Username」。
-
點選「下一步」。
-
複製下方的 Password,並貼到「歡迎使用」對話方塊。
{{{user_0.password | "Password"}}}
您也可以在「Lab setup and access」面板找到「Password」。
-
點選「下一步」。
重要事項:請務必使用實驗室提供的憑證,而非自己的 Google Cloud 帳戶憑證。
注意:如果使用自己的 Google Cloud 帳戶來進行這個實驗室,可能會產生額外費用。
-
繼續點按後續頁面:
- 接受條款及細則。
- 由於這是臨時帳戶,請勿新增救援選項或雙重驗證機制。
- 請勿申請免費試用。
Google Cloud 控制台稍後會在這個分頁開啟。
注意:如要使用 Google Cloud 產品和服務,請按一下「導覽選單」,或在「搜尋」欄位輸入服務或產品名稱。
啟動 Cloud Shell
Cloud Shell 是搭載多項開發工具的虛擬機器,提供永久的 5 GB 主目錄,而且在 Google Cloud 中運作。Cloud Shell 提供指令列存取權,方便您使用 Google Cloud 資源。
-
點按 Google Cloud 控制台頂端的「啟用 Cloud Shell」圖示  。
。
-
系統顯示視窗時,請按照下列步驟操作:
- 繼續操作 Cloud Shell 視窗。
- 授權 Cloud Shell 使用您的憑證發出 Google Cloud API 呼叫。
連線建立完成即代表已通過驗證,而且專案已設為您的 Project_ID:。輸出內容中有一行文字,宣告本工作階段的 Project_ID:
Your Cloud Platform project in this session is set to {{{project_0.project_id | "PROJECT_ID"}}}
gcloud 是 Google Cloud 的指令列工具,已預先安裝於 Cloud Shell,並支援 Tab 鍵自動完成功能。
- (選用) 您可以執行下列指令來列出使用中的帳戶:
gcloud auth list
- 點按「授權」。
輸出內容:
ACTIVE: *
ACCOUNT: {{{user_0.username | "ACCOUNT"}}}
To set the active account, run:
$ gcloud config set account `ACCOUNT`
- (選用) 您可以使用下列指令來列出專案 ID:
gcloud config list project
輸出內容:
[core]
project = {{{project_0.project_id | "PROJECT_ID"}}}
注意:如需 gcloud 的完整說明,請前往 Google Cloud 參閱 gcloud CLI 總覽指南。
工作 1:啟用 Document AI API
您必須先啟用 API,才能使用 Document AI。
-
按一下控制台頂端的「啟用 Cloud Shell」按鈕,開啟 Cloud Shell。
-
在 Cloud Shell 執行下列指令,啟用 Document AI API。
gcloud services enable documentai.googleapis.com
系統的回應大致如下:
Operation "operations/..." finished successfully.
您也必須安裝 pandas,這是 Python 的開放原始碼資料分析程式庫。
- 執行下列指令,安裝 pandas。
pip3 install --upgrade pandas
- 執行下列指令,安裝 Document AI 的 Python 用戶端程式庫。
pip3 install --upgrade google-cloud-documentai
系統的回應大致如下:
...
Installing collected packages: google-cloud-documentai
Successfully installed google-cloud-documentai-2.15.0
現在,您可以開始使用 Document AI API 了!
按一下「Check my progress」確認目標已達成。
啟用 Document AI API。
工作 2:建立表單剖析器處理器
在本實驗室,您必須先建立表單剖析器的處理器執行個體,才能用於 Document AI 平台。
- 在 Cloud 控制台,開啟「導覽選單」
 ,依序按一下「查看所有產品」>「人工智慧」>「Document AI」。
- 按一下「探索處理器」,然後點選「一般」內的「表單剖析器」,開啟「建立處理器」頁面。
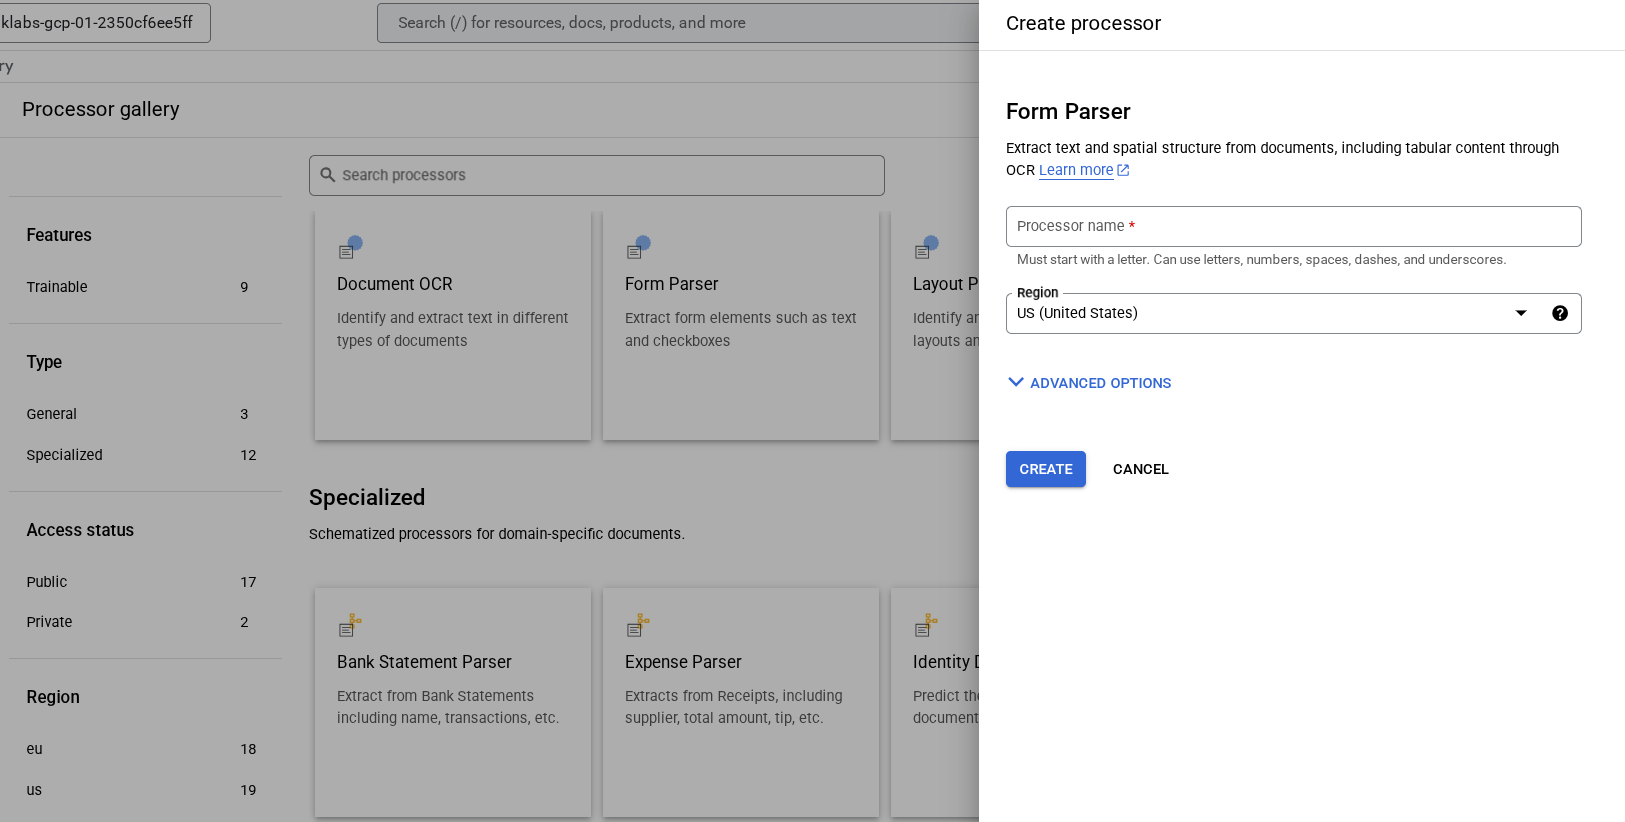
-
將處理器命名為 lab-form-parser,然後從清單中選取最接近的區域。
-
按一下「建立」即可建立處理器
-
複製處理器 ID。您稍後必須在程式碼中使用此 ID。

按一下「Check my progress」確認目標已達成。
建立處理器
在 Cloud 控制台測試處理器
上傳文件即可在控制台測試處理器。
- 對著下方圖片按一下滑鼠右鍵,然後選取「另存圖片」,即可下載範本表單。
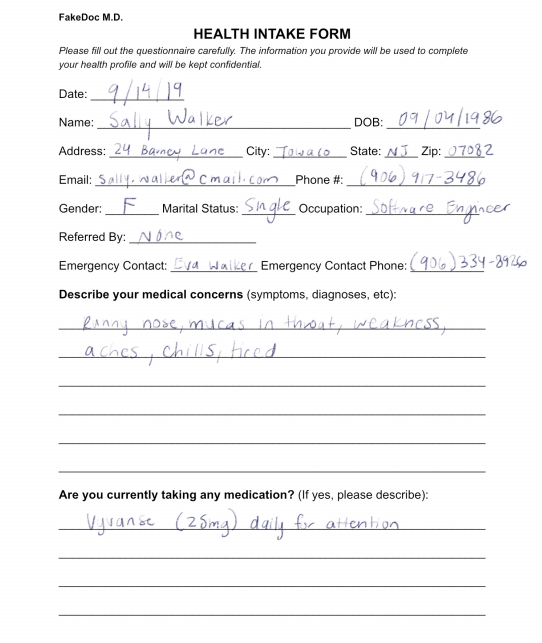
- 在「處理器詳細資料」頁面,按一下「上傳測試文件」。請選取剛下載的表單。
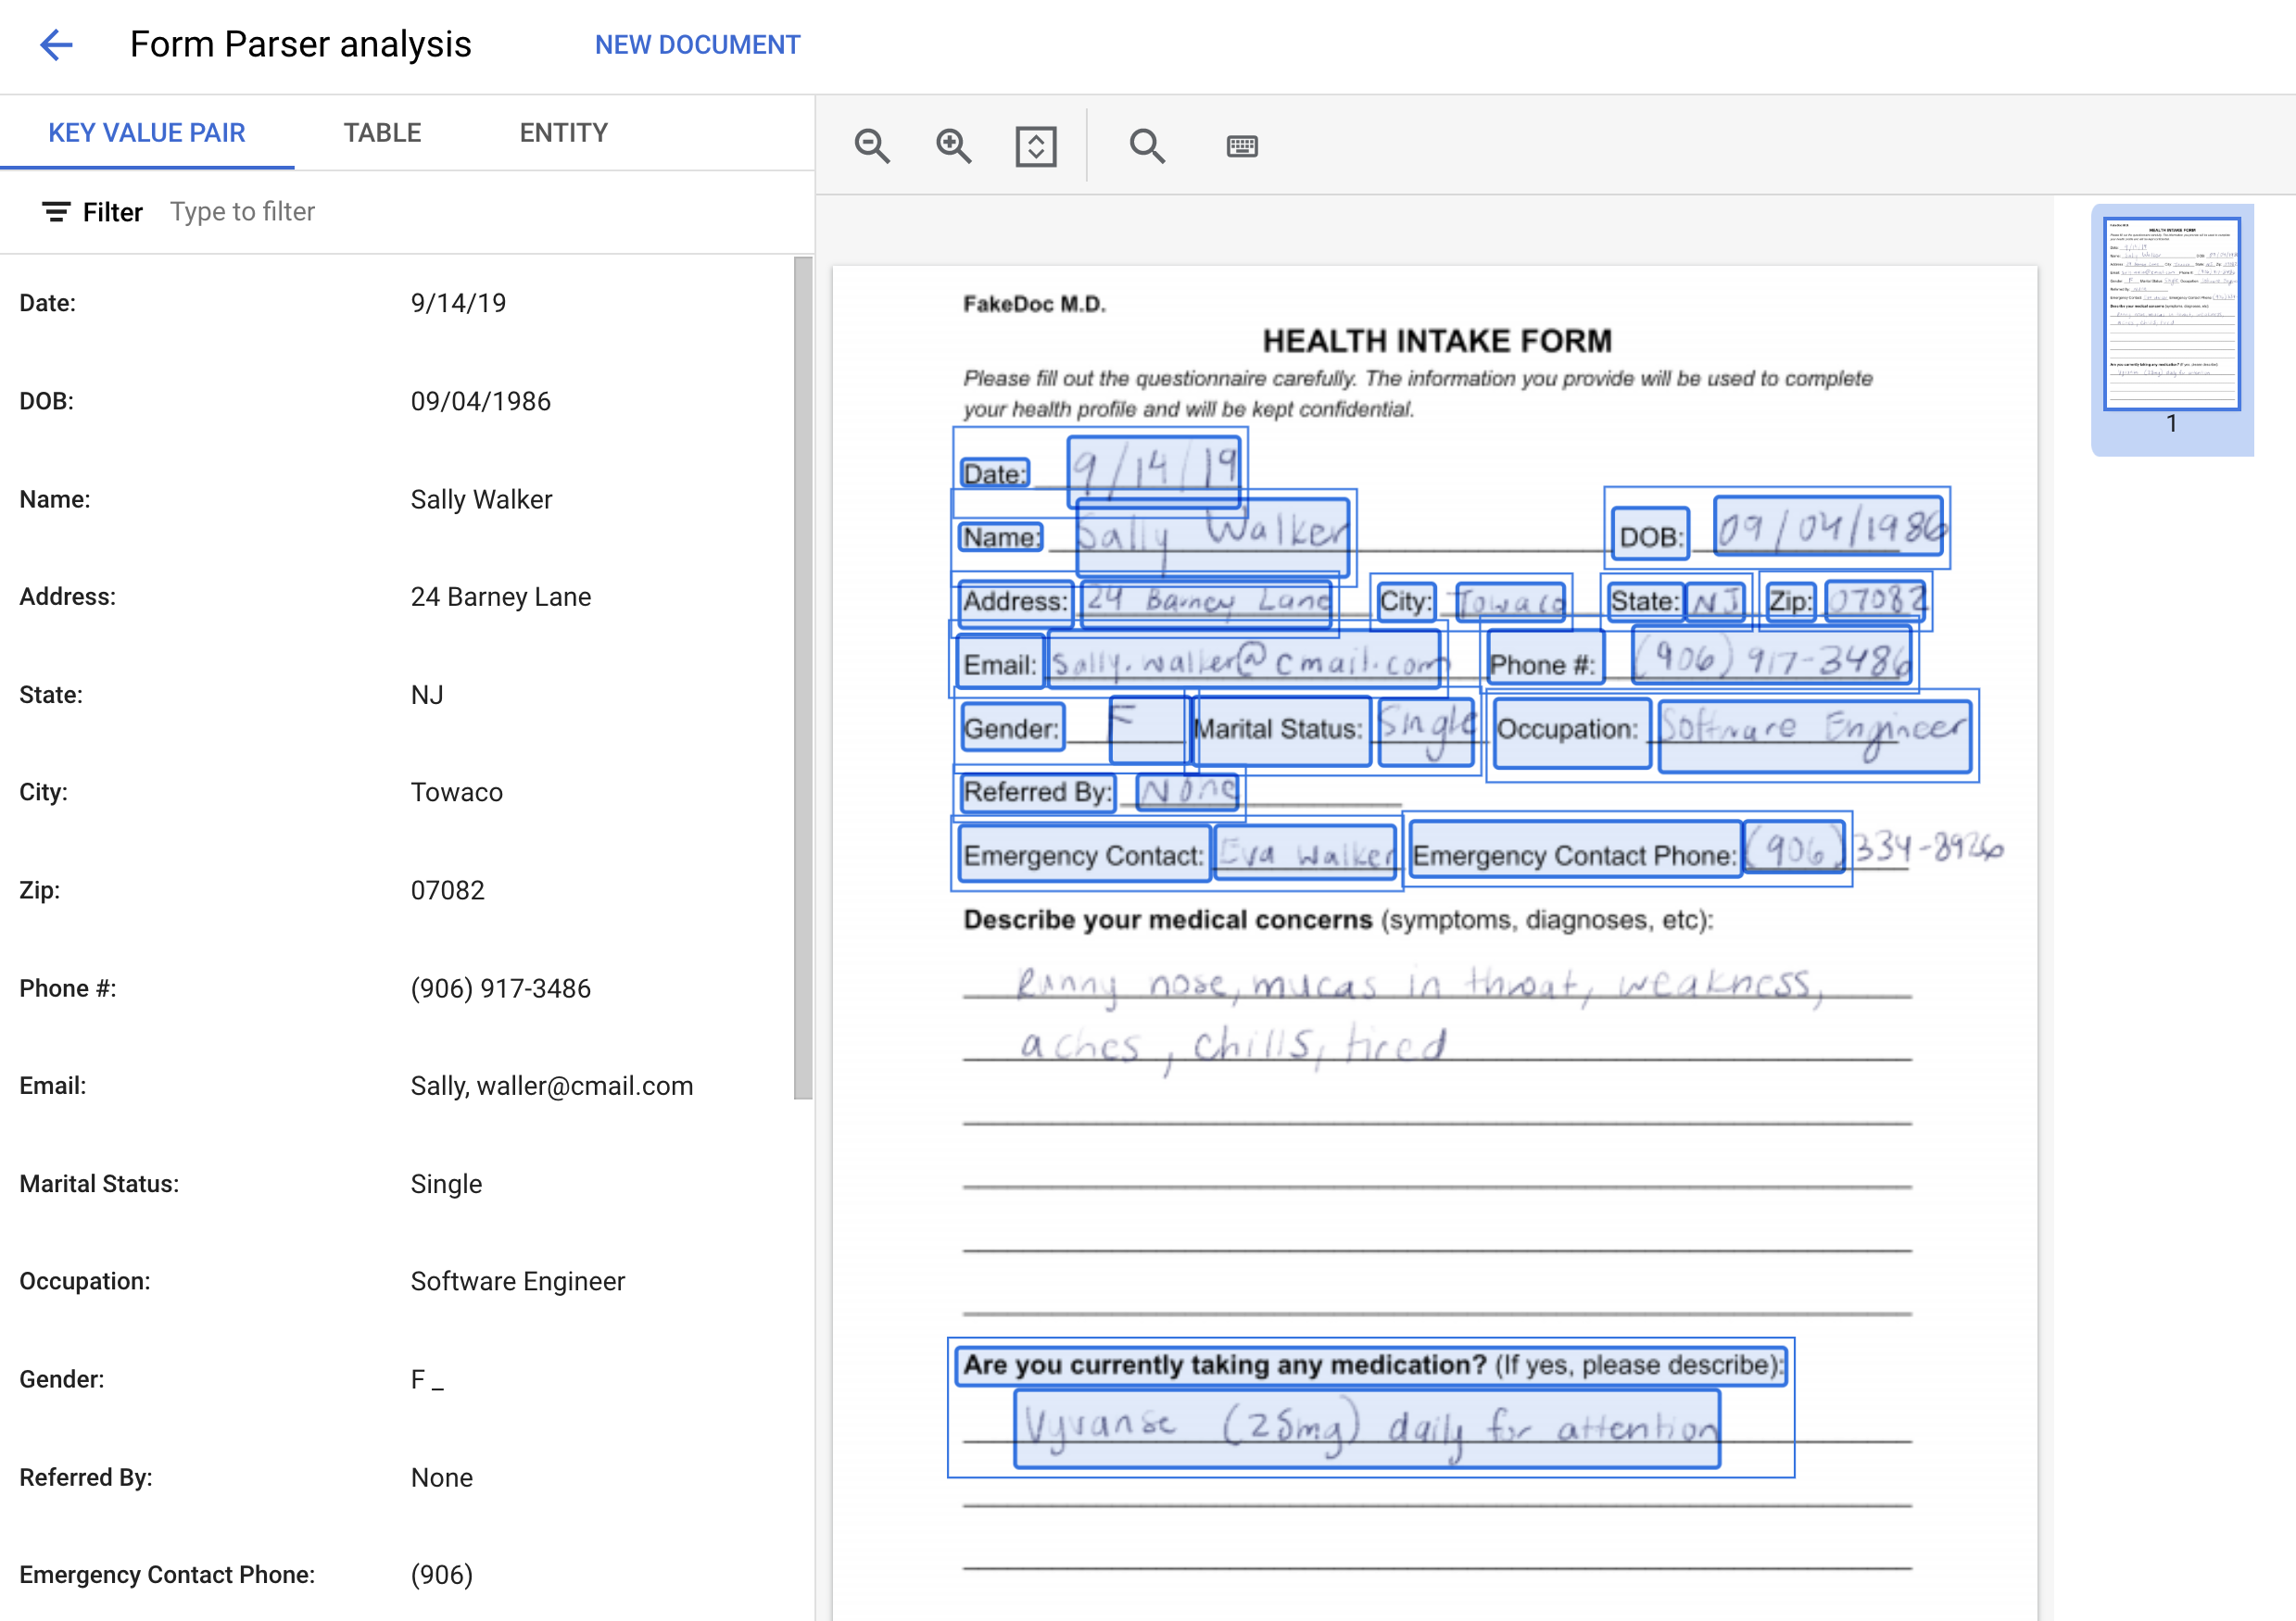
表單剖析器處理器會處理文件,並傳回剖析後的表單資料。畫面看起來大致如下:
工作 3:下載範本表單
在本節中,您將下載包含簡易病患資料登記表的範例文件。
- 執行下列指令,將範例表單下載至 Cloud Shell。
gcloud storage cp gs://cloud-samples-data/documentai/codelabs/form-parser/intake-form.pdf .
- 使用下列指令,確認檔案已下載至 Cloud Shell:
ls intake-form.pdf
工作 4:擷取表單鍵/值組合
在本節中,您將使用線上處理 API,呼叫先前建立的表單剖析器處理器。接著,您會擷取文件中找到的鍵/值組合。
線上處理功能適用於傳送單一文件並等待回應。如要傳送多個檔案,或檔案大小超過線上處理功能的頁數上限,也能使用批次處理功能。
對於所有處理器類型,用於發出處理要求的程式碼完全相同,唯一的差異是處理器 ID。Document 回應物件包含輸入文件的頁面清單。每個 page 物件都包含表單欄位清單,以及這些欄位在文字中的位置。
下列程式碼會逐一查看每個頁面,並擷取每個鍵、值和可信度分數。這類結構化資料更容易儲存在資料庫中,或用於其他應用程式。
- 在 Cloud Shell 建立名為
form_parser.py 的檔案,然後將下列程式碼貼入該檔案:
import pandas as pd
from google.cloud import documentai_v1 as documentai
def online_process(
project_id: str,
location: str,
processor_id: str,
file_path: str,
mime_type: str,
) -> documentai.Document:
"""
Processes a document using the Document AI Online Processing API.
"""
opts = {"api_endpoint": f"{location}-documentai.googleapis.com"}
# Instantiates a client
documentai_client = documentai.DocumentProcessorServiceClient(client_options=opts)
# The full resource name of the processor, e.g.:
# projects/project-id/locations/location/processor/processor-id
# You must create new processors in the Cloud Console first
resource_name = documentai_client.processor_path(project_id, location, processor_id)
# Read the file into memory
with open(file_path, "rb") as image:
image_content = image.read()
# Load Binary Data into Document AI RawDocument Object
raw_document = documentai.RawDocument(
content=image_content, mime_type=mime_type
)
# Configure the process request
request = documentai.ProcessRequest(
name=resource_name, raw_document=raw_document
)
# Use the Document AI client to process the sample form
result = documentai_client.process_document(request=request)
return result.document
def trim_text(text: str):
"""
Remove extra space characters from text (blank, newline, tab, etc.)
"""
return text.strip().replace("\n", " ")
PROJECT_ID = "YOUR_PROJECT_ID"
LOCATION = "YOUR_PROJECT_LOCATION" # Format is 'us' or 'eu'
PROCESSOR_ID = "FORM_PARSER_ID" # Create processor in Cloud Console
# The local file in your current working directory
FILE_PATH = "form.pdf"
# Refer to https://cloud.google.com/document-ai/docs/processors-list
# for supported file types
MIME_TYPE = "application/pdf"
document = online_process(
project_id=PROJECT_ID,
location=LOCATION,
processor_id=PROCESSOR_ID,
file_path=FILE_PATH,
mime_type=MIME_TYPE,
)
names = []
name_confidence = []
values = []
value_confidence = []
for page in document.pages:
for field in page.form_fields:
# Get the extracted field names
names.append(trim_text(field.field_name.text_anchor.content))
# Confidence - How "sure" the Model is that the text is correct
name_confidence.append(field.field_name.confidence)
values.append(trim_text(field.field_value.text_anchor.content))
value_confidence.append(field.field_value.confidence)
# Create a Pandas Dataframe to print the values in tabular format.
df = pd.DataFrame(
{
"Field Name": names,
"Field Name Confidence": name_confidence,
"Field Value": values,
"Field Value Confidence": value_confidence,
}
)
print(df)
- 將
YOUR_PROJECT_ID、YOUR_PROJECT_LOCATION、YOUR_PROCESSOR_ID 和 FILE_PATH 換成您環境適用的值。
請注意,FILE_PATH 是您在上一個步驟中下載至 Cloud Shell 的檔案名稱。如果沒有重新命名,名稱應為 intake-form.pdf,您需要在程式碼中更新檔名。
- 執行下列指令來執行指令碼:
python3 form_parser.py
您應該會看到下列輸出內容:
Field Name Field Name Confidence Field Value Field Value Confidence
0 Phone #: 0.999982 (906) 917-3486 0.999982
1 Emergency Contact: 0.999972 Eva Walker 0.999972
2 Marital Status: 0.999951 Single 0.999951
3 Gender: 0.999933 F 0.999933
4 Occupation: 0.999914 Software Engineer 0.999914
5 Referred By: 0.999862 None 0.999862
6 Date: 0.999858 9/14/19 0.999858
7 DOB: 0.999716 09/04/1986 0.999716
8 Address: 0.999147 24 Barney Lane 0.999147
9 City: 0.997718 Towaco 0.997718
10 Name: 0.997345 Sally Walker 0.997345
11 State: 0.996944 NJ 0.996944
...
工作 5:剖析資料表
表單剖析器也能從文件中的資料表擷取資料。在本節中,您將下載新的範例文件,並從資料表中擷取資料。由於資料會載入 Pandas,因此只需單一次方法呼叫,就能將資料輸出為 CSV 檔和許多其他格式。
下載含有資料表的範例表單
我們提供一份內含範例表單和資料表的範例文件。
- 執行下列指令,將範例表單下載至 Cloud Shell。
gcloud storage cp gs://cloud-samples-data/documentai/codelabs/form-parser/form_with_tables.pdf .
- 使用下列指令,確認檔案已下載至 Cloud Shell:
ls form_with_tables.pdf
擷取資料表資料
資料表資料的處理要求,與鍵/值組合的擷取要求完全相同,兩者的差異在於您從回應中擷取資料的欄位。資料表資料會儲存在 pages[].tables[] 欄位。
這個範例會從每個資料表和頁面的資料表標題列和主體列擷取資訊,然後輸出資料表並存為 CSV 檔。
- 建立名為
table_parsing.py 的檔案,然後將下列程式碼貼入該檔案:
# type: ignore[1]
"""
Uses Document AI online processing to call a form parser processor
Extracts the tables and data in the document.
"""
from os.path import splitext
from typing import List, Sequence
import pandas as pd
from google.cloud import documentai
def online_process(
project_id: str,
location: str,
processor_id: str,
file_path: str,
mime_type: str,
) -> documentai.Document:
"""
Processes a document using the Document AI Online Processing API.
"""
opts = {"api_endpoint": f"{location}-documentai.googleapis.com"}
# Instantiates a client
documentai_client = documentai.DocumentProcessorServiceClient(client_options=opts)
# The full resource name of the processor, e.g.:
# projects/project-id/locations/location/processor/processor-id
# You must create new processors in the Cloud Console first
resource_name = documentai_client.processor_path(project_id, location, processor_id)
# Read the file into memory
with open(file_path, "rb") as image:
image_content = image.read()
# Load Binary Data into Document AI RawDocument Object
raw_document = documentai.RawDocument(
content=image_content, mime_type=mime_type
)
# Configure the process request
request = documentai.ProcessRequest(
name=resource_name, raw_document=raw_document
)
# Use the Document AI client to process the sample form
result = documentai_client.process_document(request=request)
return result.document
def get_table_data(
rows: Sequence[documentai.Document.Page.Table.TableRow], text: str
) -> List[List[str]]:
"""
Get Text data from table rows
"""
all_values: List[List[str]] = []
for row in rows:
current_row_values: List[str] = []
for cell in row.cells:
current_row_values.append(
text_anchor_to_text(cell.layout.text_anchor, text)
)
all_values.append(current_row_values)
return all_values
def text_anchor_to_text(text_anchor: documentai.Document.TextAnchor, text: str) -> str:
"""
Document AI identifies table data by their offsets in the entirety of the
document's text. This function converts offsets to a string.
"""
response = ""
# If a text segment spans several lines, it will
# be stored in different text segments.
for segment in text_anchor.text_segments:
start_index = int(segment.start_index)
end_index = int(segment.end_index)
response += text[start_index:end_index]
return response.strip().replace("\n", " ")
PROJECT_ID = "YOUR_PROJECT_ID"
LOCATION = "YOUR_PROJECT_LOCATION" # Format is 'us' or 'eu'
PROCESSOR_ID = "FORM_PARSER_ID" # Create processor before running sample
# The local file in your current working directory
FILE_PATH = "form_with_tables.pdf"
# Refer to https://cloud.google.com/document-ai/docs/file-types
# for supported file types
MIME_TYPE = "application/pdf"
document = online_process(
project_id=PROJECT_ID,
location=LOCATION,
processor_id=PROCESSOR_ID,
file_path=FILE_PATH,
mime_type=MIME_TYPE,
)
header_row_values: List[List[str]] = []
body_row_values: List[List[str]] = []
# Input Filename without extension
output_file_prefix = splitext(FILE_PATH)[0]
for page in document.pages:
for index, table in enumerate(page.tables):
header_row_values = get_table_data(table.header_rows, document.text)
body_row_values = get_table_data(table.body_rows, document.text)
# Create a Pandas Dataframe to print the values in tabular format.
df = pd.DataFrame(
data=body_row_values,
columns=pd.MultiIndex.from_arrays(header_row_values),
)
print(f"Page {page.page_number} - Table {index}")
print(df)
# Save each table as a CSV file
output_filename = f"{output_file_prefix}_pg{page.page_number}_tb{index}.csv"
df.to_csv(output_filename, index=False)
- 將
YOUR_PROJECT_ID、YOUR_PROJECT_LOCATION、YOUR_PROCESSOR_ID 和 FILE_PATH 換成您環境適用的值。
請注意,FILE_PATH 是您在上一個步驟中下載至 Cloud Shell 的檔案名稱。如果沒有重新命名,名稱應為 form_with_tables.pdf,這是預設值,不需要變更。
- 執行下列指令來執行指令碼:
python3 table_parsing.py
您應該會看到下列輸出內容:
Page 1 - Table 0
Item Description
0 Item 1 Description 1
1 Item 2 Description 2
2 Item 3 Description 3
在您執行程式碼的目錄中,也應該會有新的 CSV 檔。
- 執行下列指令,列出目前工作目錄中的檔案:
ls
您應該會看到下列輸出內容:
form_with_tables_pg1_tb0.csv
恭喜!
恭喜!在本實驗室中,您已成功使用 Document AI API 從手寫表單擷取資料。您也瞭解如何使用 Document AI Python 用戶端程式庫,從表單中擷取鍵/值組合,以及從含有資料表的表單中擷取表格型資料。
後續步驟/瞭解詳情
如要進一步瞭解 Document AI 和 Python 用戶端程式庫,請參閱下列資源:
Google Cloud 教育訓練與認證
協助您瞭解如何充分運用 Google Cloud 的技術。我們的課程會介紹專業技能和最佳做法,讓您可以快速掌握要領並持續進修。我們提供從基本到進階等級的訓練課程,並有隨選、線上和虛擬課程等選項,方便您抽空參加。認證可協助您驗證及證明自己在 Google Cloud 技術方面的技能和專業知識。
使用手冊上次更新日期:2025 年 7 月 21 日
實驗室上次測試日期:2025 年 7 月 21 日
Copyright 2026 Google LLC 保留所有權利。Google 和 Google 標誌是 Google LLC 的商標,其他公司和產品名稱則有可能是其關聯公司的商標。


