
Create a Cloud Storage bucket and upload an object

Check my progress

/ 30

Create a Load Balancer

Check my progress

/ 30

Delete the object from Cloud Storage bucket

Check my progress

/ 20

Create Edge Security Policy for your CDN Cache and Validate Policy

Check my progress

/ 20

This lab may incorporate AI tools to support your learning.

GSP878

總覽

Google Cloud Armor 邊緣安全性政策可讓您限制存取 Cloud CDN (內容傳遞網路) 和 Cloud Storage 中的快取物件。邊緣安全性政策會部署於 Google 網路最外層的邊界 (也就是 Cloud CDN 快取所在位置的上游),並強制執行。採取這種做法有很多原因,包括:確保使用者無法從受限制的地理位置存取 Storage bucket 中的物件,或是確認媒體發布系統僅限在您擁有授權的位置放送內容。

在本實驗室,您將建立 Google Cloud Storage bucket、將圖片上傳至 bucket、將 bucket 繫結至負載平衡器,然後為 bucket 啟用 Cloud CDN 和 Cloud Armor 邊緣安全性政策。

課程內容

本實驗室的內容包括:

  • 設定 Cloud Storage bucket 並上傳可快取內容
  • 建立邊緣安全性政策來保護內容
  • 確認邊緣安全性政策運作正常

設定和需求

瞭解以下事項後,再點選「Start Lab」按鈕

請詳閱以下操作說明。實驗室活動會計時,且中途無法暫停。點選「Start Lab」後就會開始計時,顯示可使用 Google Cloud 資源的時間。

您將在真正的雲端環境完成實作實驗室活動,而不是模擬或示範環境。為此,我們會提供新的暫時憑證,供您在實驗室活動期間登入及存取 Google Cloud。

為了順利完成這個實驗室,請先確認:

  • 可以使用標準的網際網路瀏覽器 (Chrome 瀏覽器為佳)。
注意事項:請使用無痕模式 (建議選項) 或私密瀏覽視窗執行此實驗室,這可以防止個人帳戶和學員帳戶之間的衝突,避免個人帳戶產生額外費用。
  • 是時候完成實驗室活動了!別忘了,活動一旦開始將無法暫停。
注意事項:務必使用實驗室專用的學員帳戶。如果使用其他 Google Cloud 帳戶,可能會產生額外費用。

如何開始實驗室及登入 Google Cloud 控制台

  1. 按一下「Start Lab」按鈕。如果實驗室會產生費用,請在開啟的對話方塊中選取付款方式。右側的「Lab setup and access」面板會顯示下列項目:

    • 「Open Google Cloud console」按鈕
    • 此實驗室所需的臨時憑證 (使用者名稱和密碼)
    • 完成此實驗室所需的其他資訊 (如有)

    請注意,實驗室計時器位於頁面頂端附近,會顯示剩餘時間。

  2. 按一下「Open Google Cloud console」。如果使用 Chrome 瀏覽器,也可以按一下滑鼠右鍵,選取「在無痕視窗中開啟連結」

    接著,實驗室會啟動相關資源,並開啟另一個分頁,顯示「登入」頁面。

    提示:您可以在不同的視窗並排開啟分頁。

    注意:頁面顯示「選擇帳戶」對話方塊時,請點選「使用其他帳戶」
  3. 如有必要,請將下方的 Username 貼到「登入」對話方塊。

    {{{user_0.username | "Username"}}}

    您也可以在「Lab setup and access」面板找到「Username」。

  4. 點選「下一步」

  5. 複製下方的 Password,並貼到「歡迎使用」對話方塊。

    {{{user_0.password | "Password"}}}

    您也可以在「Lab setup and access」面板找到「Password」。

  6. 點選「下一步」

    重要事項:請務必使用實驗室提供的憑證,而非自己的 Google Cloud 帳戶憑證。 注意:如果使用自己的 Google Cloud 帳戶來進行這個實驗室,可能會產生額外費用。
  7. 繼續點按後續頁面:

    • 接受條款及細則。
    • 由於這是臨時帳戶,請勿新增救援選項或雙重驗證機制。
    • 請勿申請免費試用。

Google Cloud 控制台稍後會在這個分頁開啟。

注意:如要使用 Google Cloud 產品和服務,請按一下「導覽選單」,或在「搜尋」欄位輸入服務或產品名稱。「導覽選單」圖示和搜尋欄位

事前準備

  • 在 Cloud Shell 設定專案 ID,並建立環境變數:
export PROJECT_ID=$(gcloud config get-value project) echo $PROJECT_ID gcloud config set project $PROJECT_ID

工作 1:建立 Cloud Storage bucket 並上傳物件

Cloud Storage bucket 將做為 Cloud CDN 的來源。

  1. 前往控制台,依序點選「導覽選單」圖示 導覽選單 >「Cloud Storage」>「bucket」

  2. 點選「建立」,建立新的 Cloud Storage bucket。

  3. 將 bucket 命名為 -bucket。

  4. 點選「繼續」

  5. 在「位置類型」下方選取「區域」,然後選擇「」。

  6. 點選「繼續」

  7. bucket 的預設儲存空間級別為 Standard。點選「繼續」

  8. 在「禁止公開存取」底下,取消勾選「強制禁止公開存取這個 bucket」核取方塊。

  9. 在「存取控管」底下,選擇「精細」

  10. 點選「繼續」

  11. 點選「建立」

大功告成,您剛剛建立了 Cloud Storage bucket!

將物件上傳至 bucket

現在請將物件上傳至 bucket,後續工作會用到。Cloud Storage bucket 預設為私人狀態。在本實驗室,您會將物件設為公開,讓網際網路上的使用者都能存取。

  1. 在 Cloud Shell 執行下列指令,將映像檔下載至 Cloud Shell。本實驗室使用 Google 首頁的 Google 圖片。
wget --output-document google.png https://www.google.com/images/branding/googlelogo/1x/googlelogo_color_272x92dp.png
  1. 執行 gsutil cp 指令,將圖片從 Cloud Shell 上傳至先前建立的 bucket:
gsutil cp google.png gs://{{{project_0.startup_script.project_id|Bucket Name}}}
  1. 從 Cloud Shell 移除下載的圖片:
rm google.png
  1. 依序前往「Cloud Storage」>「bucket」>「,找出上傳至 bucket 的物件。

  2. 找到先前上傳的物件,點選右側的三點圖示,然後按一下「編輯存取權」

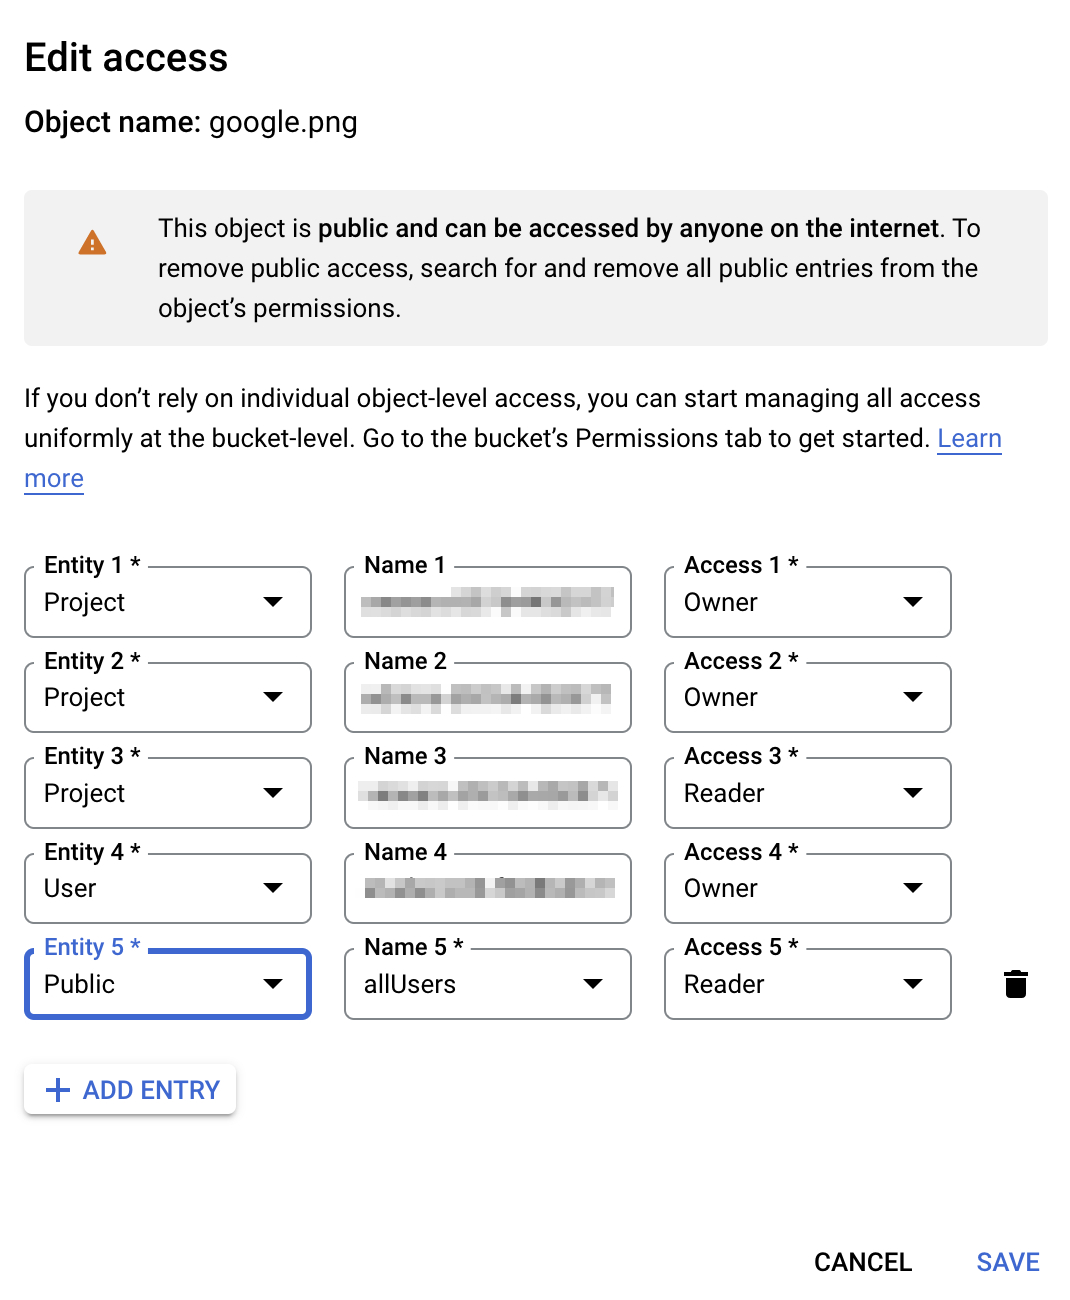
  3. 點選「新增項目」,然後從下拉式選單將實體設為「公開」

  4. 點選「儲存」

「編輯存取權」頁面,列出實體清單和「儲存」與「取消」按鈕

點選「Check my progress」,確認目標已達成。 建立 Cloud Storage bucket 並上傳物件

工作 2:建立負載平衡器

Cloud CDN 和 Cloud Armor 都是可與 Google 全域 Cloud Load Balancing 搭配運作的元件。在本節中,您將建立 HTTP 負載平衡器。

  1. 依序點選「導覽選單」圖示 「導覽選單」圖示 >「查看所有產品」>「網路服務」>「負載平衡」
  2. 點選「+ 建立負載平衡器」
  3. 在「負載平衡器類型」底下,選取「應用程式負載平衡器 (HTTP/HTTPS)」,然後點選「下一步」
  4. 在「公開或內部」底下,選取「公開 (外部)」,然後點選「下一步」。
  5. 在「全域或單一區域部署」部分,選取「最適合全域工作負載」,然後點選「下一步」。
  6. 在「負載平衡器代別」部分,選取「全域外部應用程式負載平衡器」,然後點選「下一步」。
  7. 點選「設定」按鈕。
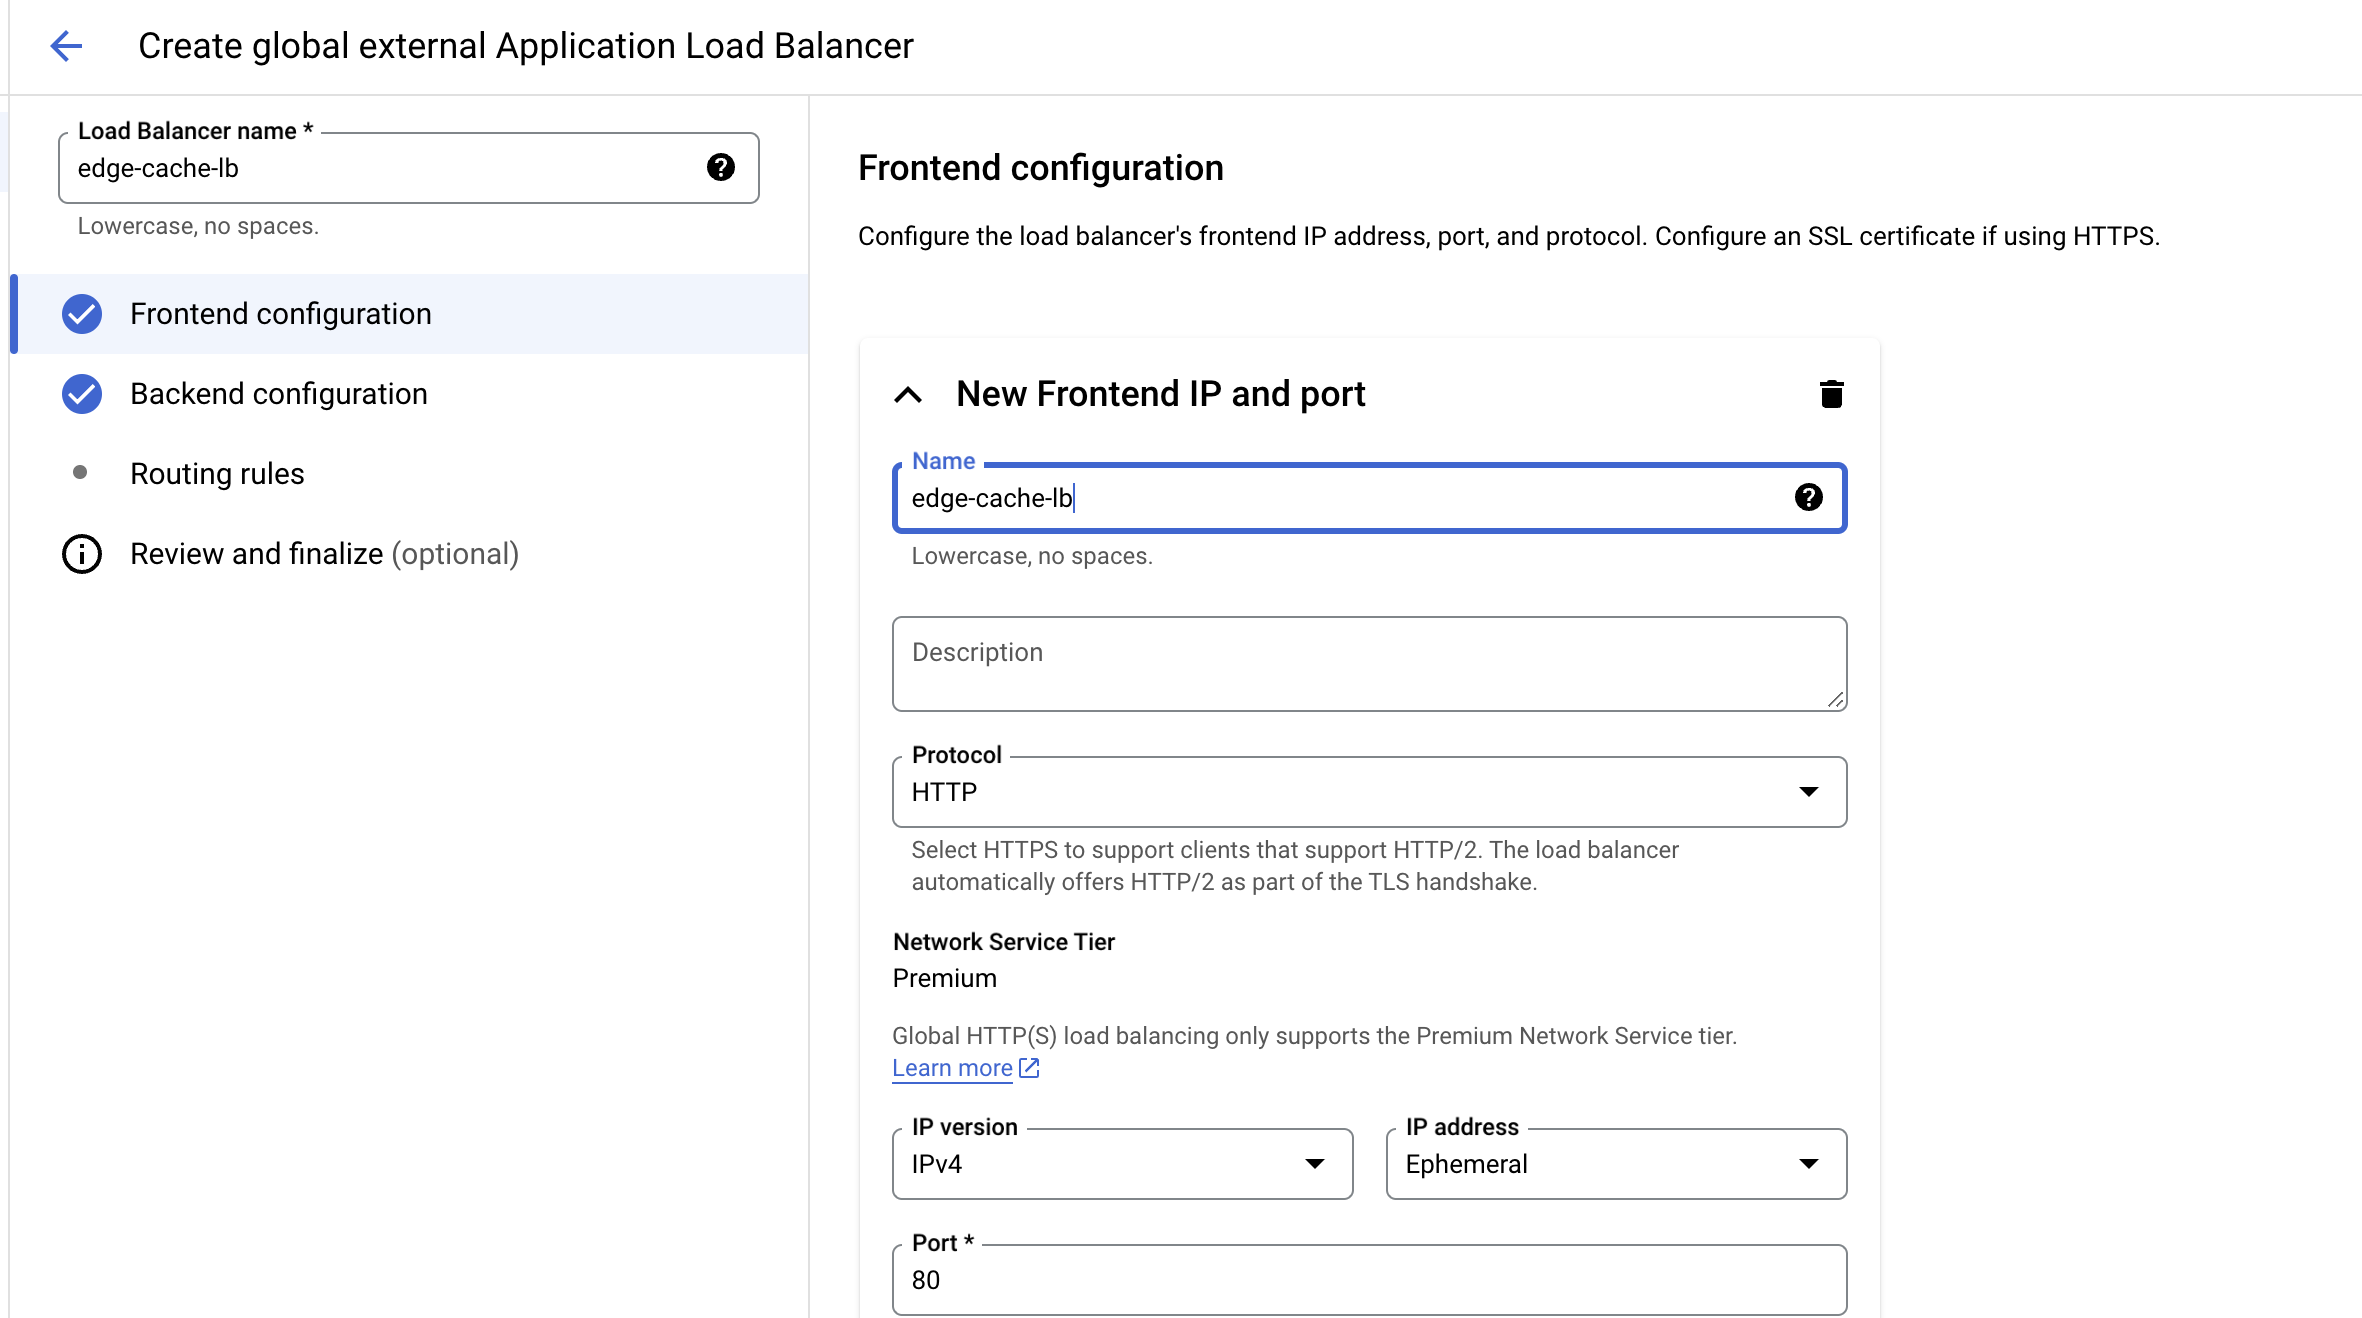
  8. 將負載平衡器命名為 edge-cache-lb

建立前端設定

請按照下列步驟操作,建立前端設定:

  1. 點選「前端設定」

  2. 前端設定請使用 HTTP (若有憑證,也能使用 HTTPS) 和暫時性 IP 位址,並確保已選取進階級網路。這是預設選項。

  3. 點選「完成」

前端設定頁面,列出負載平衡器的說明

建立後端設定

請按照下列步驟操作,建立後端設定:

  1. 點選「後端設定」

  2. 在「後端服務和後端 bucket」部分,點選「建立後端 bucket」

  3. 將「後端 bucket 名稱」設為 lb-backend-bucket

  4. 在下一個欄位,點選「瀏覽」按鈕,選取先前建立的 Cloud Storage bucket。

  5. 其他設定均保留預設值。

  6. 點選「建立」

建立主機與路徑規則

請按照下列步驟操作,建立主機與路徑規則:

  1. 點選左側的「轉送規則」

  2. 在「模式」底下,選取「簡易型主機與路徑規則」,將所有要求傳送至 bucket。這是預設選項。

檢查並建立 HTTP 負載平衡器

按照下列步驟操作,檢查並建立 HTTP 負載平衡器:

  1. 點選「檢查並完成」
  2. 檢查「後端服務」和「前端」
  3. 點選「建立」

取得負載平衡器 IP

請按照下列步驟操作,透過控制台取得負載平衡器 IP:

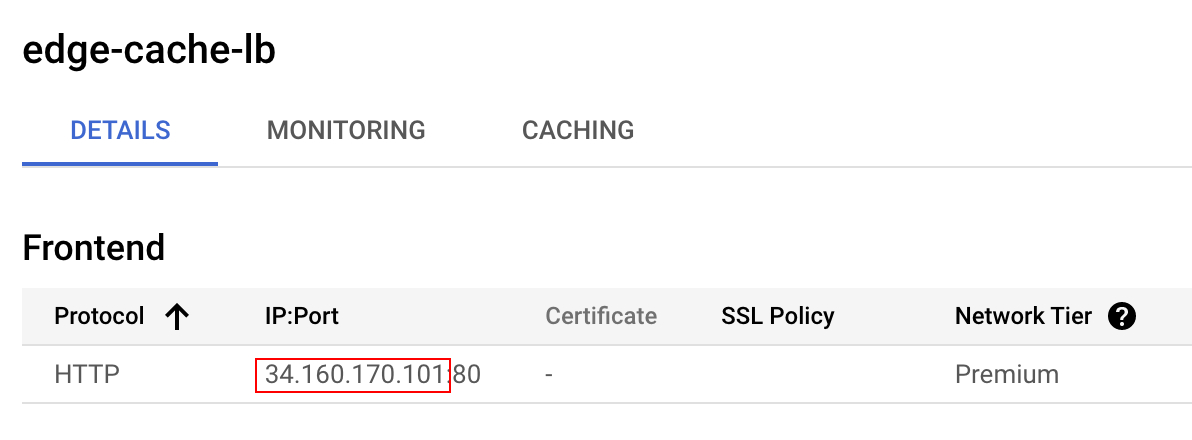
  • 在專案的負載平衡器清單中,點選負載平衡器名稱。記下負載平衡器的 IPv4 位址,後續工作會用到 (以下稱為 [LOAD_BALANCER_IP])。

「詳細資料」頁面,包含醒目顯示的 IP:Port 位址

對負載平衡器執行查詢

請在幾分鐘後查詢負載平衡器,確認上傳的物件。您需要提供負載平衡器的 IP 位址和映像檔名稱。

  1. 從 Cloud Shell 執行下列指令,並將 LOAD_BALANCER_IP 換成負載平衡器的 IPv4 位址:
curl -svo /dev/null http://LOAD_BALANCER_IP/google.png 注意:最多可能需要 5 分鐘,才能存取 HTTP 負載平衡器。

輸出內容:

student-cloudshell% curl -svo /dev/null http://34.98.81.123/google.png * Trying 34.98.81.123... * TCP_NODELAY set * Connected to 34.98.81.123 (34.98.81.123) port 80 (#0) > GET /google.png HTTP/1.1 > Host: YOUR_IP > User-Agent: curl/7.64.1 > Accept: */* > < HTTP/1.1 200 OK < X-GUploader-UploadID: ADPycdtoILI76KVsvBvdVGvSfzaxys1m3zYqCepBrmJxAI48ni24cWCRIdNu-53PX3DS6iycxp6xwFbMpwtcHHZQUQmEBxAgng < Expires: Mon, 13 Dec 2021 22:58:26 GMT < Date: Mon, 13 Dec 2021 21:58:26 GMT < Cache-Control: public, max-age=3600 < Last-Modified: Mon, 13 Dec 2021 21:45:57 GMT < ETag: "8f9327db2597fa57d2f42b4a6c5a9855" < x-goog-generation: 1639431957957903 < x-goog-metageneration: 2 < x-goog-stored-content-encoding: identity < x-goog-stored-content-length: 5969 < Content-Type: image/png < x-goog-hash: crc32c=TeiHTA== < x-goog-hash: md5=j5Mn2yWX+lfS9CtKbFqYVQ== < x-goog-storage-class: STANDARD < Accept-Ranges: bytes < Content-Length: 5969 < Server: UploadServer
  1. 透過下列指令執行幾個查詢:
for i in `seq 1 50`; do curl http://LOAD_BALANCER_IP/google.png; done

確認 Cloud CDN 提供的內容

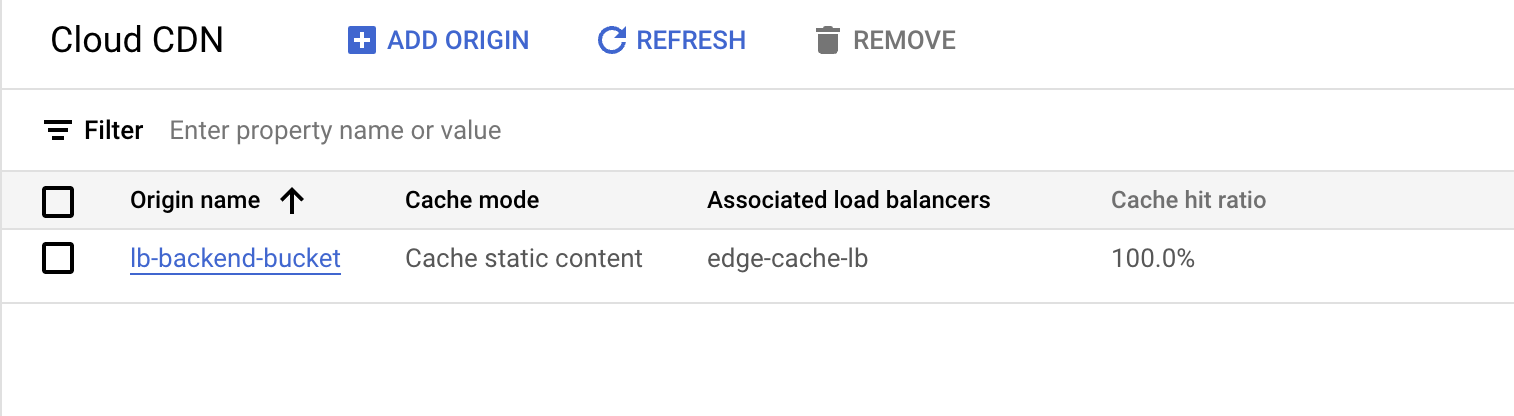
  • 前往「網路服務」>「Cloud CDN」,透過 CDN 或負載平衡監控功能,確認內容確實是由 CDN 提供。

Cloud CDN 總覽頁面,已填入一個結果

您應該會看到接近 100% 的命中率。

點選「Check my progress」,確認目標已達成。 建立負載平衡器

工作 3:從 Cloud Storage bucket 刪除物件

快取已填入完成,現在請從 bucket 刪除物件。這麼做能讓您更清楚瞭解,政策的套用對象為快取,而不是後端。

  1. 依序點選「導覽選單」圖示 「導覽選單」圖示 >「Cloud Storage」>「bucket」>「-bucket」>「物件」

  2. 選取物件,接著點選頂端的「刪除」按鈕來刪除物件。

  3. 點選提示訊息中的「刪除」

點選「Check my progress」,確認目標已達成。 從 Cloud Storage bucket 刪除物件

工作 4:建立邊緣安全性政策

Cloud Armor 政策獨立於 HTTP 負載平衡器之外。部署 Cloud Armor 政策後,即可將政策與一或多個 HTTP 負載平衡器後端服務或 bucket 資源 (稱為「目標」) 建立關聯。

  1. 依序點選「導覽選單」圖示 「導覽選單」圖示 >「查看所有產品」>「網路安全性」>「Cloud Armor 政策」,然後按一下「建立政策」
  1. 設定下方的值,其他屬性均保留預設值,然後點選「下一步」
屬性 值 (按照指示輸入值或選取選項)
名稱 edge-security-policy
政策類型 邊緣安全性政策
預設規則動作 拒絕
  1. 在「對目標套用政策」部分,點選「新增目標」並設定下列值:
屬性
類型 1 後端 bucket (外部應用程式負載平衡器)
後端 bucket 目標 1 lb-backend-bucket
  1. 點選「完成」

  2. 點選「建立政策」

驗證邊緣安全性政策

您已在後端 bucket 前方建立邊緣安全性政策,現在請驗證政策是否如預期運作。

檢查安全性政策

幾分鐘後,您可以確認 Cloud Armor 政策是否正在執行。

在指令列執行下列指令,系統會傳回 403 錯誤:

curl -svo /dev/null http://LOAD_BALANCER_IP/google.png

當您沒有權限存取網頁或網路伺服器上的內容時,就會發生 403 錯誤。

輸出內容:

curl -svo /dev/null http://34.98.81.123/google.png * Trying 34.98.81.123... * TCP_NODELAY set * Connected to 34.98.81.123 (34.98.81.123) port 80 (#0) > GET /google.png HTTP/1.1 > Host: YOUR_IP > User-Agent: curl/7.64.1 > Accept: */* > < HTTP/1.1 403 Forbidden < X-GUploader-UploadID: ADPycdtS6FtJOGIsiWYDrAAE8VFeQuNutcvbGoQe2t8EZxsuspVtmCjyiTv_P3CNktroHMOGFXkTCfG-Jj-rUO60ZGPpEbpqcw < Content-Type: application/xml; charset=UTF-8 < Content-Length: 111 < Date: Mon, 13 Dec 2021 23:09:35 GMT < Expires: Mon, 13 Dec 2021 23:09:35 GMT < Cache-Control: private, max-age=0 < Server: UploadServer

調查記錄

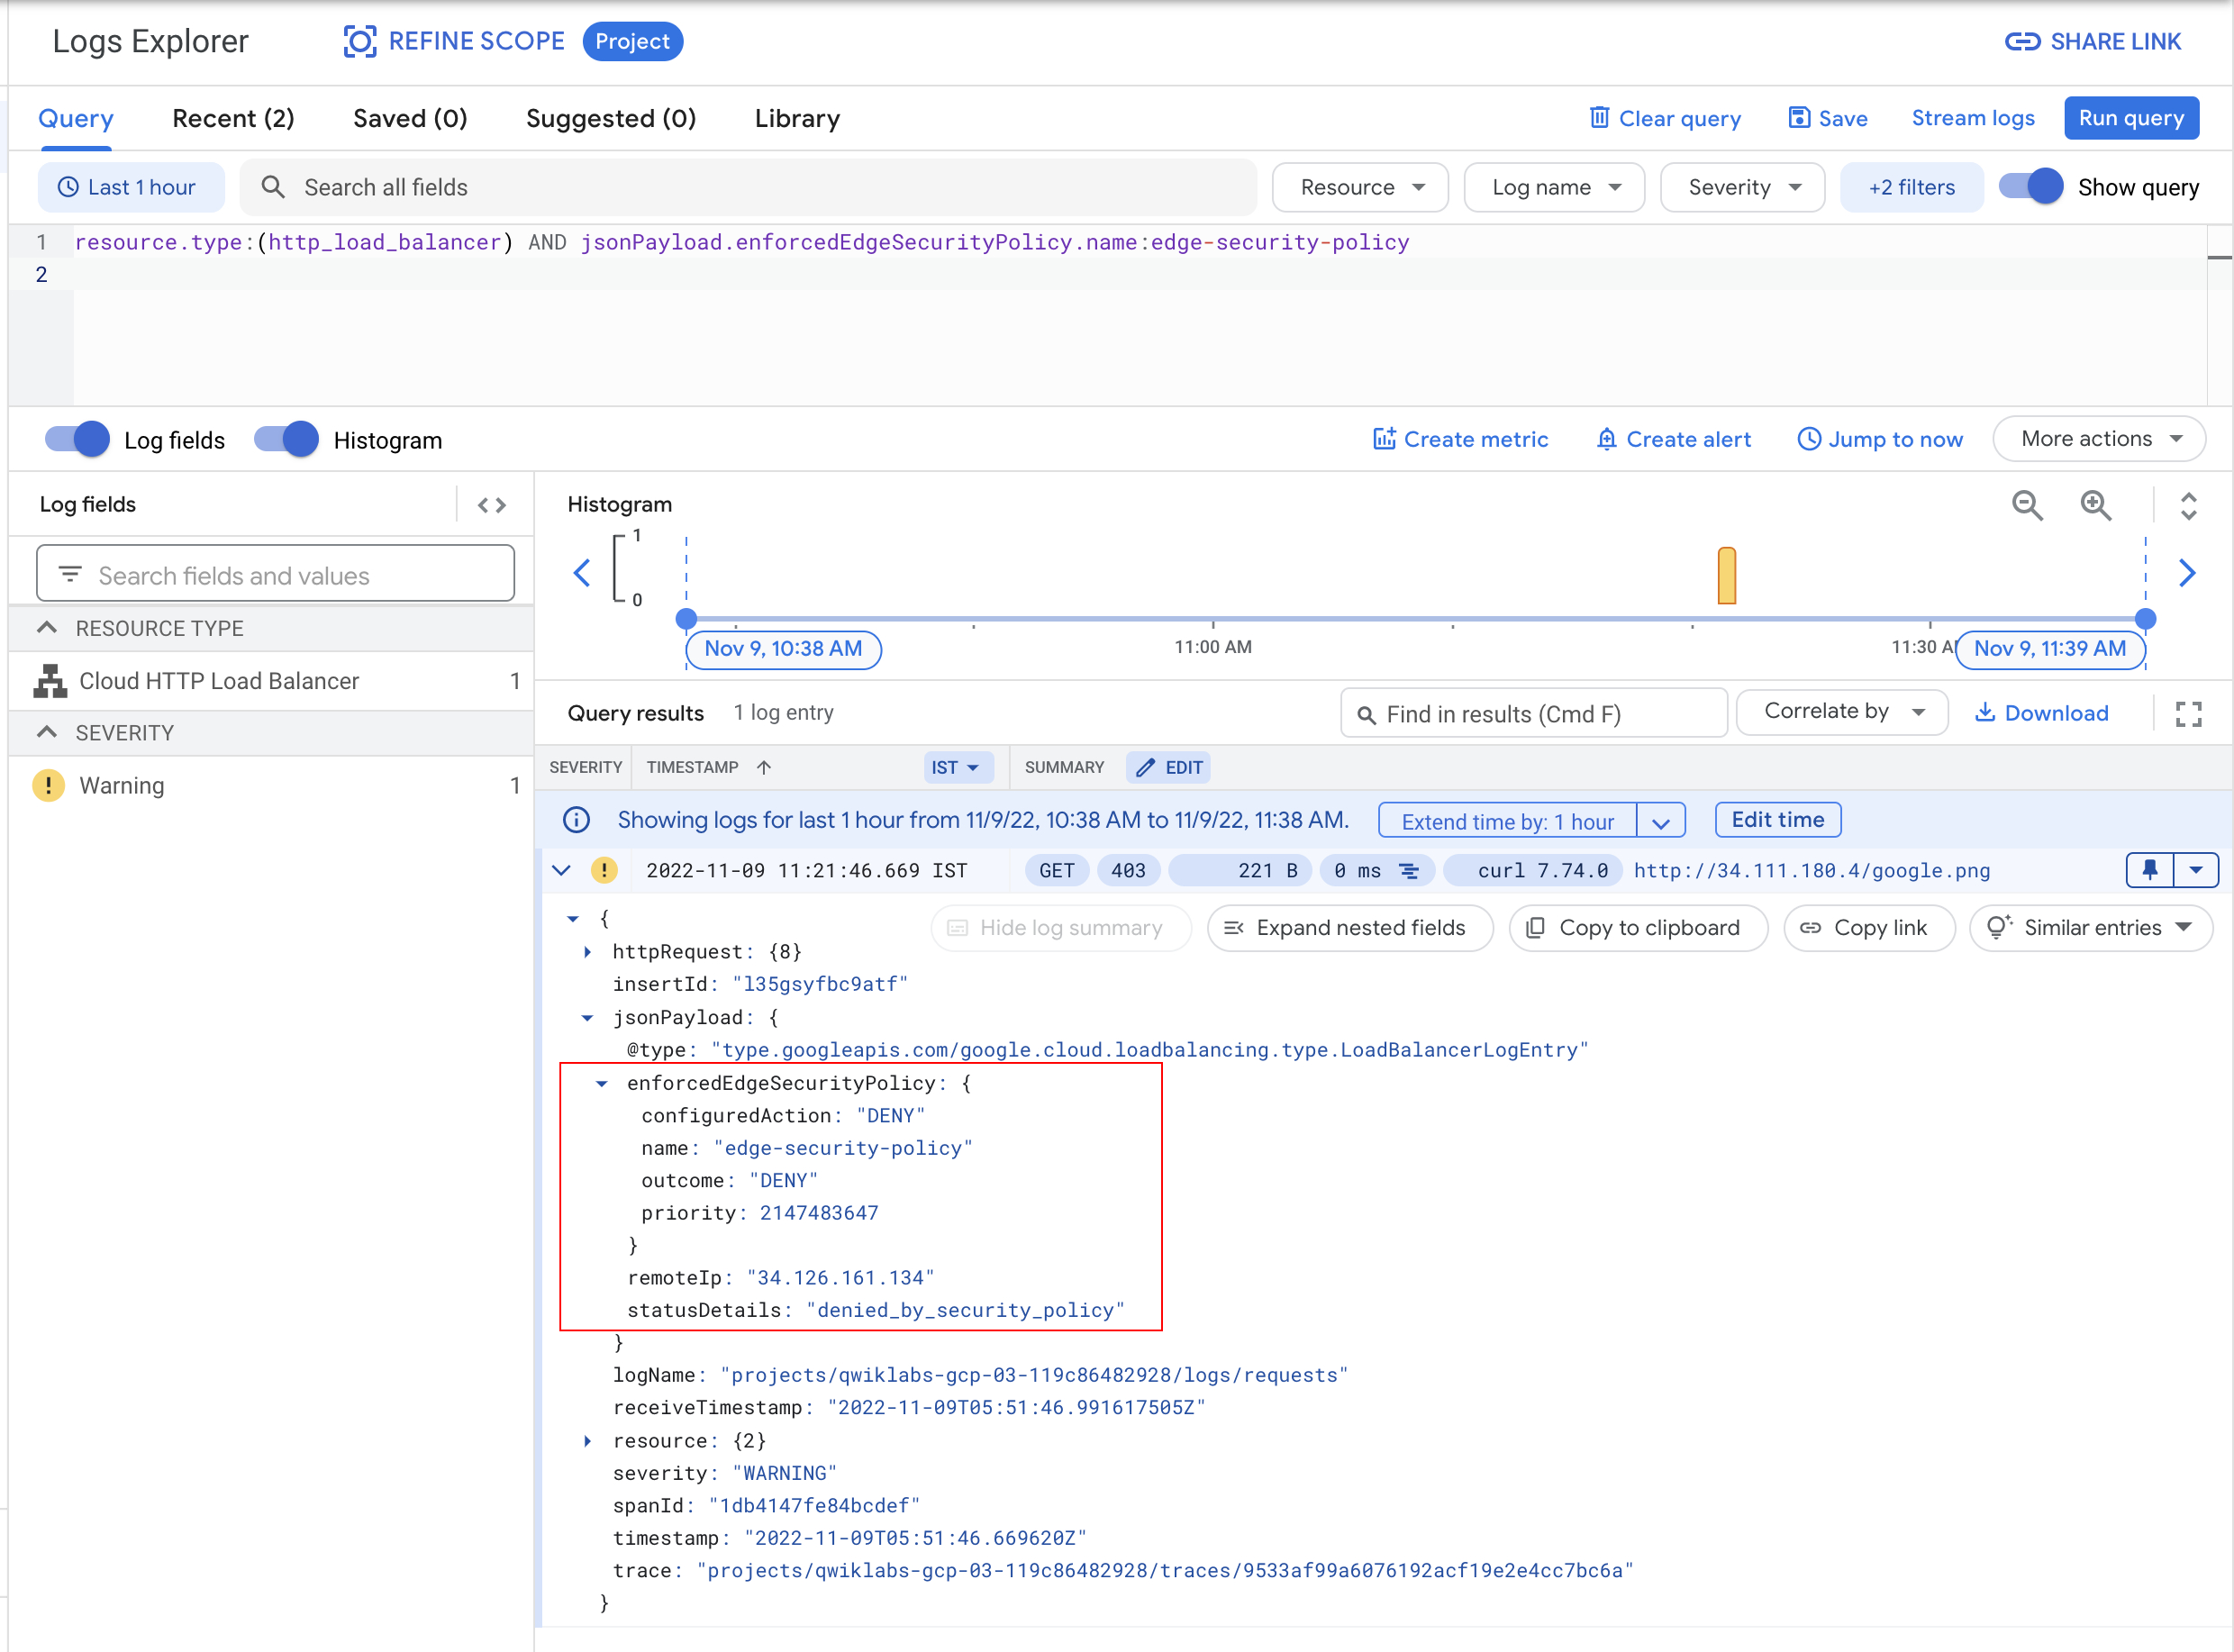
接著查看記錄,確認已強制執行邊緣安全性政策。

  1. 依序點選「導覽選單」圖示 「導覽選單」圖示 >「查看所有產品」>「觀測能力」>「記錄」>「Logs Explorer」

  2. 在查詢方塊輸入下列程式碼片段,然後點選「執行查詢」

resource.type:(http_load_balancer) AND jsonPayload.@type="type.googleapis.com/google.cloud.loadbalancing.type.LoadBalancerLogEntry" AND severity>=WARNING
  1. 請注意 403 response 和強制執行的安全性政策。

「查詢」頁面,列出醒目顯示的 403 回應訊息及安全性政策

點選「Check my progress」,確認目標已達成。 建立 Cloud Armor 邊緣安全性政策

移除安全性政策

請移除 Cloud Armor 安全性政策並再次查詢該物件,驗證物件確實是由 CDN 快取提供。來源物件已從 Cloud Storage 移除,由此可知物件目前是由邊緣快取提供。

  1. 依序點選「導覽選單」圖示 「導覽選單」圖示 >「查看所有產品」>「網路安全性」>「Cloud Armor 政策」>「edge-security-policy」>「目標」
  2. 選取「lb-backend-bucket」目標,然後點選「移除」來移除目標 bucket。再次點選「移除」來確認操作。
  1. 稍候幾分鐘,然後再次執行 curl 指令,將資源傳送至 Cloud Storage bucket:
curl -svo /dev/null http://LOAD_BALANCER_IP/google.png

這次您會收到 200 回應,代表網頁運作正常。

輸出內容:

student-cloudshell% curl -svo /dev/null http://34.98.81.123/google.png Trying 34.98.81.123... TCP_NODELAY set Connected to 34.98.81.123 (34.98.81.123) port 80 (#0) GET /google.png HTTP/1.1 Host: YOUR_IP User-Agent: curl/7.64.1 Accept: */* HTTP/1.1 200 OK X-GUploader-UploadID: ADPycdtI7f49P3MSuZSZ8vl6RwfwmnIDJ59EeSKp7UPvLPawdaiRHXiNWLtseQTxUxceWOvSLvpYmT3pWVkV4qeIP7M Date: Mon, 13 Dec 2021 23:06:46 GMT Last-Modified: Mon, 13 Dec 2021 21:45:57 GMT ETag: "8f9327db2597fa57d2f42b4a6c5a9855" x-goog-generation: 1639431957957903 x-goog-metageneration: 2 x-goog-stored-content-encoding: identity x-goog-stored-content-length: 5969 Content-Type: image/png x-goog-hash: crc32c=TeiHTA== x-goog-hash: md5=j5Mn2yWX+lfS9CtKbFqYVQ== x-goog-storage-class: STANDARD Accept-Ranges: bytes Content-Length: 5969 Server: UploadServer Age: 1621 Cache-Control: public,max-age=3600 { [775 bytes data] Connection #0 to host 34.98.81.123 left intact Closing connection 0

多試幾次,看看是否會收到 403 狀態碼。

恭喜!

您已成功建立 Cloud Storage bucket、將圖片上傳至 bucket、將 bucket 繫結至負載平衡器,然後為 bucket 啟用 Cloud CDN 和邊緣安全性政策。

使用手冊上次更新日期:2024 年 12 月 10 日

實驗室上次測試日期:2025 年 9 月 4 日

Copyright 2026 Google LLC 保留所有權利。Google 和 Google 標誌是 Google LLC 的商標,其他公司和產品名稱則有可能是其關聯公司的商標。

Before you begin

  1. Labs create a Google Cloud project and resources for a fixed time
  2. Labs have a time limit and no pause feature. If you end the lab, you'll have to restart from the beginning.
  3. On the top left of your screen, click Start lab to begin

Use private browsing

  1. Copy the provided Username and Password for the lab
  2. Click Open console in private mode

Sign in to the Console

  1. Sign in using your lab credentials. Using other credentials might cause errors or incur charges.
  2. Accept the terms, and skip the recovery resource page
  3. Don't click End lab unless you've finished the lab or want to restart it, as it will clear your work and remove the project

This content is not currently available

We will notify you via email when it becomes available

Great!

We will contact you via email if it becomes available

One lab at a time

Confirm to end all existing labs and start this one

Use private browsing to run the lab

Using an Incognito or private browser window is the best way to run this lab. This prevents any conflicts between your personal account and the Student account, which may cause extra charges incurred to your personal account.

Complete this quick step to start your lab.


