GSP1077

總覽
Cloud Build 是在 Google Cloud 執行您建構內容的服務,可匯入原始碼、執行建構作業等。
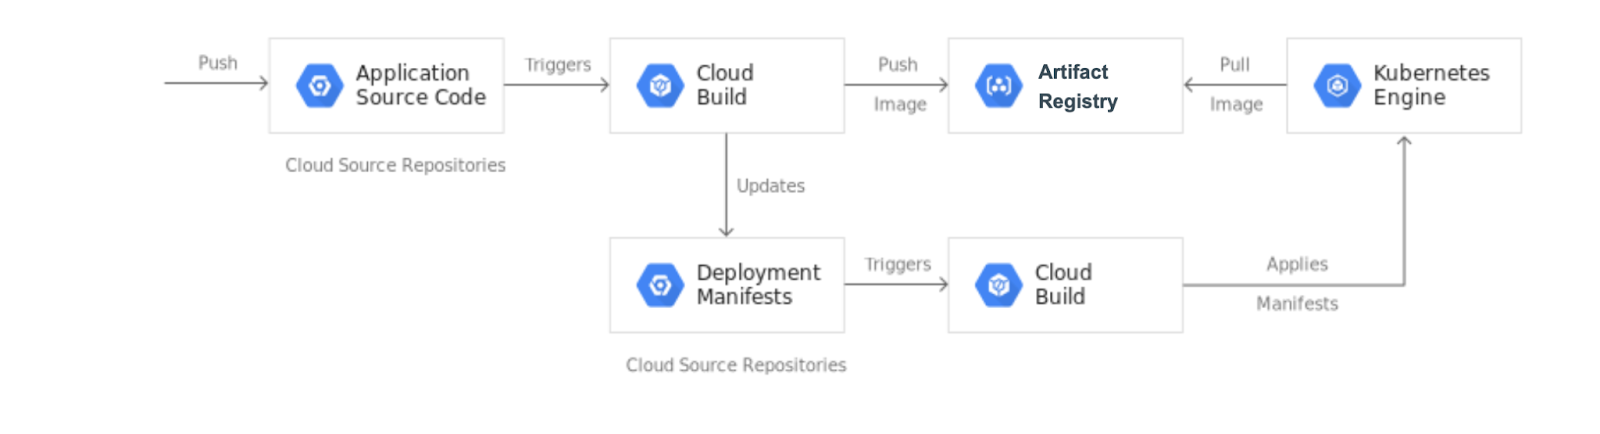
在本實驗室中,您將建立持續整合/持續部署 (CI/CD) 管道,從已修訂的程式碼自動建構容器映像檔、將該映像檔儲存到 Artifact Registry、更新 Git 存放區中的 Kubernetes 資訊清單,並使用該清單將應用程式部署到 Google Kubernetes Engine。
在本實驗室中,您將建立 2 個 Git 存放區:
-
app:包含應用程式原始碼
-
env:包含 Kubernetes 部署作業資訊清單
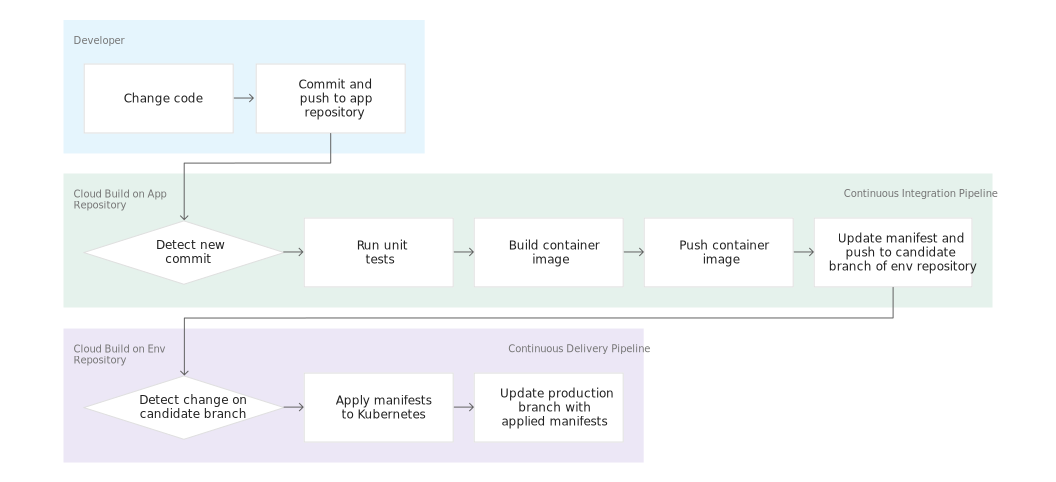
當您將變更推送到 app 存放區時,Cloud Build 管道會執行測試、建構容器映像檔,並將該變更推送到 Artifact Registry。推送映像檔後,Cloud Build 會更新部署作業資訊清單,再將該清單推送到 env 存放區。這會觸發另一個 Cloud Build 管道,將資訊清單套用到 GKE 叢集,並在套用成功後,將清單儲存到 env 存放區的其他分支版本。
之所以將 app 和 env 區隔開來,是因為這兩個存放區有不同的生命週期和用途。app 存放區專用於特定應用程式,主要由真人使用。env 存放區可能由多個應用程式共用,並由 Cloud Build 等自動化系統使用。env 存放區可以有多個分支版本,每個版本都會對應到特定環境並參照特定的容器映像檔,而 app 存放區則沒有。
完成本實驗室後,您的系統將能輕鬆執行下列工作:
- 查看 Cloud Build 記錄來區分失敗和成功的部署作業。
- 查看
env 存放區的 production 分支版本,存取目前使用的資訊清單。
- 重新執行對應的 Cloud Build 建構作業,復原到先前的任何版本。
目標
在本實驗室,您將瞭解如何執行下列工作:
- 建立 Kubernetes Engine 叢集
- 建立 GitHub 存放區。
- 從 GitHub 存放區觸發 Cloud Build。
- 透過 Cloud Build 自動測試並發布可部署的容器映像檔。
- 透過 Cloud Build 管理 Kubernetes Engine 叢集中部署的資源。
設定和需求
瞭解以下事項後,再點選「Start Lab」按鈕
請詳閱以下操作說明。實驗室活動會計時,且中途無法暫停。點選「Start Lab」後就會開始計時,顯示可使用 Google Cloud 資源的時間。
您將在真正的雲端環境完成實作實驗室活動,而不是模擬或示範環境。為此,我們會提供新的暫時憑證,供您在實驗室活動期間登入及存取 Google Cloud。
為了順利完成這個實驗室,請先確認:
- 可以使用標準的網際網路瀏覽器 (Chrome 瀏覽器為佳)。
注意事項:請使用無痕模式 (建議選項) 或私密瀏覽視窗執行此實驗室,這可以防止個人帳戶和學員帳戶之間的衝突,避免個人帳戶產生額外費用。
- 是時候完成實驗室活動了!別忘了,活動一旦開始將無法暫停。
注意事項:務必使用實驗室專用的學員帳戶。如果使用其他 Google Cloud 帳戶,可能會產生額外費用。
如何開始研究室及登入 Google Cloud 控制台
-
點選「Start Lab」按鈕。如果實驗室會產生費用,畫面上會出現選擇付款方式的對話方塊。左側的「Lab Details」窗格會顯示下列項目:
- 「Open Google Cloud console」按鈕
- 剩餘時間
- 必須在這個研究室中使用的臨時憑證
- 完成這個實驗室所需的其他資訊 (如有)
-
點選「Open Google Cloud console」;如果使用 Chrome 瀏覽器,也能按一下滑鼠右鍵,選取「在無痕視窗中開啟連結」。
接著,實驗室會啟動相關資源,並開啟另一個分頁,顯示「登入」頁面。
提示:您可以在不同的視窗中並排開啟分頁。
注意:如果頁面中顯示「選擇帳戶」對話方塊,請點選「使用其他帳戶」。
-
如有必要,請將下方的 Username 貼到「登入」對話方塊。
{{{user_0.username | "Username"}}}
您也可以在「Lab Details」窗格找到 Username。
-
點選「下一步」。
-
複製下方的 Password,並貼到「歡迎使用」對話方塊。
{{{user_0.password | "Password"}}}
您也可以在「Lab Details」窗格找到 Password。
-
點選「下一步」。
重要事項:請務必使用實驗室提供的憑證,而非自己的 Google Cloud 帳戶憑證。
注意:如果使用自己的 Google Cloud 帳戶來進行這個實驗室,可能會產生額外費用。
-
按過後續的所有頁面:
- 接受條款及細則。
- 由於這是臨時帳戶,請勿新增救援選項或雙重驗證機制。
- 請勿申請免費試用。
Google Cloud 控制台稍後會在這個分頁開啟。
注意:如要使用 Google Cloud 產品和服務,請點選「導覽選單」,或在「搜尋」欄位輸入服務或產品名稱。
啟動 Cloud Shell
Cloud Shell 是搭載多項開發工具的虛擬機器,提供永久的 5 GB 主目錄,而且在 Google Cloud 中運作。Cloud Shell 提供指令列存取權,方便您使用 Google Cloud 資源。
-
點按 Google Cloud 控制台頂端的「啟用 Cloud Shell」圖示  。
。
-
系統顯示視窗時,請按照下列步驟操作:
- 繼續操作 Cloud Shell 視窗。
- 授權 Cloud Shell 使用您的憑證發出 Google Cloud API 呼叫。
連線建立完成即代表已通過驗證,而且專案已設為您的 Project_ID:。輸出內容中有一行文字,宣告本工作階段的 Project_ID:
Your Cloud Platform project in this session is set to {{{project_0.project_id | "PROJECT_ID"}}}
gcloud 是 Google Cloud 的指令列工具,已預先安裝於 Cloud Shell,並支援 Tab 鍵自動完成功能。
- (選用) 您可以執行下列指令來列出使用中的帳戶:
gcloud auth list
- 點按「授權」。
輸出內容:
ACTIVE: *
ACCOUNT: {{{user_0.username | "ACCOUNT"}}}
To set the active account, run:
$ gcloud config set account `ACCOUNT`
- (選用) 您可以使用下列指令來列出專案 ID:
gcloud config list project
輸出內容:
[core]
project = {{{project_0.project_id | "PROJECT_ID"}}}
注意:如需 gcloud 的完整說明,請前往 Google Cloud 參閱 gcloud CLI 總覽指南。
工作 1:初始化實驗室
您會在這項工作中設定環境:
- 將專案 ID 和專案編號匯入為變數
- 啟用 GKE、Cloud Build、Secret Manager 和 Artifact Analysis 的 API
- 建立 Artifact Registry Docker 存放區
- 建立 GKE 叢集,用於部署本實驗室的範例應用程式
- 在 Cloud Shell 執行下列指令,用專案 ID 和專案編號設定
PROJECT_ID 和 PROJECT_NUMBER 變數:
export PROJECT_ID=$(gcloud config get-value project)
export PROJECT_NUMBER=$(gcloud projects describe $PROJECT_ID --format='value(projectNumber)')
export REGION={{{ project_0.default_region }}}
gcloud config set compute/region $REGION
接著將要用的 Google Cloud 專案準備好,包含:啟用必要的 API、在 Cloud Shell 初始化 Git 設定,以及下載本實驗室稍後會用到的程式碼範例。
- 執行下列指令,啟用 GKE、Cloud Build、Secret Manager 和 Artifact Analysis 的 API:
gcloud services enable container.googleapis.com \
cloudbuild.googleapis.com \
secretmanager.googleapis.com \
containeranalysis.googleapis.com
- 在 區域建立名為
my-repository 的 Artifact Registry Docker 存放區,以便儲存容器映像檔:
gcloud artifacts repositories create my-repository \
--repository-format=docker \
--location=$REGION
- 建立 GKE 叢集,用於部署本實驗室的範例應用程式:
gcloud container clusters create hello-cloudbuild --num-nodes 1 --region $REGION
- 在 Cloud Shell 執行下列指令,設定 Git 和 GitHub:
curl -sS https://webi.sh/gh | sh
gh auth login
gh api user -q ".login"
GITHUB_USERNAME=$(gh api user -q ".login")
git config --global user.name "${GITHUB_USERNAME}"
git config --global user.email "${USER_EMAIL}"
echo ${GITHUB_USERNAME}
echo ${USER_EMAIL}
按下 Enter 鍵接受預設選項。請按照 CLI 工具中的指示操作,透過網路瀏覽器登入 GitHub。如已成功登入,系統會顯示您的 GitHub 使用者名稱。
點選「Check my progress」,確認目標已達成。
啟用服務、建立 Artifact Registry 和 GKE 叢集
工作 2:在 GitHub 存放區建立 Git 存放區
GitHub 是儲存、共用及協作撰寫程式碼的平台;Git 則是版本管控系統。檔案上傳至 GitHub 時,會儲存在「Git 存放區」。也就是說,當您在 GitHub 中對檔案進行變更 (或「修訂」) 時,Git 會自動開始追蹤及管理變更。詳情請參閱「關於 GitHub 和 Git」。
在這項工作中,您將建立兩個 Git 存放區 (hello-cloudbuild-app 和 hello-cloudbuild-env),並運用一些程式碼範例初始化 hello-cloudbuild-app。
- 在 Cloud Shell 執行下列指令,建立兩個 Git 存放區:
gh repo create hello-cloudbuild-app --private
gh repo create hello-cloudbuild-env --private
- 從 Cloud Storage 下載程式碼範例:
cd ~
mkdir hello-cloudbuild-app
gcloud storage cp -r gs://spls/gsp1077/gke-gitops-tutorial-cloudbuild/* hello-cloudbuild-app
- 將 GitHub 存放區設定為遠端存放區:
cd ~/hello-cloudbuild-app
export REGION={{{project_0.default_region | "REGION"}}}
sed -i "s/us-central1/$REGION/g" cloudbuild.yaml
sed -i "s/us-central1/$REGION/g" cloudbuild-delivery.yaml
sed -i "s/us-central1/$REGION/g" cloudbuild-trigger-cd.yaml
sed -i "s/us-central1/$REGION/g" kubernetes.yaml.tpl
PROJECT_ID=$(gcloud config get-value project)
git init
git config credential.helper gcloud.sh
git remote add google https://github.com/${GITHUB_USERNAME}/hello-cloudbuild-app
git branch -m master
git add . && git commit -m "initial commit"
剛剛複製的程式碼包含一個簡易的「Hello World」應用程式:
from flask import Flask
app = Flask('hello-cloudbuild')
@app.route('/')
def hello():
return "Hello World!\n"
if __name__ == '__main__':
app.run(host = '0.0.0.0', port = 8080)
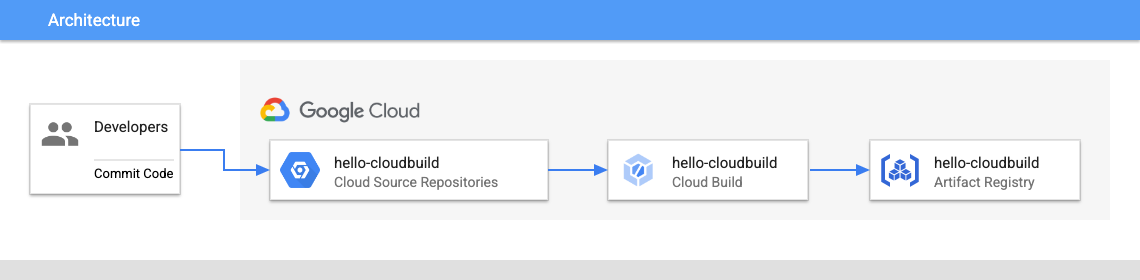
工作 3:使用 Cloud Build 建立容器映像檔
在這項工作中,您將使用現有的 Dockerfile,透過 Cloud Build 建立並儲存容器映像檔。
您先前複製的程式碼即包含此 Docker 檔案:
FROM python:3.7-slim
RUN pip install flask
WORKDIR /app
COPY app.py /app/app.py
ENTRYPOINT ["python"]
CMD ["/app/app.py"]
運用此 Dockerfile,就能使用 Cloud Build 建立容器映像檔,並儲存到 Artifact Registry。
- 在 Cloud Shell 執行下列指令,根據最新的修訂版本建立 Cloud Build 建構作業:
cd ~/hello-cloudbuild-app
COMMIT_ID="$(git rev-parse --short=7 HEAD)"
gcloud builds submit --tag="${REGION}-docker.pkg.dev/${PROJECT_ID}/my-repository/hello-cloudbuild:${COMMIT_ID}" .
執行此指令時,Cloud Build 會將建立容器映像檔時產生的記錄檔串流到終端機。
- 建構作業完成後,在 Google Cloud 控制台標題列的「搜尋」欄位輸入「Artifact Registry」,然後點選搜尋結果中的「Artifact Registry」。請確認 Artifact Registry 中有新的容器映像檔。點選「my-repository」,即可在「映像檔」清單中看到
hello-cloudbuild 映像檔。
點選「Check my progress」,確認目標已達成。
使用 Cloud Build 建立容器映像檔
工作 4:建立持續整合 (CI) 管道
在這項工作中,您將設定 Cloud Build 自動執行小型單元測試、建構容器映像檔,然後推送到 Artifact Registry。將新修訂版本推送到 GitHub 存放區時,會自動觸發此管道。
程式碼中的 cloudbuild.yaml 檔案是管道的設定。
-
在控制台標題列的「搜尋」欄位中輸入「Cloud Build triggers」,然後點選搜尋結果中的「Triggers, Cloud Build」。
-
點選「建立觸發條件」。
-
在「名稱」部分,輸入 hello-cloudbuild。將「區域」設為「」。
-
將「事件」設為「推送至分支版本」。
-
在「來源」下方的「存放區」部分,點選「連結新的存放區」。
a. 選取「GitHub (Cloud Build GitHub 應用程式)」。點選「繼續」。
b. 以使用者名稱和密碼,向來源存放區驗證身分。
c. 如果出現「您的所有存放區均未安裝 GitHub 應用程式」訊息,請按照下列步驟操作。
i. 點選「安裝 Google Cloud Build」,在個人帳戶中安裝 Cloud Build GitHub 應用程式。使用 GitHub 帳戶允許安裝。
ii. 在「Repository access」下方,選擇「Only select repositories」。點選「Select the repositories」選單,然後選取「${GITHUB_USERNAME}/hello-cloudbuild-app」和「${GITHUB_USERNAME}/hello-cloudbuild-env」。
iii. 按一下「Install」。
d. 在「存放區」部分,選取「${GITHUB_USERNAME}/hello-cloudbuild-app」。然後點選「確定」。
e. 勾選「我瞭解所選存放區的 GitHub 內容會轉移至這項 GCP 專案...」。
f. 點選「連線」。
-
如果您的帳戶已安裝 Cloud Build GitHub 應用程式,GitHub 會提供「Edit Repositories」選項。
a. 選取「Repository access」下方的「Only select repositories」。點選「Select repositories」選單,然後選取「$${GITHUB_USERNAME}/hello-cloudbuild-app」和「$${GITHUB_USERNAME}/hello-cloudbuild-env」存放區。
b. 點選「Save」。
-
在「觸發條件」頁面的「存放區」清單中,點選「${GITHUB_USERNAME}/hello-cloudbuild-app」。
-
在「分支版本」類型中輸入 .* (任何分支版本)。
-
在「設定」部分,將「類型」設為「Cloud Build 設定檔」。
-
在「位置」欄位中,在 / 後面輸入 cloudbuild.yaml。
-
將「服務帳戶」設為「Compute Engine 預設服務帳戶」。
-
點選「建立」。
建立觸發條件後,請返回 Cloud Shell。現在需要將應用程式程式碼推送到 GitHub 存放區,以觸發 Cloud Build 中的 CI 管道。
- 執行下列指令,開始這項觸發作業:
cd ~/hello-cloudbuild-app
git add .
git commit -m "Type Any Commit Message here"
git push google master
-
點選左側窗格中的「資訊主頁」。
-
您應該會看到執行中或最近完成的建構作業。您可以點選該建構作業,追蹤執行情況並查看記錄檔。
點選「Check my progress」,確認目標已達成。
建立持續整合 (CI) 管道
工作 5:在建構作業透過安全殼層金鑰存取 GitHub
在這個步驟中,您將使用 Secret Manager 搭配 Cloud Build 來存取私人的 GitHub 存放區。
建立安全殼層金鑰
-
在 Cloud Shell 中,切換至主目錄。
cd ~
-
建立名為 workingdir 的新目錄,然後前往該目錄:
mkdir workingdir
cd workingdir
-
建立新的 GitHub 安全殼層金鑰,將 [your-github-email] 替換成您的個人 GitHub 電子郵件地址:
ssh-keygen -t rsa -b 4096 -N '' -f id_github -C [your-github-email]
這個步驟會建立兩個檔案:id_github 和 id_github.pub。
- 在 Cloud Shell 動作列,依序點選「
 」(顯示更多項目) >「下載」>「切換檔案瀏覽器」,然後選取
下拉式選單和 workingdir 資料夾,將 id_github 檔案下載到本機電腦。
將私人安全殼層金鑰儲存在 Secret Manager
-
在控制台標題列輸入「Secret Manager」,然後在搜尋結果中點選「Secret Manager」。
-
按一下「建立密鑰」。
-
將「名稱」設為「ssh_key_secret」。
-
將「密鑰值」設為「Upload」,然後上傳 id_github 檔案。
-
其餘設定則保留預設狀態。
-
按一下「建立密鑰」。
這會將 id_github 檔案上傳至 Secret Manager。
將公開安全殼層金鑰新增至私人存放區的部署金鑰
-
登入個人 GitHub 帳戶
-
依序點選右上角的個人資料相片和「Your profile」。
-
在個人資料頁面點選「Repositories」,然後點選 hello-cloudbuild-env 存放區。
-
點選存放區的「Settings」。
-
點選左側窗格的「Deploy Keys」,然後點選「Add deploy key」。
-
在「Title」欄中輸入「SSH_KEY」,然後在「Key」欄貼上 Cloud Shell 的 workingdir/id_github.pub 公開安全殼層金鑰。
-
選取「Allow write access」,讓這個金鑰擁有存放區的寫入權限。具備寫入權限的部署金鑰可讓部署作業推送至存放區。
-
按一下「Add key」。
-
刪除磁碟中的安全殼層金鑰:
rm id_github*
授予服務帳戶 Secret Manager 的存取權
輸入下列指令,授予服務帳戶 Secret Manager 的存取權:
gcloud projects add-iam-policy-binding ${PROJECT_NUMBER} \
--member=serviceAccount:${PROJECT_NUMBER}-compute@developer.gserviceaccount.com \
--role=roles/secretmanager.secretAccessor
點選「Check my progress」,確認目標已達成。
在建構作業透過安全殼層金鑰存取 GitHub
工作 6:建立測試環境和 CD 管道
Cloud Build 也可用於持續推送軟體更新管道。每次將修訂版本推送到 hello-cloudbuild-env 存放區的 candidate 分支版本時,管道都會開始運作。管道會將新版資訊清單套用到 Kubernetes 叢集,並在套用成功後,將清單複製到 production 分支版本。這項程序具有下列屬性:
- candidate 分支版本是嘗試部署記錄。
- production 分支版本是成功部署記錄。
- 您可以查看 Cloud Build 中成功和失敗的部署作業。
- 您可以復原到先前部署的任何版本,只要重新執行對應的 Cloud Build 建構作業即可。復原作業也會更新 production 分支版本,真實反映部署記錄。
接著請修改持續整合管道,更新 hello-cloudbuild-env 存放區的 candidate 分支版本,觸發持續推送軟體更新管道。
將 GKE 存取權授予 Cloud Build
如要在 Kubernetes 叢集部署應用程式,Cloud Build 需要 Kubernetes Engine 開發人員 IAM 角色。
- 在 Cloud Shell 執行下列指令:
cd ~
PROJECT_NUMBER="$(gcloud projects describe ${PROJECT_ID} --format='get(projectNumber)')"
gcloud projects add-iam-policy-binding ${PROJECT_NUMBER} \
--member=serviceAccount:${PROJECT_NUMBER}@cloudbuild.gserviceaccount.com \
--role=roles/container.developer
您需要使用兩個分支版本 (production 和 candidate) 和描述部署程序的 Cloud Build 設定檔,將 hello-cloudbuild-env 存放區初始化。
第一步是複製 hello-cloudbuild-env 存放區並建立 production 分支版本,這個分支版本目前仍是空的。
- 在 Cloud Shell 中,從 Cloud Storage 下載程式碼範例:
mkdir hello-cloudbuild-env
gcloud storage cp -r gs://spls/gsp1077/gke-gitops-tutorial-cloudbuild/* hello-cloudbuild-env
cd hello-cloudbuild-env
export REGION={{{project_0.default_region | "REGION"}}}
sed -i "s/us-central1/$REGION/g" cloudbuild.yaml
sed -i "s/us-central1/$REGION/g" cloudbuild-delivery.yaml
sed -i "s/us-central1/$REGION/g" cloudbuild-trigger-cd.yaml
sed -i "s/us-central1/$REGION/g" kubernetes.yaml.tpl
- 如要讓 Cloud Build 連線至 GitHub,必須將公開安全殼層金鑰新增至 Cloud Build 建構環境的
known_hosts 檔案。在 hello-cloudbuild-env 目錄中,建立名為 known_hosts.github 的檔案,將公開安全殼層金鑰加入這個檔案,並提供檔案的必要權限:
cd ~/hello-cloudbuild-env
ssh-keyscan -t rsa github.com > known_hosts.github
chmod +x known_hosts.github
git init
git config credential.helper gcloud.sh
git remote add google https://github.com/${GITHUB_USERNAME}/hello-cloudbuild-env
git branch -m master
git add . && git commit -m "initial commit"
git push google master
cd ~/hello-cloudbuild-env
git checkout -b production
- 接著,請替換
hello-cloudbuild-env 存放區中的 cloudbuild.yaml 檔案,並提交變更:
cd ~/hello-cloudbuild-env
- 將
hello-cloudbuild-env 存放區中的 cloudbuild.yaml 替換為下列程式碼,並將 {GITHUB-USERNAME} 替換成您的個人 GitHub 使用者名稱:
# Copyright 2018 Google LLC
#
# Licensed under the Apache License, Version 2.0 (the "License");
# you may not use this file except in compliance with the License.
# You may obtain a copy of the License at
#
# https://www.apache.org/licenses/LICENSE-2.0
#
# Unless required by applicable law or agreed to in writing, software
# distributed under the License is distributed on an "AS IS" BASIS,
# WITHOUT WARRANTIES OR CONDITIONS OF ANY KIND, either express or implied.
# See the License for the specific language governing permissions and
# limitations under the License.
# [START cloudbuild-delivery]
steps:
# This step deploys the new version of our container image
# in the hello-cloudbuild Kubernetes Engine cluster.
- name: 'gcr.io/cloud-builders/kubectl'
id: Deploy
args:
- 'apply'
- '-f'
- 'kubernetes.yaml'
env:
- 'CLOUDSDK_COMPUTE_REGION={{{ project_0.default_region }}}'
- 'CLOUDSDK_CONTAINER_CLUSTER=hello-cloudbuild'
# Access the id_github file from Secret Manager, and setup SSH
- name: 'gcr.io/cloud-builders/git'
secretEnv: ['SSH_KEY']
entrypoint: 'bash'
args:
- -c
- |
echo "$$SSH_KEY" >> /root/.ssh/id_rsa
chmod 400 /root/.ssh/id_rsa
cp known_hosts.github /root/.ssh/known_hosts
volumes:
- name: 'ssh'
path: /root/.ssh
# Clone the repository
- name: 'gcr.io/cloud-builders/git'
args:
- clone
- --recurse-submodules
- git@github.com:${GITHUB-USERNAME}/hello-cloudbuild-env.git
volumes:
- name: ssh
path: /root/.ssh
# This step copies the applied manifest to the production branch
# The COMMIT_SHA variable is automatically
# replaced by Cloud Build.
- name: 'gcr.io/cloud-builders/gcloud'
id: Copy to production branch
entrypoint: /bin/sh
args:
- '-c'
- |
set -x && \
cd hello-cloudbuild-env && \
git config user.email $(gcloud auth list --filter=status:ACTIVE --format='value(account)')
sed "s/GOOGLE_CLOUD_PROJECT/${PROJECT_ID}/g" kubernetes.yaml.tpl | \
git fetch origin production && \
# Switch to the production branch and copy the kubernetes.yaml file from the candidate branch
git checkout production && \
git checkout $COMMIT_SHA kubernetes.yaml && \
# Commit the kubernetes.yaml file with a descriptive commit message
git commit -m "Manifest from commit $COMMIT_SHA
$(git log --format=%B -n 1 $COMMIT_SHA)" && \
# Push the changes back to Cloud Source Repository
git push origin production
volumes:
- name: ssh
path: /root/.ssh
availableSecrets:
secretManager:
- versionName: projects/${PROJECT_NUMBER}/secrets/ssh_key_secret/versions/1
env: 'SSH_KEY'
# [END cloudbuild-delivery]
options:
logging: CLOUD_LOGGING_ONLY
git add .
git commit -m "Create cloudbuild.yaml for deployment"
cloudbuild.yaml 檔案描述了要在 Cloud Build 執行的部署程序,其中有兩個步驟:
- Cloud Build 對 GKE 叢集套用資訊清單。
- 如果套用成功,Cloud Build 會將資訊清單複製到 production 分支版本。
- 建立 candidate 分支版本,並將兩個分支版本推送到 GitHub 存放區:
git checkout -b candidate
git push google production
git push google candidate
為持續推送軟體更新管道建立觸發條件
-
在控制台標題列中輸入「Cloud Build Triggers」,然後點選「Triggers, Cloud Build」。
-
點選「建立觸發條件」。
-
將「名稱」設為「hello-cloudbuild-deploy」。將「區域」設為「」。
-
在「事件」下方,選取「推送至分支版本」。
-
在「來源」下方的「存放區」部分,點選「連結新的存放區」。
a. 選取「GitHub (Cloud Build GitHub 應用程式)」。點選「繼續」。
b. 使用 GitHub 使用者名稱和密碼,向來源存放區驗證身分。
c. 選取「${GITHUB_USERNAME}/hello-cloudbuild-env」存放區。然後點選「確定」。
d. 勾選「我瞭解所選存放區的 GitHub 內容會轉移至這項 GCP 專案...」
e. 點選「連線」。
-
在「存放區」下方,選取「${GITHUB_USERNAME}/hello-cloudbuild-env」。
-
在「來源」下方,將「分支版本」設為 ^candidate$。
-
在「建構設定」下方,選取「Cloud Build 設定檔」。
-
在「Cloud Build 設定檔位置」欄位中,在 / 後面輸入 cloudbuild.yaml。
-
將「服務帳戶」設為「Compute Engine 預設服務帳戶」。
-
點選「建立」。
-
在 hello-cloudbuild-app 目錄中,建立名為 known_hosts.github 的檔案,將公開安全殼層金鑰加入這個檔案,並提供必要的檔案權限:
cd ~/hello-cloudbuild-app
ssh-keyscan -t rsa github.com > known_hosts.github
chmod +x known_hosts.github
git add .
git commit -m "Adding known_host file."
git push google master
修改持續整合管道以觸發持續推送軟體更新管道
接著為持續整合管道新增一些步驟,以產生新版 Kubernetes 資訊清單,並推送到 hello-cloudbuild-env 存放區,觸發持續推送軟體更新管道。
- 複製
app 存放區的 cloudbuild.yaml 檔案擴充版本:
cd ~/hello-cloudbuild-app
cloudbuild.yaml 檔案新增的步驟會產生新的 Kubernetes 資訊清單,並觸發持續推送軟體更新管道。
設定建構作業
- 將
hello-cloudbuild-app 存放區中的 cloudbuild.yaml 替換為下列程式碼,並將 ${GITHUB-USERNAME} 改成您的 GitHub 使用者名稱。
# Copyright 2018 Google LLC
#
# Licensed under the Apache License, Version 2.0 (the "License");
# you may not use this file except in compliance with the License.
# You may obtain a copy of the License at
#
# https://www.apache.org/licenses/LICENSE-2.0
#
# Unless required by applicable law or agreed to in writing, software
# distributed under the License is distributed on an "AS IS" BASIS,
# WITHOUT WARRANTIES OR CONDITIONS OF ANY KIND, either express or implied.
# See the License for the specific language governing permissions and
# limitations under the License.
# [START cloudbuild]
steps:
# This step runs the unit tests on the app
- name: 'python:3.7-slim'
id: Test
entrypoint: /bin/sh
args:
- -c
- 'pip install flask && python test_app.py -v'
# This step builds the container image.
- name: 'gcr.io/cloud-builders/docker'
id: Build
args:
- 'build'
- '-t'
- '{{{ project_0.default_region }}}-docker.pkg.dev/$PROJECT_ID/my-repository/hello-cloudbuild:$SHORT_SHA'
- '.'
# This step pushes the image to Artifact Registry
# The PROJECT_ID and SHORT_SHA variables are automatically
# replaced by Cloud Build.
- name: 'gcr.io/cloud-builders/docker'
id: Push
args:
- 'push'
- '{{{ project_0.default_region }}}-docker.pkg.dev/$PROJECT_ID/my-repository/hello-cloudbuild:$SHORT_SHA'
# [END cloudbuild]
# Access the id_github file from Secret Manager, and setup SSH
- name: 'gcr.io/cloud-builders/git'
secretEnv: ['SSH_KEY']
entrypoint: 'bash'
args:
- -c
- |
echo "$$SSH_KEY" >> /root/.ssh/id_rsa
chmod 400 /root/.ssh/id_rsa
cp known_hosts.github /root/.ssh/known_hosts
volumes:
- name: 'ssh'
path: /root/.ssh
# Clone the repository
- name: 'gcr.io/cloud-builders/git'
args:
- clone
- --recurse-submodules
- git@github.com:${GITHUB-USERNAME}/hello-cloudbuild-env.git
volumes:
- name: ssh
path: /root/.ssh
# [START cloudbuild-trigger-cd]
# This step clones the hello-cloudbuild-env repository
- name: 'gcr.io/cloud-builders/gcloud'
id: Change directory
entrypoint: /bin/sh
args:
- '-c'
- |
cd hello-cloudbuild-env && \
git checkout candidate && \
git config user.email $(gcloud auth list --filter=status:ACTIVE --format='value(account)')
volumes:
- name: ssh
path: /root/.ssh
# This step generates the new manifest
- name: 'gcr.io/cloud-builders/gcloud'
id: Generate manifest
entrypoint: /bin/sh
args:
- '-c'
- |
sed "s/GOOGLE_CLOUD_PROJECT/${PROJECT_ID}/g" kubernetes.yaml.tpl | \
sed "s/COMMIT_SHA/${SHORT_SHA}/g" > hello-cloudbuild-env/kubernetes.yaml
volumes:
- name: ssh
path: /root/.ssh
# This step pushes the manifest back to hello-cloudbuild-env
- name: 'gcr.io/cloud-builders/gcloud'
id: Push manifest
entrypoint: /bin/sh
args:
- '-c'
- |
set -x && \
cd hello-cloudbuild-env && \
git add kubernetes.yaml && \
git commit -m "Deploying image {{{ project_0.default_region }}}-docker.pkg.dev/$PROJECT_ID/my-repository/hello-cloudbuild:${SHORT_SHA}
Built from commit ${COMMIT_SHA} of repository hello-cloudbuild-app
Author: $(git log --format='%an <%ae>' -n 1 HEAD)" && \
git push origin candidate
volumes:
- name: ssh
path: /root/.ssh
availableSecrets:
secretManager:
- versionName: projects/${PROJECT_NUMBER}/secrets/ssh_key_secret/versions/1
env: 'SSH_KEY'
# [END cloudbuild-trigger-cd]
options:
logging: CLOUD_LOGGING_ONLY
注意:這個管道使用簡單的 sed 指令來呈現資訊清單範本。實際上,使用 kustomize 或 skaffold 等專用工具也有一些好處,例如可進一步控制資訊清單範本的轉譯作業。
- 修訂內容並推送到 GitHub 存放區:
cd ~/hello-cloudbuild-app
git add cloudbuild.yaml
git commit -m "Trigger CD pipeline"
git push google master
這會觸發 Cloud Build 中的持續整合管道。
點選「Check my progress」,確認目標已達成。
建立測試環境和 CD 管道
工作 7:查看 Cloud Build 管道
在這項工作中,您將在控制台中查看 Cloud Build 管道。
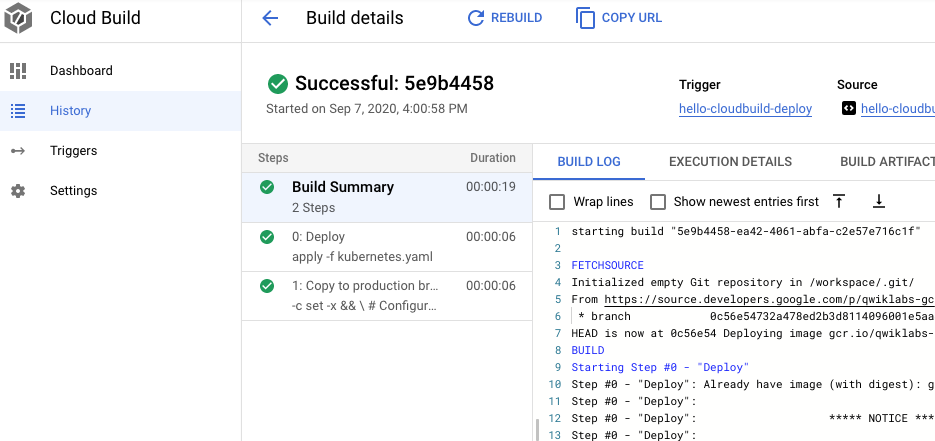
- 在控制台的 Cloud Build 頁面中,點選左窗格的「資訊主頁」。
- 點選「hello-cloudbuild-app」觸發條件,追蹤執行情況並查看記錄檔。此管道的最後一步會將新的資訊清單推送到
hello-cloudbuild-env 存放區,進而觸發持續推送軟體更新管道。
- 返回主要的「資訊主頁」。
- 您應該會看到
hello-cloudbuild-env 存放區的執行中或最近完成的建構作業。
您可以點選該建構作業,追蹤執行情況並查看記錄檔。
工作 8:測試完整管道
您已設定完整的 CI/CD 管道。在這項工作中,您將執行端對端測試。
- 在控制台的「
 」(導覽選單) 中,依序點選「Kubernetes Engine」>「閘道、Service 與 Ingress」>「服務」。
清單中應該有一個名為「hello-cloudbuild」的服務,這是由剛剛執行的持續推送軟體更新建構作業所建立。
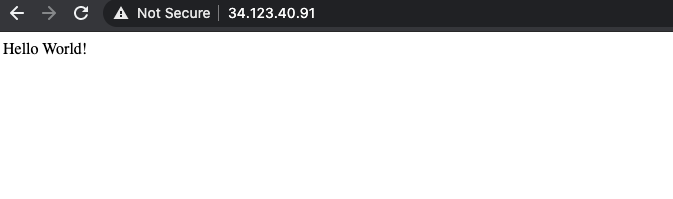
- 點選「hello-cloudbuild」服務的端點後,您應該會看到「Hello World!」。如果沒有這個端點,或是看到負載平衡器錯誤,可能必須等待幾分鐘,負載平衡器才會完全初始化。請視需要點選「重新整理」來更新頁面。
- 在 Cloud Shell 執行下列指令,將應用程式和單元測試中的「Hello World」換成「Hello Cloud Build」:
cd ~/hello-cloudbuild-app
sed -i 's/Hello World/Hello Cloud Build/g' app.py
sed -i 's/Hello World/Hello Cloud Build/g' test_app.py
- 修訂後推送到 GitHub 存放區:
git add app.py test_app.py
git commit -m "Hello Cloud Build"
git push google master
- 這會觸發完整的 CI/CD 管道。
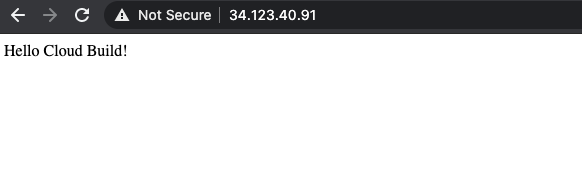
幾分鐘後,在瀏覽器中重新載入應用程式。現在應該會看到「Hello Cloud Build!」。
工作 9:測試復原作業
這項工作會將應用程式復原到顯示「Hello World!」的版本。
- 在控制台標題列的「搜尋」欄位輸入「Cloud Build Dashboard」,然後點選搜尋結果中的「Cloud Build」
- 在
hello-cloudbuild-env 存放區的「建構作業記錄」下方,點選「查看全部」連結。
- 點選第二新的可用版本。
- 點選「再次執行建構作業」。
建構完成後,在瀏覽器中重新載入應用程式。現在應該會再次看到「Hello World!」。
恭喜!
您現在可以透過 Cloud Build,在 Google Cloud 上為 GKE 建立及復原持續整合管道了!
Google Cloud 教育訓練與認證
協助您瞭解如何充分運用 Google Cloud 的技術。我們的課程會介紹專業技能和最佳做法,讓您可以快速掌握要領並持續進修。我們提供從基本到進階等級的訓練課程,並有隨選、線上和虛擬課程等選項,方便您抽空參加。認證可協助您驗證及證明自己在 Google Cloud 技術方面的技能和專業知識。
使用手冊上次更新日期:2025 年 2 月 19 日
實驗室上次測試日期:2025 年 2 月 19 日
Copyright 2025 Google LLC 保留所有權利。Google 和 Google 標誌是 Google LLC 的商標,其他公司和產品名稱則有可能是其關聯公司的商標。


