GSP1077

개요
Cloud Build는 Google Cloud에서 빌드를 실행하는 서비스입니다. 소스 코드를 가져오고 빌드를 실행하는 등의 작업을 수행할 수 있습니다.
이 실습에서는 커밋된 코드로부터 컨테이너 이미지를 자동으로 빌드하고, Artifact Registry에 이미지를 저장하고, Git 저장소의 Kubernetes 매니페스트를 업데이트하고, 이 매니페스트를 사용하여 애플리케이션을 Google Kubernetes Engine에 배포하는 지속적 통합 및 지속적 배포(CI/CD) 파이프라인을 만듭니다.
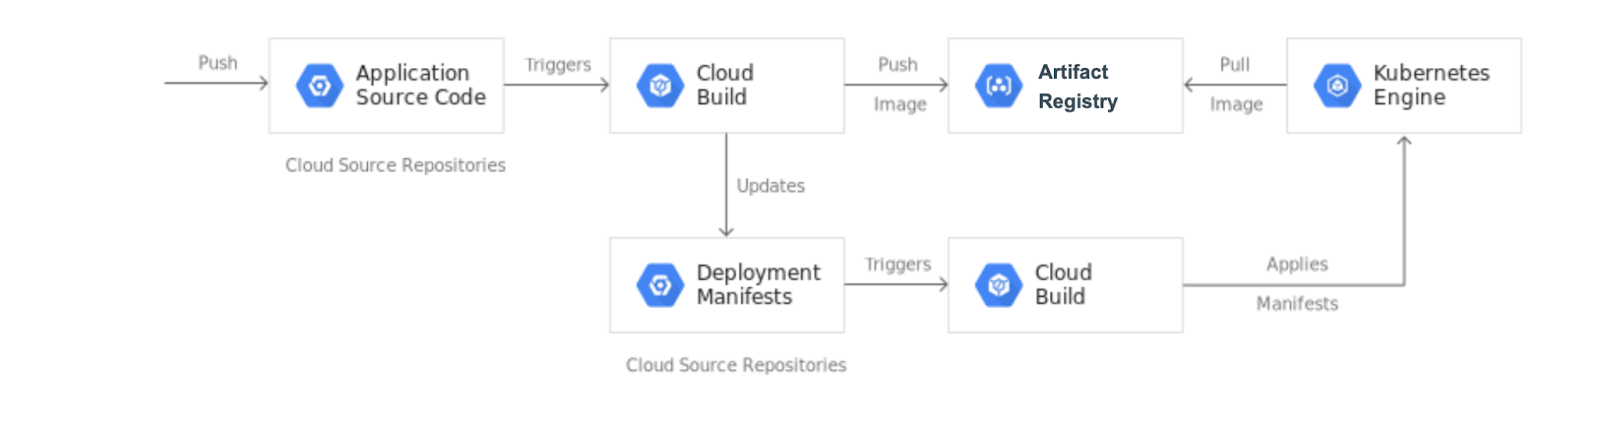
이 실습에서는 전용 자체 호스팅 Gitea Git 서버(git-server)에 호스팅된 다음 2개의 Git 저장소를 사용합니다.
-
app: 애플리케이션 소스 코드 포함(hello-cloudbuild-app)
-
env: Kubernetes 배포 매니페스트 포함(hello-cloudbuild-env)
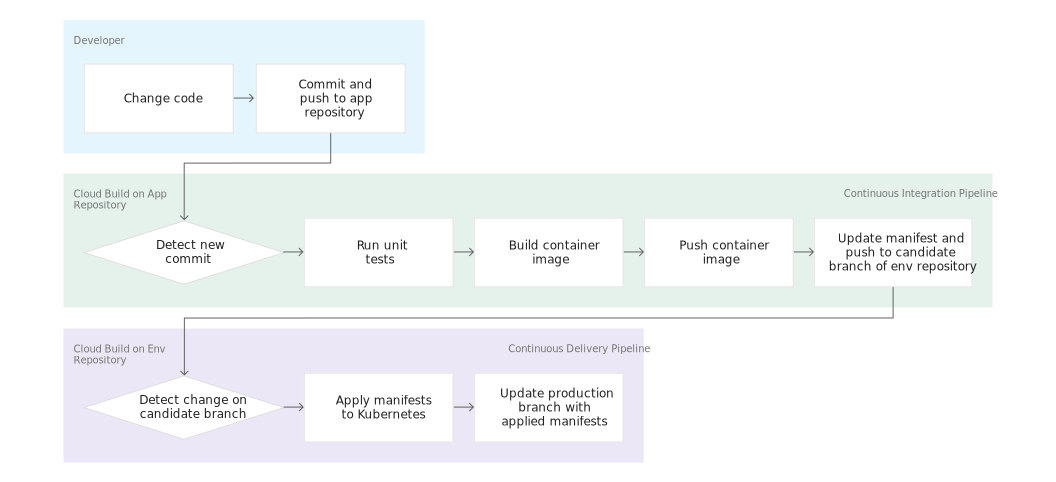
변경사항을 app 저장소에 푸시하면 Cloud Build 파이프라인이 테스트를 실행하고, 컨테이너 이미지를 빌드하고, 변경사항을 Artifact Registry에 푸시합니다. 이미지를 푸시한 후 Cloud Build는 배포 매니페스트를 업데이트하여 env 저장소에 푸시합니다. 이때 다른 Cloud Build 파이프라인이 트리거되며, 이 파이프라인은 GKE 클러스터에 매니페스트를 적용하고 성공하면 env 저장소의 다른 브랜치에 매니페스트를 저장합니다.
app 저장소와 env 저장소를 분리하는 이유는 수명 주기와 용도가 서로 다르기 때문입니다. app 저장소는 특정 애플리케이션 전용이며 주로 실제 사람이 사용합니다. env 저장소는 여러 애플리케이션에서 공유할 수 있으며 Cloud Build와 같은 자동화된 시스템에서 사용됩니다. env 저장소는 각각 특정 환경에 매핑되고 특정 컨테이너 이미지를 참조하는 여러 브랜치를 가질 수 있지만 app 저장소는 그렇지 않습니다.
이 실습을 마치면 시스템에서 다음 작업을 손쉽게 처리할 수 있습니다.
- Cloud Build 기록을 조회하여 배포 실패와 성공 구분
-
env 저장소의 production 브랜치를 조회하여 현재 사용 중인 매니페스트에 액세스
- Cloud Build의 해당 빌드를 다시 실행하여 이전 버전으로 롤백
목표
이 실습에서는 다음 작업을 수행하는 방법을 알아봅니다.
- Kubernetes Engine 클러스터를 만듭니다.
- 전용 Git 서버에 연결하고 Git 저장소를 초기화합니다.
- 소스 코드 저장소에서 Cloud Build 파이프라인을 실행합니다.
- Cloud Build를 통해 테스트를 자동화하고 배포 가능한 컨테이너 이미지를 게시합니다.
- Cloud Build를 통해 Kubernetes Engine 클러스터에 배포된 리소스를 관리합니다.
설정 및 요건
실습 시작 버튼을 클릭하기 전에
다음 안내를 확인하세요. 실습에는 시간 제한이 있으며 일시중지할 수 없습니다. 실습 시작을 클릭하면 타이머가 시작됩니다. 이 타이머는 Google Cloud 리소스를 사용할 수 있는 시간이 얼마나 남았는지를 표시합니다.
실무형 실습을 통해 시뮬레이션이나 데모 환경이 아닌 실제 클라우드 환경에서 실습 활동을 진행할 수 있습니다. 실습 시간 동안 Google Cloud에 로그인하고 액세스하는 데 사용할 수 있는 새로운 임시 사용자 인증 정보가 제공됩니다.
이 실습을 완료하려면 다음을 준비해야 합니다.
- 표준 인터넷 브라우저 액세스 권한(Chrome 브라우저 권장)
참고: 이 실습을 실행하려면 시크릿 모드(권장) 또는 시크릿 브라우저 창을 사용하세요. 개인 계정과 학습자 계정 간의 충돌로 개인 계정에 추가 요금이 발생하는 일을 방지해 줍니다.
- 실습을 완료하기에 충분한 시간(실습을 시작하고 나면 일시중지할 수 없음)
참고: 이 실습에는 학습자 계정만 사용하세요. 다른 Google Cloud 계정을 사용하는 경우 해당 계정에 비용이 청구될 수 있습니다.
실습을 시작하고 Google Cloud 콘솔에 로그인하는 방법
-
실습 시작 버튼을 클릭합니다. 실습 비용을 결제해야 하는 경우 결제 수단을 선택할 수 있는 대화상자가 열립니다.
오른쪽에는 다음과 같은 항목이 포함된 실습 설정 및 액세스 패널이 있습니다.
-
Google Cloud 콘솔 열기 버튼
- 이 실습에 사용해야 하는 임시 사용자 인증 정보(사용자 이름 및 비밀번호)
- 필요한 경우 실습 진행을 위한 기타 정보
실습 타이머는 페이지 상단에 있으며 남은 시간을 표시합니다.
-
Google Cloud 콘솔 열기를 클릭합니다(Chrome 브라우저를 실행 중인 경우 마우스 오른쪽 버튼으로 클릭하고 시크릿 창에서 링크 열기를 선택합니다).
실습에서 리소스가 가동되면 다른 탭이 열리고 로그인 페이지가 표시됩니다.
팁: 두 개의 탭을 각각 별도의 창으로 나란히 정렬하세요.
참고: 계정 선택 대화상자가 표시되면 다른 계정 사용을 클릭합니다.
-
필요한 경우 아래의 사용자 이름을 복사하여 로그인 대화상자에 붙여넣습니다.
{{{user_0.username | "Username"}}}
실습 설정 및 액세스 패널에서도 사용자 이름을 확인할 수 있습니다.
-
다음을 클릭합니다.
-
아래의 비밀번호를 복사하여 시작하기 대화상자에 붙여넣습니다.
{{{user_0.password | "Password"}}}
실습 설정 및 액세스 패널에서도 비밀번호를 확인할 수 있습니다.
-
다음을 클릭합니다.
중요: 실습에서 제공하는 사용자 인증 정보를 사용해야 합니다. Google Cloud 계정 사용자 인증 정보를 사용하지 마세요.
참고: 이 실습에 자신의 Google Cloud 계정을 사용하면 추가 요금이 발생할 수 있습니다.
-
이후에 표시되는 페이지를 클릭하여 넘깁니다.
- 이용약관에 동의하세요.
- 임시 계정이므로 복구 옵션이나 2단계 인증을 추가하지 마세요.
- 무료 체험판을 신청하지 마세요.
잠시 후 Google Cloud 콘솔이 이 탭에서 열립니다.
참고: Google Cloud 제품 및 서비스에 액세스하려면 탐색 메뉴를 클릭하거나 검색창에 제품 또는 서비스 이름을 입력합니다.

Cloud Shell 활성화
Cloud Shell은 다양한 개발 도구가 탑재된 가상 머신으로, 5GB의 영구 홈 디렉터리를 제공하며 Google Cloud에서 실행됩니다. Cloud Shell을 사용하면 명령줄을 통해 Google Cloud 리소스에 액세스할 수 있습니다.
-
Google Cloud 콘솔 상단에서 Cloud Shell 활성화  를 클릭합니다.
-
다음 창을 클릭합니다.
- Cloud Shell 정보 창을 통해 계속 진행합니다.
- 사용자 인증 정보를 사용하여 Google Cloud API를 호출할 수 있도록 Cloud Shell을 승인합니다.
연결되면 사용자 인증이 이미 처리된 것이며 프로젝트가 학습자의 PROJECT_ID, (으)로 설정됩니다. 출력에 이 세션의 PROJECT_ID를 선언하는 줄이 포함됩니다.
Your Cloud Platform project in this session is set to {{{project_0.project_id | "PROJECT_ID"}}}
gcloud는 Google Cloud의 명령줄 도구입니다. Cloud Shell에 사전 설치되어 있으며 명령줄 자동 완성을 지원합니다.
- (선택사항) 다음 명령어를 사용하여 활성 계정 이름 목록을 표시할 수 있습니다.
gcloud auth list
-
승인을 클릭합니다.
출력:
ACTIVE: *
ACCOUNT: {{{user_0.username | "ACCOUNT"}}}
To set the active account, run:
$ gcloud config set account `ACCOUNT`
- (선택사항) 다음 명령어를 사용하여 프로젝트 ID 목록을 표시할 수 있습니다.
gcloud config list project
출력:
[core]
project = {{{project_0.project_id | "PROJECT_ID"}}}
참고: gcloud 전체 문서는 Google Cloud에서 gcloud CLI 개요 가이드를 참고하세요.
작업 1. 실습 초기화
이 작업에서는 다음을 포함한 환경을 설정합니다.
- 프로젝트 ID, 프로젝트 번호, Git 서버 IP를 변수로 가져오기
- GKE, Cloud Build, Secret Manager, Artifact Analysis용 API 사용 설정하기
- Artifact Registry Docker 저장소 만들기
- 이 실습의 샘플 애플리케이션을 배포할 GKE 클러스터 만들기
- Cloud Shell에서 다음 명령어를 실행하여 프로젝트 ID, 프로젝트 번호, 리전을 설정합니다.
export PROJECT_ID=$(gcloud config get-value project)
export PROJECT_NUMBER=$(gcloud projects describe $PROJECT_ID --format='value(projectNumber)')
export REGION={{{ project_0.default_region }}}
gcloud config set compute/region $REGION
export GIT_SERVER_IP=$(gcloud compute instances describe git-server --zone={{{ project_0.default_zone }}} --format='get(networkInterfaces[0].accessConfigs[0].natIP)')
echo "Git Server IP is: ${GIT_SERVER_IP}"
- 다음 명령어를 실행하여 GKE, Cloud Build, Secret Manager, Artifact Analysis용 API를 사용 설정합니다.
gcloud services enable container.googleapis.com \
cloudbuild.googleapis.com \
secretmanager.googleapis.com \
containeranalysis.googleapis.com
-
리전에
my-repository라는 Artifact Registry Docker 저장소를 만들어 컨테이너 이미지를 저장합니다.
gcloud artifacts repositories create my-repository \
--repository-format=docker \
--location=$REGION
- 이 실습의 샘플 애플리케이션을 배포할 GKE 클러스터를 만듭니다.
gcloud container clusters create hello-cloudbuild --num-nodes 1 --region $REGION
- 다음 명령어를 실행하여 Cloud Shell에서 Git을 구성합니다.
git config --global user.name "giteaadmin"
git config --global user.email "student@qwiklabs.net"
내 진행 상황 확인하기를 클릭하여 목표를 확인합니다.
서비스 사용 설정, Artifact Registry 및 GKE 클러스터 만들기
작업 2. Git 서버의 Git 저장소에 연결하기
이 작업에서는 전용 Git 서버(git-server)에서 두 개의 Git 저장소(hello-cloudbuild-app 및 hello-cloudbuild-env)를 초기화하고 초기 샘플 코드를 푸시합니다.
- Cloud Storage에서 샘플 코드를 다운로드합니다.
cd ~
git clone http://${GIT_SERVER_IP}:3000/giteaadmin/hello-cloudbuild-app.git
클론한 코드에는 간단한 'Hello World' 애플리케이션이 포함되어 있습니다.
from flask import Flask
app = Flask('hello-cloudbuild')
@app.route('/')
def hello():
return "Hello World!\n"
if __name__ == '__main__':
app.run(host = '0.0.0.0', port = 8080)
작업 3. Cloud Build로 컨테이너 이미지 만들기
이 작업에서는 기존 Dockerfile을 사용하여 Cloud Build로 컨테이너 이미지를 만들고 저장합니다.
이전에 클론한 코드에는 Docker 파일이 포함되어 있습니다.
FROM python:3.11-slim
RUN pip install flask
WORKDIR /app
COPY app.py /app/app.py
ENTRYPOINT ["python"]
CMD ["/app/app.py"]
이 Dockerfile을 사용하면 Cloud Build로 컨테이너 이미지를 만들어 Artifact Registry에 저장할 수 있습니다.
- Cloud Shell에서 다음 명령어를 사용하여 최신 커밋을 기반으로 Cloud Build 빌드를 만듭니다.
cd ~/hello-cloudbuild-app
COMMIT_ID="$(git rev-parse --short=7 HEAD)"
gcloud builds submit --tag="${REGION}-docker.pkg.dev/${PROJECT_ID}/my-repository/hello-cloudbuild:${COMMIT_ID}" .
이 명령어를 실행하면 Cloud Build는 컨테이너 이미지가 만들어질 때 생성되는 로그를 터미널에 스트리밍합니다.
- 빌드가 완료되면 Google Cloud 콘솔 제목 표시줄의 검색창에 Artifact Registry를 입력한 다음 검색 결과에서 Artifact Registry를 클릭합니다. 새 컨테이너 이미지를 Artifact Registry에서 실제로 사용할 수 있는지 확인합니다. my-repository를 클릭하여 이미지 목록에서
hello-cloudbuild 이미지를 확인합니다.
내 진행 상황 확인하기를 클릭하여 목표를 확인합니다.
Cloud Build로 컨테이너 이미지 만들기
작업 4. 지속적 통합(CI) 파이프라인 만들기 및 실행
이 작업에서는 단위 테스트를 자동으로 실행하고 컨테이너 이미지를 빌드한 다음 Artifact Registry에 푸시하도록 Cloud Build를 구성하고 실행합니다.
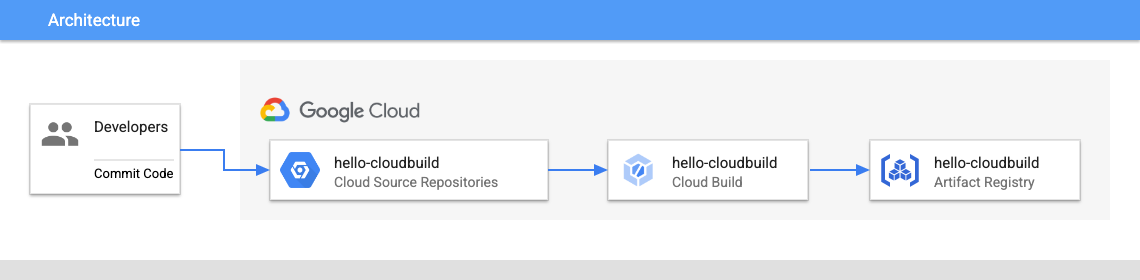
코드에 이미 포함되어 있는 cloudbuild.yaml 파일은 파이프라인의 구성입니다.
- 변경사항을 커밋하고 Git 서버에 푸시합니다.
cd ~/hello-cloudbuild-app
git add .
git commit -m "Trigger CI pipeline"
git push http://giteaadmin:GiteaPassword123@${GIT_SERVER_IP}:3000/giteaadmin/hello-cloudbuild-app.git main
- 다음 명령어를 사용하여 Cloud Build에 빌드를 제출합니다.
gcloud builds submit --config=cloudbuild.yaml --substitutions=SHORT_SHA=$(git rev-parse --short=7 HEAD) .
- Google Cloud 콘솔에서 Cloud Build를 검색하고 왼쪽 창에서 기록을 클릭합니다. CI 빌드의 실행 로그를 검사할 수 있습니다.
내 진행 상황 확인하기를 클릭하여 목표를 확인합니다.
지속적 통합(CI) 파이프라인 만들기
작업 5. Secret Manager에 SSH 키 보안 비밀 저장
이 단계에서는 Secret Manager에 비공개 키 보안 비밀을 저장하고 Cloud Build에 Secret Manager에 액세스할 수 있는 권한을 부여합니다.
SSH 키를 만들고 Secret Manager에 저장
-
Cloud Shell에서 SSH 키를 만듭니다.
mkdir -p ~/workingdir && cd ~/workingdir
ssh-keygen -t rsa -b 4096 -N '' -f id_rsa -C "student@qwiklabs.net"
-
Cloud Shell에서 다음 명령어를 실행하여 Secret Manager에 비공개 SSH 키를 저장합니다.
gcloud secrets create ssh_key_secret --data-file=$HOME/workingdir/id_rsa
또는 Google Cloud 콘솔에서 다음을 수행합니다.
a. 먼저 id_rsa를 컴퓨터에 다운로드합니다. Cloud Shell에서 더보기( ) > 파일 다운로드를 클릭하고
workingdir/id_rsa를 입력한 다음 다운로드를 클릭합니다.
b. Secret Manager를 검색하고 Secret Manager를 클릭합니다.
c. 보안 비밀 만들기를 클릭합니다.
d. 이름을 ssh_key_secret로 설정합니다.
e. 보안 비밀 값에서 업로드를 선택하고 다운로드한 id_rsa 파일을 업로드합니다.
f. 보안 비밀 만들기를 클릭합니다.
서비스 계정에 Secret Manager 액세스 권한 부여
Cloud Shell에서 다음 명령어를 실행하여 Compute Engine 기본 서비스 계정에 Secret Manager에 액세스할 수 있는 권한을 부여합니다.
PROJECT_NUMBER=$(gcloud projects describe ${PROJECT_ID} --format='value(projectNumber)')
gcloud projects add-iam-policy-binding ${PROJECT_NUMBER} \
--member=serviceAccount:${PROJECT_NUMBER}-compute@developer.gserviceaccount.com \
--role=roles/secretmanager.secretAccessor
내 진행 상황 확인하기를 클릭하여 목표를 확인합니다.
Secret Manager에 SSH 키 보안 비밀 저장
작업 6. 테스트 환경 및 CD 파이프라인 만들기
Cloud Build는 지속적 배포 파이프라인에도 사용할 수 있습니다. hello-cloudbuild-env 저장소의 candidate 브랜치에 커밋이 푸시될 때마다 파이프라인이 실행됩니다. 이 파이프라인은 Kubernetes 클러스터에 매니페스트의 새 버전을 적용하고, 성공하면 매니페스트를 production 브랜치에 복사합니다. 이 프로세스의 속성은 다음과 같습니다.
- candidate 브랜치는 배포 시도 기록입니다.
- production 브랜치는 배포 성공 기록입니다.
- Cloud Build에서 배포 성공과 실패를 확인할 수 있습니다.
- Cloud Build의 해당 빌드를 다시 실행하여 이전 배포로 롤백할 수 있습니다. 롤백하면 배포 기록을 정확히 반영하기 위해 production 브랜치도 업데이트됩니다.
다음으로 지속적 통합 파이프라인을 수정하여 hello-cloudbuild-env 저장소의 candidate 브랜치를 업데이트하고 지속적 배포 파이프라인을 트리거해 봅니다.
GKE에 Cloud Build 액세스 권한 부여
애플리케이션을 Kubernetes 클러스터에 배포하려면 Cloud Build에 Kubernetes Engine 개발자 역할이 필요합니다.
- Cloud Shell에서 다음 명령어를 실행합니다.
PROJECT_NUMBER="$(gcloud projects describe ${PROJECT_ID} --format='get(projectNumber)')"
gcloud projects add-iam-policy-binding ${PROJECT_NUMBER} \
--member=serviceAccount:${PROJECT_NUMBER}@cloudbuild.gserviceaccount.com \
--role=roles/container.developer
hello-cloudbuild-env 저장소를 두 개의 브랜치(production과 candidate) 및 배포 프로세스를 기술하는 Cloud Build 구성 파일로 초기화해야 합니다.
- Cloud Shell에서 Cloud Storage의 샘플 코드를 다운로드합니다.
cd ~
git clone http://${GIT_SERVER_IP}:3000/giteaadmin/hello-cloudbuild-env.git
- Cloud Shell에서 다음 명령어를 실행하여
hello-cloudbuild-env 저장소의 cloudbuild.yaml 콘텐츠를 바꿉니다.
cd ~/hello-cloudbuild-env
cat <<'EOF' > cloudbuild.yaml
# Copyright 2018 Google LLC
#
# Licensed under the Apache License, Version 2.0 (the "License");
# you may not use this file except in compliance with the License.
# You may obtain a copy of the License at
#
# https://www.apache.org/licenses/LICENSE-2.0
#
# Unless required by applicable law or agreed to in writing, software
# distributed under the License is distributed on an "AS IS" BASIS,
# WITHOUT WARRANTIES OR CONDITIONS OF ANY KIND, either express or implied.
# See the License for the specific language governing permissions and
# limitations under the License.
substitutions:
_COMMIT_SHA: 'v1.0'
steps:
# This step deploys the new version of our container image
# in the hello-cloudbuild Kubernetes Engine cluster.
- name: 'gcr.io/cloud-builders/kubectl'
id: Deploy
args:
- 'apply'
- '-f'
- 'kubernetes.yaml'
env:
- 'CLOUDSDK_COMPUTE_REGION={{{ project_0.default_region }}}'
- 'CLOUDSDK_CONTAINER_CLUSTER=hello-cloudbuild'
# This step copies the applied manifest to the production branch
- name: 'gcr.io/cloud-builders/gcloud'
id: Copy to production branch
entrypoint: /bin/sh
args:
- '-c'
- |
set -x && \
git clone -b production http://giteaadmin:GiteaPassword123@${GIT_SERVER_IP}:3000/giteaadmin/hello-cloudbuild-env.git prod_repo && \
cd prod_repo && \
git config user.email "student@qwiklabs.net" && \
git config user.name "Cloud Build" && \
cp ../kubernetes.yaml kubernetes.yaml && \
git add kubernetes.yaml && \
git commit -m "Deployed manifest from commit $_COMMIT_SHA" && \
git push origin production
options:
logging: CLOUD_LOGGING_ONLY
EOF
sed -i "s/\${GIT_SERVER_IP}/$GIT_SERVER_IP/g" cloudbuild.yaml
업데이트를 커밋하고 hello-cloudbuild-env에 푸시합니다.
cd ~/hello-cloudbuild-env
git checkout candidate
git add cloudbuild.yaml
git commit -m "Create cloudbuild.yaml for deployment"
git push http://giteaadmin:GiteaPassword123@${GIT_SERVER_IP}:3000/giteaadmin/hello-cloudbuild-env.git candidate
지속적 배포 파이프라인을 트리거하도록 지속적 통합 파이프라인 수정
다음으로 hello-cloudbuild-app에서 지속적 통합 파이프라인을 업데이트하여 Kubernetes 매니페스트의 새 버전을 생성하고 이를 hello-cloudbuild-env에 푸시하여 CD 파이프라인을 트리거합니다.
- Cloud Shell에서 다음 명령어를 실행하여
hello-cloudbuild-app의 cloudbuild.yaml을 바꾸고 Git 서버 IP를 대체합니다.
cd ~/hello-cloudbuild-app
cat <<'EOF' > cloudbuild.yaml
# Copyright 2018 Google LLC
#
# Licensed under the Apache License, Version 2.0 (the "License");
# you may not use this file except in compliance with the License.
# You may obtain a copy of the License at
#
# https://www.apache.org/licenses/LICENSE-2.0
#
# Unless required by applicable law or agreed to in writing, software
# distributed under the License is distributed on an "AS IS" BASIS,
# WITHOUT WARRANTIES OR CONDITIONS OF ANY KIND, either express or implied.
# See the License for the specific language governing permissions and
# limitations under the License.
substitutions:
_SHORT_SHA: 'v1.0'
_COMMIT_SHA: 'v1.0'
steps:
# This step runs the unit tests on the app
- name: 'python:3.11-slim'
id: Test
entrypoint: /bin/sh
args:
- -c
- 'pip install flask && python test_app.py -v'
# This step builds the container image.
- name: 'gcr.io/cloud-builders/docker'
id: Build
args:
- 'build'
- '-t'
- '{{{ project_0.default_region }}}-docker.pkg.dev/$PROJECT_ID/my-repository/hello-cloudbuild:$_SHORT_SHA'
- '.'
# This step pushes the image to Artifact Registry
- name: 'gcr.io/cloud-builders/docker'
id: Push
args:
- 'push'
- '{{{ project_0.default_region }}}-docker.pkg.dev/$PROJECT_ID/my-repository/hello-cloudbuild:$_SHORT_SHA'
# This step clones the hello-cloudbuild-env repository
- name: 'gcr.io/cloud-builders/gcloud'
id: Clone env repo
entrypoint: /bin/sh
args:
- '-c'
- |
git clone http://giteaadmin:GiteaPassword123@${GIT_SERVER_IP}:3000/giteaadmin/hello-cloudbuild-env.git && \
cd hello-cloudbuild-env && \
git checkout candidate && \
git config user.email "student@qwiklabs.net" && \
git config user.name "Cloud Build"
# This step generates the new manifest
- name: 'gcr.io/cloud-builders/gcloud'
id: Generate manifest
entrypoint: /bin/sh
args:
- '-c'
- |
sed "s/GOOGLE_CLOUD_PROJECT/${PROJECT_ID}/g" kubernetes.yaml.tpl | \
sed "s/COMMIT_SHA/${_SHORT_SHA}/g" > hello-cloudbuild-env/kubernetes.yaml
# This step pushes the manifest back to hello-cloudbuild-env candidate branch
- name: 'gcr.io/cloud-builders/gcloud'
id: Push manifest
entrypoint: /bin/sh
args:
- '-c'
- |
set -x && \
cd hello-cloudbuild-env && \
git add kubernetes.yaml && \
git commit -m "Deploying image {{{ project_0.default_region }}}-docker.pkg.dev/$PROJECT_ID/my-repository/hello-cloudbuild:${_SHORT_SHA}
Built from commit ${_COMMIT_SHA} of repository hello-cloudbuild-app
Author: $(git log --format='%an <%ae>' -n 1 HEAD)" && \
git push origin candidate
options:
logging: CLOUD_LOGGING_ONLY
EOF
sed -i "s/\${GIT_SERVER_IP}/$GIT_SERVER_IP/g" cloudbuild.yaml
- 수정사항을 커밋하고 Git 서버에 푸시한 후 파이프라인 빌드를 제출합니다.
cd ~/hello-cloudbuild-app
git add cloudbuild.yaml
git commit -m "Trigger CD pipeline"
git push http://giteaadmin:GiteaPassword123@${GIT_SERVER_IP}:3000/giteaadmin/hello-cloudbuild-app.git main
gcloud builds submit --config=cloudbuild.yaml --substitutions=_SHORT_SHA=$(git rev-parse --short=7 HEAD),_COMMIT_SHA=$(git rev-parse HEAD) .
이렇게 하면 Cloud Build의 지속적 통합 파이프라인이 트리거되어 애플리케이션 이미지를 빌드하고 새 kubernetes.yaml 매니페스트를 hello-cloudbuild-env 저장소에 푸시합니다.
-
hello-cloudbuild-env에서 생성된 매니페스트를 가져오고 지속적 배포(CD) 배포 빌드를 트리거합니다.
cd ~/hello-cloudbuild-env
git pull http://giteaadmin:GiteaPassword123@${GIT_SERVER_IP}:3000/giteaadmin/hello-cloudbuild-env.git candidate
gcloud builds submit --config=cloudbuild.yaml --substitutions=_COMMIT_SHA=$(git rev-parse HEAD) .
내 진행 상황 확인하기를 클릭하여 목표를 확인합니다.
테스트 환경 및 CD 파이프라인 만들기
작업 7. Cloud Build 파이프라인 검토
이 작업에서는 콘솔에서 Cloud Build 파이프라인을 검토합니다.
- 콘솔에서 Cloud Build > 기록으로 이동합니다.
- 가장 최근 빌드를 클릭하여 실행을 추적하고 로그를 검사합니다.
- 빌드 파이프라인이 모든 단계를 성공적으로 실행했는지 확인합니다.
작업 8. 전체 파이프라인 테스트
이제 전체 CI/CD 파이프라인이 구성되었습니다. 이 작업에서는 엔드 투 엔드 테스트를 수행합니다.
- 콘솔의 탐색 메뉴(
 )에서 Kubernetes Engine > 게이트웨이, 서비스, 인그레스 > 서비스를 클릭합니다.
목록에 hello-cloudbuild라는 서비스 하나가 있어야 합니다. 이 서비스는 방금 실행된 지속적 배포 빌드에서 만든 것입니다.
-
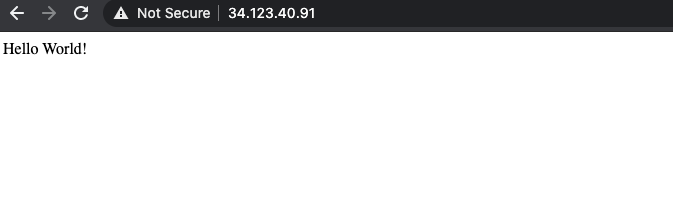
hello-cloudbuild 서비스의 엔드포인트를 클릭합니다. 'Hello World!'가 표시되어야 합니다. 엔드포인트가 없거나 부하 분산기 오류가 표시되는 경우 부하 분산기 초기화가 완료될 때까지 몇 분 정도 기다려야 할 수 있습니다. 필요한 경우 새로고침을 클릭하여 페이지를 업데이트합니다.
- Cloud Shell에서 애플리케이션 및 단위 테스트의 'Hello World'를 'Hello Cloud Build'로 바꿉니다.
cd ~/hello-cloudbuild-app
sed -i 's/Hello World/Hello Cloud Build/g' app.py
sed -i 's/Hello World/Hello Cloud Build/g' test_app.py
- 변경사항을 커밋하고 Git 서버에 푸시한 후 CI 빌드를 제출합니다.
git add app.py test_app.py
git commit -m "Hello Cloud Build"
git push http://giteaadmin:GiteaPassword123@${GIT_SERVER_IP}:3000/giteaadmin/hello-cloudbuild-app.git main
gcloud builds submit --config=cloudbuild.yaml --substitutions=_SHORT_SHA=$(git rev-parse --short=7 HEAD),_COMMIT_SHA=$(git rev-parse HEAD) .
- 업데이트된 매니페스트를
hello-cloudbuild-env로 가져오고 배포 파이프라인 빌드를 제출하여 새 애플리케이션 버전을 배포합니다.
cd ~/hello-cloudbuild-env
git pull http://giteaadmin:GiteaPassword123@${GIT_SERVER_IP}:3000/giteaadmin/hello-cloudbuild-env.git candidate
gcloud builds submit --config=cloudbuild.yaml --substitutions=_COMMIT_SHA=$(git rev-parse HEAD) .
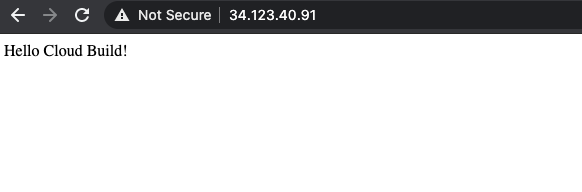
몇 분 후에 브라우저에서 애플리케이션을 새로고침합니다. 이제 'Hello Cloud Build!'가 표시되어야 합니다.
작업 9. 롤백 테스트
이 작업에서는 'Hello World!'를 표시하던 애플리케이션 버전으로 롤백해 봅니다.
- 콘솔 제목 표시줄의 검색창에 Cloud Build 대시보드를 입력한 다음 검색 결과에서 Cloud Build를 클릭합니다. 왼쪽 창에서 기록이 선택되어 있는지 확인합니다.
-
빌드 기록에서 사용 가능한 빌드 중 두 번째로 최신인 빌드를 클릭합니다.
-
다시 빌드를 클릭합니다.
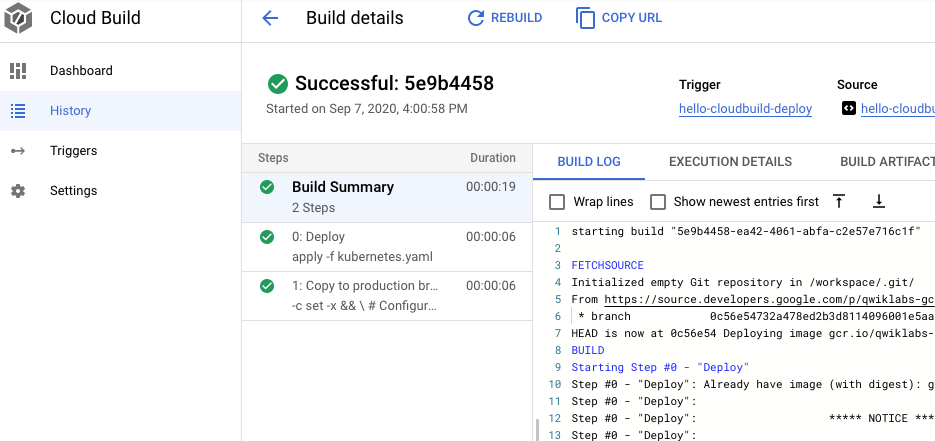
빌드가 끝나면 브라우저에서 애플리케이션을 새로고침합니다. 이제 다시 'Hello World!'가 표시됩니다.
수고하셨습니다
이제 Cloud Build를 사용하여 Google Cloud 기반 GKE에서 지속적 통합 파이프라인을 만들고 롤백할 수 있습니다.
Google Cloud 교육 및 자격증
Google Cloud 기술을 최대한 활용하는 데 도움이 됩니다. Google 강의에는 빠른 습득과 지속적인 학습을 지원하는 기술적인 지식과 권장사항이 포함되어 있습니다. 기초에서 고급까지 수준별 학습을 제공하며 바쁜 일정에 알맞은 주문형, 실시간, 가상 옵션이 포함되어 있습니다. 인증은 Google Cloud 기술에 대한 역량과 전문성을 검증하고 입증하는 데 도움이 됩니다.
설명서 최종 업데이트: 2026년 7월 20일
실습 최종 테스트: 2026년 7월 20일
Copyright 2026 Google LLC. All rights reserved. Google 및 Google 로고는 Google LLC의 상표입니다. 기타 모든 회사명 및 제품명은 해당 업체의 상표일 수 있습니다.