Questi contenuti non sono ancora ottimizzati per i dispositivi mobili.
Per un'esperienza ottimale, visualizza il sito su un computer utilizzando un link inviato via email.
Overview
In this lab, you create one VM in the Premium network service tier (default) and one VM in the Standard network service tier. Then you compare the latency and network paths for each VM instance.
With network service tiers, Google Cloud enables you to optimize your cloud network for performance by choosing the Premium tier, or for cost with the new Standard tier.
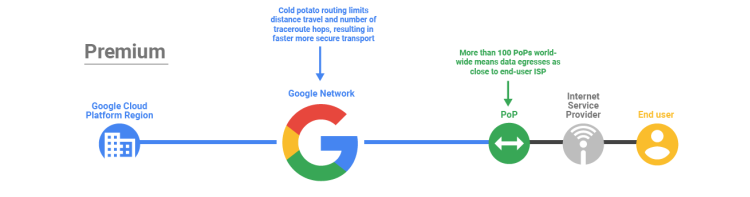
Premium tier
Premium tier delivers traffic over Google’s well-provisioned, low-latency, highly reliable global network. This network consists of an extensive global private fiber network with over 100 points of presence (POPs) across the globe.
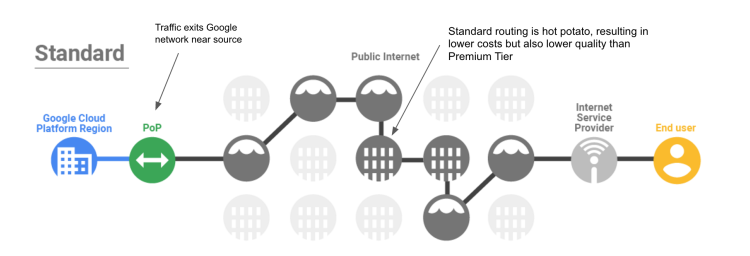
Standard tier
Standard tier is a new, lower-cost offering. The network quality of this tier is comparable to the quality of other public cloud providers and regional network services, such as regional load balancing with one VIP per region, but lower than the quality of Premium tier.
Standard tier is priced lower than Premium because the traffic between Google Cloud and your end user (internet) is delivered over transit (ISP) networks instead of Google’s network.
Objectives
In this lab, you will learn how to perform the following tasks:
Create a VM using the Premium network service tier.
Create a VM using the Standard network service tier.
Explore the latency and network paths for VMs on different network service tiers.
Setup and requirements
For each lab, you get a new Google Cloud project and set of resources for a fixed time at no cost.
Sign in to Google Skills using an incognito window.
Note the lab's access time (for example, 1:15:00), and make sure you can finish within that time.
There is no pause feature. You can restart if needed, but you have to start at the beginning.
When ready, click Start lab.
Note your lab credentials (Username and Password). You will use them to sign in to the Google Cloud Console.
Click Open Google Console.
Click Use another account and copy/paste credentials for this lab into the prompts.
If you use other credentials, you'll receive errors or incur charges.
Accept the terms and skip the recovery resource page.
Task 1. Create the VM instances
In this task, you create two VM instances and define their network service tier during the instance creation. You can configure the network tier for your VM instances at the project level or at the resource level.
Create the Premium tier VM
Create a VM instance using the Premium service tier, which is the default.
In the Cloud Console, on the Navigation menu (), click Compute Engine > VM instances.
Click Create Instance.
Specify the following, and leave the remaining settings as their defaults.
Property
Value (type value or select option as specified)
Name
vm-premium
Zone
In the left frame, click Machine configuration and make sure that these values are selected:
Property
Value (type value or select option as specified)
Series
E2
Machine type
e2-medium (2vCPU, 1 core, 4 GB memory)
In the left frame, click Networking.
In Network interfaces, click default default to expand the Network interfaces settings.
Verify that Network Service Tier is set to Premium.
Note: The Premium tier is currently the default at the project level, but you can change this by clicking the change link. Do not change the project-level tier in this lab!
Click Done.
Click Create.
Create the Standard tier VM
Create a VM instance of the same machine type and in the same zone but use the Standard service tier.
Click Create Instance.
Specify the following, and leave the remaining settings as their defaults.
Property
Value (type value or select option as specified)
Name
vm-standard
Zone
In the left frame, click
| Series | E2|
| Machine type | e2-medium (2vCPU, 1 core, 4 GB memory)|
Click Advanced options.
Click Networking.
In Network interfaces, click default default to expand the Network interfaces settings.
In Network Service Tier, click Standard.
Click Done.
Click Create.
Wait for both instances to be created. This is indicated by green checkmarks next to the instance names.
Note: Both VM instances have the same machine type, zone, and VPC network. The only differences are the network service tier and the instance names.
Note the External IP addresses of vm-premium and vm-standard. They will be referred to as [premium-IP] and [standard-IP], respectively.
Click Check my progress to verify the objective.
Create the VM instances
Task 2. Explore the latency and network paths
In this task, you explore some of the network performance differences between the Premium tier and Standard tier.
Explore the latency for each VM instance
In this step, you explore the latency from a third-party service in Europe to your VM instances in . Latency is defined as the round-trip time (RTT), or the time that network packets take to get from one host to the other and back. Lower latency improves user experience and also improves transfer speeds.
In this step, you use the website ping.eu to demonstrate the latency a user in Europe might experience when accessing your server in .
Open a new browser tab and navigate to ping.eu/ping.
Type the [premium-IP] in the IP address or host name field.
For Enter code, type the captcha code shown onscreen.
Click Go.
Wait for the four consecutive pings to complete.
The output should look like this.
Output example (yours will differ):
--- PING 35.202.10.213 (35.202.10.213) 56(84) bytes of data. ---
64 bytes from 35.202.10.213: icmp_seq=1 ttl=54 time=124 ms
64 bytes from 35.202.10.213: icmp_seq=2 ttl=54 time=123 ms
64 bytes from 35.202.10.213: icmp_seq=3 ttl=54 time=123 ms
64 bytes from 35.202.10.213: icmp_seq=4 ttl=54 time=123 ms
...
--- Round Trip Time (rtt) ---
min 123.499 ms
avg 123.753 ms
max 124.225 ms
Note: In the example output, the average latency of the Premium tier VM is 123.753 milliseconds.
Type the [standard-IP] in the IP address or host name field.
For Enter code, type the captcha code shown onscreen.
Click Go.
Wait for the four consecutive pings to complete.
The output should look like this.
Output example (yours will differ):
--- PING 35.206.65.89 (35.206.65.89) 56(84) bytes of data. ---
64 bytes from 35.206.65.89: icmp_seq=1 ttl=69 time=128 ms
64 bytes from 35.206.65.89: icmp_seq=2 ttl=69 time=127 ms
64 bytes from 35.206.65.89: icmp_seq=3 ttl=69 time=127 ms
64 bytes from 35.206.65.89: icmp_seq=4 ttl=69 time=127 ms
...
--- Round Trip Time (rtt) ---
min 127.746 ms
avg 127.986 ms
max 128.470 ms
Note: In the example output, the average latency of the Standard tier VM is 127.986 milliseconds. Therefore, the Premium tier VM has a 5% lower latency than the Standard tier VM.
Note: This is a very basic test. Passing real application traffic is always the best indicator of latency and performance. You can examine this Google Cloud blog on network service tiers to learn more about performance differences between network tiers.
Explore the network path for each VM instance
Next, explore the network path between a third-party service in Europe and your VM instances in using traceroute. Traceroute shows all Layer 3 (routing layer) hops between hosts; therefore, it can illustrate a network path between hosts.
In this step, you use ping.eu/traceroute to visualize a network path that traffic from a user in Europe might take when accessing your server in .
Type the [premium-IP] in the IP address or host name field.
For Enter code, type the captcha code shown onscreen.
Click Go.
Wait for traceroute to complete.
The output should look like this.
Output example (yours will differ):
traceroute to 35.202.10.213 (35.202.10.213), 30 hops max, 60 byte packets
1 * * *
2 core21.fsn1.hetzner.com 213.239.245.237 de 0.293 ms
core22.fsn1.hetzner.com 213.239.245.241 de 0.231 ms
core21.fsn1.hetzner.com 213.239.245.237 de 0.293 ms
3 core12.nbg1.hetzner.com 213.239.245.214 de 2.791 ms
core11.nbg1.hetzner.com 213.239.224.9 de 2.764 ms
core0.fra.hetzner.com 213.239.252.29 de 5.014 ms
4 core4.fra.hetzner.com 213.239.245.245 de 5.489 ms 5.484 ms
us
5 * * *
6 * * *
7 * * *
8 * * *
9 * * *
No reply for 5 hops. Assuming we reached firewall.
Note: In the example output, the traffic destined for the Premium tier VM reached Google Cloud's network after the 5th hop. The IP address on hop 4 is listed in Bavaria, Germany, which is the same state as the origin server and an
Edge Point of Presence (PoP). Therefore, the Premium network tier traffic entered the Google Cloud network very close to the user, as expected.
Type the [standard-IP] in the IP address or host name field.
For Enter code, type the captcha code shown onscreen.
Click Go.
Wait for traceroute to complete.
The output should look like this.
Output example (yours will differ):
traceroute to 35.206.65.89 (35.206.65.89), 30 hops max, 60 byte packets
1 * * *
2 core22.fsn1.hetzner.com 213.239.245.241 de 0.229 ms
core21.fsn1.hetzner.com 213.239.245.237 de 0.229 ms
core22.fsn1.hetzner.com 213.239.245.241 de 0.229 ms
3 core12.nbg1.hetzner.com 213.239.224.13 de 2.807 ms
core5.fra.hetzner.com 213.239.224.246 de 4.948 ms 4.956 ms
4 ffm-b4-link.telia.net 213.248.70.2 5.023 ms 5.030 ms 5.032 ms
5 hbg-b1-link.telia.net 213.248.70.0 14.883 ms
ffm-bb4-link.telia.net 62.115.120.7 108.287 ms
ffm-bb3-link.telia.net 62.115.120.1 119.768 ms
6 hbg-bb4-link.telia.net 213.155.135.86 115.076 ms
hbg-bb1-link.telia.net 213.155.135.82 115.813 ms
hbg-bb4-link.telia.net 62.115.141.110 126.967 ms
7 ldn-bb4-link.telia.net 62.115.122.161 116.926 ms
nyk-bb3-link.telia.net 213.155.135.5 109.611 ms
nyk-bb4-link.telia.net 80.91.251.100 110.269 ms
8 hbg-bb1-link.telia.net 80.91.249.11 145.034 ms
chi-b21-link.telia.net 62.115.137.59 110.215 ms
nyk-bb4-link.telia.net 62.115.136.185 126.232 ms
9 kbn-bb3-link.telia.net 213.155.130.101 125.870 ms 125.816 ms
chi-b21-link.telia.net 62.115.137.59 116.943 ms
10 google-ic-326155-chi-b21.c.telia.net 213.248.66.127 115.447 ms
11 chi-b21-link.telia.net 80.91.246.162 125.726 ms
12 * * *
13 * * *
14 * * *
15 * * *
16 * * *
No reply for 5 hops. Assuming we reached firewall.
Note: In the example output, the traffic destined for the Standard tier VM reached Google Cloud's network after the 12th hop. The IP address on hop 11 is listed in Chicago, USA, which has an Edge Point of Presence (PoP) and is close to Iowa, USA (us-central1). This demonstrates that Premium network tier traffic enters the Google Cloud network much closer to the user than Standard network tier traffic does.Note: Traffic on the public internet can use different routes. Therefore, you might get slightly different results than the examples shown above.
Congratulations!
In this lab, you have created one VM in the Premium network service tier (default) and one VM in the Standard network service tier. Then, you used a third-party service to visualize the differences in latency and network paths for each VM instance. The Premium tier VM had a lower latency and its traffic entered Google Cloud's network sooner than the Standard tier VM's traffic.
With network service tiers, Google Cloud offers the flexibility to configure your resources for performance or cost by introducing the Standard tier of networking. To learn more about the pricing differences between the two network tiers, refer to the pricing documentation.
End your lab
When you have completed your lab, click End Lab. Google Skills removes the resources you’ve used and cleans the account for you.
You will be given an opportunity to rate the lab experience. Select the applicable number of stars, type a comment, and then click Submit.
The number of stars indicates the following:
1 star = Very dissatisfied
2 stars = Dissatisfied
3 stars = Neutral
4 stars = Satisfied
5 stars = Very satisfied
You can close the dialog box if you don't want to provide feedback.
For feedback, suggestions, or corrections, please use the Support tab.
Copyright 2026 Google LLC All rights reserved. Google and the Google logo are trademarks of Google LLC. All other company and product names may be trademarks of the respective companies with which they are associated.
I lab creano un progetto e risorse Google Cloud per un periodo di tempo prestabilito
I lab hanno un limite di tempo e non possono essere messi in pausa. Se termini il lab, dovrai ricominciare dall'inizio.
In alto a sinistra dello schermo, fai clic su Inizia il lab per iniziare
Utilizza la navigazione privata
Copia il nome utente e la password forniti per il lab
Fai clic su Apri console in modalità privata
Accedi alla console
Accedi utilizzando le tue credenziali del lab. L'utilizzo di altre credenziali potrebbe causare errori oppure l'addebito di costi.
Accetta i termini e salta la pagina di ripristino delle risorse
Non fare clic su Termina lab a meno che tu non abbia terminato il lab o non voglia riavviarlo, perché il tuo lavoro verrà eliminato e il progetto verrà rimosso
Questi contenuti non sono al momento disponibili
Ti invieremo una notifica via email quando sarà disponibile
Bene.
Ti contatteremo via email non appena sarà disponibile
Un lab alla volta
Conferma per terminare tutti i lab esistenti e iniziare questo
Utilizza la navigazione privata per eseguire il lab
Il modo migliore per eseguire questo lab è utilizzare una finestra del browser in incognito o privata. Ciò evita eventuali conflitti tra il tuo account personale e l'account studente, che potrebbero causare addebiti aggiuntivi sul tuo account personale.
In this lab, you create one VM in the premium network service tier (default) and one VM in the standard network service tier. Then you compare the latency and routes for each VM instance.
Durata:
Configurazione in 0 m
·
Accesso da 60 m
·
Completamento in 60 m

 Standard tier is priced lower than Premium because the traffic between Google Cloud and your end user (internet) is delivered over transit (ISP) networks instead of Google’s network.
 ), click Compute Engine > VM instances.


