GSP064

Overview
Google Cloud's Identity and Access Management (IAM) service lets you create and manage permissions for Google Cloud resources. Cloud IAM unifies access control for Google Cloud services into a single system and provides a consistent set of operations.
In this lab, you sign in with two different sets of credentials to experience how granting and revoking permissions works with Google Cloud Project Owner and Viewer roles.
What you'll learn
In this lab, you learn how to perform the following tasks:
- Explore IAM roles in the Google Cloud console.
- Assign a role to a second user.
- Remove assigned roles associated with Cloud IAM.
- Verify access using Cloud Storage and Cloud Shell.
Prerequisites
This is an introductory level lab. Little to no prior knowledge of Cloud IAM is expected. Experience with Cloud Storage is helpful to complete the tasks in this lab, but is not required. Make sure that you have a file in .txt or .html format available. If you are looking for more advanced practice with Cloud IAM, be sure to check out the following Google Skills lab, IAM Custom Roles.
Once you are prepared, follow the steps below to set up your lab environment.
Setup and requirements
Note: It is recommended that you use a new Incognito window to complete this lab to avoid credential conflicts.
As mentioned earlier, this lab provides two sets of credentials to illustrate IAM policies and what permissions are available for specific roles.
In the Lab Connection panel on the left side of your lab, you see a list of credentials that resembles the following:
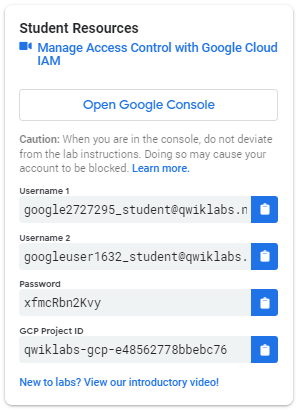
Notice that there are two usernames: Username 1 and Username 2. These represent identities in Cloud IAM, each with different access permissions allocated to them. These "roles" set constraints on what you can and cannot do with Google Cloud resources in the project you have been allocated.
Sign in to the Google Cloud console as the first user
- Click Open Google Console (or right-click and select Open Link in Incognito Window if you are running the Chrome browser).
- On the Google Cloud sign-in page, paste the Username 1 email address into the Email or phone field, and then click Next.
- Copy the password from the Lab Connection panel, paste it into the Enter your password field, and then click Next.
- Click Accept to accept the terms of service.
- On the Google Cloud console welcome page, agree to the terms of service, and then click Agree and continue.
Sign in to the Google Cloud console as the second user
- Open another new incognito browser window, and click Open Google Console to sign in as the second user.
- On the Google Cloud sign-in page, paste the Username 2 email address into the Email or phone field, and then click Next.
- Copy the password from the Lab Connection panel, paste it into the Enter your password field, and then click Next.
- Click Accept to accept the terms of service.
- On the Google Cloud console welcome page, agree to the terms of service, and then click Agree and continue.
You should now have two Google Cloud console tabs open in your browser—one signed in with Username 1 and the other with Username 2.
View or reset the user in a browser tab
Occasionally, a user session is overwritten in a browser tab or you might be confused about which user is signed into which browser tab.
To view which user is signed into a browser tab, hover over your user avatar in the Google Cloud console.
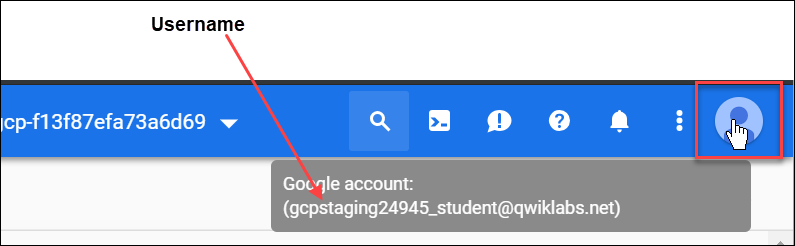
To reset which user is signed into a browser tab:
- Click your user avatar, and then click Sign out.
- In the Lab Connection panel, click Open Google Console, and sign in using the appropriate username and password.
Task 1. Explore the IAM console and project-level roles
In this task, you explore the IAM console and review basic project-level roles.
Explore project-level roles
- Return to the Username 1 Google Cloud console tab.
- In the Google Cloud console, select Navigation menu > IAM & Admin > IAM.
- Click Grant access.
- In the Assign roles section, click Select a role, navigate to Basic, and hover over each role to view its permissions.
There are four basic roles:
- Browser
- Editor
- Owner
- Viewer
These are basic roles (formerly referred to as primitive roles) in Google Cloud. Basic roles set project-level permissions and control access and management across all Google Cloud services unless otherwise specified.
The following table pulls definitions from the Google Cloud IAM documentation, Basic roles, which gives a brief overview of Browser, Viewer, Editor, and Owner role permissions:
| Role Name |
Permissions |
roles/browser |
Read access to browse the hierarchy for a project, including folders, organizations, and IAM policies. This role doesn't include permission to view resources within a project. |
roles/viewer |
Permissions for read-only actions that do not affect state, such as viewing (but not modifying) existing resources or data. |
roles/editor |
All viewer permissions, plus permissions for actions that modify state, such as changing existing resources. |
roles/owner |
All editor permissions and permissions for the following actions:
• Manage roles and permissions for a project and all resources within the project.
• Set up billing for a project. |
Because you can manage roles and permissions for this project, Username 1 has Project Owner (roles/owner) permissions.
- Click Cancel to close the Grant access pane.
Explore the viewer role
- Switch to the Username 2 Google Cloud console tab.
- In the Google Cloud console, select Navigation menu > IAM & Admin > IAM.
- In the IAM permissions table under the View by principals tab, locate Username 1 and Username 2 and review the roles assigned to each in the Role column.
You should see:
-
Username 2 has the Viewer role granted to it.
- The Grant access button is disabled. If you hover over or attempt to click it, a message indicates that you need permissions (
resourcemanager.projects.setIamPolicy) for this action.
This is an example of how IAM roles affect what you can and cannot do in Google Cloud.
- Switch back to the Username 1 Google Cloud console tab.
Task 2. Prepare a Cloud Storage bucket for access testing
In this task, you create a Cloud Storage bucket and upload a sample file to test IAM permissions.
Create a bucket
Ensure that you are in the Username 1 Google Cloud console tab.
- In the Google Cloud console, select Navigation menu > Cloud Storage > Buckets.
- Click Create.
Note: If you get a permissions error for bucket creation, sign out and then sign back in with the Username 1 credentials.
- Update the following fields, and leave the remaining settings as their defaults:
| Property |
Value |
| Name |
[globally-unique-name] (create a unique name) and click Continue
|
| Location type |
Multi-region |
Note the bucket name. You will use it in a later step.
- Click Create.
- If prompted with "Public access will be prevented", click Confirm.
Note: If you get a permissions error for bucket creation, sign out and then sign back in with the Username 1 credentials.
Upload a sample file
- On the Bucket details page, click Upload files.
- Browse your computer to find a file to use (any text or HTML file will do).
- On the row containing the uploaded file, click the More actions (three vertical dots) icon, and then click Rename.
- Rename the file to sample.txt
- Click Rename.
Click Check my progress to verify the objective.
Create a bucket and upload a sample file
Verify project viewer access
- Switch to the Username 2 Google Cloud console tab.
- In the Google Cloud console, select Navigation menu > Cloud Storage > Buckets.
- Verify that Username 2 can view the bucket you created.
Because Username 2 has the Viewer role, the user has read-only access to view resources in the project, such as Cloud Storage buckets.
Task 3. Remove project access
In this task, you remove the Project Viewer role from Username 2 and verify that access is revoked.
Remove Project Viewer for Username 2
- Switch to the Username 1 Google Cloud console tab.
- In the Google Cloud console, select Navigation menu > IAM & Admin > IAM.
- In the IAM permissions table under the View by principals tab, locate the row for Username 2, and click Edit principal (the pencil icon).
Note: You might need to expand or scroll your browser window horizontally to view the pencil icon.
- In the Edit permissions pane, click Delete role (the trash can icon) next to the Viewer role.
- Click Save.
Notice that the user has disappeared from the principals list. The user has no access now.
Note: IAM permission updates can take up to 80 seconds to propagate across Google Cloud services.
Verify that Username 2 has lost access
- Switch to the Username 2 Google Cloud console tab. Ensure that you are still signed in with Username 2's credentials.
- In the Google Cloud console, select Navigation menu > Cloud Storage > Buckets.
You should see a permission error.
Note: As mentioned before, it can take up to 80 seconds for permissions to be revoked. If you haven't received a permission error, wait 2 minutes and then try refreshing the console.
Click Check my progress to verify the objective.
Remove project access
Task 4. Add Cloud Storage permissions
In this task, you grant the Storage Object Viewer role to Username 2 and test bucket access.
Grant the Storage Object Viewer role
- Copy the Username 2 email address from the Lab Connection panel.
- Switch to the Username 1 Google Cloud console tab. Ensure that you are still signed in with Username 1's credentials.
- In the Google Cloud console, select Navigation menu > IAM & Admin > IAM.
- Click Grant access.
- In the Grant access pane, for New principals, paste the Username 2 email address.
- Select Cloud Storage > Storage Object Viewer from the Select a role drop-down list.
- Click Save.
Verify access
- Switch to the Username 2 Google Cloud console tab.
Username 2 does not have the Project Viewer role, so that user cannot view the project or general resources in the Google Cloud console. However, this user has specific access to Cloud Storage via the Storage Object Viewer role.
- Click Activate Cloud Shell (
 ) to open the Cloud Shell command line. If prompted, click Continue.
- In Cloud Shell, run the following command to list the contents of the bucket, replacing
[YOUR_BUCKET_NAME] with the name of the bucket you created earlier:
gcloud storage ls gs://[YOUR_BUCKET_NAME]
You should receive a similar output:
gs://[YOUR_BUCKET_NAME]/sample.txt
Note: If you see AccessDeniedException, wait a minute for permissions to propagate and run the previous command again.
As demonstrated, you gave Username 2 view access to the Cloud Storage bucket objects.
Click Check my progress to verify the objective.
Add Cloud Storage permissions
Congratulations!
In this lab, you explored Google Cloud IAM project-level roles and exercised granting and revoking IAM roles for a user.
Next steps / Learn more
This lab is also part of a series of labs called Qwik Starts. These labs are designed to give you a little taste of the many features available with Google Cloud. Search for "Qwik Starts" in the Google Skills catalog to find the next lab you'd like to take!
Google Cloud training and certification
...helps you make the most of Google Cloud technologies. Our classes include technical skills and best practices to help you get up to speed quickly and continue your learning journey. We offer fundamental to advanced level training, with on-demand, live, and virtual options to suit your busy schedule. Certifications help you validate and prove your skill and expertise in Google Cloud technologies.
Manual Last Updated August 13, 2026
Lab Last Tested August 13, 2026
Copyright 2026 Google LLC. All rights reserved. Google and the Google logo are trademarks of Google LLC. All other company and product names may be trademarks of the respective companies with which they are associated.







