
시작하기 전에
- 실습에서는 정해진 기간 동안 Google Cloud 프로젝트와 리소스를 만듭니다.
- 실습에는 시간 제한이 있으며 일시중지 기능이 없습니다. 실습을 종료하면 처음부터 다시 시작해야 합니다.
- 화면 왼쪽 상단에서 실습 시작을 클릭하여 시작합니다.
Create an API Key
/ 25
Upload an Image to a Cloud Storage bucket
/ 25
Upload an image for Face Detection to your bucket
/ 25
Upload an image for Landmark Annotation to your bucket
/ 25
Create an API Key
/ 25
Upload an Image to a Cloud Storage bucket
/ 25
Upload an image for Face Detection to your bucket
/ 25
Upload an image for Landmark Annotation to your bucket
/ 25
The Cloud Vision API lets you understand the content of an image by encapsulating powerful machine learning models in a simple REST API.
In this lab, you send images to the Vision API and see it detect objects, faces, and landmarks.
In this lab, you learn how to perform the following tasks:
curl.For each lab, you get a new Google Cloud project and set of resources for a fixed time at no cost.
Sign in to Google Skills using an incognito window.
Note the lab's access time (for example, 1:15:00), and make sure you can finish within that time.
There is no pause feature. You can restart if needed, but you have to start at the beginning.
When ready, click Start lab.
Note your lab credentials (Username and Password). You will use them to sign in to the Google Cloud Console.
Click Open Google Console.
Click Use another account and copy/paste credentials for this lab into the prompts.
If you use other credentials, you'll receive errors or incur charges.
Accept the terms and skip the recovery resource page.
Cloud Shell is a virtual machine that contains development tools. It offers a persistent 5-GB home directory and runs on Google Cloud. Cloud Shell provides command-line access to your Google Cloud resources. gcloud is the command-line tool for Google Cloud. It comes pre-installed on Cloud Shell and supports tab completion.
Click the Activate Cloud Shell button (
Click Continue.
It takes a few moments to provision and connect to the environment. When you are connected, you are also authenticated, and the project is set to your PROJECT_ID.
(Output)
(Example output)
(Output)
(Example output)
Since you are using curl to send a request to the Vision API, you need to generate an API key to pass in your request URL.
To create an API key, navigate to APIs & Services > Credentials in your Cloud console:
Click CREATE CREDENTIALS and select API key.
In the Create API key side panel that appears, Under APIs that can be accessed using this key, click the dropdown menu (Select APIs).
Search for or scroll to find Cloud Vision API and check the box.
Click OK.
Click Create.
Next, copy the key you just generated and click Close.
Click Check my progress to verify the objective.
Now save it to an environment variable to avoid having to insert the value of your API key in each request.
Run the following in Cloud Shell, replacing <YOUR_API_KEY> with the key you just copied:
There are two ways to send an image to the Vision API for image detection: by sending the API a base64 encoded image string, or passing it the URL of a file stored in Cloud Storage. You use a Cloud Storage URL. The first step is to create a Cloud Storage bucket to store your images.
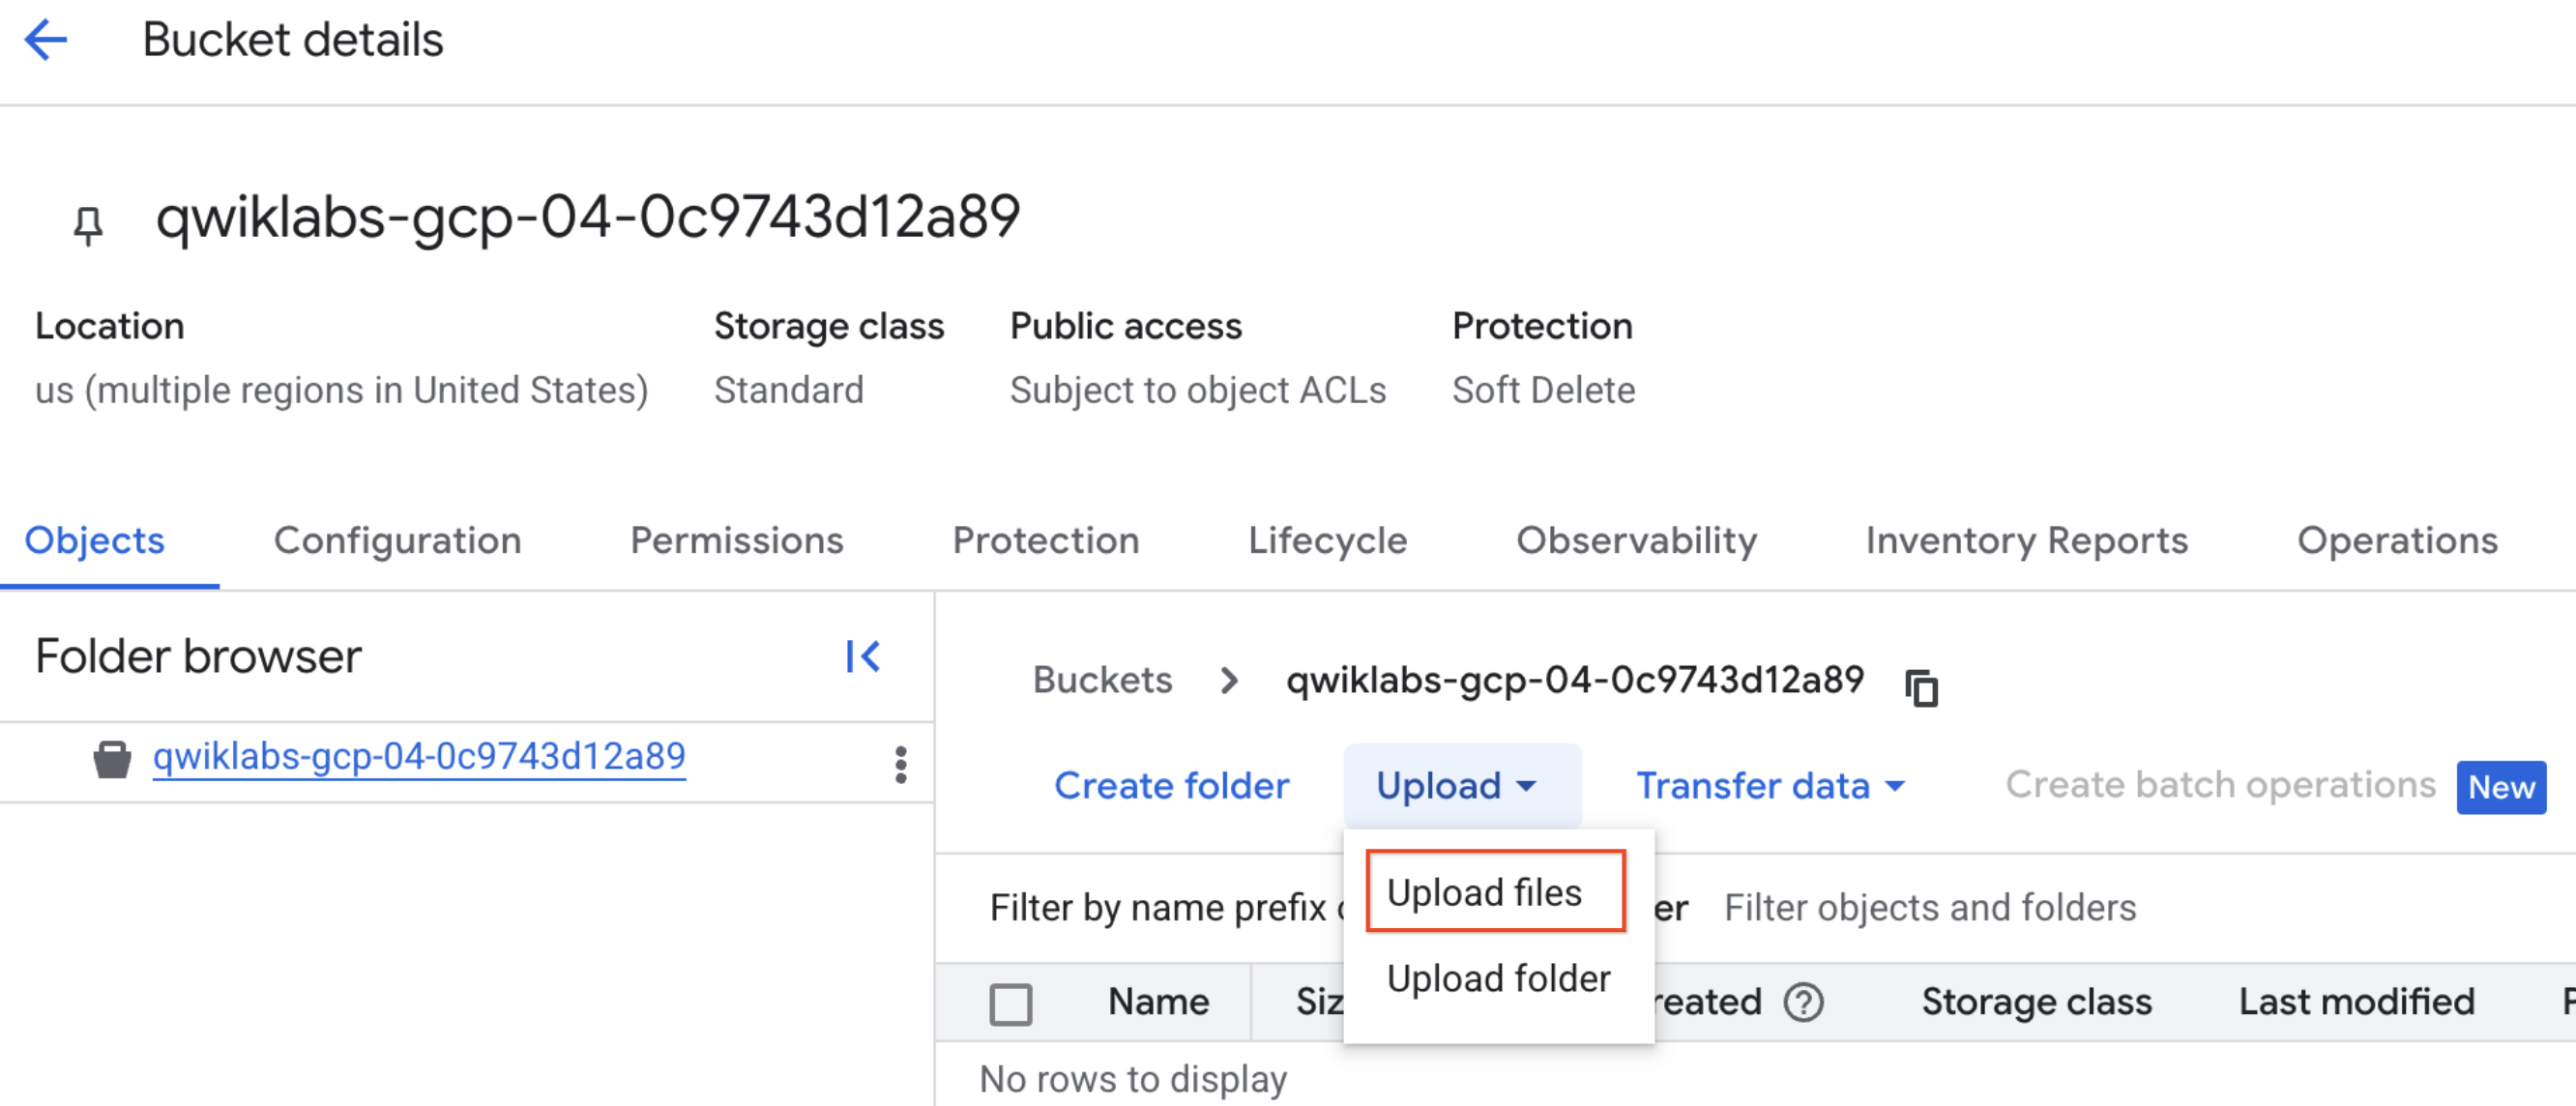
Navigate to Navigation menu > Cloud Storage in the Cloud console for your project, then click CREATE BUCKET.
Set a unique name (use your project ID because it is unique) and then choose a regional bucket and set Region
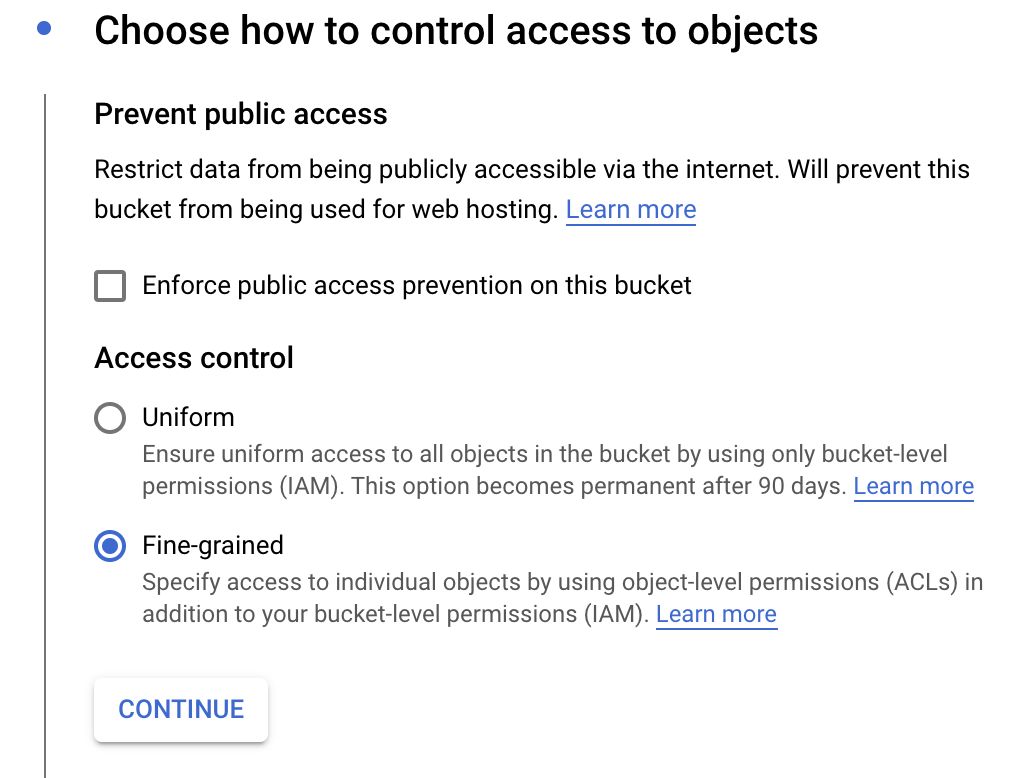
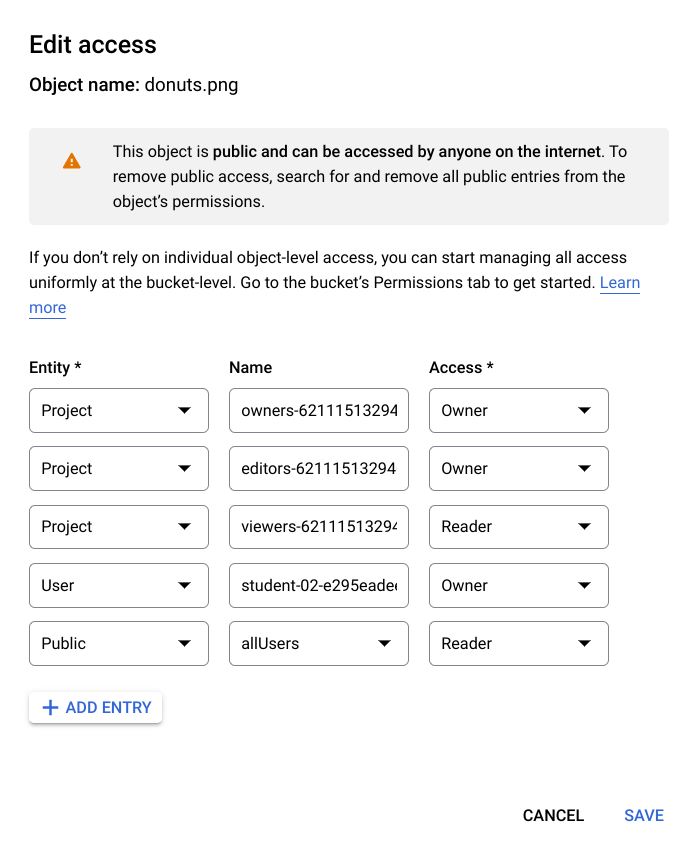
After naming your bucket, click Choose how to control access to objects.
Uncheck Enforce public access prevention on this bucket and select the Fine-grained circle:
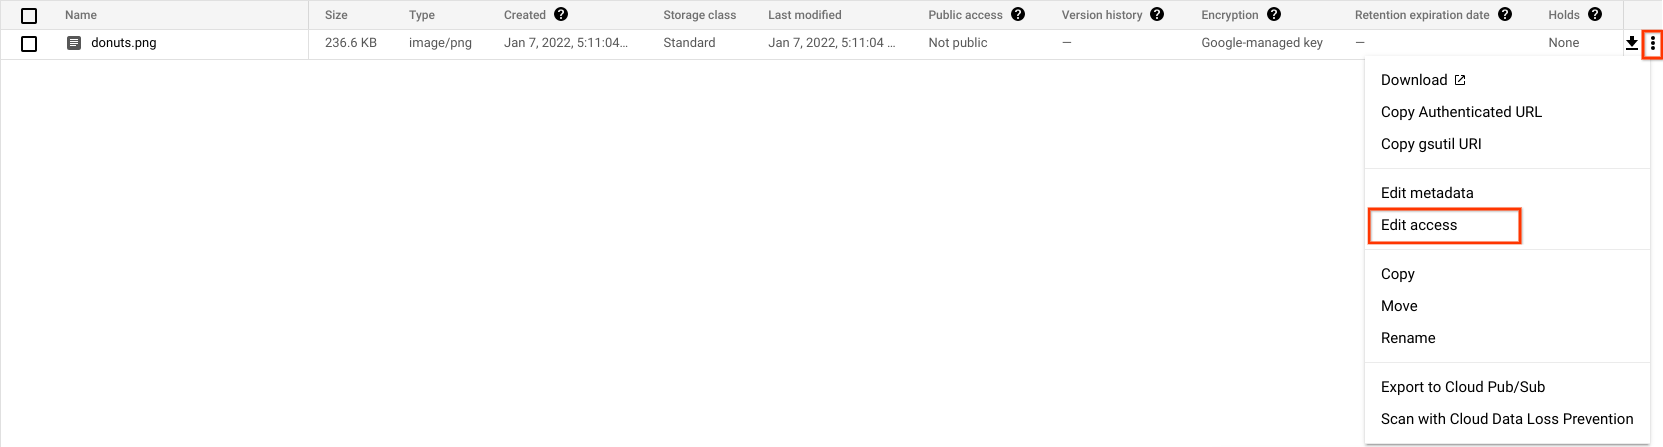
You should see the file in your bucket.
Entity: Public
Name: allUsers
Access: Reader
Now that you have the file in your bucket, you're ready to create a Vision API request, passing it the URL of this donuts picture.
Click Check my progress to verify the objective.
Now you create a request.json file in the Cloud Shell environment.
Create a JSON request file for submitting the base64 encoded form for processing:
Replace my-bucket-name with the name of your storage bucket.
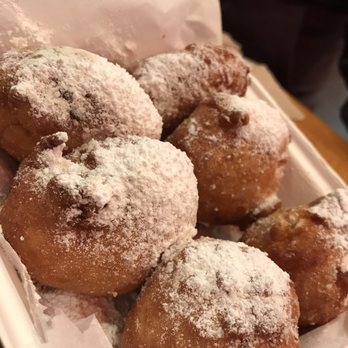
The first Cloud Vision API feature you try out is label detection. This method returns a list of labels (words) of what's in your image.
Call the Vision API with curl:
Your response should look something like the following:
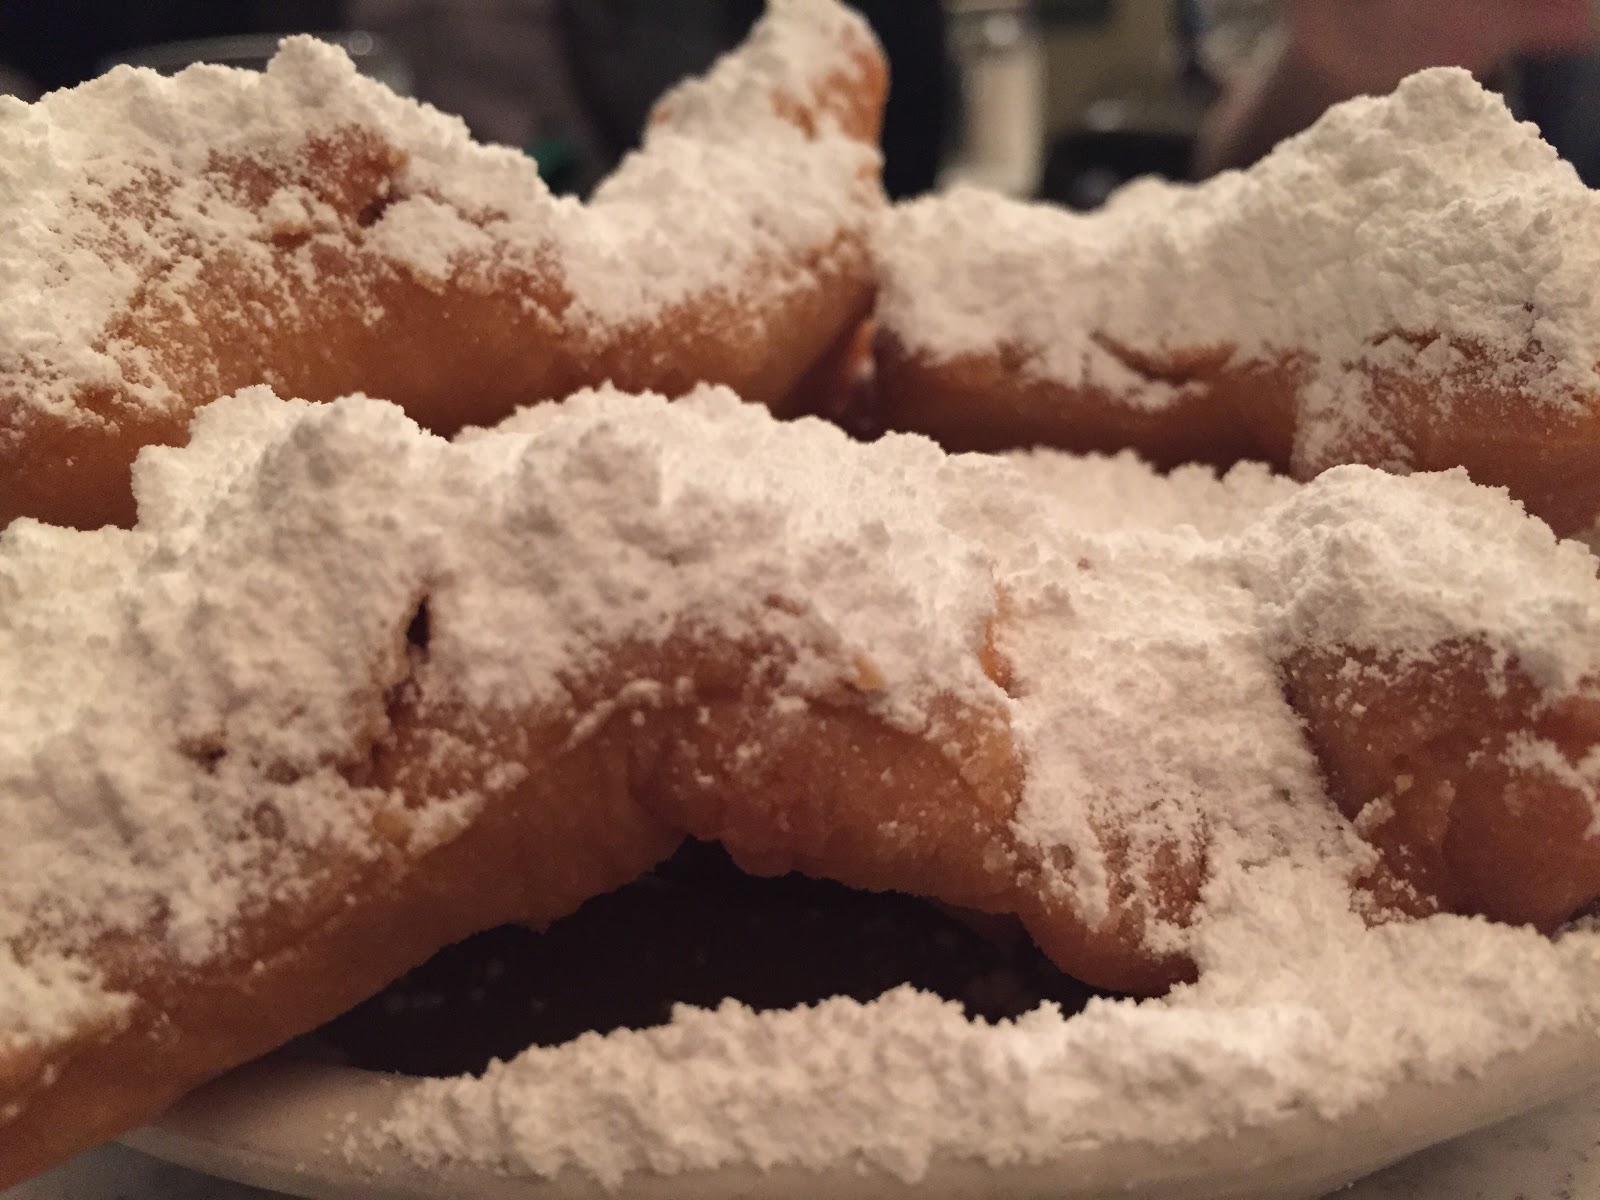
The API was able to identify the specific type of donuts these are, powdered sugar. Cool! For each label the Vision API found, it returns a:
description with the name of the item.score, a number from 0 - 1 indicating how confident it is that the description matches what's in the image.mid value that maps to the item's mid in Google's Knowledge Graph. You can use the mid when calling the Knowledge Graph API to get more information on the item.In addition to getting labels on what's in your image, the Vision API can also search the Internet for additional details on your image. Through the API's webDetection method, you get a lot of interesting data back:
To try out web detection, use the same image of beignets and change one line in the request.json file (you can also venture out into the unknown and use an entirely different image).
LABEL_DETECTION to WEB_DETECTION. The request.json should now look like this:Save the file.
curl command as before (just press the up arrow in Cloud Shell):Dive into the response, starting with webEntities. Here are some of the entities this image returned:
This image has been used in many presentations on Cloud ML APIs, which is why the API found the entities "Machine learning" and "Cloud Vision".
If you inpsect the URLs under fullMatchingImages, partialMatchingImages, and pagesWithMatchingImages, you notice that many of the URLs point to this lab site (super meta!).
Say you wanted to find other images of beignets, but not the exact same images. That's where the visuallySimilarImages part of the API response comes in handy. Here are a few of the visually similar images it found:
You can navigate to those URLs to see the similar images:


And now you probably really want a powdered sugar beignet (sorry)! This is similar to searching by an image on Google Images.
With Cloud Vision you can access this functionality with an easy to use REST API and integrate it into your applications.
Next explore the face detection methods of the Vision API.
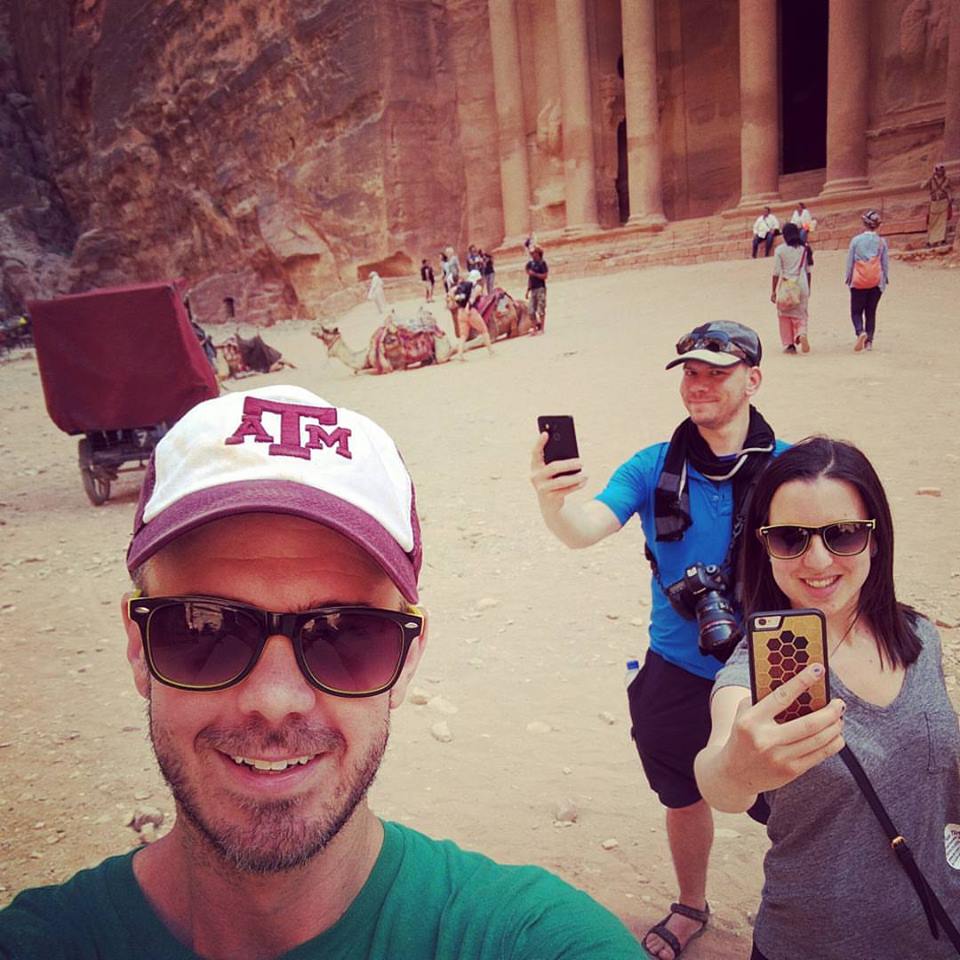
To use this method, you upload a new image with faces to the Cloud Storage bucket.
Click Check my progress to verify the objective.
request.json file with the following, which includes the URL of the new image, and uses face and landmark detection instead of label detection. Be sure to replace my-bucket-name with the name of your Cloud Storage bucket:Now you're ready to call the Vision API using the same curl command you used above:
Take a look at the faceAnnotations object in the response. You notice the API returns an object for each face found in the image - in this case, three. Here's a clipped version of the response:
boundingPoly gives you the x,y coordinates around the face in the image.fdBoundingPoly is a smaller box than boundingPoly, focusing on the skin part of the face.landmarks is an array of objects for each facial feature, some you may not have even known about. This tells us the type of landmark, along with the 3D position of that feature (x,y,z coordinates) where the z coordinate is the depth. The remaining values gives you more details on the face, including the likelihood of joy, sorrow, anger, and surprise.The response you're reading is for the person standing furthest back in the image - you can see he's making kind of a silly face which explains the joyLikelihood of LIKELY.
To use this method, you upload a new image with faces to the Cloud Storage bucket.
Click Check my progress to verify the objective.
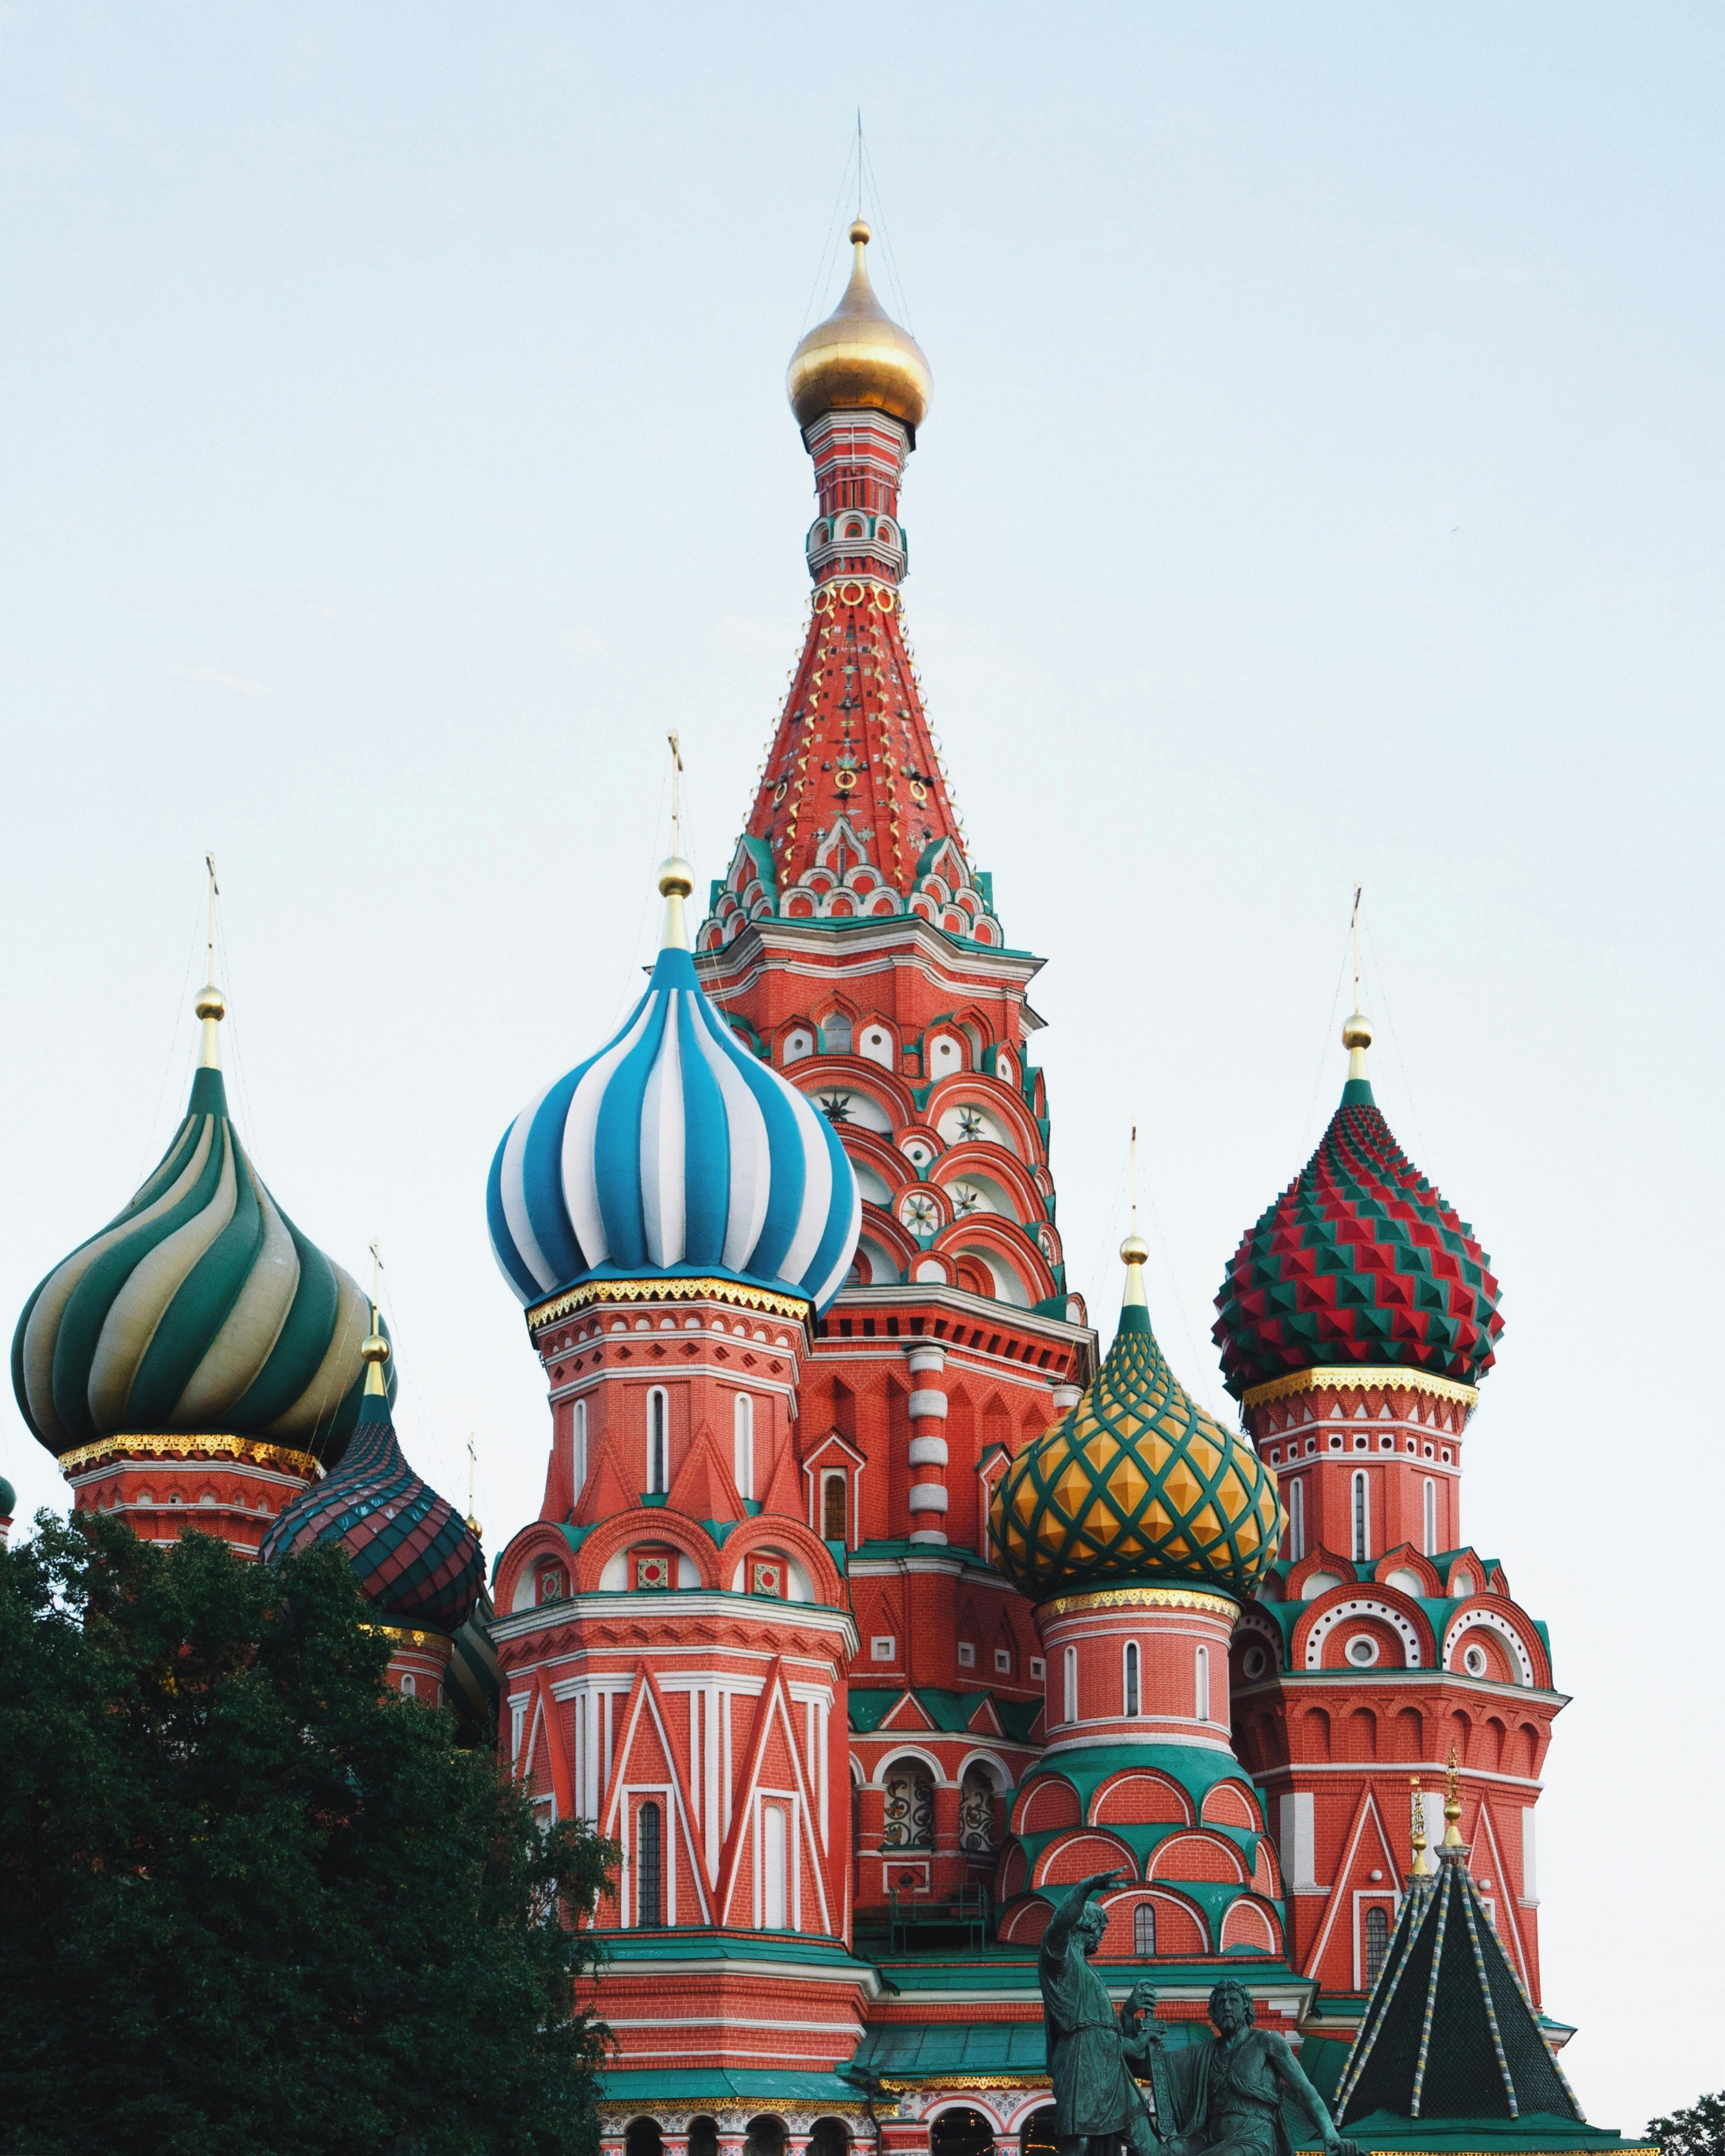
request.json file with the following, which includes the URL of the new image, and uses landmark detection. Be sure to replace my-bucket-name with the name of your Cloud Storage bucket:Now you're ready to call the Vision API using the same curl command you used above:
Next, look at the landmarkAnnotations part of the response:
Here, the Vision API was able to tell that this picture was taken in Boston, and gives you a map of the exact location. The values in this response should look similar to the labelAnnotations response above:
mid of the landmarkdescription)score
boundingPoly shows the region in the image where the landmark was identified.locations key tells us the latitude longitude coordinates of the picture.You've looked at the Vision API's label, face, and landmark detection methods, but there are three others you haven't explored. Dive into the docs to learn about the other three:
You've learned how to analyze images with the Vision API. In this example you passed the API the Cloud Storage URL of your image. Alternatively, you can pass a base64 encoded string of your image.
When you have completed your lab, click End Lab. Google Skills removes the resources you’ve used and cleans the account for you.
You will be given an opportunity to rate the lab experience. Select the applicable number of stars, type a comment, and then click Submit.
The number of stars indicates the following:
You can close the dialog box if you don't want to provide feedback.
For feedback, suggestions, or corrections, please use the Support tab.
Copyright 2026 Google LLC All rights reserved. Google and the Google logo are trademarks of Google LLC. All other company and product names may be trademarks of the respective companies with which they are associated.


현재 이 콘텐츠를 이용할 수 없습니다
이용할 수 있게 되면 이메일로 알려드리겠습니다.

감사합니다
이용할 수 있게 되면 이메일로 알려드리겠습니다.

한 번에 실습 1개만 가능
모든 기존 실습을 종료하고 이 실습을 시작할지 확인하세요.
실습을 시작하려면 이 간단한 단계를 완료하세요.