
시작하기 전에
- 실습에서는 정해진 기간 동안 Google Cloud 프로젝트와 리소스를 만듭니다.
- 실습에는 시간 제한이 있으며 일시중지 기능이 없습니다. 실습을 종료하면 처음부터 다시 시작해야 합니다.
- 화면 왼쪽 상단에서 실습 시작을 클릭하여 시작합니다.
BigQuery는 Google의 완전 관리형, 노옵스(NoOps), 저비용 분석 데이터베이스입니다. BigQuery를 사용하면 관리할 인프라나 데이터베이스 관리자가 없어도 테라바이트 단위의 대규모 데이터를 쿼리할 수 있습니다. BigQuery는 SQL을 사용하므로 사용한 만큼만 지불하는 모델의 장점을 활용할 수 있습니다. BigQuery는 데이터를 분석하여 의미 있고 유용한 정보를 찾는 데 집중할 수 있게 해줍니다.
이 실습에서 사용할 데이터 세트는 Google Merchandise Store의 Google 애널리틱스 레코드 수백만 개가 BigQuery에 로드된 전자상거래 데이터 세트입니다. 이 실습에서는 해당 데이터 세트의 복사본에서 사용 가능한 필드와 행을 탐색하여 유용한 정보를 파악합니다.
이 실습에서는 여러 유형의 데이터 세트를 BigQuery 내부의 테이블에 수집합니다.
각 실습에서는 정해진 기간 동안 새 Google Cloud 프로젝트와 리소스 집합이 무료로 제공됩니다.
시크릿 창을 사용하여 Qwiklabs에 로그인합니다.
실습 사용 가능 시간(예: 1:15:00)을 참고하여 해당 시간 내에 완료합니다.
일시중지 기능은 없습니다. 필요한 경우 다시 시작할 수 있지만 처음부터 시작해야 합니다.
준비가 되면 실습 시작을 클릭합니다.
실습 사용자 인증 정보(사용자 이름 및 비밀번호)를 기록해 두세요. Google Cloud Console에 로그인합니다.
Google Console 열기를 클릭합니다.
다른 계정 사용을 클릭한 다음, 안내 메시지에 이 실습에 대한 사용자 인증 정보를 복사하여 붙여넣습니다.
다른 사용자 인증 정보를 사용하는 경우 오류가 발생하거나 요금이 부과됩니다.
약관에 동의하고 리소스 복구 페이지를 건너뜁니다.
Cloud Console의 BigQuery에 오신 것을 환영합니다라는 메시지 상자가 열립니다. 이 메시지 상자에서는 빠른 시작 가이드 링크 및 UI 업데이트 목록을 확인할 수 있습니다.
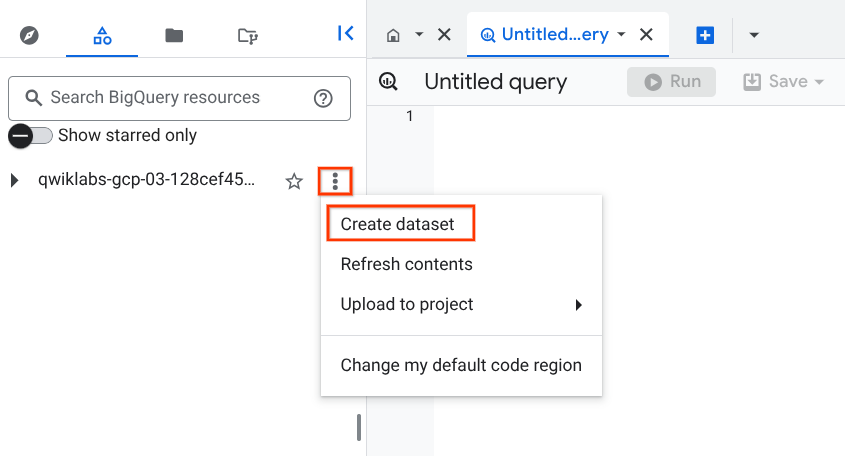
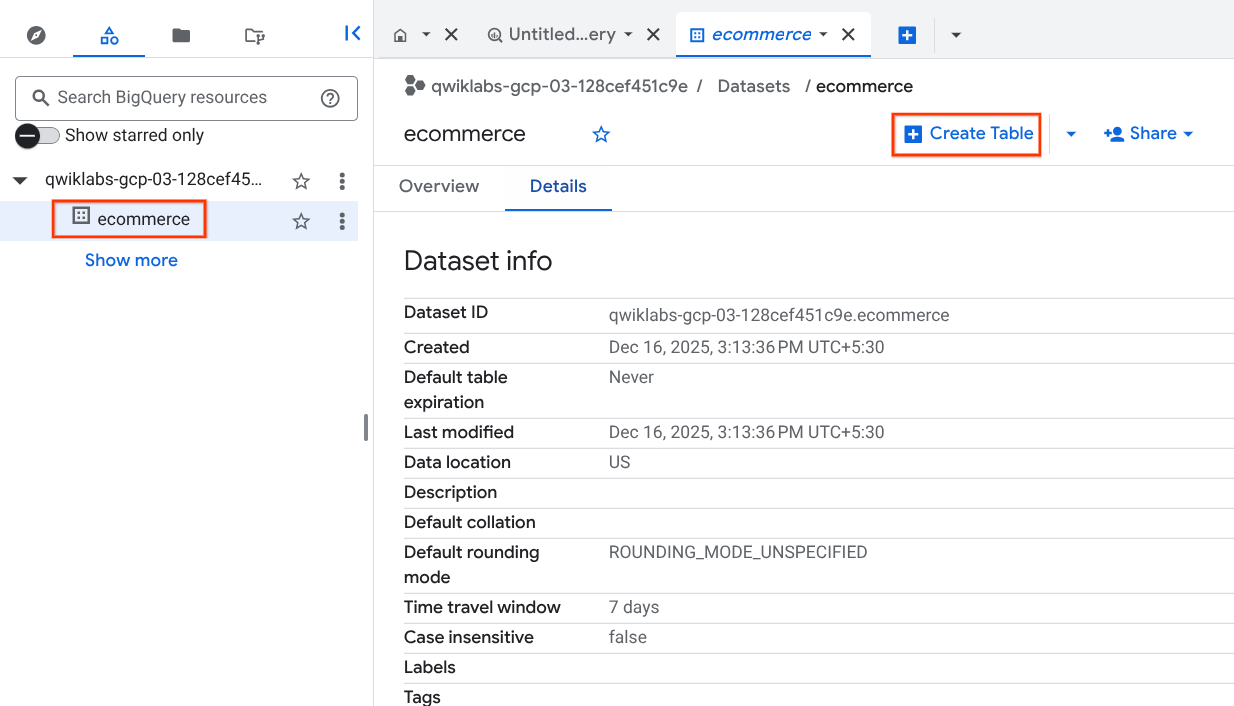
데이터 세트 ID를 ecommerce로 설정합니다. 다른 필드는 기본값 그대로 둡니다.
데이터 세트 만들기를 클릭합니다.
이제 프로젝트 이름 아래에 ecommerce 데이터 세트가 표시됩니다.
시나리오: 마케팅팀에서 재고 수준에 따라 프로모션이 적용되는 제품을 결정할 수 있도록 도움을 달라고 요청합니다. 또한 각 제품에 대한 고객 감정의 추세가 어떤지 제품 리뷰를 바탕으로 확인하고 싶어합니다.
기존 전자상거래 데이터 세트에는 재고 수준이나 제품 리뷰 데이터가 포함되어 있지 않지만 운영팀 및 마케팅팀에서 분석을 위한 새로운 데이터 세트를 제공했습니다.
시작하려면 다음 단계를 따르세요.
product stock level 데이터 세트를 다운로드하여 컴퓨터에 로컬 파일로 저장합니다.
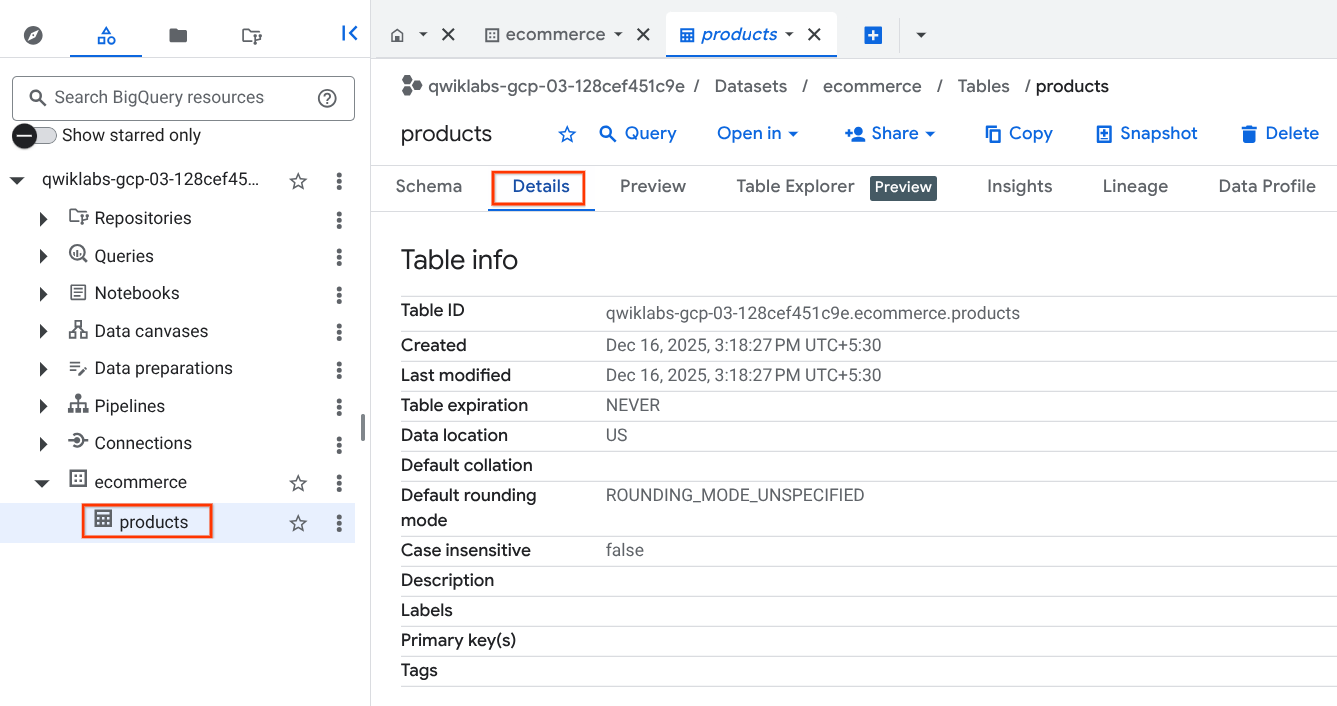
ecommerce 데이터 세트를 선택한 다음 테이블 만들기를 클릭합니다.
소스:
앞서 다운로드한 로컬 파일 선택
대상:
테이블 이름: products
다른 설정은 모두 기본값 그대로 둡니다.
스키마:
도움말: 체크박스가 표시되지 않나요? 파일 형식이 Avro가 아닌 CSV인지 재확인하세요.
고급 옵션:
이제 ecommerce 데이터 세트 아래에 products 테이블이 표시됩니다.
|
SKU |
name |
orderedQuantity |
stockLevel |
restockingLeadTime |
|
GGOEGDHQ014899 |
20 oz Stainless Steel Insulated Tumbler |
499 |
652 |
2 |
|
GGOEGOAB022499 |
Satin Black Ballpoint Pen |
403 |
477 |
2 |
|
GGOEYHPB072210 |
Twill Cap |
1429 |
1997 |
2 |
|
GGOEGEVB071799 |
Pocket Bluetooth Speaker |
214 |
246 |
2 |
CSV 파일이 새 BigQuery 테이블에 성공적으로 로드되었습니다.
다음으로, 새 products 테이블에서 유용한 정보를 얻을 수 있는 기본적인 쿼리를 실습해보겠습니다.
ecommerce 데이터 세트를 선택하고 테이블 만들기를 클릭합니다.
아래와 같이 테이블 옵션을 지정합니다.
소스:
대상:
테이블 이름: products
나머지 설정은 모두 기본값으로 둡니다.
스키마:
고급 옵션:
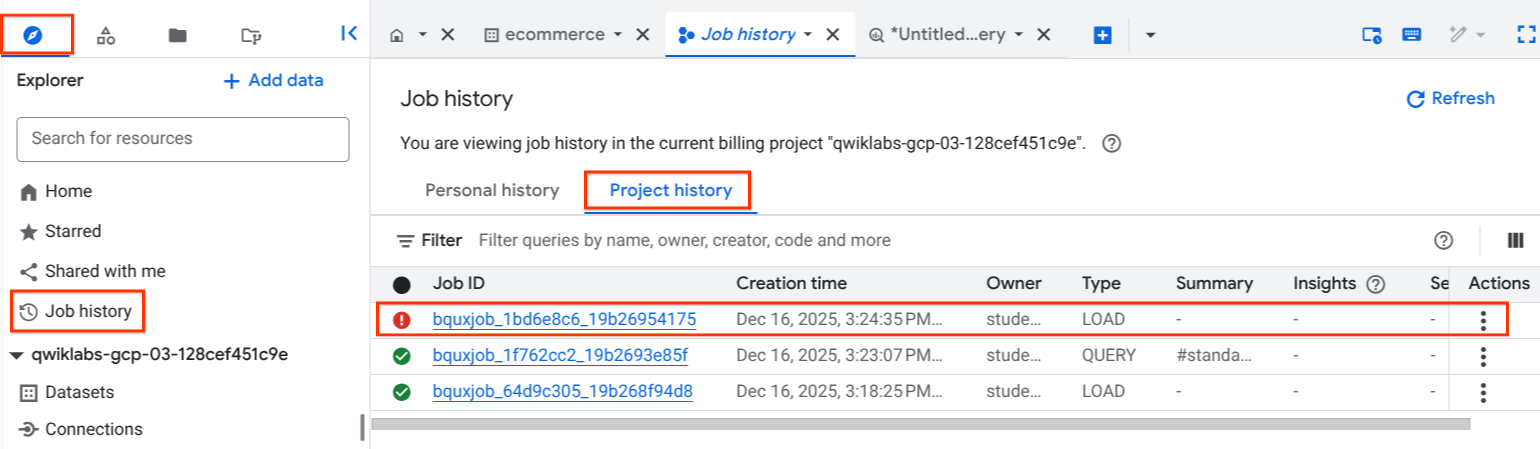
그렇지만 테이블이 생성되지 않습니다.
취소를 클릭하여 메시지를 닫은 다음 테이블 만들기 대화상자에서 예, 종료합니다를 클릭합니다.
탐색기 창에서 작업 기록으로 이동한 다음 프로젝트 기록을 클릭하고 표시된 오류 메시지를 선택합니다.
세부정보를 검토한 다음 닫기를 클릭합니다.
스키마 섹션에 도달할 때까지 작업 3을 반복합니다.
아래로 스크롤하여 고급 옵션을 펼치고 쓰기 환경설정 드롭다운 메뉴에서 테이블 덮어쓰기를 선택합니다.
이제 테이블 만들기를 클릭합니다.
테이블이 제대로 생성되었는지 확인합니다.
+ SQL 쿼리를 선택합니다.
다음 쿼리를 실행하여 재고 회전율을 기준으로 재입고가 가장 필요한 제품이 무엇이고 이러한 제품이 얼마나 빨리 보충될 수 있는지 확인합니다.
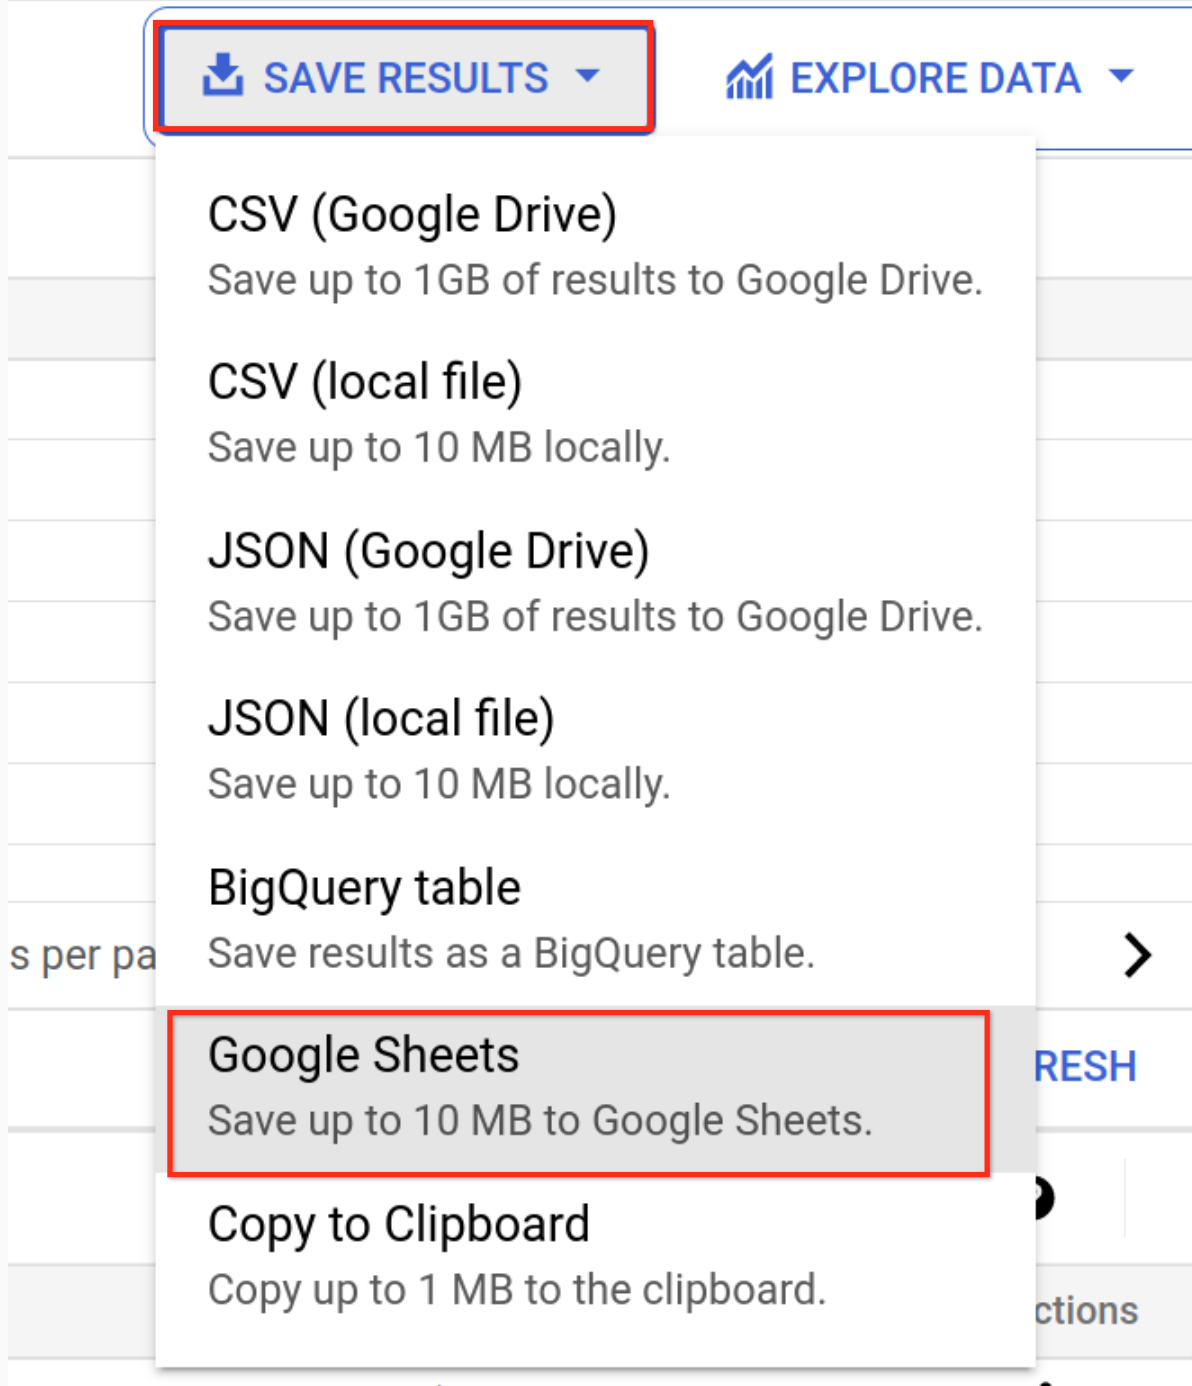
project_id.ecommerce.products 대신 ecommerce.products와 같은 상대적인 프로젝트 이름 경로를 지정하면 BigQuery는 현재 프로젝트를 사용합니다.시나리오: 재고를 재주문하기 위해 공급업체에 연락했는지 여부를 기록하고 상품에 대한 메모를 작성하는 방법을 공급망 관리팀에 제공하려고 합니다. 간단한 조사를 수행하기 위해 Google Sheets를 사용하기로 했습니다.
이제 스프레드시트를 만듭니다.
스프레드시트를 열 수 있는 링크가 포함된 팝업이 표시되면 열기를 선택합니다.
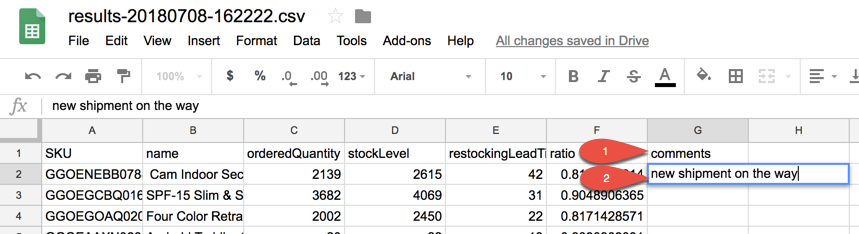
스프레드시트의 G열에 comments라는 새 필드를 추가하고 첫 번째 제품 행에 new shipment on the way를 입력합니다.
Google Sheets에서 공유와 공유 가능한 링크 받기를 선택한 다음 링크를 복사합니다.
BigQuery 탭으로 돌아갑니다.
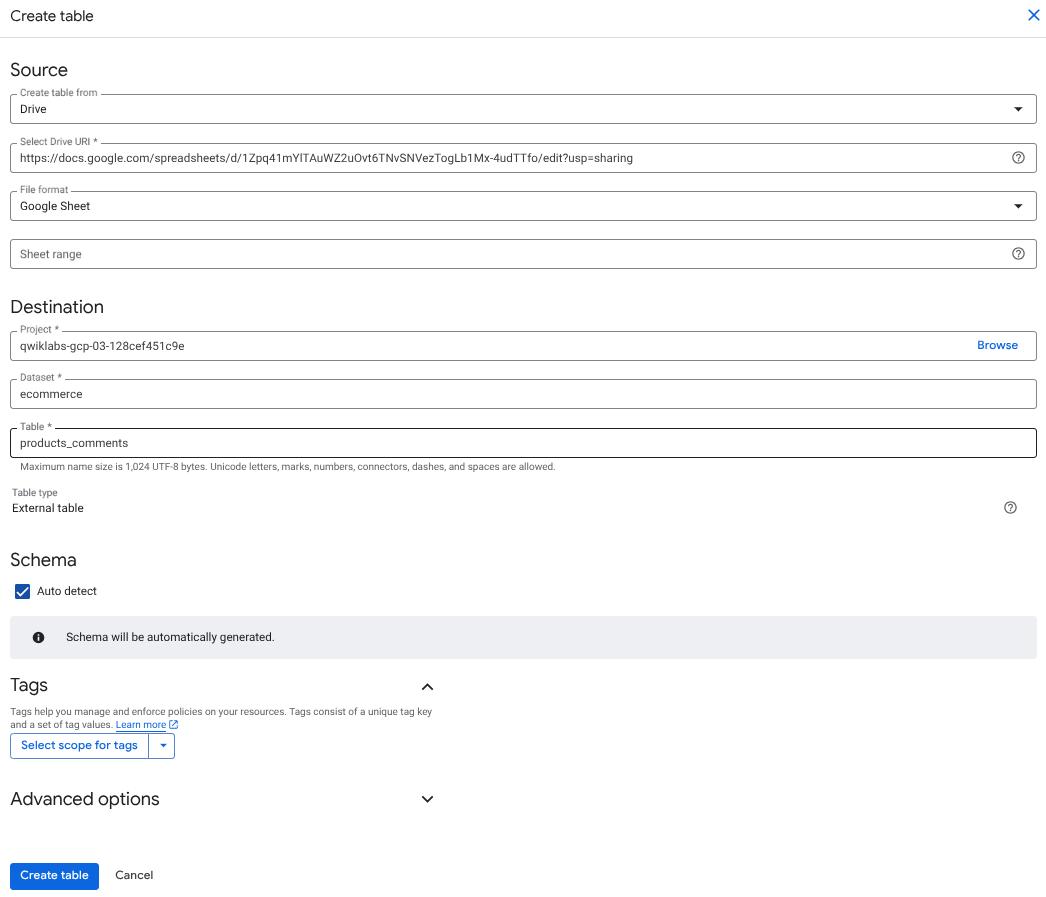
ecommerce 데이터 세트를 클릭한 다음 테이블 만들기를 클릭합니다.
다음 테이블 옵션을 지정합니다.
소스:
put-your-spreadsheet-url-here
대상:
스키마:
고급 옵션:
+ SQL 쿼리를 클릭합니다.
아래 쿼리를 추가한 후 실행을 클릭합니다.
쿼리가 실행될 때까지 기다립니다. 이제 새로운 comments 필드가 반환된 것을 확인할 수 있습니다.
|
SKU |
name |
orderedQuantity |
stockLevel |
restockingLeadTime |
ratio |
comments |
|
GGOENEBB078899 |
Cam Indoor Security Camera - USA |
2139 |
2615 |
42 |
0.8179732314 |
new shipment on the way |
Google Sheets 탭으로 다시 이동합니다.
Comments 필드에 다른 내용을 추가합니다.
BigQuery로 돌아가서 실행을 클릭하여 쿼리를 다시 실행합니다.
새 데이터가 결과에 올바르게 표시되는지 확인합니다.
BigQuery에 Google Spreadsheets를 연결하는 외부 테이블 연결이 생성되었습니다.
외부 테이블을 BigQuery에 연결할 때(예: Google Sheets, 또는 Google Cloud Storage에서 직접 연결) 몇 가지 제한사항이 있습니다. 가장 중요한 두 가지는 다음과 같습니다.
새로운 데이터 세트를 만들고 CSV, Google Cloud Storage, Google Drive에서 BigQuery로 새로운 외부 데이터 소스를 수집하는 방법을 학습했습니다.
실습을 완료하면 실습 종료를 클릭합니다. Google Cloud Skills Boost에서 사용된 리소스를 자동으로 삭제하고 계정을 지웁니다.
실습 경험을 평가할 수 있습니다. 해당하는 별표 수를 선택하고 의견을 입력한 후 제출을 클릭합니다.
별점의 의미는 다음과 같습니다.
의견을 제공하고 싶지 않다면 대화상자를 닫으면 됩니다.
의견이나 제안 또는 수정할 사항이 있다면 지원 탭을 사용하세요.
Copyright 2026 Google LLC All rights reserved. Google 및 Google 로고는 Google LLC의 상표입니다. 기타 모든 회사명 및 제품명은 해당 업체의 상표일 수 있습니다.


현재 이 콘텐츠를 이용할 수 없습니다
이용할 수 있게 되면 이메일로 알려드리겠습니다.

감사합니다
이용할 수 있게 되면 이메일로 알려드리겠습니다.

한 번에 실습 1개만 가능
모든 기존 실습을 종료하고 이 실습을 시작할지 확인하세요.
실습을 시작하려면 이 간단한 단계를 완료하세요.