Vertex AI is now Gemini Enterprise Agent Platform! We are currently updating our content to reflect this change. Please bear with us if you encounter naming inconsistencies during this transition.
Applica le tue competenze nella console Google Cloud
Questo lab potrebbe incorporare strumenti di AI a supporto del tuo apprendimento.
Overview
BigQuery is Google's fully managed, NoOps, low cost analytics database. With BigQuery you can query terabytes and terabytes of data without having any infrastructure to manage or needing a database administrator. BigQuery uses SQL and can take advantage of the pay-as-you-go model. BigQuery allows you to focus on analyzing data to find meaningful insights.
The dataset you'll use is an ecommerce dataset that has millions of Google Analytics records for the Google Merchandise Store loaded into BigQuery. You have a copy of that dataset for this lab and will explore the available fields and row for insights.
In this lab you will ingest several types of datasets into tables inside of BigQuery.
Setup and requirements
For each lab, you get a new Google Cloud project and set of resources for a fixed time at no cost.
Sign in to Google Skills using an incognito window.
Note the lab's access time (for example, 1:15:00), and make sure you can finish within that time.
There is no pause feature. You can restart if needed, but you have to start at the beginning.
When ready, click Start lab.
Note your lab credentials (Username and Password). You will use them to sign in to the Google Cloud Console.
Click Open Google Console.
Click Use another account and copy/paste credentials for this lab into the prompts.
If you use other credentials, you'll receive errors or incur charges.
Accept the terms and skip the recovery resource page.
Open BigQuery Console
In the Google Cloud Console, select Navigation menu > BigQuery.
The Welcome to BigQuery in the Cloud Console message box opens. This message box provides a link to the quickstart guide and lists UI updates.
Click Done.
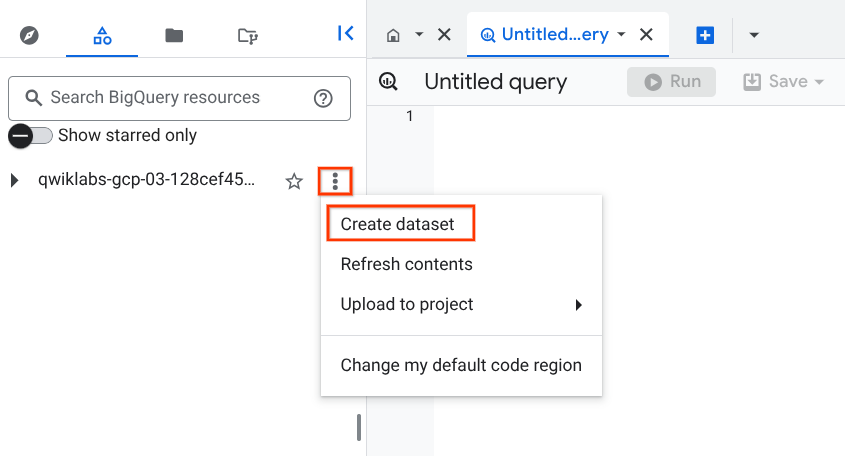
Task 1. Create a new dataset to store tables
In the Classic Explorer, click on the 3 vertical dots next to your project, then click Create Dataset.
Set the Dataset ID to ecommerce. Leave the other fields at their default values.
Click Create dataset.
You'll now see the ecommerce dataset under your project name.
Task 2. Ingest a new dataset from a CSV
Scenario: Your marketing team is looking to you to help guide them with what products should be up for promotions based on inventory stock levels. They have also asked how each product is trending in customer sentiment based on the product reviews.
Your existing ecommerce transactional dataset does not have inventory stock levels or product review data in it, but your operations and marketing teams have provided you with new datasets for you to analyze.
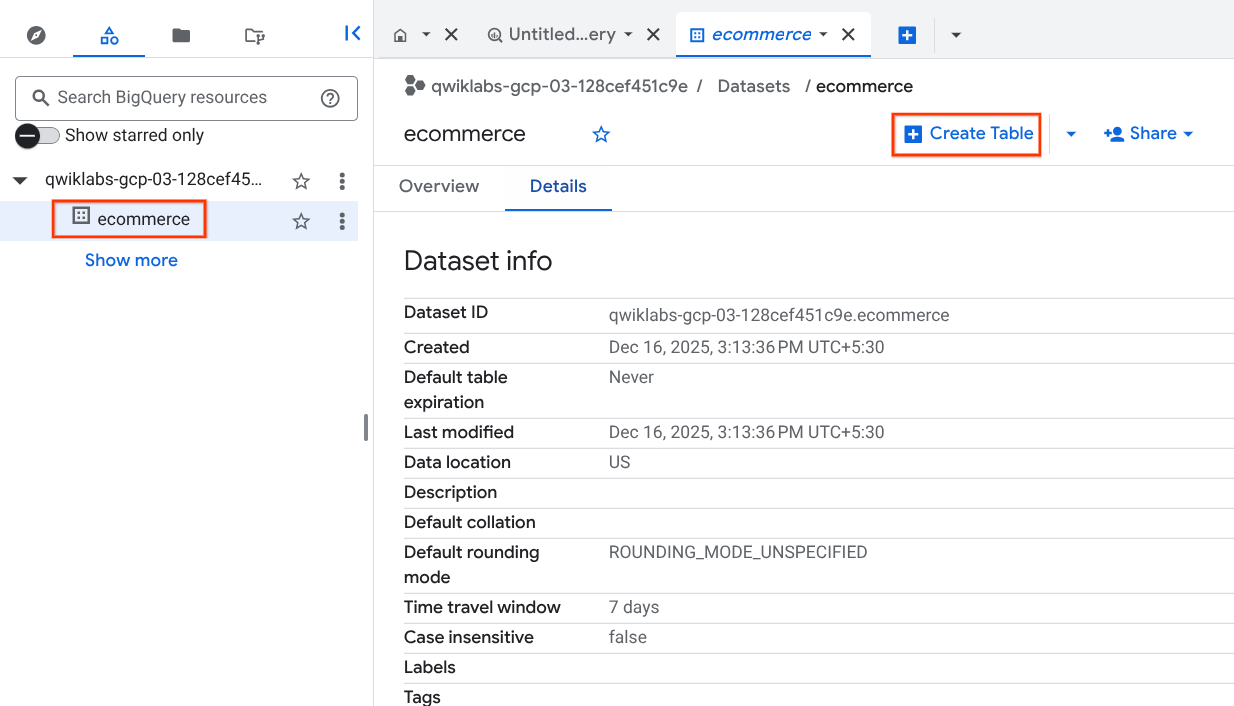
Select the ecommerce dataset; then click Create Table.
Specify the below table options:
Source:
Create table from: Upload
Select file: select the file you downloaded locally earlier
File format: CSV
Destination:
Table name: products
Leave other settings at their default value.
Schema:
Check Auto Detect for Schema and input parameters
Tip: Not seeing the checkbox? Ensure the file format is CSV and not Avro.
Partition and Cluster settings: Leave at default settings
Advanced Options:
Leave at default settings
Click Create Table.
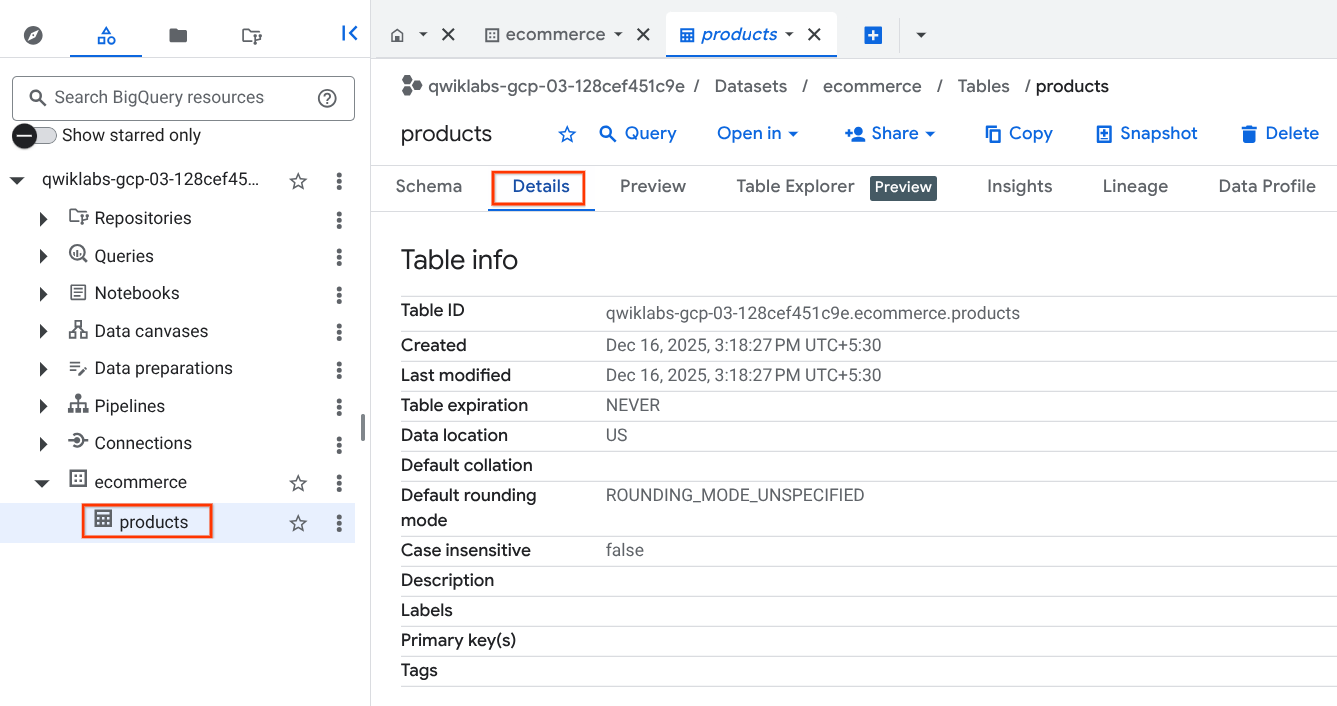
You should now see the products table below the ecommerce dataset.
Select the products table and view details:
Select Preview and confirm all columns have been loaded (sampled below):
SKU
name
orderedQuantity
stockLevel
restockingLeadTime
GGOEGDHQ014899
20 oz Stainless Steel Insulated Tumbler
499
652
2
GGOEGOAB022499
Satin Black Ballpoint Pen
403
477
2
GGOEYHPB072210
Twill Cap
1429
1997
2
GGOEGEVB071799
Pocket Bluetooth Speaker
214
246
2
You have successfully loaded in a CSV file into a new BigQuery table.
Exploring newly loaded data with SQL
Next, practice with a basic query to gain insights from the new products table.
In the + SQL query, write a query to list the top 5 products with the highest stockLevel:
#standardSQL
SELECT
*
FROM
ecommerce.products
ORDER BY
stockLevel DESC
LIMIT 5
Task 3. Ingest data from Google Cloud Storage
Select the ecommerce dataset and click Create Table.
Specify the below table options:
Source:
Create table from: Google Cloud Storage
Select file from GCS bucket: cloud-training/data-insights-course/exports/products.csv
File format: CSV
Destination:
Table name: products
Leave all other settings as default.
Schema:
Check Auto Detect for Schema and input parameters.
Advanced Options:
Leave at default settings
Click Create Table.
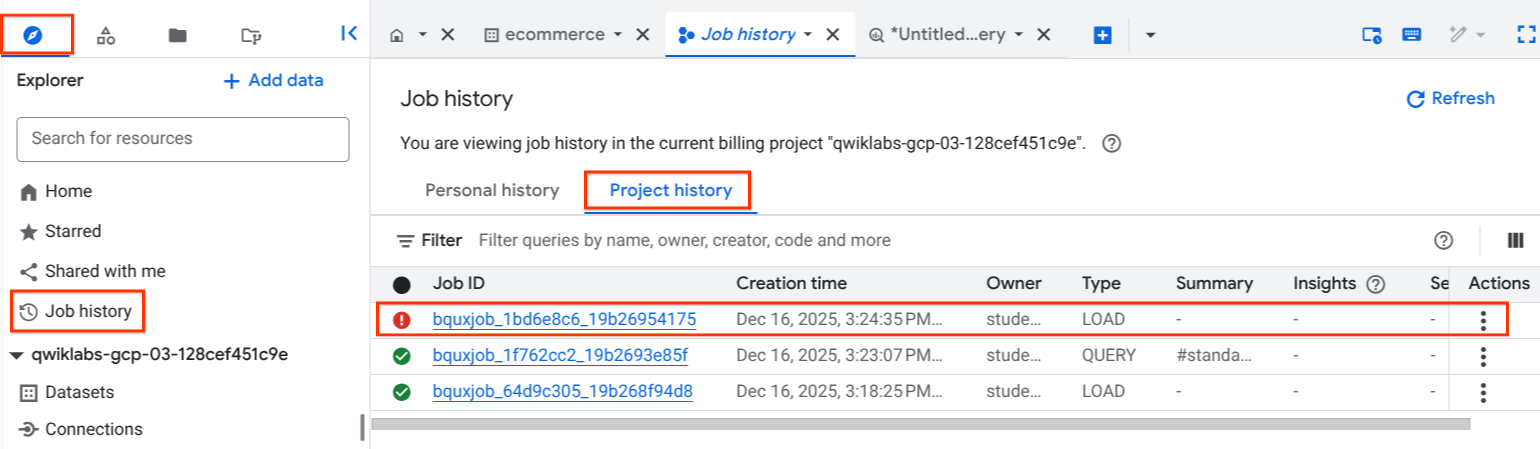
Does it work? No
Click Cancel to close the message, then click Yes,quit in the Create table dialog.
In the Explorer pane, navigate to Job history, then click Project history and select the displayed error message.
Review the details, then click Close.
Repeat Task 3 until you reach the Schema section.
Scroll down, expand Advanced options, and from the Write preference drop-down menu, select Overwrite table.
Now click Create Table.
Confirm the table was executed successfully.
Task 4. Ingest a new dataset from a Google Spreadsheet
Select + SQL Query.
Execute this next query to show which products are in the greatest restocking need based on inventory turnover and how quickly they can be resupplied:
#standardSQL
SELECT
*,
SAFE_DIVIDE(orderedQuantity,stockLevel) AS ratio
FROM
ecommerce.products
WHERE
# include products that have been ordered and
# are 80% through their inventory
orderedQuantity > 0
AND SAFE_DIVIDE(orderedQuantity,stockLevel) >= .8
ORDER BY
restockingLeadTime DESC
Note: If you specify a relative project name path like ecommerce.products instead of project_id.ecommerce.products, BigQuery will assume the current project.
Task 5. Saving Data to Google Sheets
Scenario: You want to provide your supply chain management team with a way to notate whether or not they have contacted the supplier to reorder inventory, and to make any notes on the items. You decide on using a Google Spreadsheet for a quick survey.
Now you'll create it:
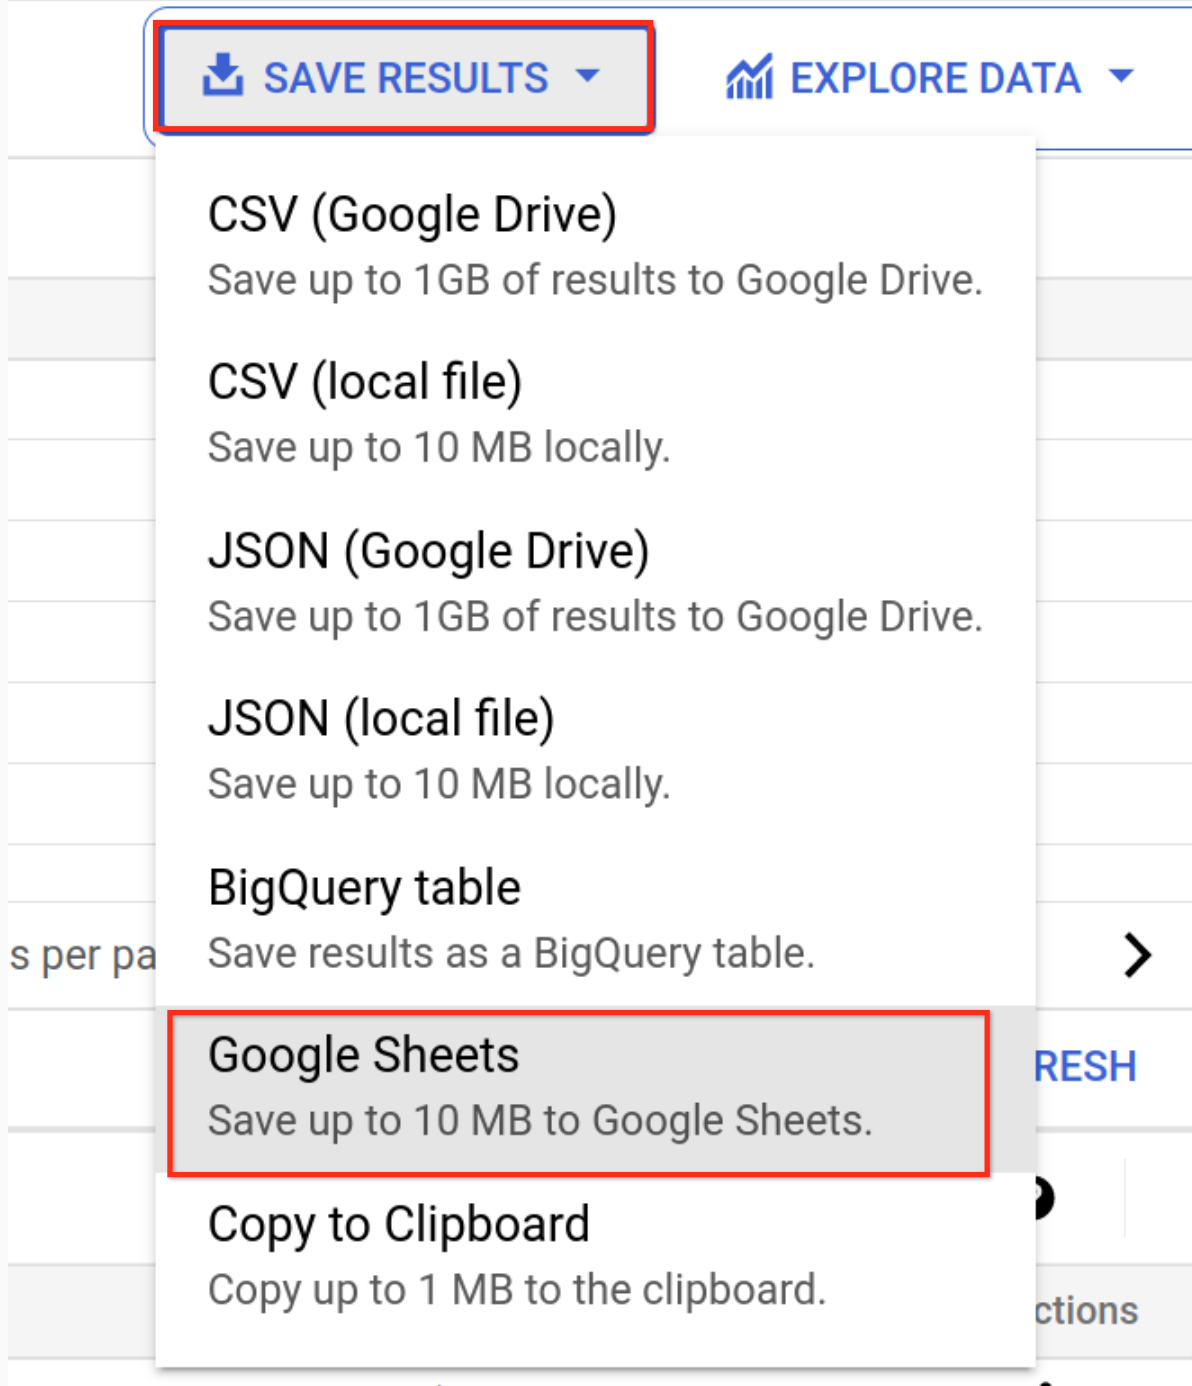
In Query Results, select Save Results > Google Sheets.
A popup will appear with a link to Open the spreadsheet, select Open.
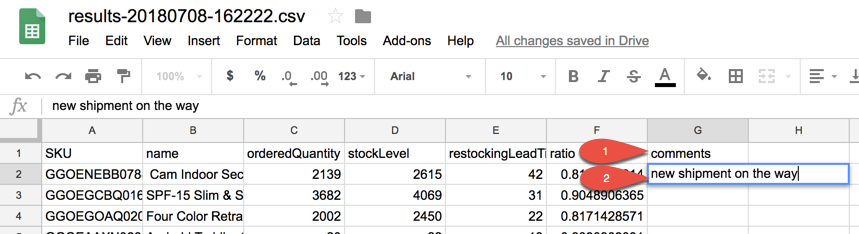
In your spreadsheet, in column G add a new field titled comments and for the first product row type new shipment on the way.
In Google Sheets, select Share and Get Shareable Link then copy the link.
Return to your BigQuery tab.
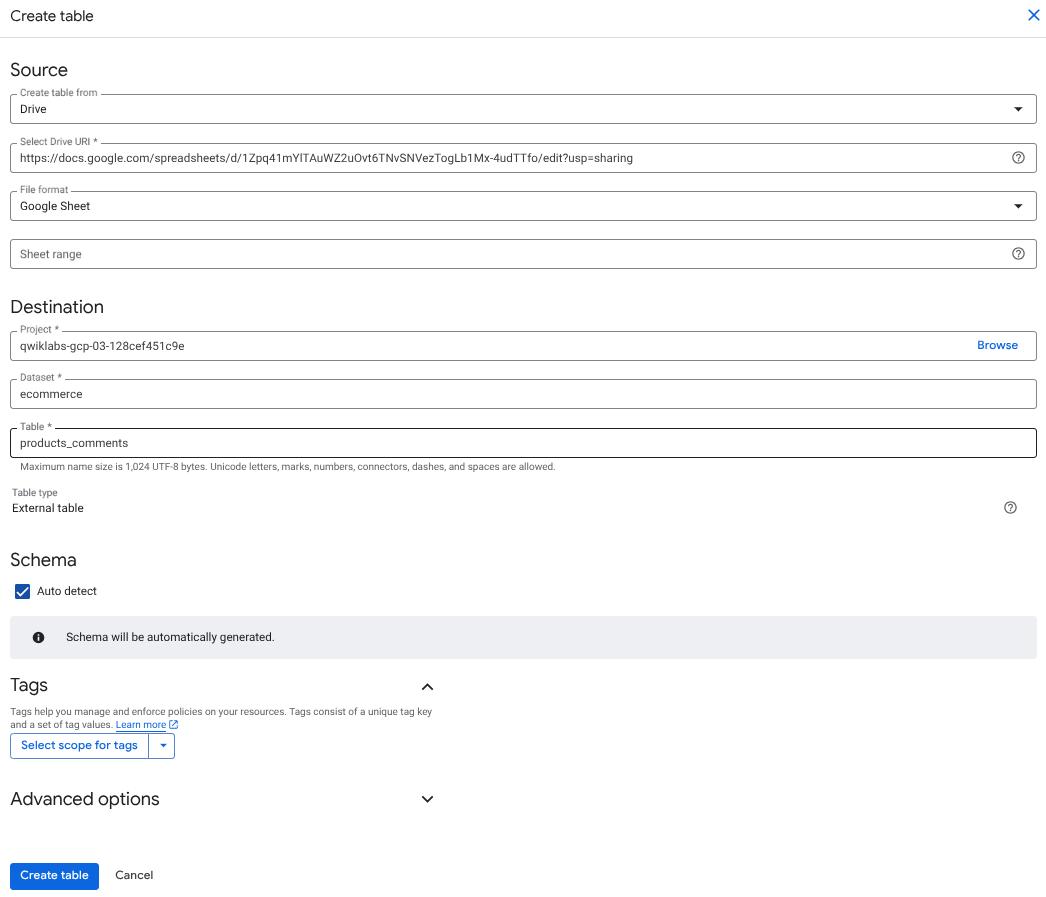
Click on the ecommerce dataset, then Create Table.
Specify the these table options:
Source:
Create table from: Drive
Select Drive URI: put-your-spreadsheet-url-here
File format: Google Sheet
Destination:
Table type: Leave as default (External table)
Table name: products_comments
Schema:
Check Auto Detect for Schema and input parameters
Advanced options:
Set Header rows to skip: to 1.
Leave all options at their default.
Click Create Table.
Note: There is no load job for creating an externally-linked table since the data is not ingested.
Query data from an external spreadsheet
Click + SQL Query.
Add the below query then Run:
#standardSQL
SELECT * FROM ecommerce.products_comments WHERE comments IS NOT NULL
Wait for the query to execute. You will see that the new comments field is now returned.
SKU
name
orderedQuantity
stockLevel
restockingLeadTime
ratio
comments
GGOENEBB078899
Cam Indoor Security Camera - USA
2139
2615
42
0.8179732314
new shipment on the way
Navigate back to your Google Spreadsheet tab.
Type in more comments in the Comments field.
Navigate back to BigQuery and execute the query again by clicking Run.
Confirm the new data properly shows in the results.
You have successfully created an external table connection into BigQuery from Google Spreadsheets.
Task 6. External table performance and data quality considerations
Linking external tables to BigQuery (e.g. Google Spreadsheets or directly from Google Cloud Storage) has several limitations. Two of the most significant are:
Data consistency is not guaranteed if the data values in the source are changed while querying.
Data sources stored outside of BigQuery lose the performance benefits of having BigQuery manage your data storage (including but not limited to auto-optimization of your query execution path, certain wildcard functions are disabled, etc.).
Congratulations!
You've successfully created a new dataset and ingested new external data sources into BigQuery from CSV, Google Cloud Storage, and Google Drive.
End your lab
When you have completed your lab, click End Lab. Google Skills removes the resources you’ve used and cleans the account for you.
You will be given an opportunity to rate the lab experience. Select the applicable number of stars, type a comment, and then click Submit.
The number of stars indicates the following:
1 star = Very dissatisfied
2 stars = Dissatisfied
3 stars = Neutral
4 stars = Satisfied
5 stars = Very satisfied
You can close the dialog box if you don't want to provide feedback.
For feedback, suggestions, or corrections, please use the Support tab.
Copyright 2026 Google LLC All rights reserved. Google and the Google logo are trademarks of Google LLC. All other company and product names may be trademarks of the respective companies with which they are associated.
Prima di iniziare
I lab creano un progetto e risorse Google Cloud per un periodo di tempo prestabilito
I lab hanno un limite di tempo e non possono essere messi in pausa. Se termini il lab, dovrai ricominciare dall'inizio.
In alto a sinistra dello schermo, fai clic su Inizia il lab per iniziare
Utilizza la navigazione privata
Copia il nome utente e la password forniti per il lab
Fai clic su Apri console in modalità privata
Accedi alla console
Accedi utilizzando le tue credenziali del lab. L'utilizzo di altre credenziali potrebbe causare errori oppure l'addebito di costi.
Accetta i termini e salta la pagina di ripristino delle risorse
Non fare clic su Termina lab a meno che tu non abbia terminato il lab o non voglia riavviarlo, perché il tuo lavoro verrà eliminato e il progetto verrà rimosso
Questi contenuti non sono al momento disponibili
Ti invieremo una notifica via email quando sarà disponibile
Bene.
Ti contatteremo via email non appena sarà disponibile
Un lab alla volta
Conferma per terminare tutti i lab esistenti e iniziare questo
Utilizza la navigazione privata per eseguire il lab
Il modo migliore per eseguire questo lab è utilizzare una finestra del browser in incognito o privata. Ciò evita eventuali conflitti tra il tuo account personale e l'account studente, che potrebbero causare addebiti aggiuntivi sul tuo account personale.
This lab focuses on how to ingest new datasets into tables inside of BigQuery.
Durata:
Configurazione in 0 m
·
Accesso da 90 m
·
Completamento in 60 m