

准备工作
- 实验会创建一个 Google Cloud 项目和一些资源,供您使用限定的一段时间
- 实验有时间限制,并且没有暂停功能。如果您中途结束实验,则必须重新开始。
- 在屏幕左上角,点击开始实验即可开始
Create a Kubernetes cluster
/ 30
Deploy MySQL on the cluster
/ 30
Use Helm to deploy MySQL on the cluster
/ 40

In this lab, you create a Google Kubernetes Engine (GKE) cluster, and then deploy databases into it. You see two ways to deploy the databases: first using your own configuration code, and then using a Kubernetes package manager called Helm.
In this lab, you learn how to perform the following tasks:
In this task, you perform initialization steps for your lab.
For each lab, you get a new Google Cloud project and set of resources for a fixed time at no cost.
Sign in to Google Skills using an incognito window.
Note the lab's access time (for example, 1:15:00), and make sure you can finish within that time.
There is no pause feature. You can restart if needed, but you have to start at the beginning.
When ready, click Start lab.
Note your lab credentials (Username and Password). You will use them to sign in to the Google Cloud Console.
Click Open Google Console.
Click Use another account and copy/paste credentials for this lab into the prompts. If you use other credentials, you'll receive errors or incur charges.
Accept the terms and skip the recovery resource page.
Open a new web browser window and navigate to the Google Cloud Console (console.cloud.google.com). Use the project selector to choose the first project with a leading name of 'qwiklabs-gcp.'
On the Navigation menu (
Click Create.
You can see Standard: You manage your cluster inside Create a cluster pop-up.
Click Configure next to Standard: You manage your cluster.
For Location type, select Zonal.
Accept all defaults and click Create. It will take a couple minutes for the cluster to be ready.
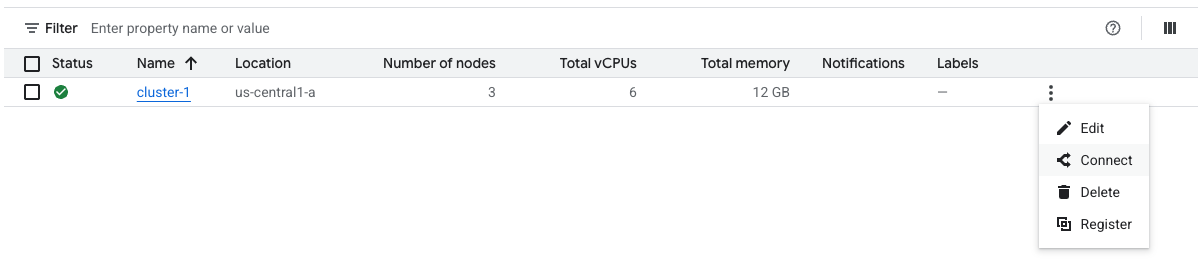
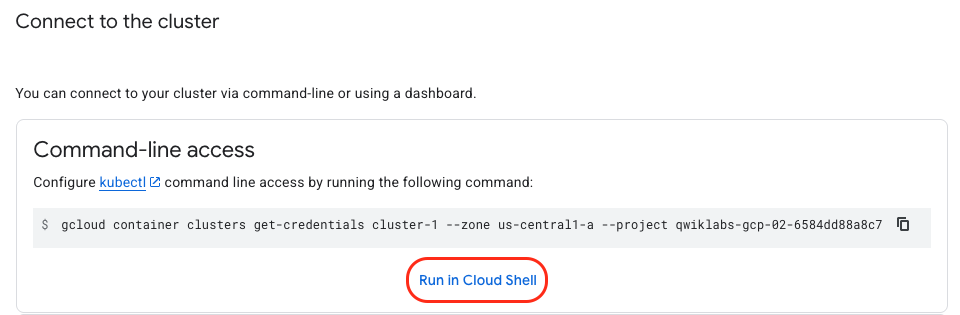
When the cluster is ready, click Connect from the Actions menu.
The command for connecting to the cluster is specified.
You are connected to the cluster and ready to deploy a program.
This command returns a list of the three virtual machines that make up this cluster.
Click Check my progress to verify the objective.
You just created a Kubernetes cluster. Next, you configure and deploy MySQL to run in it.
You need a root password for the database. You store the password as a Kubernetes secret. The secret is a key-value pair. In this case, the key is ROOT_PASSWORD and the value is password.
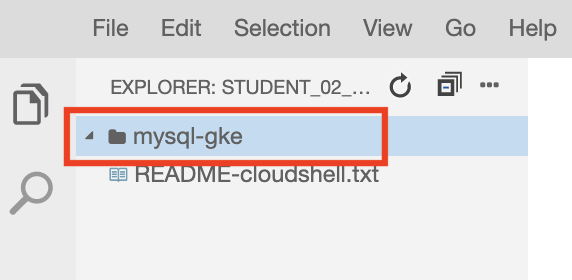
Right click the mysql-gke folder, and then click New File.
For name, type volume.yaml.
Enter the following YAML code and save the file:
This reserves 1 gigabyte of disk space for the MySQL database. Note the name mysql-data-disk. This name will be used in the next file.
Notes:
The database needs a service so it can be accessed.
In Cloud Shell, click Open Terminal to return to the command line. Make sure you are in the correct folder and type ls to verify that you have your three YAML files.
To deploy your database, enter the following kubectl commands:
The pod that has your database installed should be running. If it is not running yet, wait a little while and try again.
Click Check my progress to verify the objective.
Copy the name of the pod obtained from the last command to the clipboard. It will begin with mysql-deployment- followed by a unique string.
Enter the following command but < replace the pod name > with your pod's name:
Now you're at a bash prompt within the MySQL pod.
When prompted, enter the password password. This gives you a mysql prompt.
Run the following command:
Type exit to exit MySQL.
Type exit again to return to the Cloud Shell command prompt.
To remove everything that was created, enter the following commands:
You deployed a MySQL database to a Kubernetes cluster using Kubernetes configuration files.
Helm is a package manager for Kubernetes. It can make deploying databases and other applications easier on a Kubernetes cluster. You use it next.
You should still be in Cloud Shell, connected to your Kubernetes cluster.
Click Check my progress to verify the objective.
Read the output from the Helm install command and connect to your database using the instructions provided.
When you are connected to the database, exit to return to the Cloud Shell command prompt.
To see your Helm deployment, enter the following command:
Notice that the deployment has the name mydb specified in the install command.
Congratulations! You have created a Kubernetes cluster and then deployed MySQL databases into it, first using your own configuration code, and then using Helm.
When you have completed your lab, click End Lab. Google Skills removes the resources you’ve used and cleans the account for you.
You will be given an opportunity to rate the lab experience. Select the applicable number of stars, type a comment, and then click Submit.
The number of stars indicates the following:
You can close the dialog box if you don't want to provide feedback.
For feedback, suggestions, or corrections, please use the Support tab.
Copyright 2026 Google LLC All rights reserved. Google and the Google logo are trademarks of Google LLC. All other company and product names may be trademarks of the respective companies with which they are associated.


此内容目前不可用
一旦可用,我们会通过电子邮件告知您

太好了!
一旦可用,我们会通过电子邮件告知您

一次一个实验
确认结束所有现有实验并开始此实验