

Before you begin
- Labs create a Google Cloud project and resources for a fixed time
- Labs have a time limit and no pause feature. If you end the lab, you'll have to restart from the beginning.
- On the top left of your screen, click Start lab to begin
Create a MySQL database on Linux
/ 40
Create a SQL Server database on Windows
/ 30
Automate server creation using the Google Cloud SDK
/ 30

In this lab, you create database servers running on Compute Engine. You create both Linux and Windows servers and use the CLI to automate the creation of a server.
In this lab, you learn how to perform the following tasks:
In this task, you perform initialization steps for your lab.
For each lab, you get a new Google Cloud project and set of resources for a fixed time at no cost.
Sign in to Google Skills using an incognito window.
Note the lab's access time (for example, 1:15:00), and make sure you can finish within that time.
There is no pause feature. You can restart if needed, but you have to start at the beginning.
When ready, click Start lab.
Note your lab credentials (Username and Password). You will use them to sign in to the Google Cloud Console.
Click Open Google Console.
Click Use another account and copy/paste credentials for this lab into the prompts. If you use other credentials, you'll receive errors or incur charges.
Accept the terms and skip the recovery resource page.
Open a new web browser window and navigate to the Google Cloud Console (console.cloud.google.com). Use the project selector to choose the first project with a leading name of 'qwiklabs-gcp.'
On the Navigation menu (
To create a new instance, click Create Instance.
On the Machine configuration page, specify the following values:
| Field | Value |
|---|---|
| Name | mysql-db |
| Region | |
| Zone |
Click OS and storage.
Click Change to begin configuring your boot disk and select the values for:
Debian
Debian GNU/Linux 12 (bookworm)
Leave the size as default and Click on Select.
Accept the remaining defaults, and then click Create.
When the VM is ready, click SSH.
This will log you in to the server in a new tab.
In the terminal window, to update the packages and install MySQL using the apt-get package manager, enter the following command:
To secure the database, enter the following command:
When you are prompted for the current password for root, press Enter (Return) for none.
When you are prompted for Switch to unix_socket authentication [Y/n], press N.
When you are prompted for Change the root password? [Y/n], press Y.
Enter something you will remember, because you will need it later.
When you are prompted for Remove anonymous users? [Y/n], press N.
When you are prompted for Disallow root login remotely? [Y/n], press N.
When you are prompted for Remove test database and access to it? [Y/n], press N.
When you are prompted for Reload privilege tables now? [Y/n], press Y.
Now log in to the database. Enter the following command, and then enter your password when prompted:
At the MariaDB [(none)]> prompt, to see the current databases, enter the following command:
To create a new database, enter the following command:
Switch to that database:
Create a table:
Add a record:
Confirm that your record was added:
Type exit to log out of the database.
Type exit again to close the SSH session.
You just created a MySQL database server using Debian Linux.
Click Check my progress to verify the objective.
Return to the Google Cloud Console and the Compute Engine service.
To create a new instance, click Create Instance.
On the Machine configuration page, specify the following values:
| Field | Value |
|---|---|
| Name | sql-server-db |
| Region | |
| Zone | |
| Series | E2 |
| Machine Type | e2-standard-4 |
Click OS and storage.
Click Change to begin configuring your boot disk and select the following values:
SQL Server on Windows Server
SQL Server 2019 Web on Windows Server 2019 Datacenter
Leave the size as default and Click on Select.
Accept the remaining defaults, and then click Create.
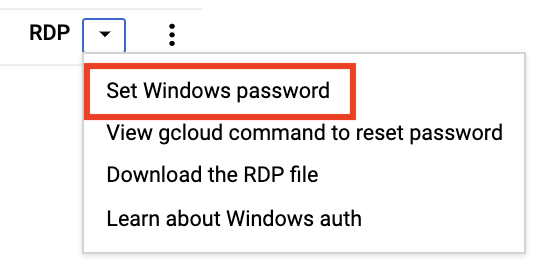
When the Windows server is ready, click the dropdown arrow in the Connect column, and then select Set Windows password.
Leave the Username as it is (the generated username is a portion of your lab username), and then click Set.
Copy and paste the generated password into a text file so you don't lose it, and then click Close.
You need to have an RDP client to log on to the Windows machine.
Do one of the following:
When you are logged on to the Windows server, close the Server Manager Dashboard.
On the Start menu, type SSMS, then right click the SQL Server Management Studio shortcut, and choose Run as administrator to run the program.
On the Popup window choose Yes when prompted Do you want to allow this app to make changes to your device?.
In the Connect to Server dialog, the server name should be SQL-SERVER-DB.
Check the Trust server certificate and click Connect.
In Management Studio, in the Object Explorer, right-click SQL-SERVER-DB, and select Properties.
In the Server Properties dialog, select the Security page.
For Server Authentication, select SQL Server and Windows Authentication mode, and then click OK.
Read the warning message and click OK again.
In Object Explorer, right-click the SQL-SERVER-DB server, and select Restart.
Click Yes when prompted. If the Restart command is disabled, click the Start menu and reboot the server. Give it a minute or two and then restart your RDP session.
When you're logged in, return to SQL Server Management Studio and Run as administrator and connect to the database server.
Expand the Security and Logins branch of the tree view. Right-click on the Logins branch, and select New Login.
For Login name, enter your first name or another unique value.
Select SQL Server authentication.
Enter a password you will remember (paste it in a text file if you like).
Clear Enforce password policy.
a. Click the Server roles page, and select the sysadmin role.
b. Click the User Mapping page, and select all the databases.
c. Click OK.
To test the login you just created, in Object Explorer, click Connect, and then select Database Engine.
For Authentication, select SQL Server Authentication.
Enter your login and password, then check Trust server certificate. Click Connect.
In the toolbar, click New Query.
To create a database, enter the following command, and then click Execute:
In the databases dropdown to the left of the Execute button, select your petsdb database.
To create a table, enter the following command, and then click Execute:
To add a record:
To confirm that it worked:
Close your RDP connection.
You just created a SQL Server database server running on Windows.
Click Check my progress to verify the objective.
Return to the Google Cloud Console and the Compute Engine service.
To create a new instance, click CREATE INSTANCE.
On the Machine configuration page, specify the following values:
| Field | Value |
|---|---|
| Name | db-server |
| Region | |
| Zone |
Click OS and storage.
Click Change to begin configuring your boot disk and select the following values:
Debian GNU/Linux 12 (bookworm)
Leave the size as default and Click on Select.
Click Observability
Click Advanced then in Automation - Startup script paste the following:
Scroll to the bottom, but do not click the Create button; instead click the Equivalent Code button on the top right and then navigate to the Command Line pane on the right of the screen.
This pane shows you the gcloud CLI command you can use to automate this server's creation as you configured it. Next, make a small change to this command.
Click Copy at the bottom of the pane.
Cancel the Create an instance wizard.
In Notepad or similar text editor, paste the copied code.
If present, from the list of commands remove the following parameter: --provisioning-model=STANDARD
Select the entire edited command and copy it to the clipboard.
Launch the Cloud Shell in the top right section of the Cloud Console page, paste the command, and press Return/Enter to create the VM.
If prompted, click Authorize.
Press Return (Enter) to allow for an empty passphrase.
Please wait for 3 to 5 minutes for the startup script to run. Then in the Cloud Shell terminal, enter the following to log in to the virtual machine:
If asked: Do you want to continue(Y/n)?, Enter Y. Accept all defaults for setting up secure communications.
To see whether your database server is running, enter the following command:
The output on the console should contain a row similar to the following:
Press Q to exit the status screen.
Click Check my progress to verify the objective.
You created database servers running on Compute Engine. You created both Linux and Windows servers and have used the CLI to automate the creation of a server.
When you have completed your lab, click End Lab. Google Skills removes the resources you’ve used and cleans the account for you.
You will be given an opportunity to rate the lab experience. Select the applicable number of stars, type a comment, and then click Submit.
The number of stars indicates the following:
You can close the dialog box if you don't want to provide feedback.
For feedback, suggestions, or corrections, please use the Support tab.
Copyright 2026 Google LLC All rights reserved. Google and the Google logo are trademarks of Google LLC. All other company and product names may be trademarks of the respective companies with which they are associated.


This content is not currently available
We will notify you via email when it becomes available

Great!
We will contact you via email if it becomes available

One lab at a time
Confirm to end all existing labs and start this one