Dans cet atelier, vous allez créer des serveurs de base de données exécutés sur Compute Engine. Vous allez créer des serveurs Linux et Windows, et utiliser la CLI pour automatiser la création d'un serveur.
Dans cette tâche, vous allez effectuer les étapes d'initialisation de l'atelier.
Pour chaque atelier, nous vous attribuons un nouveau projet Google Cloud et un nouvel ensemble de ressources pour une durée déterminée, sans frais.
-
Ouvrez une nouvelle fenêtre de navigateur Web et accédez à la console Google Cloud (console.cloud.google.com). Utilisez le sélecteur de projet pour choisir le premier projet dont le nom commence par "qwiklabs-gcp".
-
Dans le menu de navigation ( ), cliquez sur Compute Engine > Instances de VM.
-
Pour créer une instance, cliquez sur Créer une instance.
-
Sur la page Configuration de la machine, saisissez les valeurs suivantes :
| Champ |
Valeur |
| Nom |
mysql-db |
| Région |
|
| Zone |
|
-
Cliquez sur OS et stockage.
Cliquez sur Modifier pour configurer le disque de démarrage et sélectionnez les valeurs suivantes :
-
Système d'exploitation :
Debian
-
Version :
Debian GNU/Linux 12 (bookworm)
Conservez la taille par défaut et cliquez sur Sélectionner.
-
Acceptez les autres valeurs par défaut, puis cliquez sur Créer.
-
Une fois la VM prête, cliquez sur SSH.
Vous serez connecté au serveur dans un nouvel onglet.

-
Dans la fenêtre de terminal, pour mettre à jour les packages et installer MySQL à l'aide du gestionnaire de paquets apt-get, saisissez la commande suivante :
sudo apt-get update
sudo apt-get install -y default-mysql-server
-
Pour sécuriser la base de données, saisissez la commande suivante :
sudo mysql_secure_installation
-
Lorsque vous êtes invité à saisir le mot de passe actuel pour root, appuyez sur Entrée (Retour) pour ne pas en fournir.
-
Lorsque l'invite Switch to unix_socket authentication [Y/n] (Passer à l'authentification unix_socket [O/n]) s'affiche, appuyez sur N (Non).
-
Lorsque vous êtes invité à répondre à la question Change the root password? [Y/n] (Modifier le mot de passe racine ? [O/n]), appuyez sur Y (Oui).
Saisissez un mot de passe dont vous vous souviendrez, car vous en aurez besoin plus tard.
-
Lorsque vous êtes invité à répondre à la question Remove anonymous users? [Y/n] (Supprimer les utilisateurs anonymes ? [O/n]), appuyez sur N (Non).
-
Lorsque vous êtes invité à répondre à la question Disallow root login remotely? [Y/n] (Désactiver la connexion racine à distance [O/n], appuyez sur N (Non).
-
Lorsque vous êtes invité à répondre à la question Remove test database and access to it? [Y/n] (Supprimer la base de données de test et l'accès à celle-ci ? [O/n]), appuyez sur N (Non).
-
Lorsque vous êtes invité à répondre à la question Reload privilege tables now? [Y/n] (Actualiser la table des privilèges maintenant ? [O/n]), appuyez sur Y (Oui).
-
Maintenant, connectez-vous à la base de données. Saisissez la commande suivante, puis votre mot de passe lorsque vous y êtes invité :
sudo mysql -u root -p
-
Lorsque l'invite MariaDB [(none)]> s'affiche, saisissez la commande suivante pour afficher les bases de données actuelles :
SHOW databases;
-
Pour créer une base de données, saisissez la commande suivante :
CREATE database petsdb;
-
Passez à cette base de données :
USE petsdb;
-
Créez une table :
CREATE TABLE pets (
id INT AUTO_INCREMENT PRIMARY KEY,
name VARCHAR(255),
breed VARCHAR(255)
);
-
Ajoutez un enregistrement :
INSERT INTO pets (name, breed)
VALUES ('Noir', 'Schnoodle');
-
Vérifiez que votre enregistrement a été ajouté :
SELECT * FROM pets;
-
Saisissez exit (quitter) pour vous déconnecter de la base de données.
-
Saisissez exit à nouveau pour fermer la session SSH.
Vous venez de créer un serveur de base de données MySQL à l'aide de Debian Linux.
-
Revenez à la console Google Cloud et au service Compute Engine.
-
Pour créer une instance, cliquez sur Créer une instance.
-
Sur la page Configuration de la machine, saisissez les valeurs suivantes :
| Champ |
Valeur |
| Nom |
sql-server-db |
| Région |
|
| Zone |
|
| Série |
E2 |
| Type de machine |
e2-standard-4 |
-
Cliquez sur OS et stockage.
Cliquez sur Modifier pour commencer à configurer le disque de démarrage et sélectionnez les valeurs suivantes :
-
Système d'exploitation :
SQL Server sur Windows Server
-
Version :
SQL Server 2019 Web sur Windows Server 2019 Datacenter
Conservez la taille par défaut et cliquez sur Sélectionner.
-
Acceptez les autres valeurs par défaut, puis cliquez sur Créer.
-
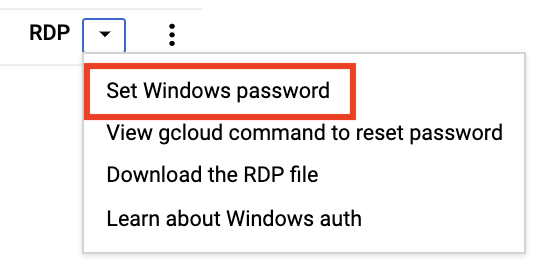
Lorsque le serveur Windows est prêt, cliquez sur la flèche du menu déroulant dans la colonne Se connecter, puis sélectionnez Définir un mot de passe Windows.
Remarque : Si vous atteignez cette étape trop rapidement, le serveur Windows n'est peut-être pas prêt, même si la console affiche une coche verte. Attendez quelques minutes et réessayez.
-
Laissez le nom d'utilisateur tel quel (le nom d'utilisateur généré est une partie de votre nom d'utilisateur pour l'atelier), puis cliquez sur Définir.
-
Copiez le mot de passe généré et collez-le dans un fichier texte pour ne pas le perdre, puis cliquez sur Fermer.
Vous devez disposer d'un client RDP pour vous connecter à la machine Windows.
-
Effectuez l'une des opérations suivantes :
- Si vous utilisez Windows, vous disposez déjà de RDP :
- Cliquez sur la flèche du menu déroulant dans la colonne Se connecter, puis sélectionnez Télécharger le fichier RDP.
- Une fois le téléchargement terminé, double-cliquez sur le fichier, puis connectez-vous avec votre nom d'utilisateur et le mot de passe que vous avez copié.
- Utilisateurs Mac :
- Installez le client Microsoft Remote Desktop depuis l'App Store d'Apple (il est peut-être déjà installé).
- Après avoir installé le client, téléchargez le fichier RDP, puis connectez-vous avec votre nom d'utilisateur et le mot de passe que vous avez copié.
-
Une fois connecté au serveur Windows, fermez le tableau de bord du gestionnaire de serveur.
-
Dans le menu Démarrer, saisissez SSMS, puis effectuez un clic droit sur le raccourci SQL Server Management Studio et sélectionnez Exécuter en tant qu'administrateur pour exécuter le programme.
-
Dans la fenêtre pop-up, choisissez Oui lorsque vous êtes invité à répondre à la question Voulez-vous autoriser cette application à apporter des modifications sur votre appareil ?.
-
Dans la boîte de dialogue Se connecter au serveur, le nom du serveur doit être SQL-SERVER-DB.
-
Cochez la case Faire confiance au certificat du serveur, puis cliquez sur Se connecter.
-
Dans Management Studio, effectuez un clic droit sur SQL-SERVER-DB dans l'explorateur d'objets, puis sélectionnez Propriétés.
-
Dans la boîte de dialogue Propriétés du serveur, sélectionnez la page Sécurité.
-
Pour le paramètre Authentification du serveur, sélectionnez Mode d'authentification SQL Server et Windows, puis cliquez sur OK.
-
Lisez le message d'avertissement, puis cliquez à nouveau sur OK.
-
Dans l'explorateur d'objets, effectuez un clic droit sur le serveur SQL-SERVER-DB, puis sélectionnez Redémarrer.
-
Cliquez sur Oui lorsque vous y êtes invité. Si la commande Redémarrer est désactivée, cliquez sur le menu Démarrer et redémarrez le serveur. Patientez une ou deux minutes, puis redémarrez votre session RDP.
-
Une fois connecté, revenez à SQL Server Management Studio, exécutez-le en tant qu'administrateur et connectez-vous au serveur de base de données.
-
Développez les branches Sécurité et Connexions de l'arborescence. Effectuez un clic droit sur la branche Connexions, puis sélectionnez Nouvelle connexion.
-
Dans le champ Nom de connexion, saisissez votre prénom ou une autre valeur unique.
-
Sélectionnez Authentification SQL Server.
-
Saisissez un mot de passe dont vous vous souviendrez. Vous pouvez le coller dans un fichier texte si vous le souhaitez.
-
Décochez la case Appliquer la stratégie de mot de passe.
a. Cliquez sur la page Rôles de serveur et sélectionnez le rôle sysadmin.
b. Cliquez sur la page Mappage des utilisateurs et sélectionnez toutes les bases de données.
c. Cliquez sur OK.
-
Pour tester la connexion que vous venez de créer, cliquez sur Se connecter dans l'explorateur d'objets, puis sélectionnez Moteur de base de données.
-
Pour Authentification, sélectionnez Authentification SQL Server.
-
Saisissez votre identifiant et votre mot de passe, puis cochez la case Faire confiance au certificat du serveur. Cliquez sur Se connecter.
-
Dans la barre d'outils, cliquez sur Nouvelle requête.
-
Pour créer une base de données, saisissez la commande suivante, puis cliquez sur Exécuter :
CREATE DATABASE petsdb;
-
Dans le menu déroulant des bases de données à gauche du bouton "Exécuter", sélectionnez votre base de données petsdb.
-
Pour créer une table, saisissez la commande suivante, puis cliquez sur Exécuter :
USE petsdb;
CREATE TABLE pets (
id INT PRIMARY KEY IDENTITY (1, 1),
name VARCHAR (MAX),
breed VARCHAR (MAX)
);
-
Pour ajouter un enregistrement :
INSERT INTO pets (name, breed)
VALUES ('Noir', 'Schnoodle');
-
Pour vérifier que l'opération a réussi :
SELECT * FROM pets;
-
Fermez votre connexion RDP.
Vous venez de créer un serveur de base de données SQL Server exécuté sur Windows.
-
Revenez à la console Google Cloud et au service Compute Engine.
-
Pour créer une instance, cliquez sur CRÉER UNE INSTANCE.
-
Sur la page Configuration de la machine, saisissez les valeurs suivantes :
| Champ |
Valeur |
| Nom |
db-server |
| Région |
|
| Zone |
|
-
Cliquez sur OS et stockage.
Cliquez sur Modifier pour commencer à configurer le disque de démarrage et sélectionnez les valeurs suivantes :
-
Version :
Debian GNU/Linux 12 (bookworm)
Conservez la taille par défaut et cliquez sur Sélectionner.
-
Cliquez sur Observabilité.
- Décochez la case Installer l'agent Ops pour la surveillance et la journalisation sous Agent Ops (recommandé).
-
Cliquez sur Avancé, puis dans Automatisation > Script de démarrage, collez le script suivant :
#! /bin/bash
sudo apt-get update
sudo apt-get install -y default-mysql-server
-
Faites défiler la page jusqu'en bas, mais ne cliquez pas sur le bouton Créer. Cliquez plutôt sur le bouton Code équivalent en haut à droite, puis accédez au volet Ligne de commande à droite de l'écran.
Ce volet affiche la commande gcloud CLI permettant d’automatiser la création de ce serveur avec les paramètres que vous venez de configurer. Maintenant, modifiez légèrement cette commande.
-
Cliquez sur Copier en bas du volet.
-
Fermez l'assistant Créer une instance
-
Dans le Bloc-notes ou un éditeur de texte similaire, collez le code que vous avez copié.
-
S'il est présent, supprimez le paramètre --provisioning-model=STANDARD de la liste des commandes.
Remarque : Veillez à ne supprimer que le paramètre provisioning-model.
-
Copiez l'intégralité de la commande modifiée et collez-la dans le presse-papiers.
-
Lancez Cloud Shell en haut à droite de la page de la console Cloud, collez la commande et appuyez sur Retour/Entrée pour créer la VM.
Cliquez sur Autoriser si vous y êtes invité.
-
Appuyez sur Retour (Entrée) pour autoriser une phrase secrète vide.
-
Veuillez patienter 3 à 5 minutes pendant l'exécution du script de démarrage. Ensuite, dans le terminal Cloud Shell, saisissez la commande suivante pour vous connecter à la machine virtuelle :
gcloud compute ssh db-server --zone={{{project_0.default_zone | ZONE}}}
-
Lorsque l'invite "Do you want to continue (Y/n)?" (Voulez-vous continuer (Oui/Non) ?) s'affiche, saisissez Y (Oui). Acceptez toutes les valeurs par défaut pour configurer les communications sécurisées.
-
Pour vérifier que votre serveur de base de données est en cours d'exécution, saisissez la commande suivante :
sudo systemctl status mysql
La sortie sur la console doit contenir une ligne semblable à celle-ci :
Aug 17 14:32:10 db-server systemd[1]: Started MariaDB 10.5.15 database server.
-
Appuyez sur Q pour quitter l'écran d'état.
Vous avez créé des serveurs de base de données exécutés sur Compute Engine. Vous avez créé des serveurs Linux et Windows, et vous avez utilisé la CLI pour automatiser la création d'un serveur.
Si vous le souhaitez, vous pouvez noter l'atelier. Sélectionnez un nombre d'étoiles, saisissez un commentaire, puis cliquez sur Envoyer.
Voici à quoi correspond le nombre d'étoiles que vous pouvez attribuer à un atelier :
Si vous ne souhaitez pas donner votre avis, vous pouvez fermer la boîte de dialogue.
Pour soumettre des commentaires, suggestions ou corrections, veuillez accéder à l'onglet Assistance.
Copyright 2026 Google LLC Tous droits réservés. Google et le logo Google sont des marques de Google LLC. Tous les autres noms de société et de produit peuvent être des marques des sociétés auxquelles ils sont associés.


