


Before you begin
- Labs create a Google Cloud project and resources for a fixed time
- Labs have a time limit and no pause feature. If you end the lab, you'll have to restart from the beginning.
- On the top left of your screen, click Start lab to begin
In this lab, you use the OAuthV2 policy to allow apps to access the retail API proxy by providing an OAuth token.
In this lab, you learn how to perform the following tasks:
For each lab, you get a new Google Cloud project and set of resources for a fixed time at no cost.
Sign in to Google Skills using an incognito window.
Note the lab's access time (for example, 1:15:00), and make sure you can finish within that time.
There is no pause feature. You can restart if needed, but you have to start at the beginning.
When ready, click Start lab.
Note your lab credentials (Username and Password). You will use them to sign in to the Google Cloud Console.
Click Open Google Console.
Click Use another account and copy/paste credentials for this lab into the prompts. If you use other credentials, you'll receive errors or incur charges.
Accept the terms and skip the recovery resource page.
Google Cloud Shell is a virtual machine that is loaded with development tools. It offers a persistent 5GB home directory and runs on the Google Cloud.
Google Cloud Shell provides command-line access to your Google Cloud resources.
In Cloud console, on the top right toolbar, click the Open Cloud Shell button.
Click Continue.
It takes a few moments to provision and connect to the environment. When you are connected, you are already authenticated, and the project is set to your PROJECT_ID. For example:
gcloud is the command-line tool for Google Cloud. It comes pre-installed on Cloud Shell and supports tab-completion.
Output:
Example output:
Output:
Example output:
These assets have already been added to the Apigee organization:
These assets will be added to the Apigee organization as soon as the runtime is available:
The highlighted items are used during this lab.
In this task, to force callers to present an OAuth token when accessing the API, you add an OAuthV2 policy.
In the Google Cloud console, on the Navigation menu (
The Apigee console page will open.
If Apigee is not listed, search for Apigee in the top search bar and navigate to the Apigee service.
To pin Apigee in the console, click the favorite icon (
The Apigee console page will now be listed as a favorite product in the Navigation menu.
On the left navigation menu, select Proxy development > API proxies.
Select the retail-v1 proxy.
Click the Develop tab.
You are modifying the version of the retail-v1 proxy that was created during Labs 1 through 3.
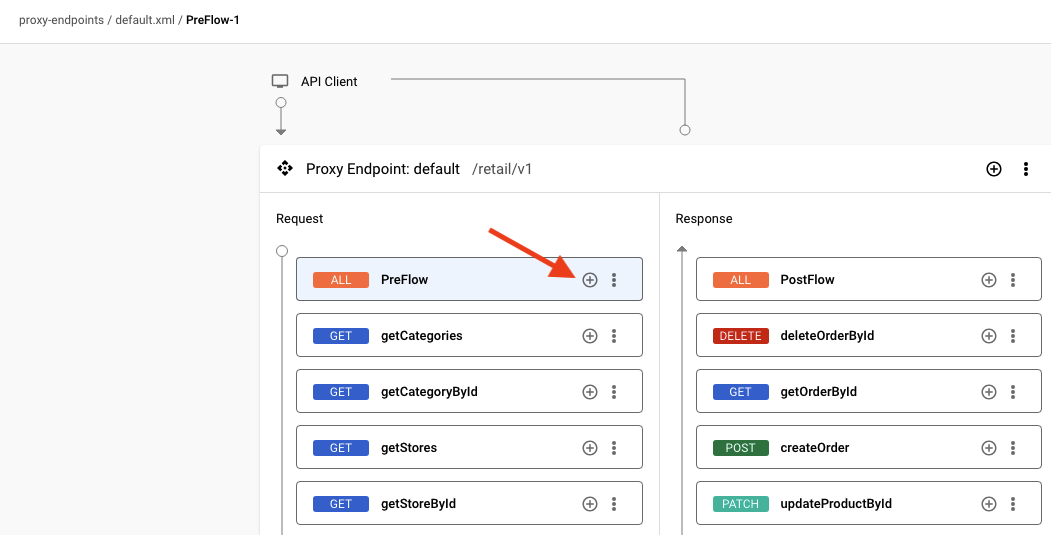
In the Navigator pane, click Proxy endpoints > default > PreFlow.
The step in that flow, the VerifyAPIKey policy named VA-VerifyKey, is graphically represented.
To detach the VA-VerifyKey policy, click Policy step actions (
On the Request PreFlow, click Add Policy Step (+).
In the Add policy step pane, select Create new policy, and then select Security > OAuth v2.0.
Specify the following values:
| Property | Value |
|---|---|
| Name | OAuthV2-VerifyToken |
| Display name | OAuthV2-VerifyToken |
Click Add.
Click on Policies > OAuthV2-VerifyToken.
The policy's default Operation is VerifyAccessToken, which is the correct operation. By default, the policy will look for the OAuth token in the standard location, which is the Authorization header. The value of the header must be:
Even though the default configuration of the policy will work, there are elements that are not used with the VerifyAccessToken operation. Make the configuration cleaner by replacing the configuration with:
To save the updates, click Save, and then click Save as New Revision.
Click Deploy.
To specify that you want the new revision deployed to the eval environment, select eval as the Environment, and then click Deploy.
Click Confirm.
You will return to this API proxy later in the lab.
In this task, you will examine the OAuth proxy that has been added to the organization.
An OAuth proxy named oauth-v1 has been added to your Apigee organization. It can be used to create OAuth access tokens for the client credentials grant type, which we will be using in this lab.
Navigate to Proxy development > API Proxies.
Select the oauth-v1 proxy, and then click the Develop tab.
Click on the POST /token cc grant flow.
The flow will be executed if:
These follow the OAuth 2.0 specification.
Click on the OAuthV2 policy OA2-Generate-Token-CC-Form in the POST /token cc grant flow.
Looking at the policy configuration, the OAuthV2 policy is using the GenerateAccessToken operation. When this policy runs, it will generate an access token for the client_credentials grant type. The token will expire in 60 minutes.
To learn more about what this implementation of the Apigee OAuthV2 policy does, you can use Gemini Cloud Assist in the Google Cloud console.
Open Gemini Cloud Assist
To open Gemini Cloud Assist, in the Google Cloud console, click Open or close Gemini Cloud Assist chat (
If prompted in the Cloud Assist panel, click Get Gemini Cloud Assist.
Optionally view the APIs that are required and recommended to be enabled.
Click Enable Gemini Cloud Assist at no cost.
Click Start chatting.
Prompt Gemini
Ensure the OA2-Generate-Token-CC-Form policy XML is open in the Apigee UI from the previous step.
For the prompt, type:
Click Send (
Read the response generated by Gemini Cloud Assist.
Optionally, click Show related content to browse the related documentation.
In this task, you use the OAuth proxy to create an OAuth token for your application.
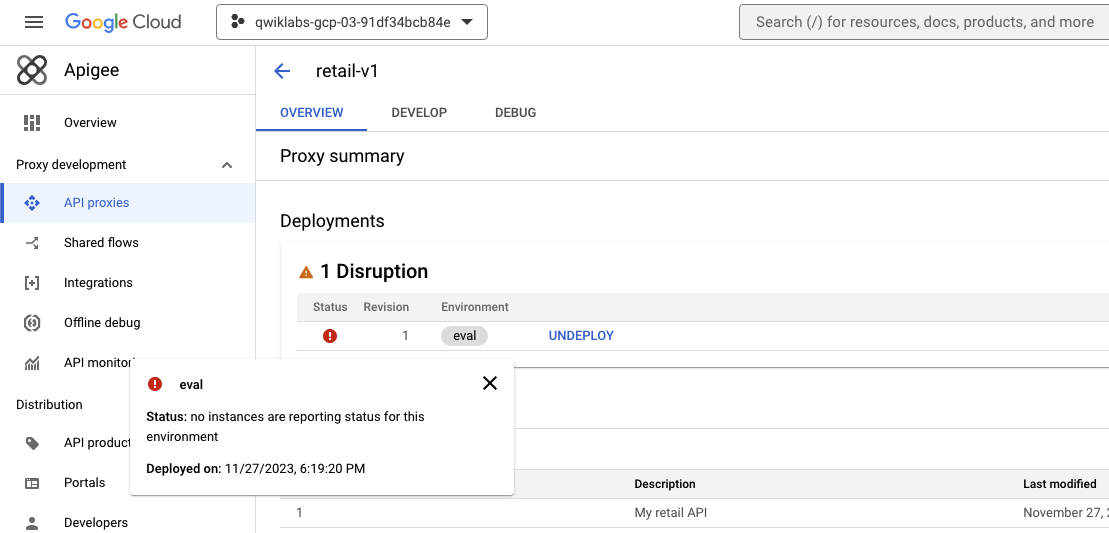
Certain assets, including API products, developers, developer apps, and KVMs, cannot be saved until the runtime is available.
For example, when navigating to the API products page, you might see an error message that reads "Products were not loaded successfully."
This is an error you should see when you are waiting for the runtime instance to be available. Once the runtime is available, refreshing the page will remove the error.
If you get this type of error, you can check the status of provisioning.
In Cloud Shell, to confirm that the runtime instance has been installed and the eval environment has been attached, run the following commands:
When the script returns ORG IS READY TO USE, you can proceed to the next steps.
The eval environment in the Apigee organization can be called using the hostname eval.example.com. The DNS entry for this hostname has been created within your project, and it resolves to the IP address of the Apigee runtime instance. This DNS entry has been created in a private zone, which means it is only visible on the internal network.
Cloud Shell does not reside on the internal network, so Cloud Shell commands cannot resolve this DNS entry. A virtual machine (VM) within your project can access the private zone DNS. A virtual machine named apigeex-test-vm was automatically created for this purpose. You can make API proxy calls from this machine.
The curl command will be used to send API requests to an API proxy. The -k option for curl tells it to skip verification of the TLS certificate. For this lab, the Apigee runtime uses a self-signed certificate. For a production environment, you should use certificates that have been created by a trusted certificate authority (CA).
In Cloud Shell, open a new tab, and then open an SSH connection to your test VM:
The first gcloud command retrieves the zone of the test VM, and the second opens the SSH connection to the VM.
If prompted, type Y to continue.
For each question asked in the Cloud Shell, click Enter or Return to specify the default input.
Your logged in identity is the owner of the project, so SSH to this machine is allowed.
Your Cloud Shell session is now running inside the VM.
Navigate to Distribution > Apps.
Select Joe's retail app.
This app is associated with the read-only retail product.
To copy the Key into the clipboard, for the Key, click Copy to clipboard (
To create a shell variable that contains the key's value, in the Cloud Shell SSH session, run the following command:
Replace the word REPLACE with the key you copied. Verify that the key matches the key in the Apigee console, and that there are no leading or trailing spaces.
To copy the Secret into the clipboard, for the Secret, click Copy to clipboard (
In the Cloud Shell SSH session, run the following command:
Replace the word REPLACE with the secret you copied. Verify that the secret matches the secret in the Apigee console, and that there are no leading or trailing spaces.
Print the saved variables to confirm that they are correct:
You should see the app's key and secret inside the parentheses and separated by a colon, with no spaces.
OAuth requires that the application's key and secret be passed in a Basic Authentication header. A Basic Auth header uses the header named Authorization, and the value is the string "Basic " followed by a Base64-encoded string. The string before Base64 encoding is the key and secret, separated by a colon (":").
You can use a command-line tool to Base64-encode the username and password string:
The base64 command encodes the string and prints it, wrapping the text at 76 columns.
To save the key and secret into the .bashrc file, run this command:
If the Cloud Shell SSH session is closed or disconnects, the APP_KEY and APP_SECRET variables will be automatically repopulated the next time you log in.
Next, you will confirm that the oauth-v1 and retail-v1 are deployed.
A proxy that is deployed and ready to take traffic will show a green status.
When a proxy is marked as deployed but the runtime is not yet available and the environment is not yet attached, you will see a yellow caution sign. Hold the pointer over the Details text to see the current status.
If the proxy is deployed and shows as green, your proxy is ready for API traffic.
If your proxy is not deployed because there are no runtime pods, you can check the status of provisioning by following these instructions.
You can check the status of provisioning by checking the Lab Startup Tasks dashboard.
When Proxies handle API traffic is complete, your proxies should be ready to take traffic.
In the Cloud Shell SSH session, execute this curl command:
The -u parameter automatically creates a Basic Auth header using the app's key and secret, and adds it to the request.
The request is POST /token, with the request body being a form parameter indicating the grant type. The Content-Type, application/x-www-form-urlencoded, indicates the content type of the request.
The fields should resemble this:
The access_token may be used to call the retail API. It will provide the permissions that are granted by the API product(s) associated with the application.
To automatically copy a token into a shell variable, use this command:
The jq command extracts the access_token value from the JSON response.
In this task, you will test the retail API, confirming that a valid OAuth token is now required to call the API.
Call the API without a token using this command:
This command returns a 401 error:
Call the API with a bad token using this command:
This command also returns a 401 error:
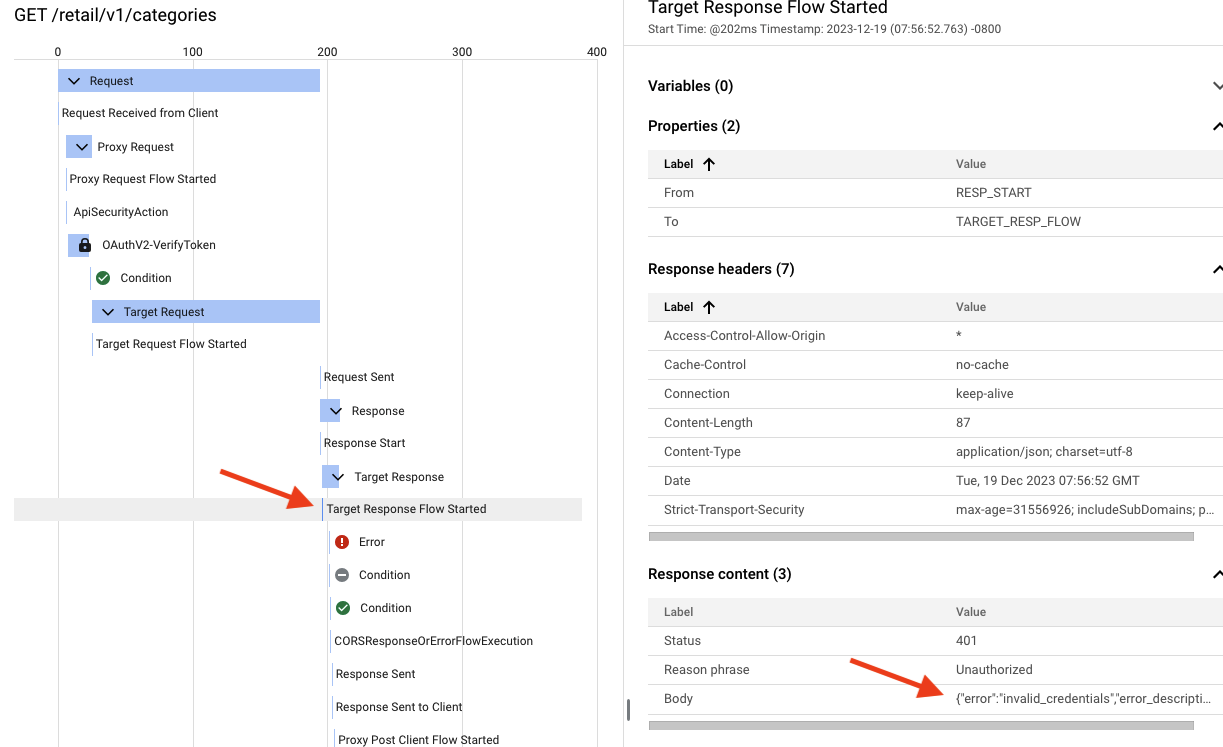
Call the API with the valid token using this command:
This command also returns a 401 error, but with a different format:
If you have correctly attached a valid token, you receive this error. Why is an error still happening, even though the token was attached correctly?
Whenever you are not sure what is happening in the API proxy, the debug tool may be used to trace an API call.
Click Proxy development > API Proxies.
Select the retail-v1 proxy, then click the Debug tab, and then click Start Debug Session.
In the Start debug session pane, on the Environment dropdown, select eval.
The deployed revision number will also show in the dropdown.
Click Start.
A debug session will last a maximum of 10 minutes or until 15 transactions are received, whichever comes first.
Debug will trace requests being sent to the API proxy.
Back in the Cloud Shell SSH session, repeat the curl command:
Use the debug tool to try to investigate what is happening. Try to determine what is happening before moving to the next task.
In this task, you determine the source of the error.
Did you understand what happened? The transaction looks like this:
The error message indicates invalid credentials. What credentials did you send to the backend?
The Authorization header was sent to the backend target in the request! By default, any headers, query parameters, and payload that are sent in a request are passed through to the target.
This API proxy requires that a caller send an OAuth token in an Authorization header to gain access to the API. As you will see in a future lab, the backend service uses the Authorization header for Basic Authentication. Even if it was using the Authorization header for OAuth, it would have no way to verify the Apigee token.
A backend service typically doesn't know details about the security added in API proxy that calls it. The backend service detected an invalid Authorization header, and therefore returned an error.
It is always a good policy to strip off any credentials that are used at the API proxy level before sending the request to the backend. In many cases, the backend might ignore the data. However, this sensitive data could be logged somewhere, or be seen by the operations team. It is recommended that you remove sensitive data from the request message after it is used and before you forward it to any external service.
You might have determined that something unusual was happening because the error format was different from the other errors you saw, but the debug tool is typically the best way to debug your proxies.
In this task, you remove the Authorization header and API key before sending the request to the target.
Click the Develop tab.
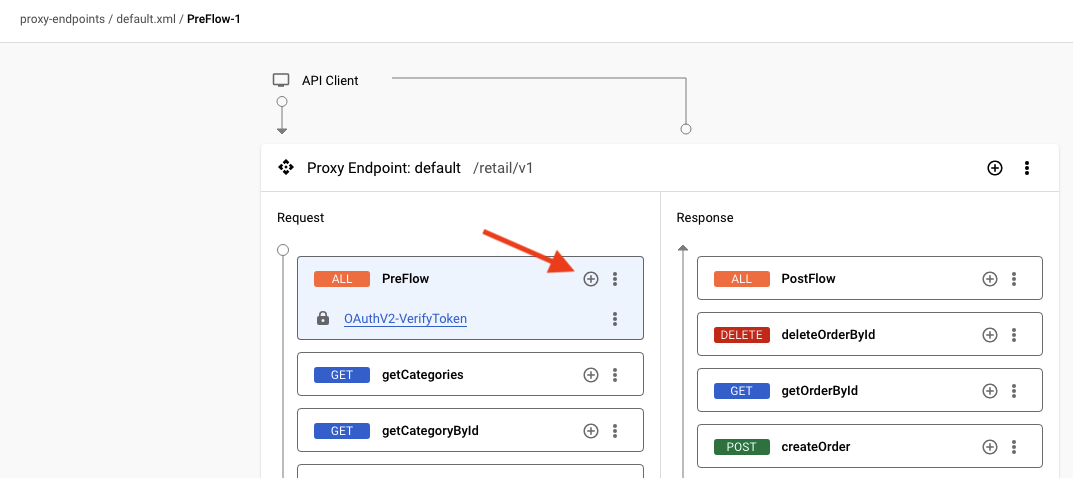
In the Navigator pane, click Proxy endpoints > default > PreFlow.
On the Request PreFlow, click Add Policy Step (+).
The policy currently in that flow, the OAuthV2 policy named OAuthV2-VerifyToken, is graphically represented.
In the Add policy step pane, select Create new policy, and then select Mediation > Assign Message.
Specify the following values:
| Property | Value |
|---|---|
| Name | AM-RemoveAuth |
| Display name | AM-RemoveAuth |
Click Add.
Click Policies > AM-RemoveAuth.
Replace the default configuration with this:
Any Authorization or apikey header will be removed when this policy executes.
To save the updates, click Save, and then click Save as New Revision.
Click Deploy.
To specify that you want the new revision deployed to the eval environment, select eval as the Environment, and then click Deploy.
Click Confirm.
Click the Overview tab.
After waiting for the change to be deployed, make the request again:
You should now see the categories in a 200 OK response.
In this lab, you learned how to use an OAuth proxy to get an access token for your app, protect your API using the OAuthV2 VerifyAccessToken operation, and how to send a token with your API.
When you have completed your lab, click End Lab. Google Skills removes the resources you’ve used and cleans the account for you.
You will be given an opportunity to rate the lab experience. Select the applicable number of stars, type a comment, and then click Submit.
The number of stars indicates the following:
You can close the dialog box if you don't want to provide feedback.
For feedback, suggestions, or corrections, please use the Support tab.
Copyright 2026 Google LLC All rights reserved. Google and the Google logo are trademarks of Google LLC. All other company and product names may be trademarks of the respective companies with which they are associated.


This content is not currently available
We will notify you via email when it becomes available

Great!
We will contact you via email if it becomes available

One lab at a time
Confirm to end all existing labs and start this one
Complete this quick step to start your lab.