


Before you begin
- Labs create a Google Cloud project and resources for a fixed time
- Labs have a time limit and no pause feature. If you end the lab, you'll have to restart from the beginning.
- On the top left of your screen, click Start lab to begin

This lab shows how to add authentication to your application using Identity Platform. This authorization identifies who you are, and determines what you can do. For more information, see Authentication Overview.
Identity Platform provides a drop-in, customizable authentication service for user sign-up and sign-in. Development and admin activities are made easier with a range of app SDKs (Android, iOS, and web) as well as admin SDKs (Node.js, Java, Python, and more). For more information about Identity Platform, see Identity Platform.
The application used in this lab is an online Quiz application. You add Identity Platform authentication, and then configure authentication to use a simple email address and password credential. Finally you ensure that users must register and log in before taking a quiz.
In this lab, you perform the following tasks:
For each lab, you get a new Google Cloud project and set of resources for a fixed time at no cost.
Make sure you signed into Google Skills using an incognito window.
Note the lab's access time (for example, 
When ready, click 
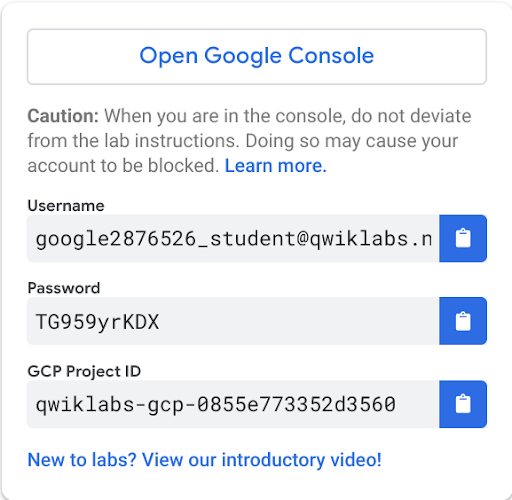
Note your lab credentials. You will use them to sign in to Google Cloud Console.
Click Open Google Console.
Click Use another account and copy/paste credentials for this lab into the prompts.
Google Cloud Shell is a virtual machine that is loaded with development tools. It offers a persistent 5GB home directory and runs on the Google Cloud.
Google Cloud Shell provides command-line access to your Google Cloud resources.
In Cloud console, on the top right toolbar, click the Open Cloud Shell button.
Click Continue.
It takes a few moments to provision and connect to the environment. When you are connected, you are already authenticated, and the project is set to your PROJECT_ID. For example:
gcloud is the command-line tool for Google Cloud. It comes pre-installed on Cloud Shell and supports tab-completion.
Output:
Example output:
Output:
Example output:
In this task, you clone, configure, and run the Quiz application.
Clone the application skeleton from a repository on GitHub.com:
Create a soft link as a shortcut to the working directory:
Navigate to the directory that contains the sample files for this lab:
Update the App Engine region using the sed command.
Configure the application:
This script file:
gs:[Project-ID]-media.GCLOUD_PROJECT and GCLOUD_BUCKET.virtualenv isolated Python environment for Python 3 and activates it.> pip install -r requirements.txt.Run the application:
 ) > Preview on port 8080 to preview the Quiz application.
Leave this window open for now, because you will need the Cloud Shell Web preview domain (which is in the form: 8080-27542cac-44d0-41a9-9e96-065800c2100c.ql-europe-west1-ctgq.cloudshell.dev) later in this lab.
In this task you examine the case study application code. You can use the shell editors that are installed on Cloud Shell, such as nano or vim or the Cloud Shell code editor.
This lab uses the Cloud Shell code editor to review the Quiz application code.
Navigate to the /firebase/start folder using the file browser panel on the left side of the code editor.
Continue navigating. Open ...quiz/webapp/static/client/. Click on the index.html file.
This file is the single page in the AngularJS Single Page Application (SPA). It contains <script></script> tags for the application libraries and code, and markup where the SPA will render dynamic output.
Select the qiq-login-template.html file in the ...quiz/webapp/static/client/app/auth/ folder.
This file contains the AngularJS template for the Login component. Notice how it contains a couple of textboxes and a button. The button has an event handler that runs code when it is clicked.
Still in this folder, select the qiq-login.js file.
This file contains an AngularJS component. It allows the user to log in to the application or to navigate to a registration page.
In this task you confirm that billing is enabled for your cloud project. Next, you configure Identity Platform to sign in a user with an email and password. You then create a user which you can use to login to the Quiz Application.
In the Google Cloud Console, on the Navigation menu (
Verify that a Billing account is linked to the project. You should see a message stating that the Billing account "Qwiklabs Production gcpd xx" is linked to this project.
In the Google Cloud Console, on the Navigation menu (
Click Enable Identity Platform.
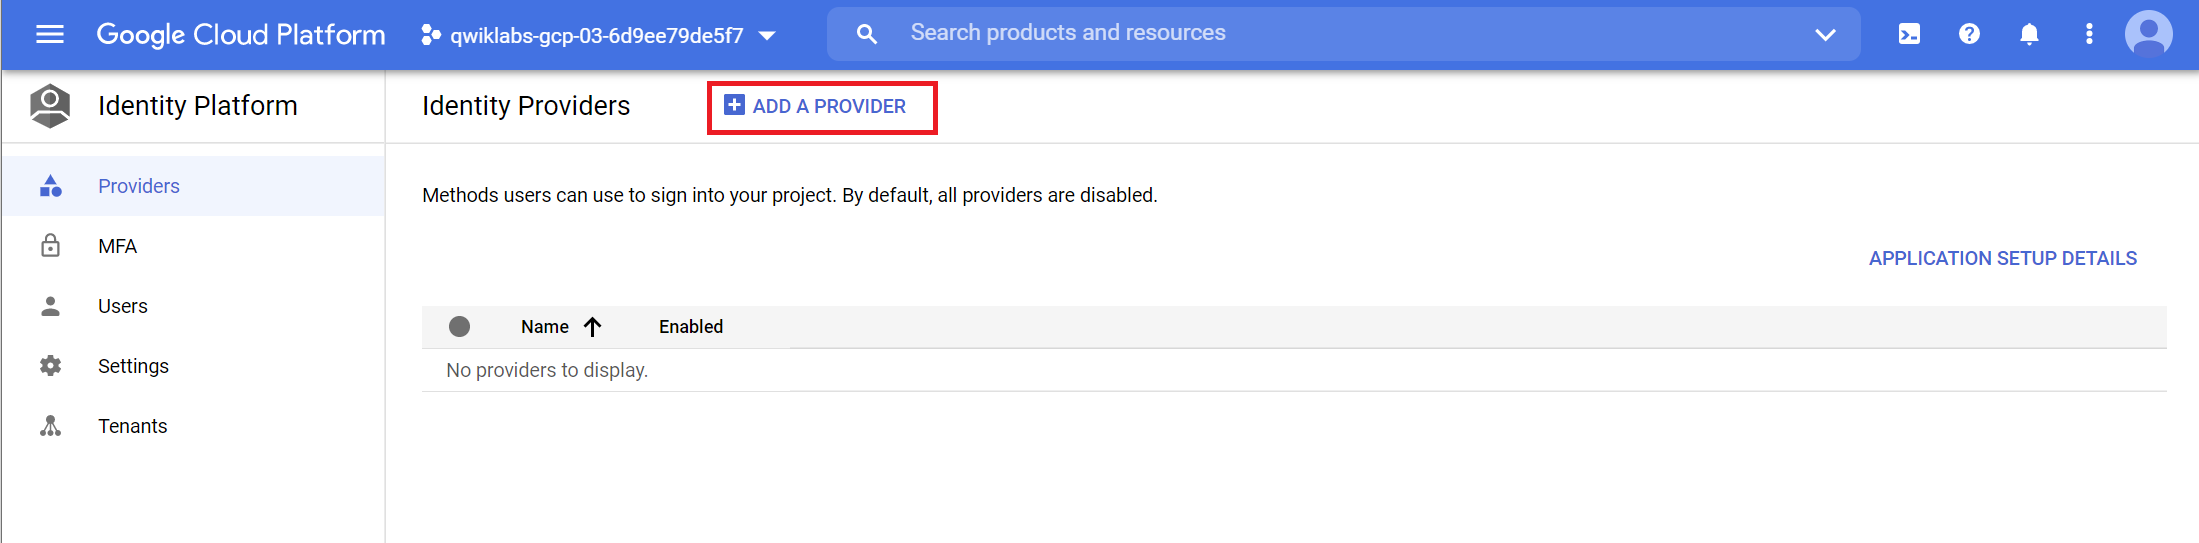
The Identity Platform page appears in the Cloud Console.
Click Add a Provider.
In the Sign-in method window, for Select a provider, select Email / Password.
Click Enabled.
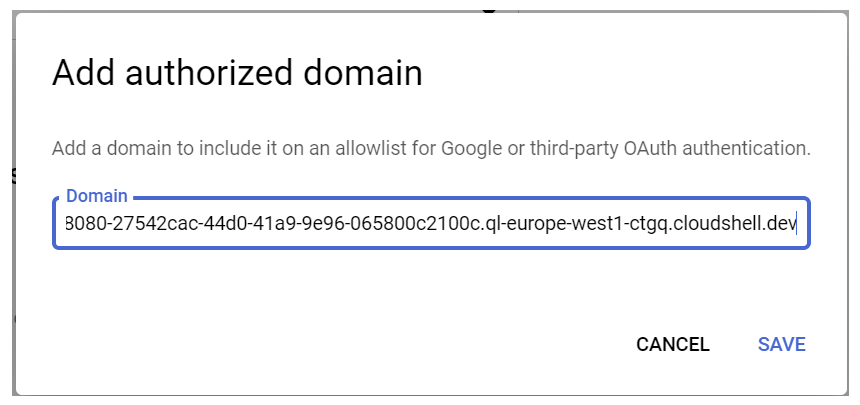
In the Authorized Domains pane, click Add Domain.
Return to the running Quiz Application and copy the domain (which has the format 8080-27542cac-44d0-41a9-9e96-065800c2100c.ql-europe-west1-ctgq.cloudshell.dev).
Paste the domain into the Domain field.
Modify the pasted domain so that only the domain name is in the Domain field.
You should remove https:// and anything that follows the domain name, including slashes. The domain name should end with cloudshell.dev.
Click Save.
In the new identity provider window click Save.
You may need to scroll down to see the Save button.
In the Identity Platform pane, click Users.
Click Add User.
In the Add user dialog box, specify the following:
|
|
user1@example.com |
|
Password |
abc123! |
Click Add.
In this task you apply the your Identity Platform configuration to your client-side web application.
In the navigation pane, click Providers.
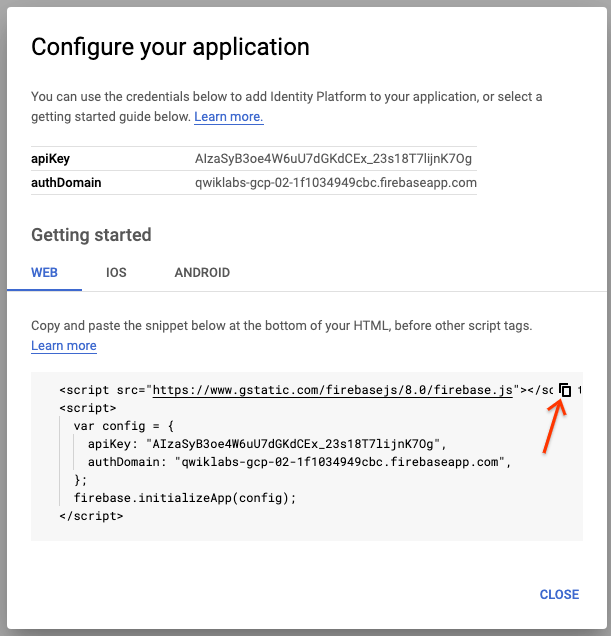
Click Application Setup Details.
In the Configure your application dialog box, copy the Identity Platform markup.
Click Close.
In the Cloud Shell code editor, open the index.html file in ...webapp/static/client/.
Paste the configuration markup just before the other <script></script> tags at the bottom of the page.
Save the index.html file.
In this task you verify that you can login to the Quiz Application using the credentials you created in Identity Platform in a previous step. You then register a new user in the Quiz Application and verify that these credentials are added to Identity Platform.
Return to the Quiz application and refresh your browser.
In the navigation bar, click Take Test.
In the navigation bar, click GCP, People, or Places.
In the navigation bar, enter the following invalid credentials:
|
|
user2@example.com |
|
Password |
abcd1234$ |
Click Login.
Enter the following credentials that you created in a previous task:
|
|
user1@example.com |
|
Password |
abc123! |
Click Login.
The user's email address should be shown in the navigation bar, and the first question will be presented.
In the navigation bar, click Logout.
Click the Register link.
In the new form, enter the following credentials:
|
|
user2@example.com |
|
Password |
abcd1234$ |
Click Register.
A complex password is required. If you have entered an acceptable password, you should be logged in and redirected to the GCP quiz.
You are able to answer questions and submit answers.
In the navigation bar, click Logout.
In the Google Cloud Console, in the Identity Platform navigation pane, click Users.
In this lab, you learned how to use Identity Platform to enable email and password registration for your application.
When you have completed your lab, click End Lab. Google Skills removes the resources you’ve used and cleans the account for you.
You will be given an opportunity to rate the lab experience. Select the applicable number of stars, type a comment, and then click Submit.
The number of stars indicates the following:
You can close the dialog box if you don't want to provide feedback.
For feedback, suggestions, or corrections, please use the Support tab.
Copyright 2026 Google LLC All rights reserved. Google and the Google logo are trademarks of Google LLC. All other company and product names may be trademarks of the respective companies with which they are associated.


This content is not currently available
We will notify you via email when it becomes available

Great!
We will contact you via email if it becomes available

One lab at a time
Confirm to end all existing labs and start this one