


Before you begin
- Labs create a Google Cloud project and resources for a fixed time
- Labs have a time limit and no pause feature. If you end the lab, you'll have to restart from the beginning.
- On the top left of your screen, click Start lab to begin
Create VPC network and instances
/ 40
Create custom ingress firewall rules
/ 30
Create a firewall rule with priority and egress firewall rule.
/ 30

In this lab, you investigate Virtual Private Cloud (VPC) networks and create firewall rules to allow and deny access to a network and instances.
You begin by creating an automatic VPC network and some VPC instances. You verify that the default-allow-ssh firewall rule is working and then compare this to the user created custom network to verify no ingress is allowed without custom firewall rules.
After deleting the default network, you use firewall rule priorities,to allow both ingress and egress of network traffic to your VMs.
In this lab, you will learn how to:
For each lab, you get a new Google Cloud project and set of resources for a fixed time at no cost.
Click the Start Lab button. If you need to pay for the lab, a pop-up opens for you to select your payment method. On the left is the Lab Details panel with the following:
Click Open Google Cloud console (or right-click and select Open Link in Incognito Window if you are running the Chrome browser).
The lab spins up resources, and then opens another tab that shows the Sign in page.
Tip: Arrange the tabs in separate windows, side-by-side.
If necessary, copy the Username below and paste it into the Sign in dialog.
You can also find the Username in the Lab Details panel.
Click Next.
Copy the Password below and paste it into the Welcome dialog.
You can also find the Password in the Lab Details panel.
Click Next.
Click through the subsequent pages:
After a few moments, the Google Cloud console opens in this tab.

Google Cloud Shell is a virtual machine that is loaded with development tools. It offers a persistent 5GB home directory and runs on the Google Cloud.
Google Cloud Shell provides command-line access to your Google Cloud resources.
In Cloud console, on the top right toolbar, click the Open Cloud Shell button.
Click Continue.
It takes a few moments to provision and connect to the environment. When you are connected, you are already authenticated, and the project is set to your PROJECT_ID. For example:
gcloud is the command-line tool for Google Cloud. It comes pre-installed on Cloud Shell and supports tab-completion.
Output:
Example output:
Output:
Example output:
In this task, you create an automatic VPC network and some initial VPC instances.
 ) to open Cloud Shell. If prompted, click Continue.
Click Check my progress to verify the objective.
In this task, you explore the default network and verify that the default-allow-ssh firewall rule is working. Later, you delete the default-vm-1 instance and default network because you no longer need it.
Return to the Cloud console and view the firewall rules.
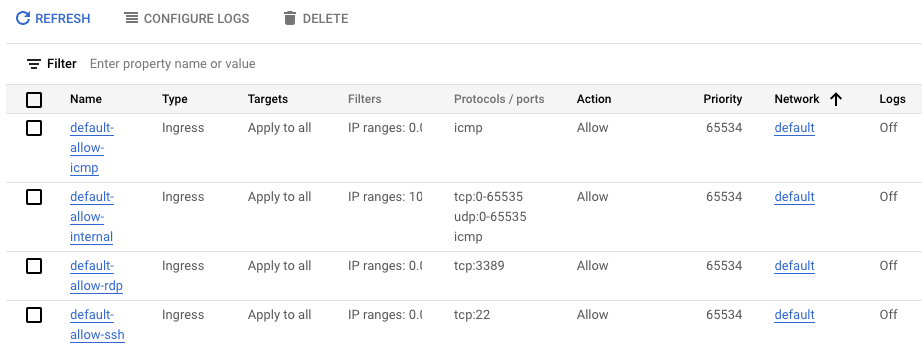
The following four default rules are created for the default network:
Remember, all networks also have the following 2 rules, which are not displayed in the console:
To check that the default-allow-ssh firewall rule is working, ssh into the default-vm-1 instance in the default network and test it.
In the Navigation menu, click Compute Engine > VM instances to display a list of VM instances.
In the row for the default-vm-1 instance, click SSH.
You should connect successfully via SSH to the instance because of the default-allow-ssh rule. You can ping www.google.com to test the egress connectivity. Press Ctrl+C to stop the ping.
Now delete the default-vm-1 instance because you no longer need it.
In the Navigation menu, click Compute Engine > VM instances, select the default-vm-1 instance and then click Delete.
In the confirmation box, click Delete.
In the Navigation menu, click VPC network > VPC networks to display the list of VPC networks in the Cloud console.
Click the default network to view the network details.
Click Delete VPC Network.
In the confirmation box, click Delete.
Wait for the network to be deleted and verify that the default network is no longer displayed on the VPC Networks page.
In this task, you explore the user-created networks to verify no ingress is allowed without custom firewall rules.
Remember, all networks have the following 2 rules (which will not be displayed in the Console) to block all incoming traffic and allow all outgoing traffic. Unlike the default network, user-created networks do not have any other rules by default, so currently no inbound traffic is allowed.
In the Navigation menu, click Compute Engine > VM instances to display a list of VM instances.
In the row for mynet-vm-1 or mynet-vm-2, click SSH.
You should NOT be able to connect via SSH to the instances.
You will now try to SSH into an instance from the Cloud Shell.
Switch back to or reopen Cloud Shell.
To try to ssh into the mynet-vm-2 instance, run the following command:
If prompted, type Y and press Enter twice to proceed.
In this task, you use Cloud Shell as your client host to test SSH connectivity to the instances. The external IP address of the Cloud Shell instance can be easily retrieved.
However, the IP address of your Cloud Shell instance can change if you close and reopen it, or if it is recycled due to inactivity. This should not be a problem during this lab. For a "real" project, you would allow the IP address of your SSH client host and there should not be a problem.
Switch back to or reopen Cloud Shell.
To retrieve the external IP address of the Cloud Shell instance, run the following commands:
Sample output (your IP will be different):
This firewall rule is also given a target tag of lab-ssh, which means it applies only to instances that are tagged with the lab-ssh tag.
It will look similar to the following, but your IP address will be different:
This firewall rule will be applied only to instances tagged with lab-ssh. It is currently not being applied to any instances.
In VPC networks, firewall rules are stateful. So for each initiated connection tracked by allow rules in one direction, the return traffic is automatically allowed, regardless of any rules.
It will take several seconds to negotiate the SSH keys, but the connection should succeed. This verifies that the firewall rule is allowing the traffic.
Type exit to log off the mynet-vm-2 instance.
To ssh into the mynet-vm-1 instance, run the following command in Cloud Shell:
This connection should also succeed because the mynet-vm-1 instance is in the same network, and the firewall rule you created is allowing access to all instances.
The ping command will not succeed. Even though the mynet-vm-1 and the mynet-vm-2 instances are in the same VPC network, all traffic is blocked by default unless there is a firewall rule allowing it.
Press Ctrl+C to stop ping if needed. Do not log out of the mynet-vm-1 instance yet.
To open a new Cloud Shell window, click Open a new tab (+).
To add a firewall rule that allows ALL instances in the mynetwork VPC to ping each other, run the following command:
Notice that the hostname mynet-vm-2 resolved to the internal IP address of the instance. The internal IP will start with 10.132.0 (for example, 10.132.0.2). Google Cloud resolves internal hostnames for you.
Press Ctrl+C to stop ping.
You can also try pinging the internal IP address directly and that will also work. Press Ctrl+C to stop ping.
To locate the external IP address of mynet-vm-2, on the Navigation menu, click Compute Engine > VM instances.
Click on mynet-vm-2, locate and copy the external IP address of the instance.
From the Cloud Shell session that is connected to mynet-vm-1, try to ping the external IP address of the mynet-vm-2 instance:
This should NOT work. When you ping the external IP address, the connection goes through the internet gateway, which causes the request to be NATed. The request is now coming from the external IP address of the mynet-vm-1 instance. The firewall rule is to only allow ICMP requests that come from internal IP addresses.
Click Check my progress to verify the objective.
In this task, you set the firewall rule priority to deny ICMP traffic. You then verify that any traffic that does not match the rule priority is denied.
So far, all the rules created have been ingress allow rules, so the priority has not been important. Firewall rules can be both allow and deny, can specify ingress and egress, and have a priority from 0 to 65,535. If you do not set a priority, the default is 1,000. Rules are evaluated based on priority, starting from the lowest value. The first rule that matches gets applied.
qwiklabs@mynet-vm-1:~$.If not connected, use the following command to reconnect:
Press Ctrl+C to stop ping.
Switch to your second Cloud Shell window (or open a new one).
In the second Cloud Shell, create a firewall ingress rule to deny ICMP traffic from any IP with a priority of 500:
It should no longer work. This new rule has a priority of 500, where the allow rule is 1,000.
Now change the deny rule to a priority of 2,000.
2000:This time it will work because the deny rule has a lower priority, so the allow rule is the first matching rule.
In this task, you create an egress firewall rule and set the priority to 10,000. You then verify that both ingress and egress rule allow that traffic.
Currently, the VMs are still able to ping each other because the rule that denies ICMP has a higher priority than the allow ICMP rule.
Now try an egress rule.
10000:Notice that the egress rule priority is set to 10,000, which is much higher than the rules created earlier.
It should no longer work. Even though the egress rule has a much higher priority of 10,000, it is still blocking traffic. This is because for traffic to be allowed, there must be both an ingress and egress rule allowing that traffic. The priority of ingress rules does not affect the priority of egress rules.
Click Check my progress to verify the objective.
In this lab, you did the following:
When you have completed your lab, click End Lab. Google Skills removes the resources you’ve used and cleans the account for you.
You will be given an opportunity to rate the lab experience. Select the applicable number of stars, type a comment, and then click Submit.
The number of stars indicates the following:
You can close the dialog box if you don't want to provide feedback.
For feedback, suggestions, or corrections, please use the Support tab.
Copyright 2026 Google LLC All rights reserved. Google and the Google logo are trademarks of Google LLC. All other company and product names may be trademarks of the respective companies with which they are associated.


This content is not currently available
We will notify you via email when it becomes available

Great!
We will contact you via email if it becomes available

One lab at a time
Confirm to end all existing labs and start this one