Übersicht
In diesem Lab lernen Sie die Weboberfläche von Google Cloud kennen. Sie bietet zwei integrierte Umgebungen:
- die Google Cloud Console, die grafische Benutzeroberfläche
- die Cloud Shell, die Befehlszeile mit vorinstallierten Google Cloud CLI-Befehlen
In diesem Kurs verwenden Sie beide Umgebungen.
Wichtige Hinweise zur Google Cloud Console:
- Die Google Cloud Console wird ständig weiterentwickelt, daher ändert sich gelegentlich das grafische Layout. Dies passiert meist, um neue Google Cloud-Funktionen oder Änderungen in der Technologie zu berücksichtigen, und kann dazu führen, dass sich der Workflow leicht verändert.
- Sie können die meisten gängigen Google Cloud-Aktionen in der Google Cloud Console ausführen. Manchmal werden neue Funktionen zuerst in der Google Cloud CLI implementiert, bevor sie in der Google Cloud Console zur Verfügung gestellt werden.
- Mit der Google Cloud Console lassen sich manche Vorgänge äußerst schnell durchführen. Mehrere Aktionen, für die sonst unter Umständen viele CLI-Befehle eingegeben werden müssten, können mit der Google Cloud Console zusammengefasst werden.
- Die Befehle in der Google Cloud CLI sind nützliche Tools für automatisierte Abläufe.
Ziele
Aufgaben in diesem Lab:
- Auf die Google Cloud Console und Cloud Shell zugreifen
- Mit der Google Cloud Console vertraut machen
- Die Cloud Shell-Funktionen einschließlich des Cloud Shell-Editors kennenlernen
- Buckets und VMs mit der Google Cloud Console und Cloud Shell erstellen
- IAM-Berechtigungen konfigurieren
- Weitere Befehle in Cloud Shell ausführen
Lab einrichten
Auf Ihr Lab zugreifen
Für jedes Lab werden Ihnen ein neues Google Cloud-Projekt und die entsprechenden Ressourcen für eine bestimmte Zeit kostenlos zur Verfügung gestellt.
-
Klicken Sie auf Lab starten. Wenn Sie für das Lab bezahlen müssen, wird ein Pop-up-Fenster geöffnet, in dem Sie Ihre Zahlungsmethode auswählen können.
Auf der linken Seite befindet sich der Bereich Details zum Lab mit diesen Informationen:
- Schaltfläche Google Cloud Console öffnen
- Restzeit
- Temporäre Anmeldedaten für das Lab
- Ggf. weitere Informationen für dieses Lab
-
Klicken Sie auf Google Cloud Console öffnen (oder klicken Sie mit der rechten Maustaste und wählen Sie Link in Inkognitofenster öffnen aus, wenn Sie Chrome verwenden).
Im Lab werden Ressourcen aktiviert. Anschließend wird ein weiterer Tab mit der Seite Anmelden geöffnet.
Tipp: Ordnen Sie die Tabs nebeneinander in separaten Fenstern an.
Hinweis: Wird das Dialogfeld Konto auswählen angezeigt, klicken Sie auf Anderes Konto verwenden.
-
Kopieren Sie bei Bedarf den folgenden Nutzernamen und fügen Sie ihn in das Dialogfeld Anmelden ein.
{{{user_0.username | "Username"}}}
Sie finden den Nutzernamen auch im Bereich Details zum Lab.
-
Klicken Sie auf Weiter.
-
Kopieren Sie das folgende Passwort und fügen Sie es in das Dialogfeld Willkommen ein.
{{{user_0.password | "Password"}}}
Sie finden das Passwort auch im Bereich Details zum Lab.
-
Klicken Sie auf Weiter.
Wichtig: Sie müssen die für das Lab bereitgestellten Anmeldedaten verwenden. Nutzen Sie nicht die Anmeldedaten Ihres Google Cloud-Kontos.
Hinweis: Wenn Sie Ihr eigenes Google Cloud-Konto für dieses Lab nutzen, können zusätzliche Kosten anfallen.
-
Klicken Sie sich durch die nachfolgenden Seiten:
- Akzeptieren Sie die Nutzungsbedingungen.
- Fügen Sie keine Wiederherstellungsoptionen oder Zwei-Faktor-Authentifizierung hinzu (da dies nur ein temporäres Konto ist).
- Melden Sie sich nicht für kostenlose Testversionen an.
Nach wenigen Augenblicken wird die Google Cloud Console in diesem Tab geöffnet.
Hinweis: Wenn Sie eine Liste der Google Cloud-Produkte und ‑Dienste aufrufen möchten, klicken Sie oben links auf das Navigationsmenü oder geben Sie den Namen des Produkts oder Dienstes in das Feld Suchen ein.

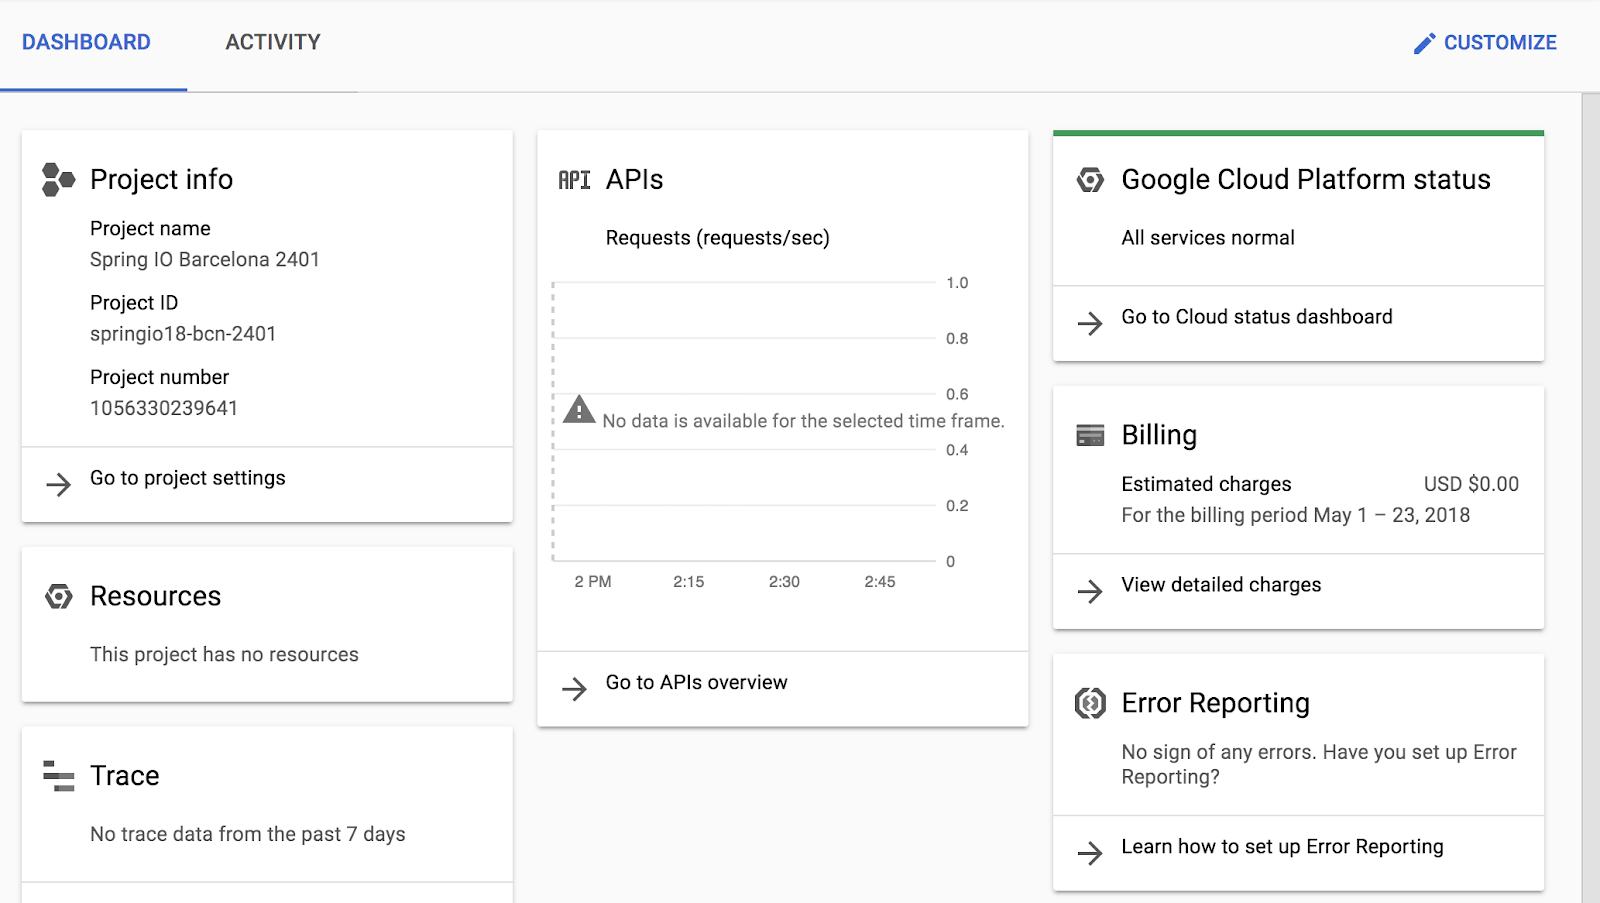
Sobald Sie sich angemeldet haben, sehen Sie das Projekt-Dashboard.
Aufgabe 1: Google Cloud Console entdecken
Im Rahmen dieser Aufgabe machen Sie sich mit der Google Cloud Console-Oberfläche vertraut. Sie lernen, wie Sie zu verschiedenen Diensten gelangen und wichtige Details über eine aktive virtuelle Maschine (VM) erfahren.
VM-Instanz erstellen
Google Compute Engine bietet virtuelle Maschinen, die in den Rechenzentren und im Network as a Service von Google ausgeführt werden. In der Architektur von Google Kubernetes Engine ist Compute Engine eine wichtige Komponente. Daher ist es sinnvoll, dass Sie zuerst etwas mehr über Compute Engine erfahren, bevor Sie sich mit Google Kubernetes Engine vertraut machen.
- Klicken Sie im Navigationsmenü (
 ) auf Compute Engine > VM-Instanzen.
- Klicken Sie auf Instanz erstellen.
- Geben Sie bei Name den Namen first-vm für Ihre Instanz ein.
- Wählen Sie unter Region die Option aus.
- Wählen Sie bei Zone die Option aus.
- Sehen Sie sich nun die Optionen unter Maschinentyp an.
Hinweis: Im Menü „Maschinentyp“ sind die Zahl der virtuellen CPUs, die Größe des Arbeitsspeichers und ein symbolischer Name wie e2-medium aufgeführt. Der Name ist der Parameter, mit dem Sie den Maschinentyp bestimmen, wenn Sie eine virtuelle Maschine mit dem gcloud-Befehl erstellen. Rechts neben Region, Zone und Maschinentyp sind die geschätzten Kosten pro Monat angegeben.
- Eine Übersicht der geschätzten Kosten finden Sie rechts neben der Liste Maschinentyp unter Monatliche Schätzung.
- Klicken Sie unter Maschinentyp auf Standard > e2-standard-2.
Wie haben sich die Kosten verändert?
- Klicken Sie unter Maschinentyp auf Mit gemeinsam genutztem Kern > e2-micro aus.
Das ist eine kostengünstige VM mit gemeinsam genutztem Kern.
- Klicken Sie im linken Bereich auf Netzwerk und wählen Sie für Firewall die Option HTTP-Traffic zulassen aus.
- Lassen Sie alle anderen Einstellungen unverändert und klicken Sie auf Erstellen.
Warten Sie, bis die neue virtuelle Maschine erstellt wurde.
Details der VM ansehen
- Klicken Sie auf der ersten Seite der VM-Instanzen auf den Namen Ihrer VM, first-vm.
- Sehen Sie sich in der Maschinenkonfiguration den Wert der CPU-Plattform an.
- Klicken Sie oben auf das Stiftsymbol, um die Instanz
first-vm zu bearbeiten.
Hinweis: Der Maschinentyp, die CPU-Plattform und die Zone einer laufenden Google Cloud-VM können nicht geändert werden. Sie können Netzwerk-Tags einfügen und bestimmten Traffic aus dem Internet durch die Firewalls zulassen. Einige Eigenschaften sind integraler Bestandteil einer VM und werden bei der Erstellung festgelegt. Sie können nicht geändert werden. Andere Attribute können dagegen bearbeitet werden. Beispielsweise können Sie Laufwerke hinzufügen und festlegen, ob das Bootlaufwerk beim Löschen der VM-Instanz ebenfalls gelöscht werden soll.
-
Scrollen Sie nach unten zum Abschnitt Verwaltung und prüfen Sie die Parameter Bei Hostwartung und Automatischer Neustart.
-
Klicken Sie auf Abbrechen.
IAM-Dienstkonto erstellen
Ein IAM-Dienstkonto ist eine spezielle Art von Google-Konto, das nicht zu einem einzelnen Endnutzer, sondern zu einer Anwendung oder einer virtuellen Maschine gehört.
- Klicken Sie im Navigationsmenü auf IAM und Verwaltung > Dienstkonten.
- Klicken Sie auf + Dienstkonto erstellen.
- Geben Sie auf der Seite Dienstkontodetails bei Name des Dienstkontos die Bezeichnung
test-service-account ein.
- Klicken Sie auf Erstellen und fortfahren.
- Legen Sie auf der Seite Diesem Dienstkonto Zugriff auf das Projekt erteilen als Rolle Basic > Editor fest.
- Klicken Sie auf Weiter.
- Klicken Sie auf Fertig.
Prüfen Sie, ob das Testkonto test-service-account@qwiklabs-gpc-xx-xxxxxxxxxxx.gserviceaccount.com aufgeführt ist.
Klicken Sie auf Fortschritt prüfen.
Erstellen Sie eine VM-Instanz mit den erforderlichen Firewallregeln und ein IAM-Dienstkonto.
Aufgabe 2: Cloud Shell entdecken
Im Rahmen dieser Aufgabe aktivieren Sie Cloud Shell, eine vorkonfigurierte Befehlszeilenumgebung. Sie stellen sicher, dass sie automatisch authentifiziert wird und einsatzbereit ist.
Cloud Shell bietet Ihnen eine Befehlszeile, mit der Sie direkt von Ihrem Browser aus auf Ihre Cloud-Ressourcen zugreifen können. Mit der Cloud Shell sind Google Cloud CLI-Befehlszeilentools wie gcloud immer verfügbar, auf dem neuesten Stand und vollständig authentifiziert.
Cloud Shell bietet folgende Features und Funktionen:
- Temporäre Compute Engine-VM
- Befehlszeilenzugriff auf die Instanz über einen Browser
- 5 GB nichtflüchtiger Speicher (
$HOME dir)
- Vorinstallierte Google Cloud CLI und andere Tools
-
gcloud: zum Arbeiten mit Compute Engine, Google Kubernetes Engine (GKE) und vielen Google Cloud-Diensten
-
gcloud storage und gsutil: zum Arbeiten mit Cloud Storage
-
kubectl: zum Arbeiten mit GKE und Kubernetes
-
bq: zum Arbeiten mit BigQuery
- Sprachunterstützung für Java, Go, Python, Node.js, PHP und Ruby
- Webvorschau
- Integrierte Autorisierung für den Zugriff auf Ressourcen und Instanzen
Nach einer Stunde Inaktivität wird die Cloud Shell-Instanz recycelt. Nur das /home-Verzeichnis bleibt bestehen. Sämtliche Änderungen an der Systemkonfiguration, einschließlich Umgebungsvariablen, gehen zwischen Sitzungen verloren.
Cloud Shell öffnen und Funktionen entdecken
- Klicken Sie in der Titelleiste der Google Cloud Console auf Cloud Shell aktivieren (
 ).
).
- Klicken Sie auf Weiter, wenn Sie dazu aufgefordert werden. Wenn Sie dazu aufgefordert werden, klicken Sie auf Autorisieren.
Cloud Shell wird unten im Fenster der Google Cloud Console geöffnet.
Ganz rechts in der Cloud Shell-Symbolleiste gibt es folgende Symbole:
-
Ausblenden/Wiederherstellen: Mit dem Symbol wird das Fenster ausgeblendet und wiederhergestellt, sodass Sie vollen Zugriff auf die Google Cloud Console haben, ohne Cloud Shell zu schließen.
-
In neuem Fenster öffnen: Wenn Sie einzelne Befehle eingeben, ist es nützlich, Cloud Shell unten in der Google Cloud Console zu haben. Wenn Sie aber Dateien bearbeiten oder die gesamte Ausgabe eines Befehls sehen möchten, können Sie sich das Cloud Shell-Terminalfenster mit diesem Symbol auch in voller Größe anzeigen lassen.
-
Alle Tabs schließen: Mit diesem Symbol wird Cloud Shell geschlossen. Bei jedem Schließen von Cloud Shell wird die virtuelle Maschine recycelt und der komplette Maschinenkontext geht verloren. Die Daten, die Sie im Basisverzeichnis gespeichert haben, bleiben jedoch für die nächste Cloud Shell-Sitzung erhalten.
Mit Cloud Shell die auf dem System gespeicherten Anmeldedaten auflisten
Verwenden Sie in Cloud Shell den folgenden Befehl, um die Konten aufzulisten, deren Anmeldedaten im System gespeichert sind.
- Führen Sie den folgenden Befehl aus, um die aktiven Konten aufzulisten:
gcloud auth list
- Prüfen Sie, ob in der Ausgabe Ihre E‑Mail-Adresse für das Lab als aktives Konto angezeigt wird.
Projekt prüfen
Cloud Shell legt Ihre Umgebung auch automatisch auf die aktuelle Projekt-ID fest.
- Führen Sie den folgenden Befehl aus, um die Projektkonfiguration zu prüfen:
gcloud config list project
-
Prüfen Sie, ob die Ausgabe mit der Projekt-ID übereinstimmt, die im Bereich mit den Verbindungsdetails des Labs angezeigt wird.
-
Führen Sie den folgenden Befehl aus, um die Google Cloud-Projekt-ID auszugeben, die der aktuellen Cloud Shell-Sitzung zugeordnet ist:
echo $DEVSHELL_PROJECT_ID
Mit dieser Variablen können Sie Scripts ausführen, ohne die Projekt-ID jedes Mal manuell eingeben zu müssen.
- Führen Sie den folgenden Befehl aus, um Ihr aktuelles Verzeichnis zu prüfen:
pwd
Ihr Teilnehmerverzeichnis wird angezeigt.
- Führen Sie den folgenden Befehl aus, um Hilfe zu dem Befehl zu erhalten, den Sie in der nächsten Aufgabe verwenden werden:
gcloud storage buckets create --help
Verwenden Sie die Pfeiltasten oder drücken Sie die Eingabetaste, um weitere Informationen zu erhalten.
- Drücken Sie zum Beenden Strg + C.
Aufgabe 3: Cloud Storage-Buckets erstellen
Im Rahmen dieser Aufgabe erstellen Sie Cloud Storage-Buckets und verwalten Objekte sowohl mit der Cloud Console (GUI) als auch mit Cloud Shell (CLI). Sie erstellen Buckets, kopieren eine Datei zwischen ihnen über die Befehlszeile und prüfen die Änderungen in der Console. Abschließend konfigurieren Sie IAM-Berechtigungen (Identity and Access Management), um einen Bucket öffentlich zugänglich zu machen und Ihre Datei über einen Webbrowser aufzurufen.
Dies zeigt, dass Sie unabhängig davon, welches Tool Sie verwenden, mit denselben Google Cloud-Ressourcen interagieren.
-
Wählen Sie in der Google Cloud Console im Navigationsmenü () die Option Cloud Storage > Buckets aus.
-
Klicken Sie auf Bucket erstellen.
-
Geben Sie unter Name -bucket1 ein.
Hinweis: Bucket-Namen dürfen nicht nur in Ihrem Projekt, sondern in der gesamten Google Cloud-Umgebung nur einmal vorkommen. In unserem Lab verwenden wir die Projekt-ID als Präfix. Dies ist jedoch aus Sicherheitsgründen nicht empfehlenswert, da das Vorhandensein eines Buckets von allen überprüft werden kann. Daher sollten idealerweise keine IDs von Nutzenden, E‑Mail-Adressen, Projektnamen, Projektnummern oder personenidentifizierbaren Informationen in Bucket-Namen verwendet werden.
-
Klicken Sie auf Weiter.
-
Wählen Sie als Standorttyp die Option Region und dann aus dem Drop-down-Menü aus.
-
Klicken Sie auf Weiter.
-
Übernehmen Sie unter Art der Datenspeicherung auswählen die Standardeinstellungen und klicken Sie auf Weiter.
-
Entfernen Sie unter Legen Sie fest, wie der Zugriff auf Objekte gesteuert wird das Häkchen bei Verhinderung des öffentlichen Zugriffs für diesen Bucket erzwingen.
-
Achten Sie darauf, dass im Abschnitt Zugriffssteuerung die Option Einheitlich ausgewählt ist.
-
Klicken Sie auf Weiter und dann auf Erstellen.
Sie haben jetzt einen Storage-Bucket über die grafische Benutzeroberfläche erstellt.
Hinweis: In der Google Cloud Console gibt es ein Symbol für Benachrichtigungen ( ). Dort werden manchmal Rückmeldungen der im Hintergrund ausgeführten Befehle angezeigt. Wenn Sie auf das Benachrichtigungssymbol klicken, sehen Sie zusätzliche Informationen und einen Verlauf.
Bucket in Cloud Shell prüfen
Jetzt verwenden Sie Cloud Shell, um zu prüfen, dass der Bucket vorhanden ist.
-
Kehren Sie zum Cloud Shell-Terminalfenster zurück.
-
Führen Sie den folgenden Befehl aus, um die Storage-Buckets in Ihrem Projekt aufzulisten:
gcloud storage buckets list
- Es sollte nun der Name des Buckets zu sehen sein, den Sie gerade erstellt haben: -bucket1.
Einen Bucket mit Cloud Shell erstellen
Als Nächstes führen Sie dieselbe Aktion aus, nämlich einen Bucket erstellen, aber über die Befehlszeile.
- Erstellen Sie in Cloud Shell mit dem Befehl
gcloud storage einen Bucket:
gcloud storage buckets create gs://{{{project_0.project_id | Project ID}}}-bucket2 --location={{{project_0.default_region | REGION}}}
- Führen Sie den folgenden Befehl aus, um zu prüfen, ob Sie beide Storage-Buckets in Ihrem Projekt sehen:
gcloud storage buckets list
Datei in den Cloud Storage-Bucket kopieren
- Kopieren Sie ein Katzenbild aus einem von Google bereitgestellten Cloud Storage-Bucket in Cloud Shell:
gcloud storage cp gs://cloud-training/ak8s/cat.jpg cat.jpg
- Kopieren Sie die Datei in den ersten Bucket, den Sie zuvor erstellt haben:
gcloud storage cp cat.jpg gs://{{{project_0.project_id | Project ID}}}-bucket1
- Kopieren Sie die Datei aus dem ersten Bucket in den zweiten Bucket:
gcloud storage cp gs://{{{project_0.project_id | Project ID}}}-bucket1/cat.jpg gs://{{{project_0.project_id | Project ID}}}-bucket2/cat.jpg
- Klicken Sie in der Google Cloud Console im Navigationsmenü() auf Cloud Storage > Buckets, wählen Sie die beiden erstellten Buckets aus und prüfen Sie, ob die Datei
cat.jpg in beiden enthalten ist.
Hinweis: Möglicherweise müssen Sie auf Aktualisieren klicken, um den zweiten Bucket zu sehen.
-
Wählen Sie den ersten Storage-Bucket aus, den Sie erstellt haben: -bucket1. Sie sehen, dass für die Datei cat.jpg kein Öffentlicher Zugriff angezeigt wird.
-
Klicken Sie auf den Tab Berechtigungen.
-
Klicken Sie unter Nach Hauptkonten ansehen auf Zugriff gewähren.
-
Geben Sie unter Neue Hauptkonten den Wert allUsers ein.
-
Geben Sie im Feld Rolle auswählen unter „Rollen zuweisen“ den Text Storage Object Viewer ein und wählen Sie Storage Object Viewer aus.
-
Klicken Sie auf Speichern.
-
Klicken Sie im Dialogfeld „Möchten Sie diese Ressource wirklich öffentlich zur Verfügung stellen?“ auf Öffentlichen Zugriff erlauben.
-
Klicken Sie auf Zurück zur übergeordneten Seite, um zum Hauptbildschirm zurückzukehren.
-
Wählen Sie den ersten Storage-Bucket aus, den Sie erstellt haben: -bucket1.
-
Prüfen Sie, ob der öffentliche Zugriff für den Bucket jetzt als Zugriff für öffentliche Hauptkonten gewährt angezeigt wird.
-
Klicken Sie auf URL kopieren, um den Link zum Katzenbild zu kopieren.
-
Öffnen Sie einen neuen Inkognito-Browsertab und fügen Sie den Link in die Adressleiste ein. Das Katzenbild wird angezeigt. Lassen Sie den Tab geöffnet.
Klicken Sie auf Fortschritt prüfen.
Cloud Storage-Buckets erstellen
Aufgabe 4: Cloud Shell-Editor kennenlernen
In dieser Aufgabe arbeiten Sie mit dem Cloud Shell-Code-Editor.
Cloud Shell-Editor öffnen
-
Klicken Sie in Cloud Shell auf das Symbol Editor öffnen ( ).
).
-
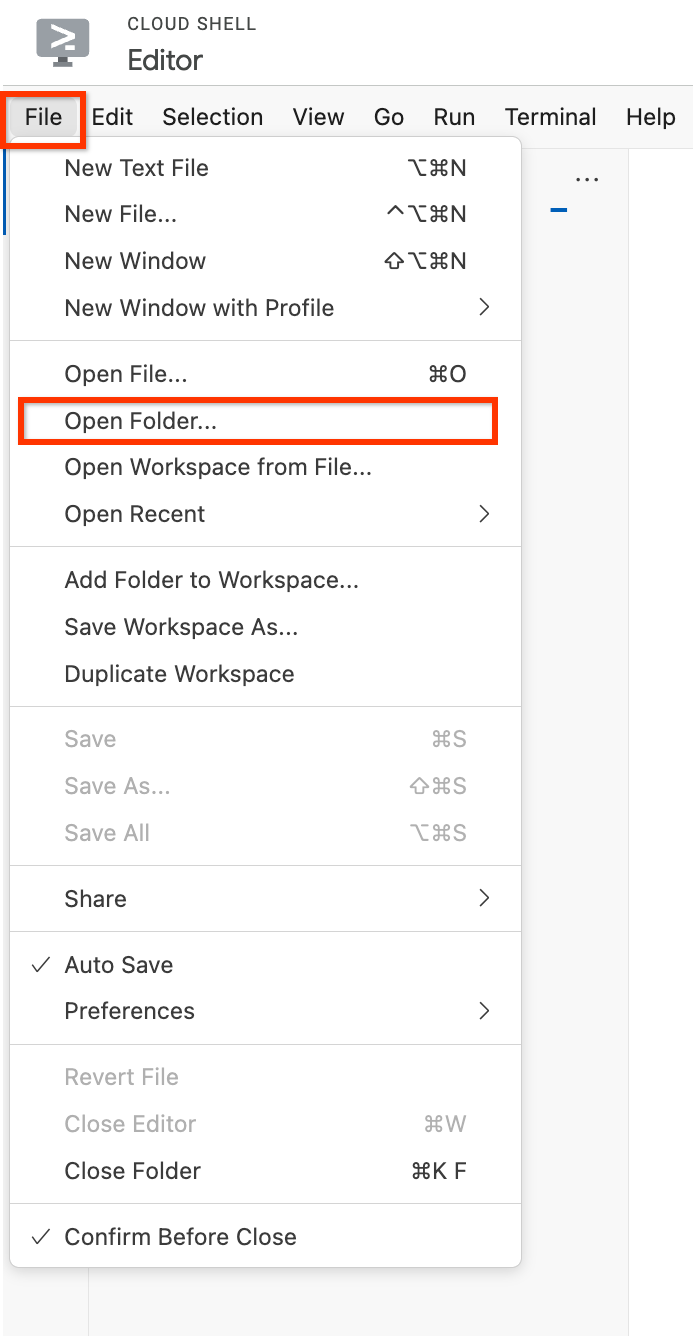
Klicken Sie im Cloud Shell-Editor auf Datei > Ordner öffnen.
- Klicken Sie auf Ok.
Der Ordner wird geöffnet und im linken Bereich wird eine Liste mit Dateien und Verzeichnissen angezeigt.
- Klicken Sie auf Terminal öffnen und geben Sie in Cloud Shell den folgenden Befehl ein, um ein
git-Repository zu klonen:
git clone https://github.com/googlecodelabs/orchestrate-with-kubernetes.git
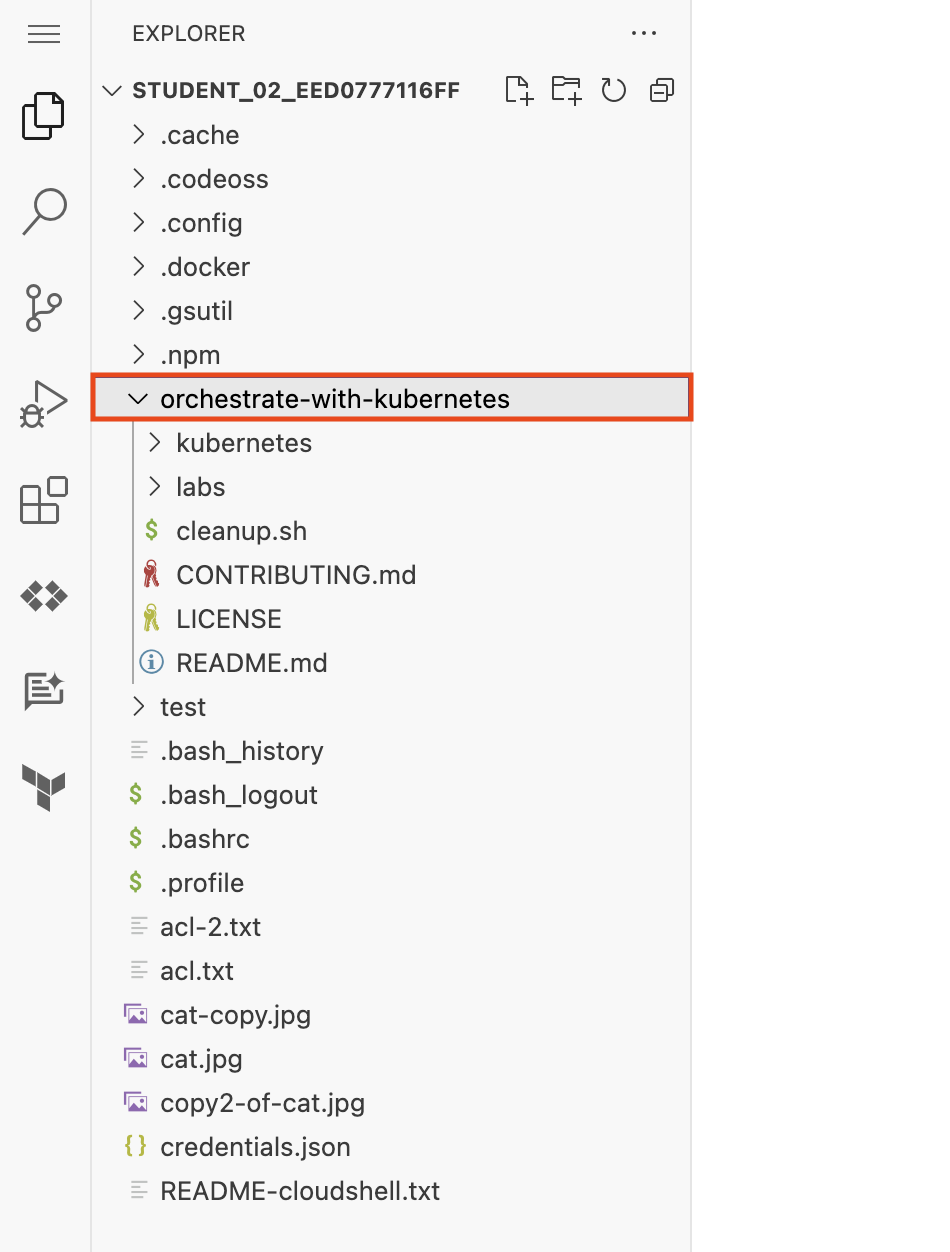
Im linken Bereich des Cloud Shell-Editorfensters wird der Ordner orchestrate-with-kubernetes angezeigt.
- Führen Sie in Cloud Shell folgenden Befehl aus, um ein Testverzeichnis zu erstellen:
mkdir test
Jetzt wird links im Cloud Shell-Editorfenster der Ordner test angezeigt.
- Klicken Sie im Cloud Shell-Editor links neben
orchestrate-with-kubernetes auf den Pfeil, um den Ordner zu maximieren.
-
Klicken Sie im linken Bereich auf die Datei cleanup.sh, um sie im rechten Bereich des Cloud Shell-Editorfensters zu öffnen.
-
Fügen Sie den folgenden Text als letzte Zeile in die Datei cleanup.sh ein:
echo Finished cleanup!
Hinweis: Ihre Arbeit wird automatisch gespeichert.
- Führen Sie in Cloud Shell die folgenden Befehle aus, um das Verzeichnis zu wechseln und sich den Inhalt von
cleanup.sh anzeigen zu lassen:
cd orchestrate-with-kubernetes
cat cleanup.sh
-
Sehen Sie nach, ob cat cleanup.sh die Textzeile enthält, die Sie eben eingefügt haben.
-
Klicken Sie im Cloud Shell-Code-Editor mit der rechten Maustaste auf den Ordner orchestrate-with-kubernetes und wählen Sie Neue Datei aus.
Hinweis: Wenn Sie in einem Pop-up-Fenster aufgefordert werden, „auf in die Zwischenablage kopierten Text und Bilder zuzugreifen“, klicken Sie auf Zulassen.
-
Nennen Sie die Datei index.html.
-
Klicken Sie auf Speichern.
-
Fügen Sie im rechten Bereich des Editorfensters folgenden HTML-Text ein:
<html><head><title>Cat</title></head>
<body>
<h1>Cat</h1>
<img src="REPLACE_WITH_CAT_URL">
</body></html>
Hinweis: Verwenden Sie zum Einfügen die Tastenkombination Ihres Computers: „Cmd + V“ für einen Mac, „Strg + V“ für einen Windows- oder Linux-Computer.
- Ersetzen Sie den String
REPLACE_WITH_CAT_URL durch die URL des Katzenbildes aus der vorherigen Aufgabe. Die URL sieht so aus:
https://storage.googleapis.com/qwiklabs-Google Cloud-1aeffbc5d0acb416/cat.jpg
-
Klicken Sie im Navigationsmenü () auf Compute Engine > VM-Instanzen.
-
Klicken Sie in der Zeile mit Ihrer ersten VM auf SSH.
-
Installieren Sie im SSH-Anmeldefenster, das für die VM geöffnet wird, den nginx-Webserver:
sudo apt-get remove -y --purge man-db
sudo touch /var/lib/man-db/auto-update
sudo apt-get update
sudo apt-get install nginx
Hinweis: Es kann einige Minuten dauern, bis der Vorgang abgeschlossen ist. Klicken Sie auf J, wenn Sie dazu aufgefordert werden, um fortzufahren.
- Kopieren Sie im Cloud Shell-Fenster die HTML-Datei, die Sie mit dem Cloud Shell-Editor erstellt haben, auf Ihre virtuelle Maschine:
gcloud compute scp index.html first-vm:index.html --zone={{{project_0.default_zone | "ZONE"}}}
Hinweis: Wenn Sie gefragt werden, ob ein Hostschlüssel zur Liste der bekannten Hosts hinzugefügt werden soll, antworten Sie mit J.
Hinweis: Falls Sie aufgefordert werden, eine Passphrase einzugeben, drücken Sie die EINGABETASTE, um mit einer leeren Passphrase zu antworten. Wenn Sie aufgefordert werden, die leere Passphrase zu bestätigen, drücken Sie die EINGABETASTE noch einmal.
- Kopieren Sie im SSH-Anmeldefenster der VM die HTML-Datei aus dem Basisverzeichnis in das Dokumentenstammverzeichnis des
nginx-Webservers:
sudo cp index.html /var/www/html
Klicken Sie auf Fortschritt prüfen.
Nginx-Webserver installieren und Begrüßungsseite anpassen
-
Klicken Sie im Navigationsmenü () auf Compute Engine > VM-Instanzen.
-
Klicken Sie bei Ihrer ersten VM in der Spalte Externe IP-Adresse auf den Link. Falls Ihnen die Meldung angezeigt wird, dass die Website keine verschlüsselte Verbindung unterstützt, klicken Sie auf Weiter zur Website.
Es wird ein neuer Browsertab geöffnet, der eine Webseite mit dem Katzenbild enthält.
Lab beenden
Wenn Sie das Lab abgeschlossen haben, klicken Sie auf Lab beenden. Google Skills entfernt daraufhin die von Ihnen genutzten Ressourcen und bereinigt das Konto.
Anschließend erhalten Sie die Möglichkeit, das Lab zu bewerten. Wählen Sie die entsprechende Anzahl von Sternen aus, schreiben Sie einen Kommentar und klicken Sie anschließend auf Senden.
Die Anzahl der Sterne hat folgende Bedeutung:
- 1 Stern = Sehr unzufrieden
- 2 Sterne = Unzufrieden
- 3 Sterne = Neutral
- 4 Sterne = Zufrieden
- 5 Sterne = Sehr zufrieden
Wenn Sie kein Feedback geben möchten, können Sie das Dialogfeld einfach schließen.
Verwenden Sie für Feedback, Vorschläge oder Korrekturen den Tab Support.
© 2026 Google LLC. Alle Rechte vorbehalten. Google und das Google-Logo sind Marken von Google LLC. Alle anderen Unternehmens- und Produktnamen können Marken der jeweils mit ihnen verbundenen Unternehmen sein.


