Note: To ensure a consistent and high-performance experience, this lab may provide cached responses for some model requests.
GENAI104

Overview
Building complex agentic applications often requires coordinating multiple specialized models, managing tool integrations, and debugging execution traces—all of which can be manually intensive and difficult to scale.
Agent Development Kit (ADK) solves these challenges by providing a modular framework to build, test, and deploy multi-agent systems. It allows you to compose specialized agents into a hierarchy, equip them with pre-built or custom tools, and orchestrate workflows using both predictable pipelines and dynamic LLM-driven routing.
In this lab, you use ADK to build a research assistant that leverages to analyze data and generate structured reports. You explore how to manage these dependencies dynamically to ensure your agentic workflows remain robust as new models are released.
Objectives
In this lab, you learn how to perform the following tasks:
- Describe ADK architecture (agents, tools, and sessions).
- Configure a local development environment for agentic apps.
- Define agents with dynamic models and custom tool access.
- Execute and inspect agents using the ADK browser UI, Python code, and the CLI chat interface.
Benefits of ADK
ADK offers several key advantages for developers building agentic applications:
-
Multi-agent systems: Build modular, scalable applications by composing specialized agents into hierarchical structures.
-
Rich tool ecosystem: Equip agents with pre-built tools, custom functions, or integrations from frameworks like LangChain and CrewAI.
-
Flexible Orchestration: Define predictable pipelines with workflow agents or use LLMs for adaptive, dynamic routing.
-
Integrated Developer Experience: Develop and debug locally with a powerful CLI and an interactive UI to inspect execution step-by-step.
-
Built-in Evaluation: Systematically assess performance by evaluating response quality and execution trajectories against test cases.
-
Deployment Ready: Easily containerize and scale agents on Agent Runtime, Cloud Run, or custom Docker infrastructure.
While other SDKs allow you to query models, ADK provides a higher-level framework that handles the complex coordination between multiple models for you.
Setup and requirements
Before you click the Start Lab button
Read these instructions. Labs are timed and you cannot pause them. The timer, which starts when you click Start Lab, shows how long Google Cloud resources are made available to you.
This hands-on lab lets you do the lab activities in a real cloud environment, not in a simulation or demo environment. It does so by giving you new, temporary credentials you use to sign in and access Google Cloud for the duration of the lab.
To complete this lab, you need:
- Access to a standard internet browser (Chrome browser recommended).
Note: Use an Incognito (recommended) or private browser window to run this lab. This prevents conflicts between your personal account and the student account, which may cause extra charges incurred to your personal account.
- Time to complete the lab—remember, once you start, you cannot pause a lab.
Note: Use only the student account for this lab. If you use a different Google Cloud account, you may incur charges to that account.
How to start your lab and sign in to the Google Cloud console
-
Click the Start Lab button. If you need to pay for the lab, a dialog opens for you to select your payment method.
On the left is the Lab Details pane with the following:
- The Open Google Cloud console button
- Time remaining
- The temporary credentials that you must use for this lab
- Other information, if needed, to step through this lab
-
Click Open Google Cloud console (or right-click and select Open Link in Incognito Window if you are running the Chrome browser).
The lab spins up resources, and then opens another tab that shows the Sign in page.
Tip: Arrange the tabs in separate windows, side-by-side.
Note: If you see the Choose an account dialog, click Use Another Account.
-
If necessary, copy the Username below and paste it into the Sign in dialog.
{{{user_0.username | "Username"}}}
You can also find the Username in the Lab Details pane.
-
Click Next.
-
Copy the Password below and paste it into the Welcome dialog.
{{{user_0.password | "Password"}}}
You can also find the Password in the Lab Details pane.
-
Click Next.
Important: You must use the credentials the lab provides you. Do not use your Google Cloud account credentials.
Note: Using your own Google Cloud account for this lab may incur extra charges.
-
Click through the subsequent pages:
- Accept the terms and conditions.
- Do not add recovery options or two-factor authentication (because this is a temporary account).
- Do not sign up for free trials.
After a few moments, the Google Cloud console opens in this tab.
Note: To access Google Cloud products and services, click the Navigation menu or type the service or product name in the Search field.

Task 1. Install ADK and set up your environment
In this task, you configure the Cloud Shell Editor, initialize your project, and install the Agent Development Kit (ADK) to prepare your environment for building and testing agentic applications.
Enable recommended APIs
In this lab environment, the Agent Platform API and Telemetry API have been enabled for you. In your own projects, you will want to enable them in order to query models and send telemetry data to Cloud Logging.
Prepare a Cloud Shell Editor tab
-
Click Activate Cloud Shell ( ) in the Google Cloud console title bar.
Note: Alternatively, select the console browser tab and press G then S to open the Cloud Shell terminal.
-
Click Continue.
-
When prompted to authorize Cloud Shell, click Authorize.
-
In the Cloud Shell Terminal action bar, click Open in new window  .
.
-
Click Open Editor ( ) on the Cloud Shell Editor action bar, to view files.
-
Click Explorer ( ) in the left pane to open your file explorer.
-
Click Open Folder.
-
In the Open Folder dialog that opens, click OK to select your Google Skills student account's home folder.
-
Close any additional tutorial or Gemini panels that appear on the right side of the screen to save more of your window for your code editor.
For the rest of this lab, you work in this window as your IDE with the Cloud Shell Editor and Cloud Shell Terminal.
Download and install ADK and code samples for this lab
-
Paste the following command into the Cloud Shell Terminal to copy a project directory with code for this lab from a Cloud Storage bucket:
gcloud storage cp -r gs://{{{project_0.project_id| YOUR_GCP_PROJECT_ID}}}-bucket/* .
-
Update your PATH environment variable to include your user's local environment and install ADK, including the OpenTelemetry (OTel) plugin for logging & telemetry, and other lab requirements by running the following commands in the Cloud Shell Terminal:
export PATH=$PATH:"/home/${USER}/.local/bin"
python3 -m pip install google-adk[otel-gcp]==1.30.0 -r adk_project/requirements.txt
Task 2. Review the core concepts and structure of ADK project directories
Explore the core concepts and fundamental building blocks of ADK, including agents, tools, and orchestration patterns, to understand the principles used to design effective and flexible multi-agent systems:
-
Agent: Agents are core building blocks designed to accomplish specific tasks. They can be powered by LLMs to reason, plan, and utilize tools to achieve goals, and can even collaborate on complex projects.
-
Tools: Tools give agents abilities beyond conversation, letting them interact with external APIs, search information, run code, or call other services.
-
Session Services: Session services handle the context of a single conversation (
Session), including its history (Events) and the agent's working memory for that conversation (State).
-
Callbacks: Custom code snippets you provide to run at specific points in the agent's process, allowing for checks, logging, or behavior modifications.
-
Artifact Management: Artifacts allow agents to save, load, and manage files or binary data (like images or PDFs) associated with a session or user.
-
Runner: The engine that manages the execution flow, orchestrates agent interactions based on Events, and coordinates with backend services.
Next, explore the standard layout of an ADK project to see how these concepts are organized in practice:
-
In the Cloud Shell Editor's file explorer pane, click adk_project to open the directory.
-
Notice the four agent directories in adk_project: adk_utils, app_agent, llm_auditor, and my_google_search_agent. Each of these directories represents a separate agent. Separating agents into their own directories within a project directory provides organization and allows ADK to understand what agents are present.
-
Click my_google_search_agent to explore an agent directory.
Note: Make sure you are in the adk_project/my_google_search_agent directory at this point.
-
Click init.py to view its contents and notice that the directory also contains an agent.py file.
-
Notice that the init.py file contains a single line, which imports from the agent.py file. ADK uses this to identify this directory as an agent package:
from . import agent
-
Click agent.py to view the code for a simple agent equipped with the Google Search tool.
- The imports from
google.adk: the Agent class and the google_search tool from the tools module.
- Read the code comments that describe the parameters that configure this simple agent.
-
To use the imported google_search tool, it needs to be passed to the agent. Paste the following line into the agent.py file around line 34, where indicated at the end of the Agent object creation:
tools=[google_search]
-
Save the agent.py file.
Tools enable an agent to perform actions beyond generating text. In this case, the google_search tool allows the agent to decide when it would like more information than it already has from its training data. It can then write a search query, use Google Search to search the web, and then base its response to the user on the results.
When a model bases its response on additional information that it retrieves, it is called "grounding," and this overall process is known as "retrieval-augmented generation" or "RAG."
Task 3. Run the agent using the ADK Dev UI
ADK includes a development UI designed to run locally to help you develop and test your agents. It can help you visualize what each agent is doing and how multiple agents interact with one another. In this task, you explore this interface.
Note: When you run an agent, ADK needs to know who is requesting the model API calls. You can provide this information in one of two ways:
- Provide a Gemini API key.
- Authenticate your environment with Google Cloud credentials and associate your model API calls with an Agent Platform project and location.
In this lab, you take the Agent Platform approach.
-
In the Cloud Shell Terminal, run the following commands to write an .env file to set your environment variables instructing the agent to use your project and the global endpoint:
cd ~/adk_project
cat << EOF > my_google_search_agent/.env
GOOGLE_GENAI_USE_VERTEXAI=TRUE
GOOGLE_CLOUD_PROJECT={{{project_0.project_id| YOUR_GCP_PROJECT_ID}}}
GOOGLE_CLOUD_LOCATION=global
MODEL={{{project_0.startup_script.gemini_flash_model_id | gemini_flash_model_id}}}
OTEL_SERVICE_NAME=adk-agent
OTEL_PYTHON_LOGGING_AUTO_INSTRUMENTATION_ENABLED=true
OTEL_INSTRUMENTATION_GENAI_CAPTURE_MESSAGE_CONTENT=true
EOF
These variables serve the following roles:
-
GOOGLE_GENAI_USE_VERTEXAI=TRUE indicates that you use Vertex AI for authentication as opposed to Gemini API key authentication.
-
GOOGLE_CLOUD_PROJECT and GOOGLE_CLOUD_LOCATION provide the project and location with which to associate your model calls.
-
MODEL is not required, but is stored here so that it can be loaded as another environment variable. This can be a convenient way to try different models in different deployment environments.
-
OTEL_SERVICE_NAME, OTEL_PYTHON_LOGGING_AUTO_INSTRUMENTATION_ENABLED, and OTEL_INSTRUMENTATION_GENAI_CAPTURE_MESSAGE_CONTENT are used to configure OpenTelemetry (OTel) for collecting ADK-specific telemetry data from the agent.
The ADK Dev UI and CLI chat interface automatically load configurations from an .env file. If no file is present, they use system environment variables with matching names.
-
In the Cloud Shell Terminal, ensure you are in the adk_project directory where your agent subdirectories are located by running:
cd ~/adk_project
-
Launch the ADK Dev UI with the following command with some useful flags. This command will:
- Launch a Fast API web server with the ADK Dev UI
- Allow the Cloud Shell web preview to query your agent
- Send telemetry data to Cloud Logging
- Reload agents when code changes are detected
adk web \
--allow_origins "regex:https://.*\.cloudshell\.dev" \
--otel_to_cloud \
--reload_agents
Output
INFO: Started server process [2434]
INFO: Waiting for application startup.
+-------------------------------------------------------+
| ADK Web Server started |
| |
| For local testing, access at http://localhost:8000. |
+-------------------------------------------------------+
INFO: Application startup complete.
INFO: Uvicorn running on http://127.0.0.1:8000 (Press CTRL+C to quit)
The result is the ADK Dev UI URL is displayed, as the DEV UI is currently running.
-
To view the web interface in a new tab, click the http://127.0.0.1:8000 link in the Terminal output, which links you via proxy to this app running locally on your Cloud Shell instance. The result is you see the Dev UI running in a new tab.
-
From the Select an agent menu options on the left, select my_google_search_agent.
-
To prompt the agent to use its Google Search tool, enter the question:
I know the Summer olympics are happening in 2028, please tell me which countries are participating and what events will be held.
Notice the agent uses Google Search to retrieve real-time information, bypassing the knowledge cutoff of its pre-trained model.
Note: A response using grounding with Google search includes ready-to-display HTML "Search Suggestions" like those you see at the bottom of the agent's response. When you use grounding with Google Search, you are required to display these suggestions, which help users follow up on the information the model used for its response.
-
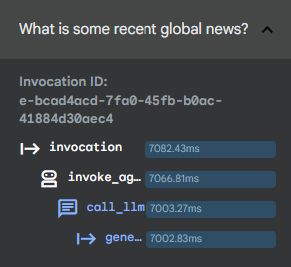
Notice that in the left pane, you are in the Trace tab by default. Click on your last query text (I know the Summer olympics are happening in 2028, please tell me which countries are participating and what events will be held.) to see a trace of how long different parts of your query took to execute.
You can use this to debug more complex executions involving tool calls to understand how various processes contribute to the latency of your responses.
-
Return to the chat discussion section of the window, and click the agent icon ( ) next to the agent's response in the right pane to inspect the event returned by the agent. This event includes the
 content returned to the user and groundingMetadata detailing the search results that the response was based on.
-
When you are finished exploring the ADK Dev UI, close this browser tab.
-
Return to your browser tab with the Cloud Shell Terminal and click in the terminal's pane.
-
Press CTRL+C to stop the web server.
Click Check my progress to verify the objective.
Run the agent using the ADK Web UI.
Task 4. Run an agent programmatically
While the ADK Dev UI is great for testing and debugging, it is not suitable for presenting your agent to multiple users in production.
To run an agent as part of a larger application, you need to include a few additional components in your agent.py script that the web app handled for you in the previous task. Proceed with the following steps to open a script with these components to review them.
-
You can set environment variables for all of your agents to use if they do not have .env files in their directories. In the Cloud Shell Terminal run the following commands to export environment variables:
export GOOGLE_GENAI_USE_VERTEXAI=TRUE
export GOOGLE_CLOUD_PROJECT={{{project_0.project_id| YOUR_GCP_PROJECT_ID}}}
export GOOGLE_CLOUD_LOCATION=global
export MODEL={{{project_0.startup_script.gemini_flash_model_id | gemini_flash_model_id}}}
-
In the Cloud Shell Editor file browser, click adk_project/app_agent.
-
Click the agent.py file in this directory.
-
This agent is designed to run as part of an application. Read the commented code in agent.py, paying particular attention to the following components in the code:
-
InMemoryRunner() (around line 68), an oversight of agent execution feature: The Runner is the code responsible for receiving the user's query, passing it to the appropriate agent, receiving the agent's response event and passing it back to the calling application or UI, and then triggering the following event. You can read more in the ADK documentation about the event loop.
-
runner.session_service.create_session() (around line 71), a conversation history and shared state feature. Sessions allow an agent to preserve state, remembering a list of items, the current status of a task, or other 'current' information. This class creates a local session service for simplicity, but in production this could be handled by a database.
-
types.Content() and types.Part() (around lines 78 and 79), a structured, multimodal messages feature. Instead of a simple string, the agent is passed a Content object which can consist of multiple Parts. This allows for complex messages, including text and multimodal content to be passed to the agent in a specific order.
Note: When you ran the agent in the ADK Dev UI, it created a session service, artifact service, and runner for you. When you write your own agents to deploy programmatically, it is recommended that you provide these components as external services rather than relying on in-memory versions.
Notice that the script includes a hardcoded query (around line 93), which asks the agent: "What is the capital of France?"
-
Run the following command in the Cloud Shell Terminal to run this agent programmatically:
python3 app_agent/agent.py
Selected Output:
** User says: What is the capital of France?
...
** trivia_agent: The capital of France is Paris.
Add Pydantic schema classes
You can also define specific input and/or output schema for an agent as follows:
-
Around line 28, add the following import statements for the Pydantic schema classes BaseModel and Field to define a schema class:
from pydantic import BaseModel, Field
class CountryCapital(BaseModel):
capital: str = Field(description="A country's capital.")
-
In your root_agent's Agent definition, around line 62, set the output_schema parameter to use the CountryCapital schema you defined above:
output_schema=CountryCapital
-
Run the agent script again to see the response following the output_schema:
python3 app_agent/agent.py
Selected Output:
** User says: What is the capital of France?
...
** trivia_agent: {"capital": "Paris"}
Click Check my progress to verify the objective.
Run an agent programmatically.
Task 5. Chat with an agent via the command-line interface
You can also chat with an agent in your local development environment by using the command line interface. This can be very handy for quickly debugging and testing agents as you develop them.
Like the web interface, the command line interface also handles the creation of the session service, artifact service, and runner for your agent.
To run an interactive session using the command line interface:
-
Run the following in Cloud Shell Terminal:
adk run my_google_search_agent
Output:
Log setup complete: /tmp/agents_log/agent.20250322_010300.log
To access latest log: tail -F /tmp/agents_log/agent.latest.log
Running agent basic_search_agent, type exit to exit.
user:
-
Input the following message:
What are some popular movies that have been released in India this year?
Example output (yours may be a little different):
[google_search_agent]: Here are some of the movies that have been released in India in the past month (January 2026 to early February 2026):
* **January 16, 2026**: *Bihu Attack*, *Happy Patel: Khatarnak Jasoos*.
* **January 23, 2026**: *Border 2*.
* **January 30, 2026**: *Mardaani 3*, *Mayasabha - The Hall of Illusion*.
* **February 5, 2026**: *Vadh 2*, *Haunted 3D: Ghosts Of The Past*.
* **February 13, 2026**: *Tu Yaa Main*, *O'Romeo*, *Swayambhu*,.
* **February 19, 2026**: *Veer Murarbaji*, *Do Deewane Seher Mein*.
* **February 20, 2026**: *Epic: Elvis Presley In Concert*, *Hamnet*.
* **February 26, 2026**: *The Kerala Story 2 Goes Beyond*.
-
When you are finished chatting with the command line interface, enter exit at the next user prompt to end the chat.
Task 6. Preview a multi-agent example
In this task, you explore a multi-agent system to understand a core ADK capability.
This agentic system evaluates and improves the factual grounding of responses generated by LLMs. It includes:
- a
critic_agent to serve as an automated fact-checker
- a
reviser_agent to rewrite responses if needed to correct inaccuracies based on verified findings
To explore this agent:
-
Use the Cloud Shell Editor file explorer to navigate to the directory adk_project/llm_auditor.
-
Within the llm_auditor directory, click agent.py.
-
Here are a few things to notice about this multi-agent example:
- The
SequentialAgent is a workflow class that passes conversation control between agents sequentially without requiring user input. When executed, the critic_agent and reviser_agent respond in order automatically."
- These sub-agents are each imported from their own directories within a
sub_agents directory.
- Sub-agent directories contain
init.py, agent.py and prompt.py. Use prompt.py to manage complex prompts independently before importing them into agent.py.
-
Copy the .env file you created earlier to be used by this agent as well and launch the ADK Dev UI again by running the following in the Cloud Shell Terminal:
cd ~/adk_project
cp my_google_search_agent/.env llm_auditor/.env
adk web \
--allow_origins "regex:https://.*\.cloudshell\.dev" \
--otel_to_cloud \
--reload_agents
Note: If you did not shut down your previous adk web session, the default port of 8000 is blocked, but you can launch the Dev UI with a new port by using adk web --port 8001, for example.
-
Click the http://127.0.0.1:8000 link in the Terminal output. A new browser tab opens with the ADK Dev UI.
-
From the Select an agent menu options on the left, select llm_auditor.
-
Start the conversation with the following false statement:
Double check this: Earth is further away from the Sun than Mars.
You should see two responses from the agent in the chat area:
- First, a detailed response from the
critic_agent checking the truthfulness of the statement based on fact-checking with Google Search.
- Second, a short revised statement from the
reviser_agent with a corrected version of your false input statement, for example, "Earth is closer to the Sun than Mars."
- Next to each response, click the agent icon () to open the event panel for that response (or find the corresponding numbered event on the Events panel and select it).
At the top of the event view, there is a graph that visualizes the relationships between the agents and tools in this multi-agent system. The agent responsible for this response is highlighted.
-
Explore the code further or ask for other fact-checking examples in the Dev UI. Another example you can try is:
Q: Why is the sky blue? A: Because the sky reflects the color of the ocean.
-
If you would like to reset the conversation, click New Session on the session title bar to restart the conversation.
-
When you are finished asking questions of this agent, close the browser tab and press CTRL+C in the Terminal to stop the server.
Note: Even though this example uses a SequentialAgent workflow agent, think of this pattern as a human-in-the-loop pattern.
When the SequentialAgent ends its sequence, the conversation goes back to its parent, the llm_auditor in this example, to get a new input turn from the user and then pass the conversation back around to the other agents.
Click Check my progress to verify the objective.
Preview a multi-agent example.
Congratulations!
You have successfully completed the foundational lab for Agent Development Kit (ADK). You analyzed the core architecture of agents and tools, initialized a standardized development environment, and configured as a dynamic model dependency. By implementing custom tools and structured output schemas, you controlled agent behavior and executed workflows across the browser UI, Python scripts, and the CLI. These skills form the baseline for building and scaling robust, production-ready agentic applications.
Next steps / Learn more
For more information about ADK, check out these resources:
Google Cloud training and certification
...helps you make the most of Google Cloud technologies. Our classes include technical skills and best practices to help you get up to speed quickly and continue your learning journey. We offer fundamental to advanced level training, with on-demand, live, and virtual options to suit your busy schedule. Certifications help you validate and prove your skill and expertise in Google Cloud technologies.
Manual Last Updated May 20, 2026
Lab Last Tested May 20, 2026
Copyright 2026 Google LLC. All rights reserved. Google and the Google logo are trademarks of Google LLC. All other company and product names may be trademarks of the respective companies with which they are associated.


