GSP1299

Overview
In this hands-on lab, you learn how to deploy your SQL Server Always On availability group cluster using Workload Manager Guided Deployment Automation for SQL Server.
Workload Manager Guided Deployment Automation for SQL Server is a feature within Google Cloud's Workload Manager service. It's designed to simplify and accelerate the process of deploying SQL Server workloads on the Google Cloud Platform. Instead of manually configuring infrastructure and software, this tool provides a guided interface to define your requirements, and then it automates the deployment based on best practices.
What you'll do
- Deploy an SQL Server cluster.
- Review the deployment.
Setup and requirements
Before you click the Start Lab button
Read these instructions. Labs are timed and you cannot pause them. The timer, which starts when you click Start Lab, shows how long Google Cloud resources are made available to you.
This hands-on lab lets you do the lab activities in a real cloud environment, not in a simulation or demo environment. It does so by giving you new, temporary credentials you use to sign in and access Google Cloud for the duration of the lab.
To complete this lab, you need:
- Access to a standard internet browser (Chrome browser recommended).
Note: Use an Incognito (recommended) or private browser window to run this lab. This prevents conflicts between your personal account and the student account, which may cause extra charges incurred to your personal account.
- Time to complete the lab—remember, once you start, you cannot pause a lab.
Note: Use only the student account for this lab. If you use a different Google Cloud account, you may incur charges to that account.
How to start your lab and sign in to the Google Cloud console
-
Click the Start Lab button. If you need to pay for the lab, a dialog opens for you to select your payment method.
On the left is the Lab Details pane with the following:
- The Open Google Cloud console button
- Time remaining
- The temporary credentials that you must use for this lab
- Other information, if needed, to step through this lab
-
Click Open Google Cloud console (or right-click and select Open Link in Incognito Window if you are running the Chrome browser).
The lab spins up resources, and then opens another tab that shows the Sign in page.
Tip: Arrange the tabs in separate windows, side-by-side.
Note: If you see the Choose an account dialog, click Use Another Account.
-
If necessary, copy the Username below and paste it into the Sign in dialog.
{{{user_0.username | "Username"}}}
You can also find the Username in the Lab Details pane.
-
Click Next.
-
Copy the Password below and paste it into the Welcome dialog.
{{{user_0.password | "Password"}}}
You can also find the Password in the Lab Details pane.
-
Click Next.
Important: You must use the credentials the lab provides you. Do not use your Google Cloud account credentials.
Note: Using your own Google Cloud account for this lab may incur extra charges.
-
Click through the subsequent pages:
- Accept the terms and conditions.
- Do not add recovery options or two-factor authentication (because this is a temporary account).
- Do not sign up for free trials.
After a few moments, the Google Cloud console opens in this tab.
Note: To access Google Cloud products and services, click the Navigation menu or type the service or product name in the Search field.

Task 1. Secret Manager for an Active Directory user
In this task, you create a secret and store the Active Directory account password in Secret Manager.
-
In the Google Cloud console, in the Navigation menu ( ), click Security > Secret Manager.
-
Click Create Secret.
-
For Name, type ad-secret.
-
For Secret value, type or paste the following:
LabP@ssw0rd!
- Leave the remaining settings as their defaults and click Create Secret.
Click Check my progress to verify the objective.
Verify the secret has been created.
Task 2. Secret Manager for the SQL Server user
Create a secret and store the SQL Server account password.
-
Return to the Secret Manager page and click Create Secret.
-
For Name, type sql-secret.
-
For Secret value, type or paste the following:
LabP@ssw0rd!
- Leave the remaining settings as their defaults and click Create Secret.
Click Check my progress to verify the objective.
Verify the secret has been created.
Task 3. Create the SQL Server deployment
In this section, you use Guided Deployment Automation to deploy an SQL Server cluster.
-
On the Google Cloud console title bar, type Workload Manager in the Search field.
-
In the left pane, click Deployments.
-
Click Create Deployment
-
For workload type, click CHOOSE SQL SERVER
-
On the Missing service account roles page, click Grant to assign the required roles to the service account.
Deployment basics
- For Deployment basics settings, use the table below. Leave the remaining settings as their defaults.
Setting |
Value |
Deployment name |
sqlserver-lab |
Deployment description |
SQL Server deployment lab |
Service account |
Compute Engine default service account - Click **Grant** button if prompted. |
Service account for Compute Engine |
Compute Engine default service account - Click **Grant** if prompted. |
Environment |
Production |
Operating System |
Windows |
Windows licensing type |
Pay-as-you-go (PAYG) |
SQL licensing type |
Pay-as-you-go (PAYG) |
|
|
OS image |
Public image
SQL Server 2019 Standard, on Windows Server 2019 Datacenter, x64 built on 20240613
|
Deployment strategy |
High Availability |
Availability mode |
Availability group (AG) |
VM name prefix |
sqllab |
- Click Continue.
Location and networking
- For Location and networking settings, use the table below. Leave the remaining settings as their defaults.
Setting |
Value |
Region |
|
Primary zone |
-a |
Secondary zone |
-b |
Tertiary zone |
-c |
Network |
default |
Subnetwork |
default |
Internet access |
Cloud NAT |
DNS zone |
Create a new DNS zone |
- Click Continue.
Active Directory
- For Active Directory settings, use the table below. Leave the remaining settings as their defaults.
Setting |
Value |
Secret name for Active Directory |
ad-secret |
Domain username |
administrator |
Active Directory IP address |
Internal IP address of the lab-dc-1 instance. |
Domain DNS Name |
wlmlab.local |
- Click Continue.
Database
- For Database settings, use the table below. Leave the remaining settings as their default.
Setting |
Value |
Secret name for Database Credentials |
sql-secret |
Tenancy model |
Shared |
Machine Type |
n2-standard-2 |
-
Click Continue.
-
Review all the options and click Create.
Click Check my progress to verify the objective.
Verify SQL Server Deployment has been created.
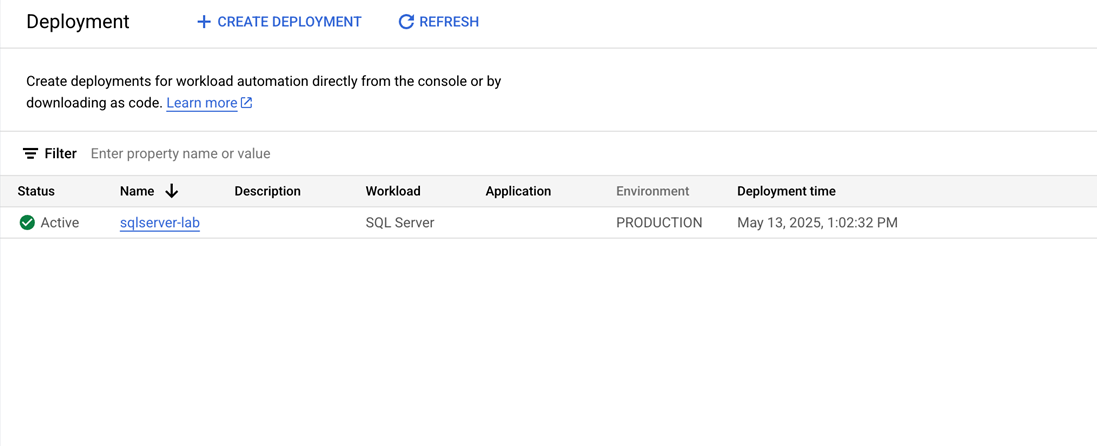
Task 4. Verify the results
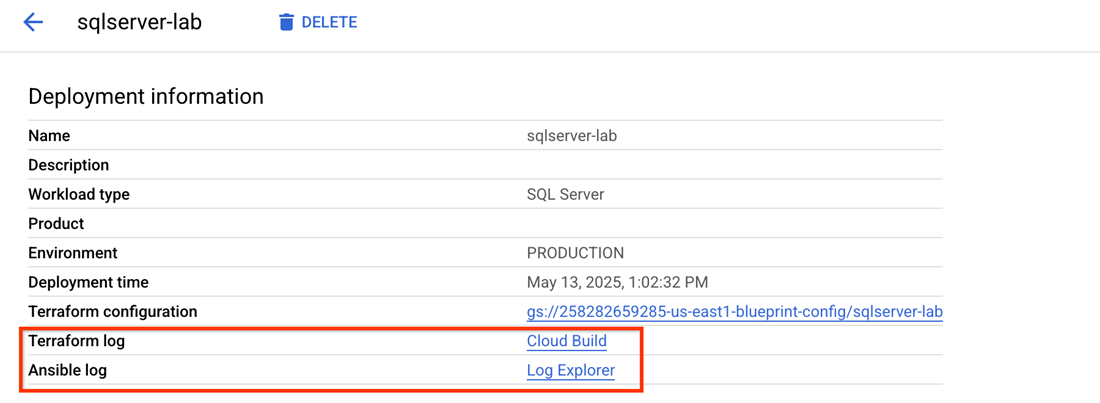
The deployment should be successful within 10 to 20 minutes. When successful, the status displays as Active.
If the deployment fails, check the Terraform logs and Ansible logs for troubleshooting.
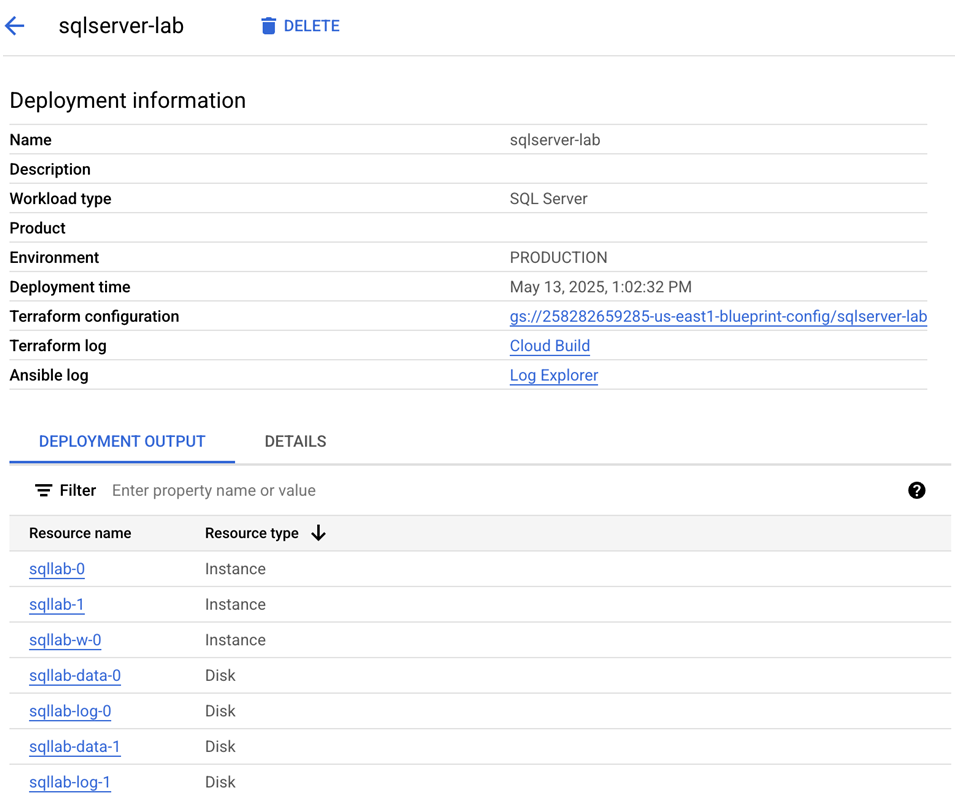
Verify the deployment output
Each cluster should consist of two SQL Server nodes and one witness. Each SQL server node will have two allocated disks: a data disk and a log disk, resulting in a total of four disk resources.
Congratulations!
You've successfully deployed SQL Server Always On availability group cluster.
Next steps/Learn more
To learn more about Workload Manager, refer to the Workload Manager Documentation.
Google Cloud training and certification
...helps you make the most of Google Cloud technologies. Our classes include technical skills and best practices to help you get up to speed quickly and continue your learning journey. We offer fundamental to advanced level training, with on-demand, live, and virtual options to suit your busy schedule. Certifications help you validate and prove your skill and expertise in Google Cloud technologies.
Manual Last Updated June 30, 2025
Lab Last Tested June 30, 2025
Copyright 2026 Google LLC. All rights reserved. Google and the Google logo are trademarks of Google LLC. All other company and product names may be trademarks of the respective companies with which they are associated.


