Vertex AI is now Gemini Enterprise Agent Platform! We are currently updating our content to reflect this change. Please bear with us if you encounter naming inconsistencies during this transition.
Applica le tue competenze nella console Google Cloud
Checkpoint
Install the Sindri CLI and Clone the Source Repository
Controlla i miei progressi
/ 30
Issue a Verifiable Credential
Controlla i miei progressi
/ 20
Build a Verifiable Presentation
Controlla i miei progressi
/ 25
Verify the Presentation
Controlla i miei progressi
/ 25
Istruzioni e requisiti di configurazione del lab
Proteggi il tuo account e i tuoi progressi. Per eseguire questo lab, utilizza sempre una finestra del browser privata e le credenziali del lab.
Leveraging Verifiable Credentials and Zero-Knowledge Proofs with Sindri
Lab
1 ora 30 minuti
universal_currency_alt
5 crediti
show_chart
Intermedio
info
Questo lab potrebbe incorporare strumenti di AI a supporto del tuo apprendimento.
Questi contenuti non sono ancora ottimizzati per i dispositivi mobili.
Per un'esperienza ottimale, visualizza il sito su un computer utilizzando un link inviato via email.
This lab was developed with our partner, Sindri. Your personal information may be shared with Sindri, the lab sponsor, if you have opted-in to receive product updates, announcements, and offers in your Account Profile.
GSP1302
Overview
In this lab, you learn about verifiable credentials and how to build credential schemes using zero-knowledge proofs.
A zero-knowledge proof is a cryptographic technique to prove the validity of a statement without revealing the underlying data. You use the serverless infrastructure of Sindri, which leverages Google Cloud, to automate and accelerate the process of generating zero-knowledge proofs.
Verifiable credentials are a new standardized form of digital credential. They offer several advantages over traditional credentials:
A single credential can incorporate multiple signed statements from various authorities.
A verifiable credentials allows proving individual properties without revealing any other information.
Verifiable credentials can use verifiable data registries for increased accessibility and security.
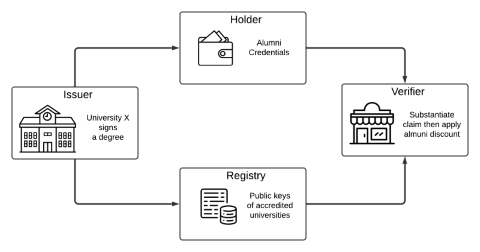
Your scenario: Working with a university-issued degree credential where a university (the issuer) awards a comprehensive credential to a graduate (the holder). This credential contains detailed information about the graduate. When the graduate seeks to leverage this credential to claim an alumni discount on merchandise, they may prefer not to disclose all the information associated with the credential to the vendor (the verifier). With verifiable credentials powered by zero-knowledge proofs, you learn how a degree holder can share an anonymized but tamper-resistant proof of their claim.
You will perform operations for three of the typical parties in the verifiable credential lifecycle: the issuer, the holder, and the verifier.
In a real-world setting, parties may also make use of a registry component, for trusted storage, which is typically managed by a secure ledger or blockchain.
What You Learn
In this lab, you learn how to:
Create and validate verifiable credentials
Generate digital signatures as an issuer
Create zero-knowledge proofs as a credential holder
Verify credential proofs as a verifier
Prerequisites
Basic knowledge of cryptography concepts
Experience with JSON and command-line interfaces
Setup and Requirements
Before you click the Start Lab button
Read these instructions. Labs are timed and you cannot pause them. The timer, which starts when you click Start Lab, shows how long Google Cloud resources will be made available to you.
This Qwiklabs hands-on lab lets you do the lab activities yourself in a real cloud environment, not in a simulation or demo environment. It does so by giving you new, temporary credentials that you use to sign in and access Google Cloud for the duration of the lab.
What you need
To complete this lab, you need:
Access to a standard internet browser (Chrome browser recommended).
Time to complete the lab.
Note: If you already have your own personal Google Cloud account or project, do not use it for this lab.
Note: If you are using a Pixelbook, open an Incognito window to run this lab.
How to start your lab and sign in to the Google Cloud Console
Click the Start Lab button. If you need to pay for the lab, a pop-up opens for you to select your payment method.
On the left is a panel populated with the temporary credentials that you must use for this lab.
Copy the username, and then click Open Google Console.
The lab spins up resources, and then opens another tab that shows the Sign in page.
Tip: Open the tabs in separate windows, side-by-side.
In the Sign in page, paste the username that you copied from the Connection Details panel. Then copy and paste the password.
Important: You must use the credentials from the Connection Details panel. Do not use your Qwiklabs credentials. If you have your own Google Cloud account, do not use it for this lab (avoids incurring charges).
Click through the subsequent pages:
Accept the terms and conditions.
Do not add recovery options or two-factor authentication (because this is a temporary account).
Do not sign up for free trials.
After a few moments, the Cloud Console opens in this tab.
Activate Cloud Shell
Cloud Shell is a virtual machine that is loaded with development tools. It offers a persistent 5GB home directory and runs on the Google Cloud. Cloud Shell provides command-line access to your Google Cloud resources.
In the Cloud Console, in the top right toolbar, click the Activate Cloud Shell button.
Click Continue.
It takes a few moments to provision and connect to the environment. When you are connected, you are already authenticated, and the project is set to your PROJECT_ID. For example:
gcloud is the command-line tool for Google Cloud. It comes pre-installed on Cloud Shell and supports tab-completion.
You can list the active account name with this command:
The programs in this lab use Sindri, running on Google Cloud, to perform the tasks of a credential holder and presenter.
You install the Sindri CLI tool, and set up an API key, as follows:
Click Check my progress to verify that you've performed the above task.
Install the Sindri CLI and Clone the Source Repository
Task 3. Issue a Verifiable Credential
Sign a verifiable credential document as an issuer.
Recall that a university transfers a verifiable credential to a holder that certifies the owner of this credential attained a degree. You start with this claim (issuer/credential.json) and add your signature using the private key of the university (issuer/issuer_sk.txt).
Run the following commands in the repository root to issue the credential:
cd issuer
go run issuer.go issuer_sk.txt credential.json
The output creates credential-signed.json which adds new fields to credential.json. You see the following values inside the "witnesses" section of credential-signed.json as well as in a standalone file called credential-witness-1-degreeType.json: G2, Hm, Pk, and Sig. These are all the key fields required in the BLS Signature Scheme.
G2 is the public generator of an elliptic curve group,
Hm is the hash of the message (the credential contents),
Pk is the public key of the issuer (the university),
Sig is the signature, or Hm exponentiated by the issuer's private key
Click Check my progress to verify that you've performed the above task.
Issue a Verifiable Credential
Task 4. Build a Verifiable Presentation
Build a verifiable presentation consisting of the bare minimum necessary data from the credential, and a zero-knowledge proof that the holder was awarded a degree by a university. You prove but you don't disclose the signature on the degree. This protects you from identity theft where someone might duplicate the claim and gain similar degrees of access.
Understanding the advantages of verifiable credentials is straightforward, but the standards governing them are intricate and sophisticated. The World Wide Web Consortium (W3C) faced the challenge of creating a framework that is rigid enough to enforce a universal standard while remaining adaptable to unforeseen new applications. You can find realistic examples of credentials and verifiable presentations provided by W3C, but for this lab the documents are summarized to look like the diagram below. In later sections, the data model of verifiable credentials is generally adhered to when it doesn't distract from the basic concepts.
This section demonstrates how a credential holder can securely convey their alumni status without disclosing the actual signature of the degree they obtained.
This functionality just scratches the surface of what zero-knowledge proofs can achieve. In a deeper dive, you could use zero-knowledge to produce a proof that a person obtained a degree from a Tier 1 university, but not disclose which one.
While the previous and next sections use local Golang code to perform their portions, the credential holder generally has much more limited compute. After all, in this example, the holder may use a mobile app to interact with the verifier to purchase something from their store. Sindri's zero-knowledge proving API and infrastructure automation suite, powered by Google's reliable cloud, supply a necessary piece of the puzzle to make verifiable presentations a mainstream technology.
In the following codeblock, you obtain a copy of the "degree verifier" circuit from Sindri's public circuit repository. A circuit in a ZK context is a mathematical representation of the computation being proven. You then compile the circuit to prepare for the next phase, which produces the zero-knowledge proof.
cd ..
sindri clone 42543290-0746-48d5-998a-e39197e5cf79 holder
cd holder
To find the Golang files, and the sindri.json manifest file used by the Sindri CLI tool, inspect the new holder directory.
The Golang code is for the zero-knowledge program that will certify the validity of the BLS signature that was issued in the last step.
Specifically this function within holder/circuit.go is worth special attention:
func (circuit *Circuit) Define(api frontend.API) error {
// performs the Miller loops
ml, _ := bls12377.MillerLoop(api, []bls12377.G1Affine{circuit.Sig, circuit.Hm}, []bls12377.G2Affine{circuit.G2, circuit.Pk})
var one fields_bls12377.E12
one.SetOne()
// performs the final expo
e := bls12377.FinalExponentiation(api, ml)
e.AssertIsEqual(api, one)
return nil
}
This is a zero-knowledge circuit definition written in gnark. It is performing the pairing check described in the previous section (e(Sig ,G2)=e(Hm,Pk)). It will only produce a valid output if a user supplies Sig, Hm, G2, and Pk that satisfy a special arithmetic relationship (one that is difficult to forge unless you have the secret key underlying the public key Pk.)
Since the credential holder in the example was issued the four necessary values in the previous step inside of their credentials, it can use those to request a proof from Sindri's API.
Run the following command to generate a proof:
Inspect the credential-proof.json file that was produced, you'll notice that the Sig field is empty. This is the major development that zero-knowledge has enabled.
Instead of a signature, you have a proof that the user has a signed piece of data corresponding to the university's public key pk.
In the next step, our verifier will be able to take the credential-proof.json file and convince themselves that the user has a signed degree, even if they withhold the signature itself.
For lab assessment purpose, run the following command to move the file to the Cloud Storage Bucket named .
Click Check my progress to verify that you've performed the above task.
Build a Verifiable Presentation
Task 5. Verify the Presentation
In this final task, you verify the zero-knowledge proof that was produced by the credential holder.
Run the following code to load the proof generated by Sindri's API and verify the proof artifacts satisfy the arithmetic relationships that underpin zero-knowledge cryptography:
cd ../verifier
go run bls-verify ../holder/credential-proof.json | tee verify_response.txt
As long as the verifiable presentation is sound, you should see something like
Proof verified successfully.
For lab assessment purpose, run the following command to move the file to the Cloud Storage Bucket named .
Click Check my progress to verify that you've performed the above task.
Verify the Presentation
As an exercise, you can try changing characters in credential-proof.json to convince yourself how difficult it is to forge a verifiable presentation.
While this lab presents an example of verifiable credentials for teaching purposes, in production, the zero-knowledge circuit would have proving and verifying keys produced well in advance. Any verifier would use the universally agreed upon keys for the verification circuit, rather than accepting a verification key from a user.
Congratulations!
You have used all the necessary tools that underpin a new paradigm of decentralized identity. These powerful standards and cryptographic techniques enable individuals to have tighter control of their credentials while broadly participating wherever credentials and identity mechanisms are necessary.
Specifically, you saw how an issuer might sign a digital document and transfer it to the credential holder. The credential holder, an end user, then applied the readily available infrastructure and software provided by Sindri and GCP to produce a verifiable presentation which they passed to a verifier. Finally, the verifier was able to substantiate that the holder possessed a valid credential without seeing the signed data firsthand.
...helps you make the most of Google Cloud technologies. Our classes include technical skills and best practices to help you get up to speed quickly and continue your learning journey. We offer fundamental to advanced level training, with on-demand, live, and virtual options to suit your busy schedule. Certifications help you validate and prove your skill and expertise in Google Cloud technologies.
Manual Last Updated February 19, 2025
Lab Last Tested February 19, 2025
Copyright 2024 Google LLC All rights reserved. Google and the Google logo are trademarks of Google LLC. All other company and product names may be trademarks of the respective companies with which they are associated.
I lab creano un progetto e risorse Google Cloud per un periodo di tempo prestabilito
I lab hanno un limite di tempo e non possono essere messi in pausa. Se termini il lab, dovrai ricominciare dall'inizio.
In alto a sinistra dello schermo, fai clic su Inizia il lab per iniziare
Utilizza la navigazione privata
Copia il nome utente e la password forniti per il lab
Fai clic su Apri console in modalità privata
Accedi alla console
Accedi utilizzando le tue credenziali del lab. L'utilizzo di altre credenziali potrebbe causare errori oppure l'addebito di costi.
Accetta i termini e salta la pagina di ripristino delle risorse
Non fare clic su Termina lab a meno che tu non abbia terminato il lab o non voglia riavviarlo, perché il tuo lavoro verrà eliminato e il progetto verrà rimosso
Questi contenuti non sono al momento disponibili
Ti invieremo una notifica via email quando sarà disponibile
Bene.
Ti contatteremo via email non appena sarà disponibile
Un lab alla volta
Conferma per terminare tutti i lab esistenti e iniziare questo
Utilizza la navigazione privata per eseguire il lab
Il modo migliore per eseguire questo lab è utilizzare una finestra del browser in incognito o privata. Ciò evita eventuali conflitti tra il tuo account personale e l'account studente, che potrebbero causare addebiti aggiuntivi sul tuo account personale.
Learn how to use the Sindri API to generate zero-knowledge proofs and use them with verifiable credentials.
Durata:
Configurazione in 0 m
·
Accesso da 90 m
·
Completamento in 90 m