GSP055

總覽
Docker 是開放式平台,用來開發、發布及執行應用程式。有了 Docker,您可以將應用程式從基礎架構中獨立出來,並將基礎架構做為代管應用程式處理。這個平台可加速推送程式碼,並加快測試及部署作業,縮短從編寫到執行程式碼的週期。
為了達成這個目標,Docker 結合核心容器化功能,以及可協助您管理及部署應用程式的工作流程與工具。
Docker 容器可直接在 Kubernetes 中使用,所以能輕鬆在 Kubernetes Engine 內執行。學習 Docker 的基礎知識後,您就能開始開發 Kubernetes 與容器化應用程式。
目標
本實驗室的學習內容包括:
- 建構、執行並偵錯 Docker 容器。
- 從 Docker Hub 和 Google Artifact Registry 提取 Docker 映像檔。
- 將 Docker 映像檔推送至 Google Artifact Registry。
事前準備
這是入門等級的實驗室,不要求學員具備 Docker 和容器的使用經驗。熟悉 Cloud Shell 及指令列的使用方法會有幫助,但並非必要。
設定和需求
瞭解以下事項後,再點選「Start Lab」按鈕
請詳閱以下操作說明。實驗室活動會計時,且中途無法暫停。點選「Start Lab」後就會開始計時,顯示可使用 Google Cloud 資源的時間。
您將在真正的雲端環境完成實作實驗室活動,而不是模擬或示範環境。為此,我們會提供新的暫時憑證,供您在實驗室活動期間登入及存取 Google Cloud。
為了順利完成這個實驗室,請先確認:
- 可以使用標準的網際網路瀏覽器 (Chrome 瀏覽器為佳)。
注意事項:請使用無痕模式 (建議選項) 或私密瀏覽視窗執行此實驗室,這可以防止個人帳戶和學員帳戶之間的衝突,避免個人帳戶產生額外費用。
- 是時候完成實驗室活動了!別忘了,活動一旦開始將無法暫停。
注意事項:務必使用實驗室專用的學員帳戶。如果使用其他 Google Cloud 帳戶,可能會產生額外費用。
如何開始實驗室及登入 Google Cloud 控制台
-
按一下「Start Lab」按鈕。如果實驗室會產生費用,請在開啟的對話方塊中選取付款方式。右側的「Lab setup and access」面板會顯示下列項目:
- 「Open Google Cloud console」按鈕
- 此實驗室所需的臨時憑證 (使用者名稱和密碼)
- 完成此實驗室所需的其他資訊 (如有)
請注意,實驗室計時器位於頁面頂端附近,會顯示剩餘時間。
-
按一下「Open Google Cloud console」。如果使用 Chrome 瀏覽器,也可以按一下滑鼠右鍵,選取「在無痕視窗中開啟連結」。
接著,實驗室會啟動相關資源,並開啟另一個分頁,顯示「登入」頁面。
提示:您可以在不同的視窗並排開啟分頁。
注意:頁面顯示「選擇帳戶」對話方塊時,請點選「使用其他帳戶」。
-
如有必要,請將下方的 Username 貼到「登入」對話方塊。
{{{user_0.username | "Username"}}}
您也可以在「Lab setup and access」面板找到「Username」。
-
點選「下一步」。
-
複製下方的 Password,並貼到「歡迎使用」對話方塊。
{{{user_0.password | "Password"}}}
您也可以在「Lab setup and access」面板找到「Password」。
-
點選「下一步」。
重要事項:請務必使用實驗室提供的憑證,而非自己的 Google Cloud 帳戶憑證。
注意:如果使用自己的 Google Cloud 帳戶來進行這個實驗室,可能會產生額外費用。
-
繼續點按後續頁面:
- 接受條款及細則。
- 由於這是臨時帳戶,請勿新增救援選項或雙重驗證機制。
- 請勿申請免費試用。
Google Cloud 控制台稍後會在這個分頁開啟。
注意:如要使用 Google Cloud 產品和服務,請按一下「導覽選單」,或在「搜尋」欄位輸入服務或產品名稱。
啟動 Cloud Shell
Cloud Shell 是搭載多項開發工具的虛擬機器,提供永久的 5 GB 主目錄,而且在 Google Cloud 中運作。Cloud Shell 提供指令列存取權,方便您使用 Google Cloud 資源。
-
點按 Google Cloud 控制台頂端的「啟用 Cloud Shell」圖示  。
。
-
系統顯示視窗時,請按照下列步驟操作:
- 繼續操作 Cloud Shell 視窗。
- 授權 Cloud Shell 使用您的憑證發出 Google Cloud API 呼叫。
連線建立完成即代表已通過驗證,而且專案已設為您的 Project_ID:。輸出內容中有一行文字,宣告本工作階段的 Project_ID:
Your Cloud Platform project in this session is set to {{{project_0.project_id | "PROJECT_ID"}}}
gcloud 是 Google Cloud 的指令列工具,已預先安裝於 Cloud Shell,並支援 Tab 鍵自動完成功能。
- (選用) 您可以執行下列指令來列出使用中的帳戶:
gcloud auth list
- 點按「授權」。
輸出內容:
ACTIVE: *
ACCOUNT: {{{user_0.username | "ACCOUNT"}}}
To set the active account, run:
$ gcloud config set account `ACCOUNT`
- (選用) 您可以使用下列指令來列出專案 ID:
gcloud config list project
輸出內容:
[core]
project = {{{project_0.project_id | "PROJECT_ID"}}}
注意:如需 gcloud 的完整說明,請前往 Google Cloud 參閱 gcloud CLI 總覽指南。
工作 1:Hello world
- 首先,在 Cloud Shell 中輸入下列指令,執行 hello world 容器:
docker run hello-world
(指令輸出)
Unable to find image 'hello-world:latest' locally
latest: Pulling from library/hello-world
9db2ca6ccae0: Pull complete
Digest: sha256:4b8ff392a12ed9ea17784bd3c9a8b1fa3299cac44aca35a85c90c5e3c7afacdc
Status: Downloaded newer image for hello-world:latest
Hello from Docker!
This message shows that your installation appears to be working correctly.
...
這個簡易容器會將 Hello from Docker! 訊息傳回螢幕畫面。雖然指令很簡單,但請留意輸出內容,看看系統執行了多少個步驟。Docker Daemon 搜尋了「hello-world」映像檔,但在本機沒有找到,所以接著從公開存放區 Docker Hub 中提取,再以該映像檔建立容器並執行。
- 執行下列指令,查看 Docker Daemon 從 Docker Hub 提取的容器映像檔:
docker images
(指令輸出)
IMAGE ID DISK USAGE CONTENT SIZE EXTRA
hello-world:latest f7931603f70e 20.3kB 3.96kB U
這是從公開存放區 Docker Hub 提取的映像檔。映像檔 ID 採用 SHA256 雜湊格式,這個欄位會指出已佈建的 Docker 映像檔。如果 Docker Daemon 在本機找不到映像檔,系統預設會在公開存放區中搜尋。
- 再次執行容器:
docker run hello-world
(指令輸出)
Hello from Docker!
This message shows that your installation appears to be working correctly.
To generate this message, Docker took the following steps:
...
請注意,第二次執行這個指令時,Docker Daemon 會在本機存放區找到映像檔,並使用該映像檔執行容器,所以不必從 Docker Hub 提取。
- 最後,執行下列指令,查看執行中的容器:
docker ps
(指令輸出)
CONTAINER ID IMAGE COMMAND CREATED STATUS PORTS NAMES
沒有執行中的容器,因為您已退出先前執行的「hello-world」容器。
- 執行
docker ps -a,以便查看所有容器,包括已執行完畢的容器:
docker ps -a
(指令輸出)
CONTAINER ID IMAGE COMMAND ... NAMES
6027ecba1c39 hello-world "/hello" ... elated_knuth
358d709b8341 hello-world "/hello" ... epic_lewin
輸出內容會顯示 Container ID (容器 ID,此為 Docker 產生、用來識別容器的 UUID),以及有關本次執行作業的其他中繼資料。容器的 Names (名稱) 也是隨機產生,但您可以透過 docker run --name [container-name] hello-world 自行指定。
工作 2:建構
在本節中,您將以簡易的 Node 應用程式為基礎,建構 Docker 映像檔。
- 執行下列指令,建立資料夾
test,並切換至該資料夾。
mkdir test && cd test
- 建立
Dockerfile:
cat > Dockerfile <<EOF
# Use an official Node runtime as the parent image
FROM node:lts
# Set the working directory in the container to /app
WORKDIR /app
# Copy the current directory contents into the container at /app
ADD . /app
# Make the container's port 80 available to the outside world
EXPOSE 80
# Run app.js using node when the container launches
CMD ["node", "app.js"]
EOF
這個檔案會指示 Docker Daemon 該如何建構映像檔。
- 第一行指定做為建構基礎的上層映像檔,本例使用的是 Node 長期支援版 (LTS) 的官方 Docker 映像檔。
- 第二行則是設定容器當前的工作目錄。
- 第三行使用
「.」,將當前目錄的內容新增到容器。
- 接著公開容器的通訊埠,以透過該通訊埠接受連線,最後執行 node 指令來啟動應用程式。
注意:請花點時間查看 Dockerfile 指令參考資料,瞭解 Dockerfile 每一行指令的含義。
接下來,請編寫 Node 應用程式,然後建構映像檔。
- 執行下列指令,建立 Node 應用程式:
cat > app.js << EOF;
const http = require("http");
const hostname = "0.0.0.0";
const port = 80;
const server = http.createServer((req, res) => {
res.statusCode = 200;
res.setHeader("Content-Type", "text/plain");
res.end("Hello World\n");
});
server.listen(port, hostname, () => {
console.log("Server running at http://%s:%s/", hostname, port);
});
process.on("SIGINT", function () {
console.log("Caught interrupt signal and will exit");
process.exit();
});
EOF
這是簡易的 HTTP 伺服器,會監聽通訊埠 80 並傳回「Hello World」。
現在來建構映像檔。
- 再次提醒,
「.」代表當前的目錄,所以您需要在有 Dockerfile 的目錄中執行這個指令:
docker build -t node-app:0.1 .
這個指令會在幾分鐘內執行完畢,輸出內容應大致如下:
+] Building 0.7s (8/8) FINISHED docker:default
=> [internal] load .dockerignore 0.0s
=> => transferring context: 2B 0.0s
=> [internal] load build definition from Dockerfile 0.0s
=> => transferring dockerfile: 397B 0.0s
=> [internal] load metadata for docker.io/library/node:lts
-t 旗標是用來依照 name:tag 語法為映像檔命名並加上標記。映像檔名為 node-app,而 tag 為 0.1。強烈建議您在建構 Docker 映像檔時加上標記。如未指定標記,標記會預設為 latest,這樣會較難分辨新舊映像檔。另外,也請留意建構映像檔時,前述 Dockerfile 中的各行指令如何產生中間容器層。
- 接著執行下列指令,查看建構的映像檔:
docker images
輸出內容應大致如下:
IMAGE ID DISK USAGE CONTENT SIZE EXTRA
hello-world:latest f7931603f70e 20.3kB 3.96kB U
node-app:0.1 6ab532e26f8d 1.62GB 408MB
請注意,node 是基礎映像檔,node-app 則是您建構的映像檔。如要移除 node,必須先移除 node-app。比起 VM,映像檔相對較小。其他版本的 node 映像檔 (例如 node:slim 和 node:alpine) 甚至更小,可攜性更高。如要進一步瞭解如何縮減容器大小,歡迎參閱「進階主題」。您可以在 node 的官方存放區查看所有版本。
工作 3:執行
- 使用這個指令,根據您建構的映像檔執行容器:
docker run -p 4000:80 --name my-app node-app:0.1
(指令輸出)
Server running at http://0.0.0.0:80/
您可以視需要使用 --name 旗標為容器命名。-p 旗標會指示 Docker 將主機的通訊埠 4000 對應至容器的通訊埠 80。現在您可以透過 http://localhost:4000 連至伺服器了。如未對應通訊埠,就無法透過 localhost 連上容器。
- 開啟另一個終端機 (在 Cloud Shell 點選
+ 圖示),並測試伺服器:
curl http://localhost:4000
(指令輸出)
Hello World
只要初始終端機還在執行,容器就會繼續執行。如果您希望容器在背景執行 (不受終端機的工作階段限制),則需指定 -d 旗標。
- 關閉初始終端機,然後執行下列指令,停止並移除容器:
docker stop my-app && docker rm my-app
- 接著執行下列指令,在背景啟動容器:
docker run -p 4000:80 --name my-app -d node-app:0.1
docker ps
(指令輸出)
CONTAINER ID IMAGE COMMAND CREATED ... NAMES
xxxxxxxxxxxx node-app:0.1 "node app.js" 16 seconds ago ... my-app
- 請注意,
docker ps 的輸出內容顯示容器正在執行中。您可以執行 docker logs [container_id],以便查看記錄。
注意:如果容器 ID 開頭前幾個字元能明確識別該容器,就不需要輸入完整 ID。舉例來說,如果容器 ID 是 17bcaca6f....,則只需執行 docker logs 17b。
docker logs [container_id]
(指令輸出)
Server running at http://0.0.0.0:80/
接著修改應用程式。
- 在 Cloud Shell,開啟先前在實驗室中建立的測試目錄:
cd test
- 使用您所選的文字編輯器 (例如 nano 或 vim) 編輯
app.js,將「Hello World」改為其他字串:
....
const server = http.createServer((req, res) => {
res.statusCode = 200;
res.setHeader('Content-Type', 'text/plain');
res.end('Welcome to Cloud\n');
});
....
- 建構這個新映像檔,並加上
0.2 標記:
docker build -t node-app:0.2 .
(指令輸出)
[+] Building 0.7s (8/8) FINISHED docker:default
=> [internal] load .dockerignore 0.0s
=> => transferring context: 2B 0.0s
=> [internal] load build definition from Dockerfile 0.0s
=> => transferring dockerfile: 397B 0.0s
=> [internal] load metadata for docker.io/library/node:lts 0.5s
請注意,在步驟 2 中,您使用現有的快取層。由於您變更了 app.js 中的內容,因此從步驟 3 開始,各層也會隨之修改。
- 使用新版映像檔執行另一個容器。請注意,這次我們對應的主機通訊埠是 8080,而非 80。您無法選擇主機通訊埠 4000,因為該通訊埠已在使用中。
docker run -p 8080:80 --name my-app-2 -d node-app:0.2
docker ps
(指令輸出)
CONTAINER ID IMAGE COMMAND CREATED
xxxxxxxxxxxx node-app:0.2 "node app.js" 53 seconds ago ...
xxxxxxxxxxxx node-app:0.1 "node app.js" About an hour ago ...
- 測試容器:
curl http://localhost:8080
(指令輸出)
Welcome to Cloud
- 現在測試您建立的第一個容器:
curl http://localhost:4000
(指令輸出)
Hello World
工作 4:偵錯
您已熟悉如何建構及執行容器,接著來瞭解一些偵錯方法。
- 您可以使用
docker logs [container_id] 指令查看容器的記錄。如要在容器執行時追蹤記錄的輸出內容,請使用 -f 選項。
docker logs -f [container_id]
(指令輸出)
Server running at http://0.0.0.0:80/
有時候,您可能會想在執行中的容器內,啟動互動式 Bash 工作階段:
- 這時可以使用
docker exec。請開啟另一個終端機 (在 Cloud Shell 點選「+」圖示),並輸入下列指令:
docker exec -it [container_id] bash
-it 旗標可分配虛擬 TTY,並讓 stdin 保持開啟狀態,這樣您就能與容器互動。請注意,Bash 是在 Dockerfile 中指定的 WORKDIR 目錄 (/app) 內執行。此時,您已開啟容器內的互動式殼層工作階段,可在其中偵錯。
(指令輸出)
root@xxxxxxxxxxxx:/app#
- 查看目錄
ls
(指令輸出)
Dockerfile app.js
- 結束 Bash 工作階段:
exit
- 您可以使用 Docker inspect 指令,查看 Docker 容器的中繼資料:
docker inspect [container_id]
(指令輸出)
[
{
"Id": "xxxxxxxxxxxx....",
"Created": "2017-08-07T22:57:49.261726726Z",
"Path": "node",
"Args": [
"app.js"
],
...
- 使用
--format 選項,查看傳回 JSON 中的特定欄位。例如:
docker inspect --format='{{range .NetworkSettings.Networks}}{{.IPAddress}}{{end}}' [container_id]
(輸出內容範例)
192.168.9.3
請務必查看下列 Docker 說明文件資源,進一步瞭解偵錯方法:
工作 5:發布
接下來要將映像檔推送至 Google Artifact Registry。推送完畢後,您將移除所有容器和映像檔,模擬全新環境,再提取及執行容器。透過這些操作,您就能看出 Docker 容器的可攜性。
如要將映像檔推送至由 Artifact Registry 託管的私人存放區,您需要使用存放區名稱標記映像檔,格式為 <regional-repository>-docker.pkg.dev/my-project/my-repo/my-image。
使用 Cloud 控制台建立目標 Docker 存放區
您必須先建立存放區,才能將映像檔推送至其中。推送映像檔不會建立存放區,且 Cloud Build 服務帳戶沒有建立存放區的權限。
-
依序點選「導覽選單」圖示 >「查看所有產品」,然後在「CI/CD」下方,依序前往「Artifact Registry」>「存放區」。
-
點選存放區旁邊的「+建立存放區」圖示。
-
指定 my-repository 做為存放區名稱。
-
格式選擇「Docker」。
-
在「位置類型」下方,選取「區域」,接著選擇位置:。
-
點選「建立」。
設定驗證機制
在推送或提取映像檔前,請先將 Docker 設為透過 Google Cloud CLI 驗證傳送至 Artifact Registry 的要求。
- 在 Cloud Shell 執行下列指令,為 區域中的 Docker 存放區設定驗證機制:
gcloud auth configure-docker {{{ project_0.default_region | "REGION" }}}-docker.pkg.dev
這個指令會更新 Docker 設定。您現在可以在 Google Cloud 專案連結 Artifact Registry,以便推送及提取映像檔。
注意:您也可以透過 gcloud CLI 使用簡化的指令列方法。
使用 CLI 建立 Artifact Registry 存放區
- 執行下列指令來建立 Artifact Registry 存放區。
gcloud artifacts repositories create my-repository --repository-format=docker --location={{{ project_0.default_region | "REGION" }}} --description="Docker repository"
注意:初次透過 Cloud Shell 發出 Google Cloud API 呼叫,或使用需要憑證的指令列工具 (例如 gcloud CLI 或 bq) 時,Cloud Shell 會顯示「授權 Cloud Shell」對話方塊。
如要允許工具使用憑證發出呼叫,請點選「授權」。
將容器推送至 Artifact Registry
- 切換至 Dockerfile 所在的目錄。
cd ~/test
- 執行下列指令,為映像檔加上
node-app:0.2 標記。
docker build -t {{{ project_0.default_region | "REGION" }}}-docker.pkg.dev/{{{ project_0.project_id | "PROJECT_ID" }}}/my-repository/node-app:0.2 .
- 執行下列指令,檢查您建構的 Docker 映像檔。
docker images
(指令輸出)
IMAGE ID DISK USAGE CONTENT SIZE EXTRA
hello-world:latest f7931603f70e 20.3kB 3.96kB U
node-app:0.1 6ab532e26f8d 1.62GB 408MB U
node-app:0.2 663fe008d88c 1.62GB 408MB U
us-east1-docker.pkg.dev/qwiklabs-gcp-03-738a984de075/my-repository/node-app:0.2 7126555bbfb6 1.62GB 408MB U
- 將這個映像檔推送至 Artifact Registry。
docker push {{{ project_0.default_region | "REGION" }}}-docker.pkg.dev/{{{ project_0.project_id | "PROJECT_ID" }}}/my-repository/node-app:0.2
指令輸出 (可能與您的輸出內容不同):
The push refers to a repository [{{{project_0.default_region | "REGION"}}}-docker.pkg.dev/{{{project_0.project_id | "PROJECT_ID"}}}/my-repository/node-app:0.2]
057029400a4a: Pushed
342f14cb7e2b: Pushed
903087566d45: Pushed
99dac0782a63: Pushed
e6695624484e: Pushed
da59b99bbd3b: Pushed
5616a6292c16: Pushed
f3ed6cb59ab0: Pushed
654f45ecb7e3: Pushed
2c40c66f7667: Pushed
0.2: digest: sha256:25b8ebd7820515609517ec38dbca9086e1abef3750c0d2aff7f341407c743c46 size: 2419
-
推送完畢後,請依序點選「導覽選單」圖示 >「查看所有產品」,然後在「CI/CD」下方,依序前往「Artifact Registry」>「存放區」。
-
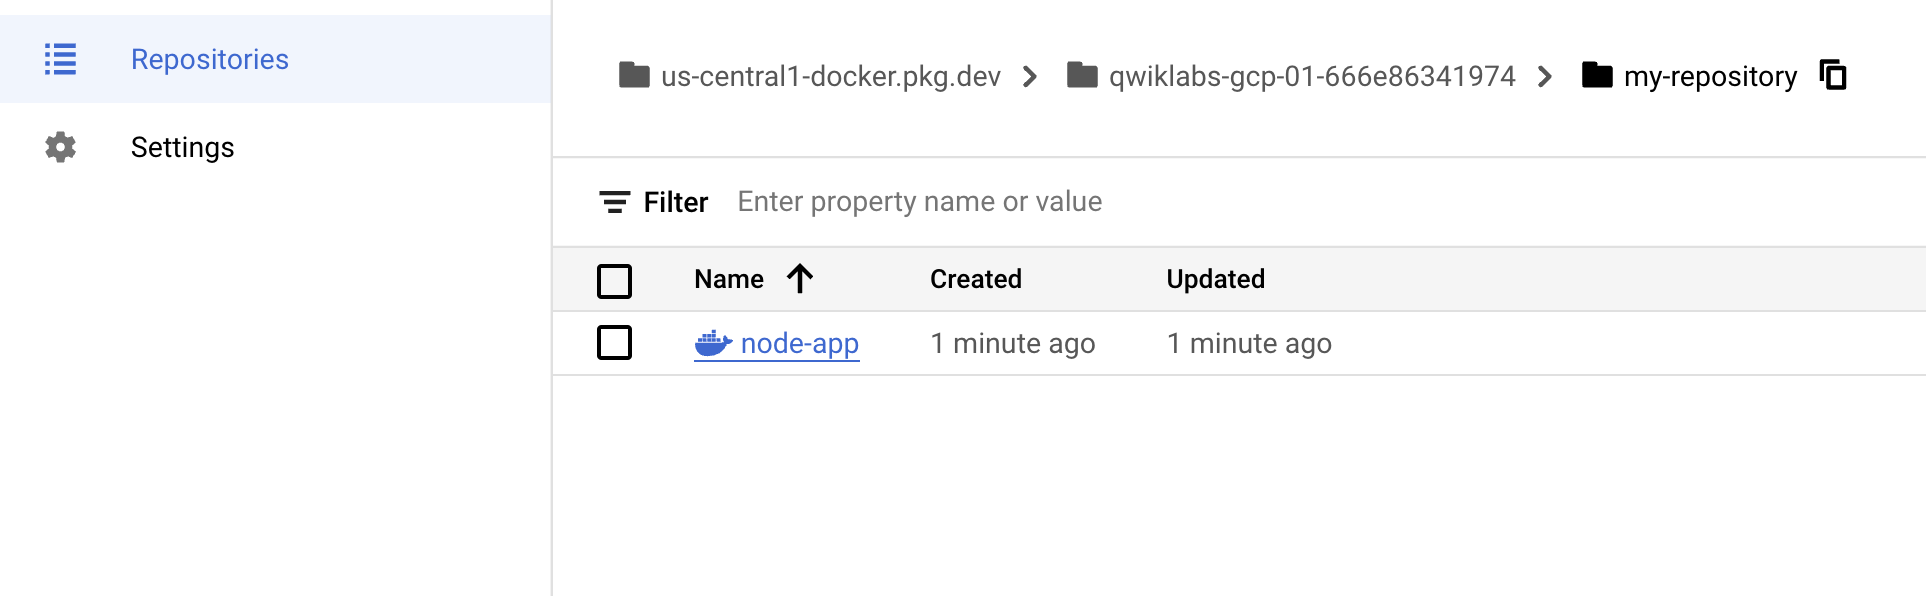
點選「my-repository」。您應該會看到已建立的 node-app Docker 容器:
測試映像檔
您可以啟動新的 VM、透過 SSH 連至該 VM,然後安裝 gcloud。為求簡便,只要移除所有容器和映像檔,即可模擬全新環境。
- 停止並移除所有容器:
docker stop $(docker ps -q)
docker rm $(docker ps -aq)
您必須先移除 node:lts 的子映像檔,才能移除 node 映像檔。
- 執行下列指令,移除所有 Docker 映像檔。
docker rmi {{{ project_0.default_region | "REGION" }}}-docker.pkg.dev/{{{ project_0.project_id| "PROJECT_ID" }}}/my-repository/node-app:0.2
docker rmi node:lts
docker rmi -f $(docker images -aq) # remove remaining images
docker images
(指令輸出)
REPOSITORY TAG IMAGE ID CREATED SIZE
此時,環境應該已接近全新狀態。
- 提取並執行映像檔。
docker run -p 4000:80 -d {{{ project_0.default_region | "REGION" }}}-docker.pkg.dev/{{{ project_0.project_id| "PROJECT_ID" }}}/my-repository/node-app:0.2
- 對執行中的容器執行 curl 指令。
curl http://localhost:4000
(指令輸出)
Welcome to Cloud
檢查工作是否已完成
點選「Check my progress」,確認工作已完成。如果成功將容器映像檔發布至 Artifact Registry,就會看到評估分數。
將容器映像檔發布至 Artifact Registry
這個步驟展示了容器的可攜性。無論是在地端部署環境或 VM,只要在主機上安裝 Docker,就能從公開或私人存放區中提取映像檔,並根據該映像檔執行容器。除了 Docker 外,您不必在主機上安裝任何應用程式依附元件。
恭喜!
太棒了!在本實驗室,您完成了多項實作活動,包括根據 Docker Hub 中的公開映像檔執行容器。您還建構了自己的容器映像檔,並成功推送至 Google Artifact Registry,也學到如何有效對執行中的容器偵錯。此外,您還實際使用從 Google Artifact Registry 提取的映像檔來執行容器,進一步加深對 Docker 的瞭解並提升操作熟練度。
後續步驟/瞭解詳情
Google Cloud 教育訓練與認證
協助您瞭解如何充分運用 Google Cloud 的技術。我們的課程會介紹專業技能和最佳做法,讓您可以快速掌握要領並持續進修。我們提供從基本到進階等級的訓練課程,並有隨選、線上和虛擬課程等選項,方便您抽空參加。認證可協助您驗證及證明自己在 Google Cloud 技術方面的技能和專業知識。
使用手冊上次更新日期:2026 年 6 月 15 日
實驗室上次測試日期:2026 年 6 月 15 日
Copyright 2026 Google LLC 保留所有權利。Google 和 Google 標誌是 Google LLC 的商標,其他公司和產品名稱則有可能是其關聯公司的商標。