As Lead AI Solutions Architect at Cymbal Bank, a financial service provider that's part of the Cymbal Group, you are assigned to assist the team with enforcing security standards for the Zermatt Holiday Helper conversational agent, a ski-lesson booking tool offered to high-value, diamond-tier retail banking customers.
Your goal is to secure communication between middleware applications and Cymbal Bank's Conversational Agent by using private networks and authenticated interactions.
This involves configuring Private Service Connect (PSC) for secure API access, enforcing ID token-based authentication for webhooks, and using Service Directory to enable private access to webhooks hosted on Cloud Run.
Objectives
In this lab, you learn how to perform the following tasks:
Set up Private Service Connect (PSC) for secure, private access to Conversational Agents APIs.
Enforce ID token authentication for Cloud Run webhooks.
Configure internal-only ingress for your Cloud Run service.
Use Service Directory to configure a private webhook endpoint.
Grant the necessary IAM roles for secure service discovery and access.
You need to ensure that by the end of this lab, your Conversational Agents agent securely interacts with internal services to meet Cymbal Bank's security requirements.
Setup and requirements
Before you click the Start Lab button
Read these instructions. Labs are timed and you cannot pause them. The timer, which starts when you click Start Lab, shows how long Google Cloud resources will be made available to you.
This Qwiklabs hands-on lab lets you do the lab activities yourself in a real cloud environment, not in a simulation or demo environment. It does so by giving you new, temporary credentials that you use to sign in and access Google Cloud for the duration of the lab.
What you need
To complete this lab, you need:
Access to a standard internet browser (Chrome browser recommended).
Time to complete the lab.
Note: If you already have your own personal Google Cloud account or project, do not use it for this lab.
Note: If you are using a Pixelbook, open an Incognito window to run this lab.
How to start your lab and sign in to the Google Cloud Console
1. Click the Start Lab button. If you need to pay for the lab, a pop-up opens for you to select your payment method. On the left is a panel populated with the temporary
credentials that you must use for this lab.
2. Copy the username, and then click Open Google Console. The lab spins up resources, and then opens another tab that shows the Sign in page.
Tip: Open the tabs in separate windows, side-by-side.
If you see the Choose an account page, click Use Another Account.
3. In the Sign in page, paste the username that you copied from the Connection Details panel. Then copy and paste the password.
Important: You must use the credentials from the Connection Details panel. Do not use your Qwiklabs credentials. If you have your own Google Cloud account, do not use it for this lab (avoids incurring charges).
4. Click through the subsequent pages:
Accept the terms and conditions.
Do not add recovery options or two-factor authentication (because this is a temporary account).
Do not sign up for free trials.
After a few moments, the Cloud Console opens in this tab.
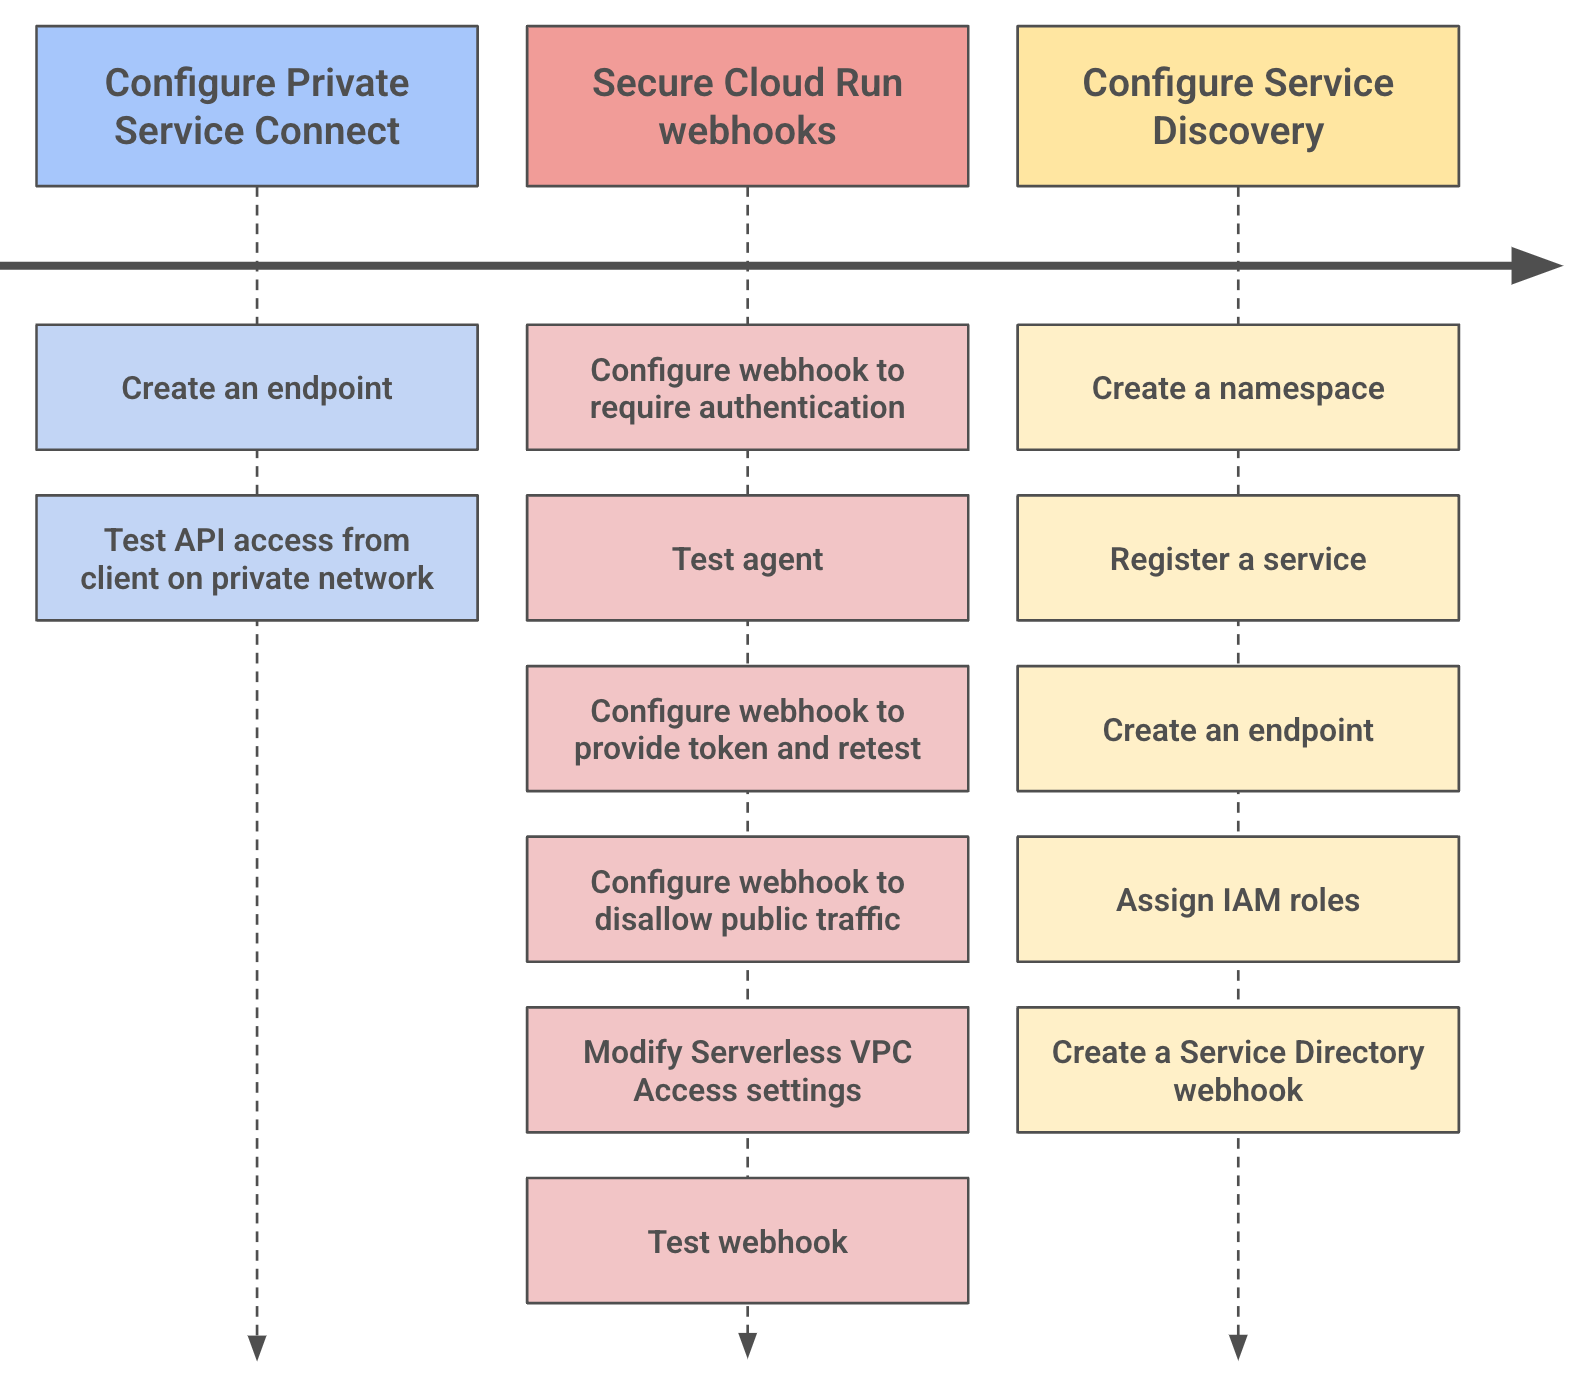
Task 1. Secure the agent, webhook, and tool endpoints
In this task, you ensure compliance with Cymbal Bank's well-defined security requirements for systems, which include:
Traffic from your middleware applications to Conversational Agents APIs should traverse only private networks.
Applications like your webhook and tool application should require authentication, and be accessed over private networks.
Here is a breakdown of the test-related activities in this task:
Configure Private Service Connect for access to Conversational Agents APIs
In the Google Cloud console, search for Private Service Connect, and select Private Service Connect in the search results.
Click Connect endpoint and configure it with the following settings:
Setting
Value
Target
Google APIs
Scope
Global
Bundle type
All Google Cloud APIs
Endpoint name
labapis
Network
default
In the IP address section, click Create IP address. Configure it as follows:
Setting
Value
Name
lab-psc-ip
IP Address
10.100.1.100
Click Save.
Click Add endpoint.
From the Navigation menu (), go to VPC Network > VPC networks. In the VPC Networks list, click on default, and switch to the Subnets tab.
Click on the default entry for .
Click Edit, toggle Private Google Access to On, and click Save.
SSH into the private-client VM in your project. (Go to Compute Engine > VM Instances and click on the SSH button next to the private-client entry in the list. If prompted, click Authorize to allow SSH-in-browser to connect to VMs.)
Execute the following ping request to check the IP address associated with the global Conversational Agents endpoint:
This should show that the DNS used by this machine resolves the Conversational Agents endpoint to the PSC endpoint you configured (10.100.1.100). The ping won't complete, but that's fine.
Run the traffic generation script with the following command:
Select your project, , and then select your agent, Booking Lesson Flow - Test Agent.
Click on Conversation history in the left-hand menu.
Confirm that new session entries (with today's date) appear, indicating a successful interaction between the VM and the Conversational Agents agent over PSC.
Task 2. Secure webhooks with Auth and private Cloud Run access
Configure the Cloud Run service to require authentication
In the Google Cloud console, from the Navigation menu (), go to the Cloud Run page.
Click on the name of the lab-agent-tool-and-webhook service.
Click on the Security tab and select Require authentication.
Click Save and wait for 30 seconds to allow the change to persist.
Note: You can ignore the error message Unable to fetch IAM policy.
Select your project, , and then select your agent, Booking Lesson Flow - Test Agent.
Click on Test Cases in the left-hand menu.
Click Book Lesson Flow - Test and observe the Expected conversation. Take note of the expected sequence of inputs that a user is expected to provide during the test, namely:
Hi
Today
Advanced
Hugo / Ingrid, etc. (The name of one of the ski instructors)
Click Toggle Simulator, and try starting a similar conversation by entering Hi at the prompt. You should get an error showing that the webhook rejected the request (this is due to the lack of authentication).
Click on Flows and select Webhooks > book_lesson. On the Webhook page, scroll down to Service Agent Auth, and select ID Token to enable authentication.
Click Save.
Rerun your test case – it should work now! If it doesn't work immediately, re-check your work and wait for 1-2 minutes, then try again. Sometimes there's a brief delay until the authentication settings take effect.
Configure the Cloud Run service for internal traffic
In the Google Cloud console, go to the Cloud Run page, click on the lab-agent-tool-and-webhook service in the list.
On the Networking tab, under Ingress, select Internal and click Save. This configures the service so that it only allows traffic coming from the VPC network and connected private networks; it disallows traffic from the public Internet.
From the Navigation menu (), go to VPC Network > Serverless VPC access. On the Serverless VPC access page, click on the lab-vpc-connector, and click the Edit () icon.
Change the Minimum Instances from 2 to 3 and maximum from 3 to 5, then click Save. Wait for the connector to finish updating.
Once the connector shows a Status of Connector is deployed and ready to receive traffic, return to the Conversational Agents console and run your test case. It should complete successfully.
Note:
Your agent is able to talk to the Cloud Run service via internal networking by using the Serverless VPC connector that was set up at the lab startup. So there was no service interruption when you reconfigured the service to no longer accept requests from the public Internet.
Task 3. Enable private access for Conversational Agents to webhooks
In this task, you create a namespace for to enable private access for Conversational Agents to the webhooks.
Click the namespaces list link to get to the namespace creation page.
Click Create namespace and use following settings:
Setting
Value
Region
Namespace name
sd-namespace-lab
Click Create.
Return to Service Directory (you can select it in the left-hand menu), click on Register service, and configure it with the following settings (you may need to click Next at some point to proceed with the configuration):
Setting
Value
Service type
Standard
Region
Namespace
sd-namespace-lab
Service name
private-webhook-lab
Click Create.
Once the private-webhook-lab service is created, click the More () icon in the Actions column, and select Add endpoint to service it with the following settings:
Setting
Value
Endpoint name
privatewebhookep
IP address
10.100.1.200
Port
443
Associated VPC Network
Choose from the list > default
Click Create.
Navigate to IAM & Admin > IAM in the Google Cloud console.
Select the checkbox for Include Google-provided role grants.
Find the service account .
In the IAM list, click the Edit () icon associated with .
In the left-hand menu, click on Flows > Manage > Webhooks.
Click the + Create button.
Fill out the form with the following values:
Setting
Value
Display name
private-webhook-ep
Type
Service Directory
Service directory
Webhook URL
Click Save.
Note:
This configuration points the webhook to the Service directory entry, which would result in Conversational Agents calling a server at 10.100.1.200. That server would be an SSL server hosting your webhook application.
You don't need to set up that server and test for the purposes of this lab; getting the networking configuration right is enough.
Congratulations
You secured the communication of Cymbal Bank's Conversational Agent by configuring Private Service Connect for private API access and enabling ID token authentication for Cloud Run services, thereby ensuring secure interactions.
End your lab
When you have completed your lab, click End Lab. Qwiklabs removes the resources you’ve used and cleans the account for you.
You will be given an opportunity to rate the lab experience. Select the applicable number of stars, type a comment, and then click Submit.
The number of stars indicates the following:
1 star = Very dissatisfied
2 stars = Dissatisfied
3 stars = Neutral
4 stars = Satisfied
5 stars = Very satisfied
You can close the dialog box if you don't want to provide feedback.
For feedback, suggestions, or corrections, please use the Support tab.
Manual last updated May 23, 2025
Lab last tested May 23, 2025
Copyright 2023 Google LLC All rights reserved. Google and the Google logo are trademarks of Google LLC. All other company and product names may be trademarks of the respective companies with which they are associated.
Lab membuat project dan resource Google Cloud untuk jangka waktu tertentu
Lab memiliki batas waktu dan tidak memiliki fitur jeda. Jika lab diakhiri, Anda harus memulainya lagi dari awal.
Di kiri atas layar, klik Start lab untuk memulai
Gunakan penjelajahan rahasia
Salin Nama Pengguna dan Sandi yang diberikan untuk lab tersebut
Klik Open console dalam mode pribadi
Login ke Konsol
Login menggunakan kredensial lab Anda. Menggunakan kredensial lain mungkin menyebabkan error atau dikenai biaya.
Setujui persyaratan, dan lewati halaman resource pemulihan
Jangan klik End lab kecuali jika Anda sudah menyelesaikan lab atau ingin mengulanginya, karena tindakan ini akan menghapus pekerjaan Anda dan menghapus project
Konten ini tidak tersedia untuk saat ini
Kami akan memberi tahu Anda melalui email saat konten tersedia
Bagus!
Kami akan menghubungi Anda melalui email saat konten tersedia
Satu lab dalam satu waktu
Konfirmasi untuk mengakhiri semua lab yang ada dan memulai lab ini
Gunakan penjelajahan rahasia untuk menjalankan lab
Gunakan jendela Samaran atau browser pribadi untuk menjalankan lab ini. Langkah ini akan mencegah konflik antara akun pribadi Anda dan akun Siswa yang dapat menyebabkan tagihan ekstra pada akun pribadi Anda.
This lab explores how to secure agent, webhook, and tool endpoints for Conversational Agents.


 ), go to VPC Network > VPC networks. In the VPC Networks list, click on default, and switch to the Subnets tab.
 ) icon in the Actions column, and select Add endpoint to service it with the following settings:


