Overview
In this lab, you use Gemini, an AI-powered collaborator in Google Cloud, to investigate logs and set up a build environment for a set of microservices in Google Kubernetes Engine (GKE).
This lab is intended for engineers of any experience level working in a DevOps environment.
Note: Duet AI was renamed to Gemini, our next-generation model. This lab has been updated to reflect this change. Any references to Duet AI in the user interface or documentation should be treated as equivalent to Gemini while following the lab instructions.
Note: As an early-stage technology, Gemini can generate output that seems plausible but is factually incorrect. We recommend that you validate all output from Gemini before you use it. For more information, see Gemini for Google Cloud and responsible AI.
Objectives
In this lab, you learn how to perform the following tasks:
- With help from Gemini, create a GKE cluster.
- Deploy a set of microservices to GKE.
- Find and understand application logs with help from Gemini.
- Use Gemini to investigate how to create a private build environment.
Setup
For each lab, you get a new Google Cloud project and set of resources for a fixed time at no cost.
-
Click the Start Lab button. If you need to pay for the lab, a pop-up opens for you to select your payment method.
On the left is the Lab Details panel with the following:
- The Open Google Cloud console button
- Time remaining
- The temporary credentials that you must use for this lab
- Other information, if needed, to step through this lab
-
Click Open Google Cloud console (or right-click and select Open Link in Incognito Window if you are running the Chrome browser).
The lab spins up resources, and then opens another tab that shows the Sign in page.
Tip: Arrange the tabs in separate windows, side-by-side.
Note: If you see the Choose an account dialog, click Use Another Account.
-
If necessary, copy the Username below and paste it into the Sign in dialog.
{{{user_0.username | "Username"}}}
You can also find the Username in the Lab Details panel.
-
Click Next.
-
Copy the Password below and paste it into the Welcome dialog.
{{{user_0.password | "Password"}}}
You can also find the Password in the Lab Details panel.
-
Click Next.
Important: You must use the credentials the lab provides you. Do not use your Google Cloud account credentials.
Note: Using your own Google Cloud account for this lab may incur extra charges.
-
Click through the subsequent pages:
- Accept the terms and conditions.
- Do not add recovery options or two-factor authentication (because this is a temporary account).
- Do not sign up for free trials.
After a few moments, the Google Cloud console opens in this tab.
Note: To view a menu with a list of Google Cloud products and services, click the Navigation menu at the top-left, or type the service or product name in the Search field.

Activate Cloud Shell
Cloud Shell is a virtual machine that contains development tools. It offers a persistent 5-GB home directory and runs on Google Cloud. Cloud Shell provides command-line access to your Google Cloud resources. gcloud is the command-line tool for Google Cloud. It comes pre-installed on Cloud Shell and supports tab completion.
-
Click the Activate Cloud Shell button ( ) at the top right of the console.
-
Click Continue.
It takes a few moments to provision and connect to the environment. When you are connected, you are also authenticated, and the project is set to your PROJECT_ID.
Sample commands
- List the active account name:
gcloud auth list
(Output)
Credentialed accounts:
- <myaccount>@<mydomain>.com (active)
(Example output)
Credentialed accounts:
- google1623327_student@qwiklabs.net
gcloud config list project
(Output)
[core]
project = <project_ID>
(Example output)
[core]
project = qwiklabs-gcp-44776a13dea667a6
Note: Full documentation of gcloud is available in the gcloud CLI overview guide.
Task 1. Configure your environment and account for Gemini
-
Sign in to the Google Cloud console with your lab credentials, and open the Cloud Shell terminal window.
-
To set your project ID and region environment variables, in Cloud Shell, run the following commands:
PROJECT_ID=$(gcloud config get-value project)
REGION={{{project_0.default_region|set at lab start}}}
echo "PROJECT_ID=${PROJECT_ID}"
echo "REGION=${REGION}"
-
To store the signed-in Google user account in an environment variable, run the following command:
USER=$(gcloud config get-value account 2> /dev/null)
echo "USER=${USER}"
-
Enable the Cloud AI Companion API for Gemini:
gcloud services enable cloudaicompanion.googleapis.com --project ${PROJECT_ID}
-
To use Gemini, grant the necessary IAM roles to your Google Cloud Qwiklabs user account:
gcloud projects add-iam-policy-binding ${PROJECT_ID} --member user:${USER} --role=roles/cloudaicompanion.user
gcloud projects add-iam-policy-binding ${PROJECT_ID} --member user:${USER} --role=roles/serviceusage.serviceUsageViewer
Adding these roles lets the user use Gemini assistance.
To verify the objective, click Check my progress.
Enable relevant APIs and grant the necessary IAM roles.
Task 2. Configure Google Kubernetes Engine
In this task, you enable the Google Kubernetes Engine (GKE) API, give yourself the permissions required to manage a GKE cluster, and create a cluster.
-
In Cloud Shell, to enable the GKE API, run the following command:
gcloud services enable container.googleapis.com --project ${PROJECT_ID}
-
To grant your user admin permissions for GKE, run the following command:
gcloud projects add-iam-policy-binding ${PROJECT_ID} --member user:${USER} --role=roles/container.admin
You can create a zonal GKE cluster to run your microservices. Gemini can tell you how to create it.
-
In the Google Cloud console, if you don't see the Open or close Gemini AI chat ( ) menu, refresh the page.
-
To open the Gemini pane, in the Google Cloud console top menu, click Open or close Gemini AI chat (), and then, if required, click Enable.
-
Click Start Chatting.
Note: If the Start Chatting button is not enabled, refresh the page and open Gemini again.
-
For the Gemini prompt, type the text below, and then click Send Prompt ( ):
):
What's the gcloud command for creating a zonal GKE cluster with a custom number of nodes and custom machine type?
Gemini should provide a response similar to this:
gcloud container clusters create <CLUSTER_NAME> \
--project=PROJECT_ID \
--zone=COMPUTE_ZONE \
--num-nodes=NUM_NODES \
--machine-type=MACHINE_TYPE
-
To create a zonal GKE cluster, run the following command:
gcloud container clusters create test \
--project={{{project_0.project_id | set at lab start}}} \
--zone={{{project_0.default_zone | set at lab start}}} \
--num-nodes=3 \
--machine-type=e2-standard-4
The cluster takes a few minutes to create. Wait for the command to finish.
To verify the objective, click Check my progress.
Configure Google Kubernetes Engine.
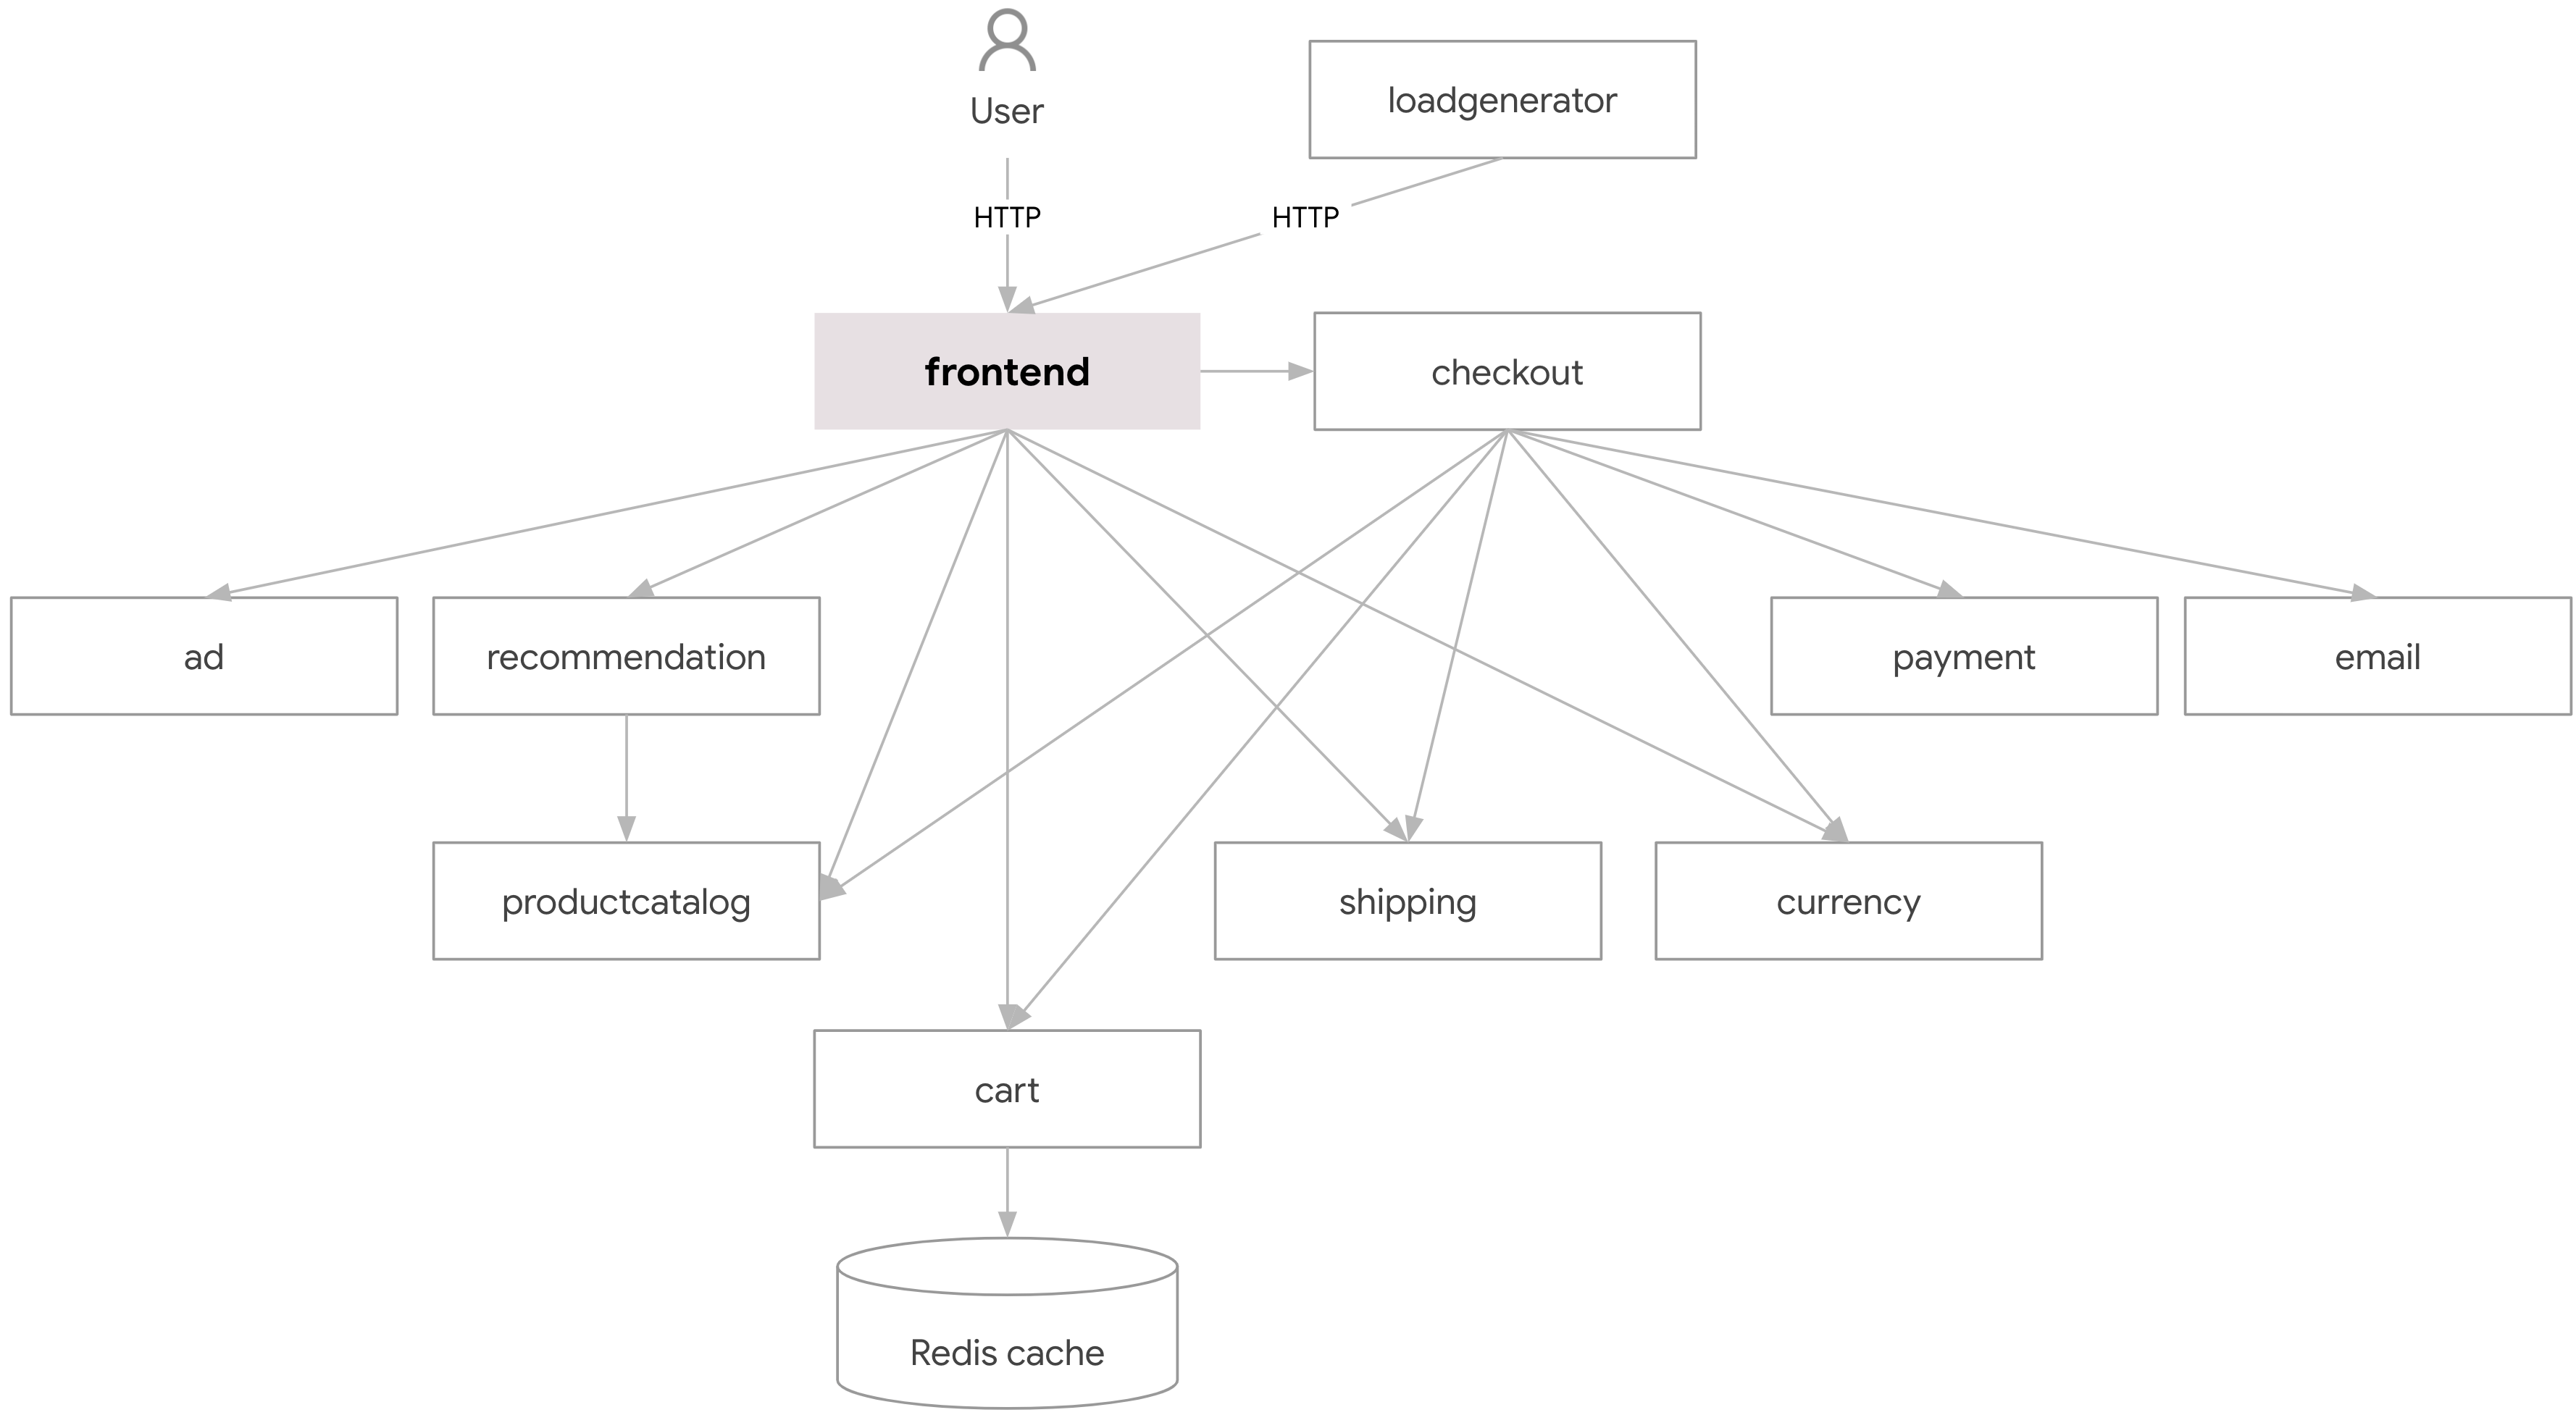
Task 3. Use kubectl to deploy a set of microservices
In this task, you clone a repository that contains the code for several microservices that make up an online boutique application. You also use kubectl to deploy these microservices to the GKE cluster.
Here's an architecture diagram for the application:
-
In Cloud Shell, to clone the repository, run the following command:
git clone --depth=1 https://github.com/GoogleCloudPlatform/microservices-demo
This repository contains the source code for each microservice in the application.
-
To deploy the microservices to GKE, run the following commands:
cd ~/microservices-demo
kubectl apply -f ./release/kubernetes-manifests.yaml
-
To check the deployment status, until each microservice is available, repeat the following command:
kubectl get deployments
When each microservice is available, the corresponding value in the Available column will be set to 1. The kubectl get deployments command will look similar to this:
NAME READY UP-TO-DATE AVAILABLE AGE
adservice 1/1 1 1 94s
cartservice 1/1 1 1 96s
checkoutservice 1/1 1 1 97s
currencyservice 1/1 1 1 95s
emailservice 1/1 1 1 97s
frontend 1/1 1 1 97s
loadgenerator 1/1 1 1 95s
paymentservice 1/1 1 1 96s
productcatalogservice 1/1 1 1 96s
recommendationservice 1/1 1 1 97s
redis-cart 1/1 1 1 94s
shippingservice 1/1 1 1 95s
The application is accessed by its external IP address.
-
To determine the URL for the application, run the following command:
echo "http://$(kubectl get service frontend-external -o=jsonpath='{.status.loadBalancer.ingress[0].ip}')"
Note: The external IP address might take a minute to be available. Run the command until the URL includes an IP address.
-
To open the application in a browser tab, hold Control (for Windows and Linux) or Command (for macOS) and then click the URL in the Cloud Shell.
The home page of the application opens. You can try out the application.
Note: If you get a pop-up that The connection is not secure, click Continue to Site.
To verify the objective, click Check my progress.
Use kubectl to deploy a set of microservices.
Task 4. Use Gemini to understand logs for workloads in GKE
Imagine that you're a DevOps engineer who has inherited an existing set of microservices to manage. These microservices run in a GKE cluster. To understand the environment, you decide to inspect logs from the various microservices.
In this task, you use Gemini to help design queries to search for specific logs and explain log entries.
-
On the Google Cloud console title bar, type Logs Explorer in the Search field, then click Logs Explorer in the search results.
-
For the Gemini prompt, type the text below, and then click Send Prompt ():
What is a Logs Explorer query to search for logs from Pods in a namespace called "default" in a GKE cluster named "test"?
You should receive a response that provides a query that looks similar to this:
resource.type="k8s_container"
resource.labels.cluster_name="test"
resource.labels.namespace_name="default"
Note: If the query from Gemini looks different from the response above, you can use the query provided here.
-
In the Query box, paste the query, and then click Run query.
Log messages are now filtered to only be messages originating from the test GKE cluster. You can now explore the log entries.
-
To learn about a log entry, expand a log entry, and then click Explain this log entry.
For example, if you click the explain button for a log entry GET /product/0PUK6V6EV0, you might get a response from Gemini that looks like this:
• This is a log entry from a Kubernetes container named main.
• The container is part of a pod named loadgenerator-84cc74dcd-jf6dr in the default namespace.
• The pod is running on cluster test in zone us-west1-a.
• The log entry is an HTTP request to /product/0PUK6V6EV0 that took 49 milliseconds to process.
• The request resulted in a 200 OK response and 40 bytes of data being sent back to the client.
After exploring the log explanations for your workloads, you now decide that you should set up infrastructure to build your team's future container images on a set of private workers with no access to the internet.
Task 5. Use Gemini to create a private build environment for container images
In this task, you use Gemini to help identify how to create and run a private build environment.
You are responsible for setting up a build system for a sensitive project. You have heard that Cloud Build is a service for performing builds on Google Cloud, and that Cloud Build uses worker pools to run your builds.
-
In the Gemini chat, to find out more about worker pools, enter the following prompt:
What is a Cloud Build worker pool?
Gemini might provide a response that begins similar to this:
A Cloud Build worker pool is a group of virtual machines that are dedicated to running your builds. Worker pools are created in a specific region and zone, and they can be either private or public.
Private pools are only accessible to your project, and they offer a number of benefits, including:
• Isolation: Your builds will run on dedicated machines, which means that they will not be affected by other workloads running in the same project.
• Security: Private pools are more secure than public pools, as they are not accessible to other projects.
• Performance: Private pools can offer better performance than public pools, as they are not shared with other projects.
The security provided by private worker pools might be a good choice for your project. It would be even better if the builds can be blocked from accessing the public internet.
-
In the Gemini chat, enter the following prompt:
Can you create a private worker pool that has no access to the public internet?
Gemini might provide a response similar to this:
Yes, you can create a private worker pool that has no access to the public internet. This is known as a "private pool with no public egress".
To create a private pool with no public egress, you can use the --no-public-egress flag when creating the pool.
Great, this should be very secure. You realize that the workers of a private pool won't have access to public package repositories like PyPI. Knowing that you will need to host private packages, you wonder if Artifact Registry can be used.
-
In the Gemini chat, enter the following prompt:
If I create a private pool with no public egress, can I use Artifact Registry to host my packages privately and access them from a private pool?
Gemini might provide a response similar to this:
Yes, you can use Artifact Registry to host your packages privately and access them from a private pool with no public egress.
To do this, you will need to create a private Artifact Registry repository and grant your private pool access to the repository. You can do this by adding the service account for your private pool as a member of the repository with the Artifact Registry Reader role.
Once you have created the repository and granted your private pool access, you can push your packages to the repository and then pull them from your private pool.
OK, let's have Gemini provide us the gcloud CLI command to create the private pool.
-
In the Gemini chat, enter the following prompt:
What is the gcloud command for creating a private worker pool with no public egress?
Gemini might provide a command similar to this:
gcloud builds worker-pools create POOL_NAME \
--project=PROJECT_ID \
--region=REGION \
--no-public-egress
-
To create the private pool, run the following command:
gcloud builds worker-pools create pool-test \
--project={{{project_0.project_id|set at lab start}}} \
--region={{{project_0.default_region|set at lab start}}} \
--no-public-egress
The lab environment likely returns an error message that looks like this:
ERROR: (gcloud.builds.worker-pools.create) FAILED_PRECONDITION: project "{{{project_0.project_id|set at lab start}}}" is unable to use private pools
You can ignore this error message in this lab.
Note: Private pools are currently disabled within the lab environment. For a project outside of the lab environment, the command to create a private pool should work.
Now let's ask Gemini how to create the private Docker repository.
-
In the Gemini chat, enter the following prompt:
How can I use gcloud to create a private Docker repository for container images in Artifact Registry?
Gemini might provide a response that includes a gcloud CLI command similar to this:
gcloud artifacts repositories create REPOSITORY \
--repository-format=docker \
--location=REGION \
--description="DESCRIPTION"
where:
• REPOSITORY is the name of the private Docker repository to be created.
• REGION is the region in which to create the private Docker repository.
• DESCRIPTION is a description of the private Docker repository.
-
To create the repository, run the following command:
gcloud artifacts repositories create my-repo \
--repository-format=docker \
--location={{{project_0.default_region|set at lab start}}} \
--description="My private Docker repository"
The repository is created.
To verify the objective, click Check my progress.
Create a repository.
End your lab
When you have completed your lab, click End Lab. Qwiklabs removes the resources you’ve used and cleans the account for you.
You will be given an opportunity to rate the lab experience. Select the applicable number of stars, type a comment, and then click Submit.
The number of stars indicates the following:
- 1 star = Very dissatisfied
- 2 stars = Dissatisfied
- 3 stars = Neutral
- 4 stars = Satisfied
- 5 stars = Very satisfied
You can close the dialog box if you don't want to provide feedback.
For feedback, suggestions, or corrections, please use the Support tab.
Congratulations!
In this lab you learned how to:
- With help from Gemini, create a GKE cluster.
- Deploy a set of microservices to GKE.
- Find and understand application logs with help from Gemini.
- Use Gemini to investigate how to create a private build environment.
Copyright 2024 Google LLC All rights reserved. Google and the Google logo are trademarks of Google LLC. All other company and product names may be trademarks of the respective companies with which they are associated.


