GSP643


Overview
Twelve years ago, Lily started the Pet Theory chain of veterinary clinics. The Pet Theory chain has expanded rapidly over the last few years. Their old appointment system is not able to handle the increased load or allow clients to schedule their own appointments, so Lily asked Patrick, in IT, and Ruby, a consultant, to build a cloud-based system that easily scale. In this lab you will build a fully fledged Firebase web app that allows users to log information and schedule appointments in real time.
Architecture
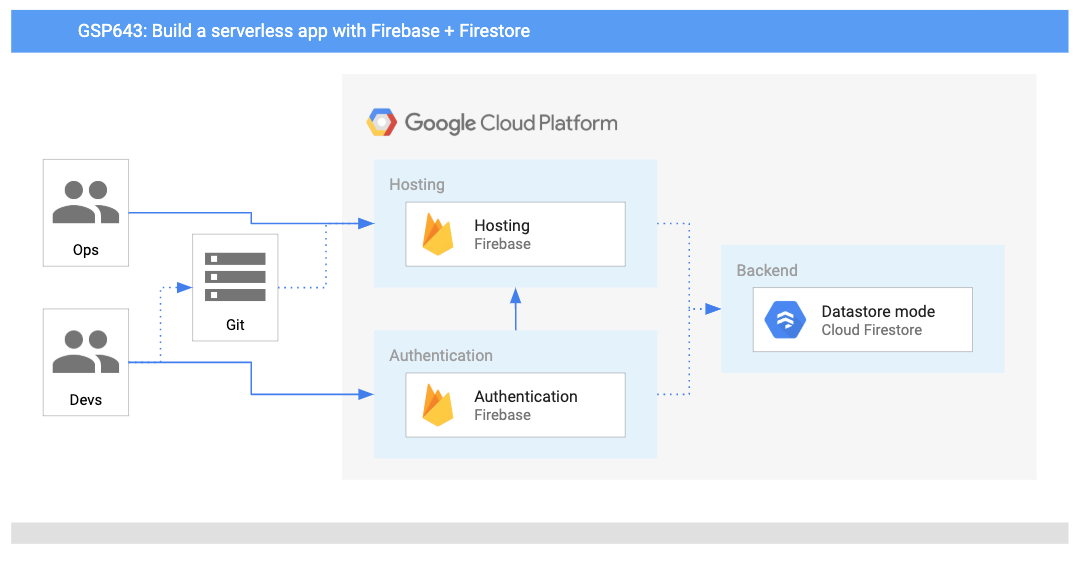
This diagram gives you an overview of the services you will be using and how they connect to one another:
Objectives
In this lab, you will learn how to:
- Configure Firestore Security to automate server-side authentication and authorization.
- Add Google sign-in to your web app.
- Configure your database so users can add their contact information.
- Explore and deploy code that allows users to schedule appointments.
- Explore Firebase's real time updates in your web app.
Prerequisites
This is a intermediate level lab. This assumes familiarity with the Cloud Console and shell environments. Experience with Firebase will be helpful, but it is not required. Before taking this lab it is recommended that you have completed the following lab:
You should also be comfortable editing files. You can use your favorite text editor (like nano, vi, etc.) or you can launch the code editor from Cloud Shell, which can be found in the top ribbon:

Once you're ready, scroll down and follow the steps below to setup your lab environment.
Firebase Backend
Ruby sends Patrick an email:
|

Ruby, Software Consultant
|
Hi Patrick,
Awesome work last week. Great to see that the clinic's data has been migrated to Firestore!
It looks like the next task is to use Firebase to host the Pet Theory website.
Ruby
|
|

Patrick, IT Administrator
|
Hi Ruby,
I haven't heard of Firebase hosting before, what are the benefits? Where would I get started?
Patrick
|
|
Ruby, Software Consultant
|
Hi Patrick
The primary benefit of Firebase hosting is that it is serverless, so there is no infrastructure to manage. Security rules are also embedded within the application, so permissions can be restricted to minimize issues when handling customer data.
It also has a "pay as you use" model, which means Firebase is a comprehensive mobile development platform for our use case.
Ruby
|
|

Patrick, IT Administrator
|
Hi Ruby
Sounds like Firebase will make security and infrastructure management (a big part of my job) a whole lot easier. I'm excited to not be billed for idle servers either!
Patrick
|
Ruby sends Patrick some background information in an email, and they hold a meeting to work out the key activities. From this meeting they determine that he needs to:
- Configure a Firebase project.
- Establish security policies.
- Add the Firestore CLI to the Google Cloud project.
Next, help Patrick accomplish these tasks.
Task 1. Register a Firebase Application
Open an incognito window and navigate to the Firebase Console.
When requested, enter the:
Note: A Firebase project labeled has been provisioned for you. Select this project to access the console.
-
If prompted, accept the Firebase Terms and Conditions and click Continue.
-
On the Project Overview page, click + Add app and then select the Web icon.
-
When prompted for an "App nickname", type in Pet Theory.
-
Check the box next to Also set up Firebase Hosting for this app.
-
In the dropdown for the site, select Create a new site or ensure it matches your project ID (or as instructed in the lab details).
-
Click the Register app button.
-
In the subsequent steps (Add Firebase SDK, Install Firebase CLI, and Deploy to Firebase Hosting), click Next or Continue to console to return to the main dashboard.
You have now configured the Firebase application.
Test completed task
Click Check my progress to verify the objective.
Register your Firebase app
Task 2. Enable Firebase Products.
Firebase Authentication
In the Firebase Console, set up Firebase Authentication to allow users to sign in with Google.
-
In the left navigation menu, click Authentication (you can find it under Project shortcuts or Product categories > Security if not pinned).
-
If this is your first time, click Get Started.
-
In the Sign-in method tab, select Google from the list of providers.
-
In the configuration dialog, click the Enable toggle.
-
Select your support email from the dropdown menu and click Save.
-
To add the custom domain for authorization, click the Settings tab at the top of the Authentication page.
-
Select Authorized domains from the menu on the left side of the settings pane.
-
Click the Add domain button.
-
Enter the following domain (replacing with your project ID if necessary):
{{{ project_0.project_id | PROJECT_ID }}}.web.app
-
Click the Add button.
Test completed task
Click Check my progress to verify the objective.
Set up Firebase authentication
Firebase Firestore
Next, set up the Firestore Database.
-
In the left navigation menu, under Databases and Storage, click Firestore.
-
On the Cloud Firestore landing page, click the Create database button.
-
In Step 1: Select edition, choose Standard edition and click Next.
-
In Step 2: Database ID & location, select the appropriate location (e.g., nam5 or accept default) and click Next.
-
In Step 3: Configure, select Start in test mode and click Create.
-
Once the database is provisioned, click the Rules tab.
-
Replace the security rules with the following to allow authenticated users to read/write their own data:
rules_version = '2';
service cloud.firestore {
match /databases/{database}/documents {
match /customers/{email} {
allow read, write: if request.auth.token.email == email;
}
match /customers/{email}/{document=**} {
allow read, write: if request.auth.token.email == email;
}
}
}
Click Publish to deploy your changes to Firebase.
You have now set up Firebase Authentication and Firestore. The backend configuration is complete.
Firebase Localhost
You have assisted Patrick in setting up a working Firebase hosting environment where a web developer can deploy their code.
However, Patrick has never enabled Firebase authentication nor has he deployed code to Firebase, so he emails Ruby for some help...
|
Patrick, IT Administrator
|
Hey Ruby,
Thanks for all the tips! The Firebase environment looks like it is all set up. My next task is to deploy the website developers' code.
Can you help me understand what this entails and what I need to do next?
Patrick
|
|
Ruby, Consultant
|
Hi Patrick,
That's great to hear! I'll send you the instructions on how to run the application and add the following features:
- Set up web authentication for logging in.
- Enable customer details to be logged on the Profile page.
- Create a self service portal for appointments.
Ruby
|
|

Patrick, DevOps Engineer
|
Hi Ruby
That sounds like it will be quite a bit of work.
Does that mean I'll have to make structural changes every time I want to add something new? Not to mention the time it will take to see those updates...
Patrick
|
|
Ruby, Consultant
|
Hey Patrick
You can do most of the heavy lifting with Firebase libraries.
Firebase has some great command line tooling to help you connect your localhost to the backend Firebase project.
Use `firebase init` to tell Firebase which products you would like to use.
Once your project is set up you can simply call `firebase deploy` from the command line.
Ruby
|
|
Patrick, IT Administrator
|
Hi Ruby
Wow, that's very comforting! Firebase hosting just gets better and better :-)
Patrick
|
Task 3. Clone the repository and install dependencies.
In this task, you will use Cloud Shell and the Cloud Shell Editor to clone the application code and install the required Node.js packages.
-
In the same incognito window you are using for the Firebase Console, open a new tab, navigate to the Google Cloud Console, and accept the Terms of Service if prompted.
-
Click Activate Cloud Shell in the Google Cloud Console toolbar.
-
In the Cloud Shell terminal, run the following command to copy the lab files from the Cloud Storage bucket:
gcloud storage cp -r gs://spls/gsp643/pet-theory .
-
To view and edit the code, click the Open Editor button in the Cloud Shell toolbar.
-
In the Cloud Shell Editor, navigate to the pet-theory/lab02 folder in the file explorer.
-
Open a terminal in the Cloud Shell Editor (or use the existing Cloud Shell terminal) and change to the lab02 directory:
cd pet-theory/lab02
-
Run the following command to install the Node.js packages:
npm install
Note: The Cloud Shell environment comes pre-installed with Node.js and npm.
You are now ready to link the application to the backend Firebase project.
Task 4. Authorize Firebase Access.
In the IDE, connect Firebase and deploy your application.
-
Type the following command to authorize Firebase project access:
firebase login --no-localhost
Note:
Firebase will attempt to authorize the local environment to connect with the Firebase project.
Therefore, ensure that you perform browser activity in an incognito window to facilitate this action with the appropriate credentials.
-
Enter Y to enable Gemini features in Firebase.
-
Enter Y if asked if Firebase can collect error reporting information and press ENTER.
-
Click the generated URL to open another tab in the same incognito window.
-
Select your lab account then click Allow.
-
Click Yes, I just ran this command to proceed.
-
Click Yes, this is my session ID to confirm your session ID.
-
Copy the generated access code, paste it into the Cloud Shell prompt Enter authorization code:, and then press ENTER.
You should receive output similar to the following response:
Example Output:
✔ Success! Logged in as student-02-21ab4a7ce0d1@qwiklabs.net
Note:
At this point the localhost is linked to the backend Firebase project.
Firebase is now connected and authorized. The next step is to initialize the Firebase products to be used.
Task 5. Initialize Firebase Products.
In the IDE, let Firebase know which products are required.
-
Initialize a new Firebase project in your current working directory:
firebase init
Note:
Running this command steps you through setting up your project directory and Firebase products.
Select the Firebase CLI features you want set up in this folder.
Use the arrow keys to move up and down the list. Use the SPACEBAR to select the product option.
-
Select the following products:
-
Use the arrow keys and the spacebar to select Firestore and Hosting. Ensure your shell matches the following and then hit Enter:
? Which Firebase CLI features do you want to set up for this folder? Press Space to select features, then Enter to confirm your choices.
◯ Realtime Database: Configure a security rules file for Realtime Database and (optionally) provision default insta
◉ Firestore: Configure security rules and indexes files for Firestore
◯ Functions: Configure a Cloud Functions directory and its files
❯◉ Hosting: Configure files for Firebase Hosting and (optionally) set up GitHub Action deploys
◯ Hosting: Set up GitHub Action deploys
◯ Storage: Configure a security rules file for Cloud Storage
-
Run through the rest of the steps to configure Firebase:
- Key down to Use an existing project and press Enter.
- Select your Project ID from the list then press Enter.
- Press N and then ENTER to keep your
firestore.rules file.
- Press N and then ENTER to keep your
firestore.indexes.json file.
- Press ENTER to keep your public directory.
- Press N to disallow rewrites to your
index.html file and then press ENTER.
- Press N when asked to set up automatic builds and deploys with GitHub? and press ENTER.
- Press N when prompted to overwrite your
404.html file.
- Press N when prompted to overwrite your
index.html file.
- Press Y when asked if you would like to install agent skills for Firebase? and then press ENTER.
Example Output:
✔ Agent skills installation started
✔ Wrote configuration info to firebase.json
✔ Wrote project information to .firebaserc
✔ Wrote .gitignore
✔ Firebase initialization complete!
The local configuration is now complete.
Task 6. Deploy to Firebase.
Continue in the Cloud Shell for this step.
Ensure you are in the Code Editor, in the pet-theory/lab02 folder.
-
Edit firebase.json and update the hosting section with the site key:
{
...
"hosting": {
"site": "{{{ project_0.project_id | PROJECT_ID }}}",
...
}
}
-
Open the terminal and deploy your Firebase application, using your site ID value, for example:
firebase deploy --only hosting:{{{ project_0.project_id | PROJECT_ID }}}
Output:
✔ Deploy complete!
Project Console: https://console.firebase.google.com/project/project_0.project_id| "PROJECT_ID"/overview
Hosting URL: https://{{{ project_0.project_id| "site" }}}.web.app
-
Click the generated hosting URL (should resemble .web.app) to open it in a new incognito tab:
https://{{{ project_0.project_id | PROJECT_ID }}}.web.app
Important:
Personal credentials should not be used as authentication in this lab.
Please use the account to perform the Google sign-in.
-
Click the Sign in with Google button:
Note:
If you see a browser is not supported or 3rd party cookies and data may be disabled error, make sure to enable cookies in your browser.
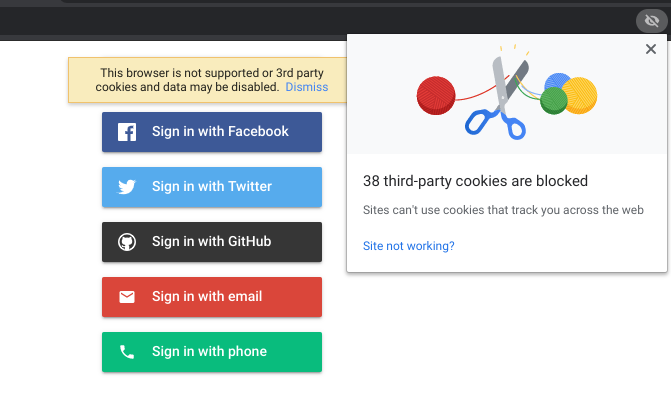
In Chrome, click the eye icon at the far right of the URL tab and follow the blue links in the popup. Click the site not working? link to update your browser settings to accept cookies.
-
Login with your username provided (e.g., ). The following page opens:
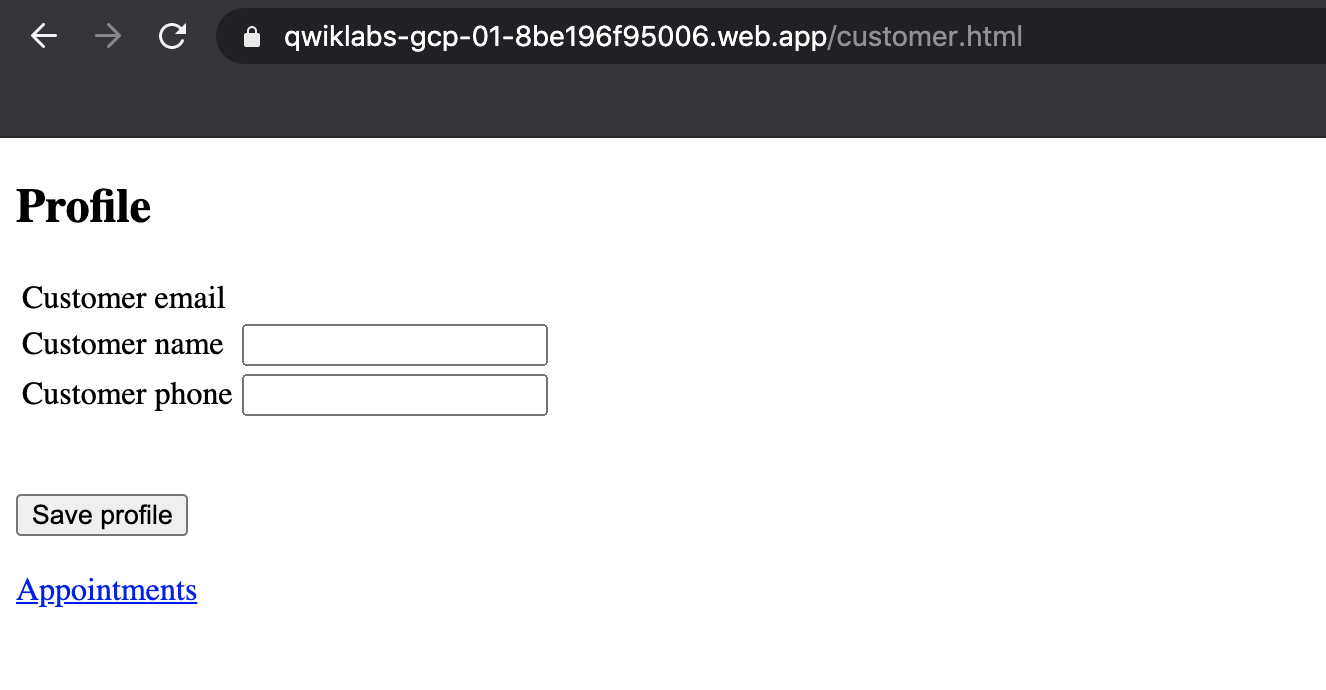
A small company like Pet Theory doesn't have the resources or requisite skill set to do this.
In this instance it can be beneficial to let application users log in with their existing Google account (or any other identity providers)!
Note:
Managing passwords is a difficult task and could expose your company to additional risk. Also, users don't want to create yet another user ID and password.
You have now deployed code to let users use Google authentication to access the appointments app.
Task 7. Add a customer page to your web app.
Return to the Terminal and use the editor to view the files in the public folder.
-
Open the public/customer.js file and copy and paste the following code:
let user;
firebase.auth().onAuthStateChanged(function(newUser) {
user = newUser;
if (user) {
const db = firebase.firestore();
db.collection("customers").doc(user.email).onSnapshot(function(doc) {
const cust = doc.data();
if (cust) {
document.getElementById('customerName').setAttribute('value', cust.name);
document.getElementById('customerPhone').setAttribute('value', cust.phone);
}
document.getElementById('customerEmail').innerText = user.email;
});
}
});
document.getElementById('saveProfile').addEventListener('click', function(ev) {
const db = firebase.firestore();
var docRef = db.collection('customers').doc(user.email);
docRef.set({
name: document.getElementById('customerName').value,
email: user.email,
phone: document.getElementById('customerPhone').value,
})
})
-
Open the public/styles.css file and paste in the following code:
body { background: #ECEFF1; color: rgba(0,0,0,0.87); font-family: Roboto, Helvetica, Arial, sans-serif; margin: 0; padding: 0; }
#message { background: white; max-width: 360px; margin: 100px auto 16px; padding: 32px 24px 16px; border-radius: 3px; }
#message h3 { color: #888; font-weight: normal; font-size: 16px; margin: 16px 0 12px; }
#message h2 { color: #ffa100; font-weight: bold; font-size: 16px; margin: 0 0 8px; }
#message h1 { font-size: 22px; font-weight: 300; color: rgba(0,0,0,0.6); margin: 0 0 16px;}
#message p { line-height: 140%; margin: 16px 0 24px; font-size: 14px; }
#message a { display: block; text-align: center; background: #039be5; text-transform: uppercase; text-decoration: none; color: white; padding: 16px; border-radius: 4px; }
#message, #message a { box-shadow: 0 1px 3px rgba(0,0,0,0.12), 0 1px 2px rgba(0,0,0,0.24); }
#load { color: rgba(0,0,0,0.4); text-align: center; font-size: 13px; }
@media (max-width: 600px) {
body, #message { margin-top: 0; background: white; box-shadow: none; }
body { border-top: 16px solid #ffa100; }
}
-
From the Terminal command line, run the following command:
firebase deploy --only hosting:{{{ project_0.project_id | PROJECT_ID }}}
Output:
✔ Deploy complete!
Project Console: https://console.firebase.google.com/project/project_0.project_id| "PROJECT_ID"/overview
Hosting URL: https://{{{ project_0.project_id | PROJECT_ID }}}.web.app
-
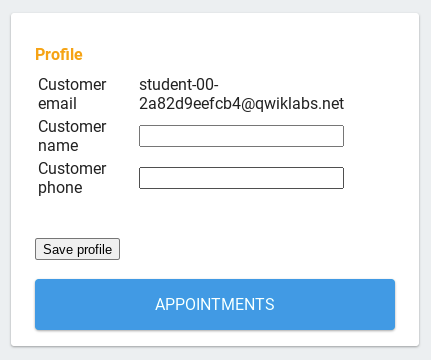
Go to your application tab and hard refresh the page with CMD+SHIFT+R (Mac) or CTRL+SHIFT+R (Windows). A simple refreshing of the page will not display the needed updates.
-
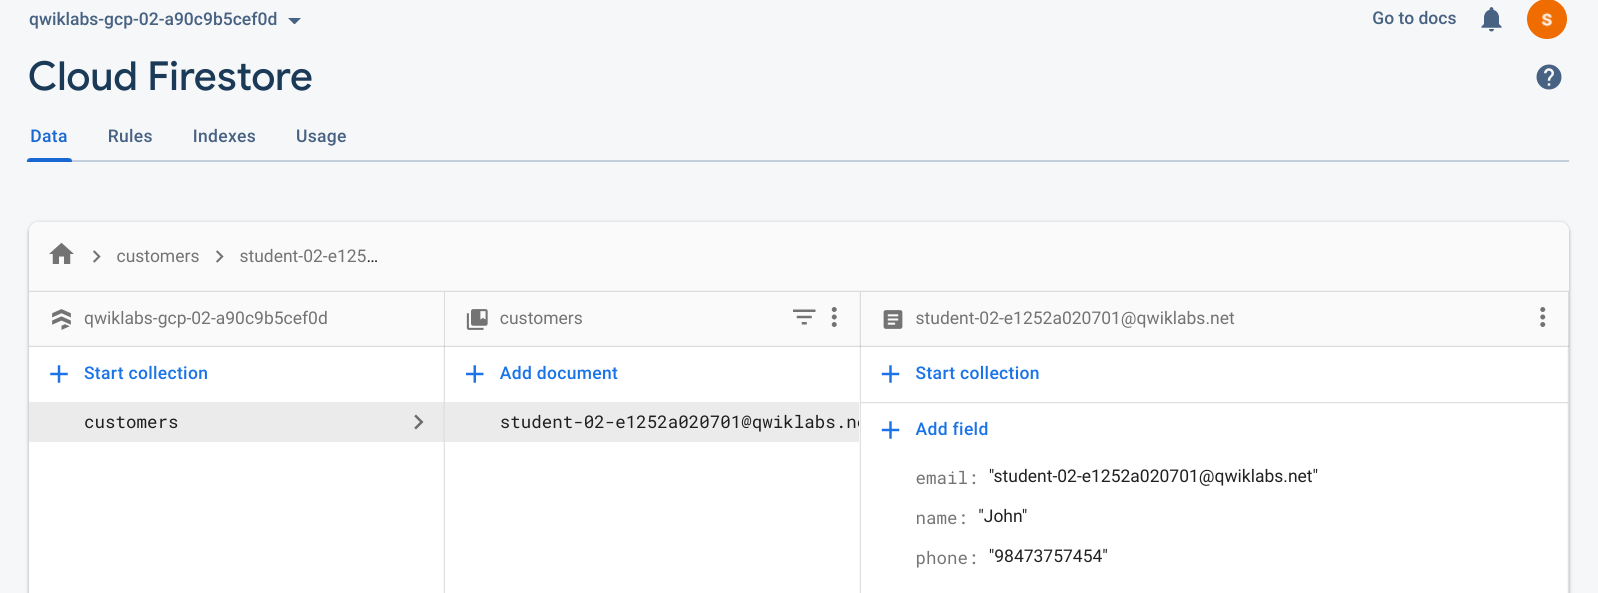
Enter some customer info—make up a name and phone number:
Customer name:
John
Customer phone:
98473757454
-
Click Save profile.
-
Return to the Firebase Console.
-
Click Build > Firestore Database to view the profile information saved:
-
Return to the web app page and click the Appointments link. You will see a blank page because the appointments code has not been deployed yet.
Test completed task
Click Check my progress to verify the objective.
Add a customer page to your web app
Pretty cool!
Firestore updates clients (web apps and native mobile apps) in real time, without the user having to refresh or reload.
Congratulations!
Throughout the course of this lab, you created a robust serverless web application with Firebase. After creating and configuring a Firebase Project, you added Firestore security to automate server-side authentication and authorization. You then went ahead and added Google Sign-in to your web app and configured your database so users can add contact info and appointments. Finally, you explored and deployed code that allows users to schedule appointments and saw Firebase's real time updates in your web app. You are ready to take more labs in this learning path.
Next steps / learn more
Google Cloud training and certification
...helps you make the most of Google Cloud technologies. Our classes include technical skills and best practices to help you get up to speed quickly and continue your learning journey. We offer fundamental to advanced level training, with on-demand, live, and virtual options to suit your busy schedule. Certifications help you validate and prove your skill and expertise in Google Cloud technologies.
Manual Last Updated May 31, 2026
Lab Last Tested May 31, 2026
Copyright 2026 Google LLC. All rights reserved. Google and the Google logo are trademarks of Google LLC. All other company and product names may be trademarks of the respective companies with which they are associated.