GSP649

概览
在本实验中,您将使用 Cloud Run functions 和 Cloud Scheduler 来识别和清理浪费的云资源。您会触发一个 Cloud Run 函数,以将存储桶从 Cloud Monitoring 提醒政策迁移到成本更低的存储类别中。
Google Cloud 会提供存储对象生命周期规则,可根据对象的某组属性(例如创建日期或有效状态)将其自动移动到不同的存储类别中。不过,这些规则无法基于对象的访问情况进行移动。有时,如果有较新的对象在一定时间段内未被访问过,则您可能需要将其移动到 Nearline Storage。
目标
在本实验中,您将学习如何完成以下操作:
- 创建两个存储桶,将文件添加到
serving-bucket 中,并针对其生成数据流量。
- 创建 Cloud Monitoring 信息中心,以直观呈现存储桶利用率。
- 部署一个 Cloud Run 函数,以将空闲存储桶迁移到更加经济实惠的存储类别中,并使用旨在模拟来自 Cloud 提醒政策的通知的载荷来触发该函数。
设置和要求
点击“开始实验”按钮前的注意事项
请阅读以下说明。实验是计时的,并且您无法暂停实验。计时器在您点击开始实验后即开始计时,显示 Google Cloud 资源可供您使用多长时间。
此实操实验可让您在真实的云环境中开展实验活动,免受模拟或演示环境的局限。为此,我们会向您提供新的临时凭据,您可以在该实验的规定时间内通过此凭据登录和访问 Google Cloud。
为完成此实验,您需要:
- 能够使用标准的互联网浏览器(建议使用 Chrome 浏览器)。
注意:请使用无痕模式(推荐)或无痕浏览器窗口运行此实验。这可以避免您的个人账号与学生账号之间发生冲突,这种冲突可能导致您的个人账号产生额外费用。
注意:请仅使用学生账号完成本实验。如果您使用其他 Google Cloud 账号,则可能会向该账号收取费用。
如何开始实验并登录 Google Cloud 控制台
-
点击开始实验按钮。如果该实验需要付费,系统会打开一个对话框供您选择支付方式。右侧是实验设置和访问权限面板,其中包含以下内容:
-
打开 Google Cloud 控制台按钮
- 您在本实验中必须使用的临时凭证(用户名和密码)
- 帮助您逐步完成该实验所需的其他信息(如果需要)
请注意,实验计时器位于页面顶部附近,将显示剩余时间。
-
点击打开 Google Cloud 控制台(如果您使用的是 Chrome 浏览器,请右键点击并选择在无痕式窗口中打开链接)。
该实验会启动资源并打开另一个标签页,显示“登录”页面。
提示:可以将这些标签页分别放在不同的窗口中,并排显示。
注意:如果您看见选择账号对话框,请点击使用其他账号。
-
如有必要,请复制下方的用户名,然后将其粘贴到登录对话框中。
{{{user_0.username | "<用户名>"}}}
您也可以在实验设置和访问权限面板中找到“用户名”。
-
点击下一步。
-
复制下面的密码,然后将其粘贴到欢迎对话框中。
{{{user_0.password | "<密码>"}}}
您也可以在实验设置和访问权限面板中找到“密码”。
-
点击下一步。
重要提示:您必须使用实验提供的凭证。请勿使用您的 Google Cloud 账号凭证。
注意:在本实验中使用您自己的 Google Cloud 账号可能会产生额外费用。
-
依次点击进入后续页面:
- 接受条款及条件。
- 由于这是临时账号,请勿添加账号恢复选项或双重身份验证。
- 请勿注册免费试用。
片刻之后,系统会在此标签页中打开 Google Cloud 控制台。
注意:如需访问 Google Cloud 产品和服务,请点击导航菜单,或在搜索字段中输入服务或产品的名称。

激活 Cloud Shell
Cloud Shell 是一种装有开发者工具的虚拟机。它提供了一个永久性的 5GB 主目录,并且在 Google Cloud 上运行。Cloud Shell 提供可用于访问您的 Google Cloud 资源的命令行工具。
-
点击 Google Cloud 控制台顶部的激活 Cloud Shell  。
。
-
在弹出的窗口中执行以下操作:
- 继续完成 Cloud Shell 信息窗口中的设置。
- 授权 Cloud Shell 使用您的凭据进行 Google Cloud API 调用。
如果您连接成功,即表示您已通过身份验证,且项目 ID 会被设为您的 Project_ID 。输出内容中有一行说明了此会话的 Project_ID:
Your Cloud Platform project in this session is set to {{{project_0.project_id | "PROJECT_ID"}}}
gcloud 是 Google Cloud 的命令行工具。它已预先安装在 Cloud Shell 上,且支持 Tab 自动补全功能。
- (可选)您可以通过此命令列出活跃账号名称:
gcloud auth list
- 点击授权。
输出:
ACTIVE: *
ACCOUNT: {{{user_0.username | "ACCOUNT"}}}
To set the active account, run:
$ gcloud config set account `ACCOUNT`
- (可选)您可以通过此命令列出项目 ID:
gcloud config list project
输出:
[core]
project = {{{project_0.project_id | "PROJECT_ID"}}}
注意:如需查看在 Google Cloud 中使用 gcloud 的完整文档,请参阅 gcloud CLI 概览指南。
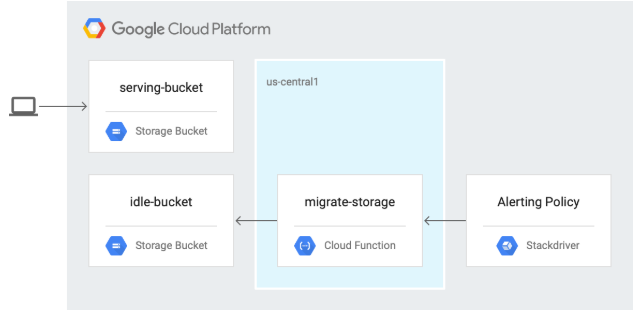
架构
在下图中,您会触发一个 Cloud Run 函数,以将存储桶从 Cloud Monitoring 提醒政策迁移到更加经济实惠的存储类别中。
任务 1. 启用 API 并下载源代码
-
点击 Google Cloud 控制台顶部的激活 Cloud Shell 。
-
在 Cloud Shell 中,启用 Cloud Scheduler API:
gcloud services enable cloudscheduler.googleapis.com
点击检查我的进度以验证是否完成了以下目标:
启用 Cloud Scheduler API
- 下载本实验的源代码:
gcloud storage cp -r gs://spls/gsp649/* . && cd gcf-automated-resource-cleanup/
- 设置环境变量,并将代码库文件夹设为 $WORKDIR,在其中运行本实验相关的所有命令:
export PROJECT_ID=$(gcloud config list --format 'value(core.project)' 2>/dev/null)
WORKDIR=$(pwd)
- 安装开源负载生成工具 Apache Bench:
sudo apt-get update
sudo apt-get install apache2-utils -y
任务 2. 创建 Cloud Storage 存储桶并添加文件
- 在 Cloud Shell 中,导航到
migrate-storage 目录:
cd $WORKDIR/migrate-storage
- 创建 Cloud Storage 存储桶
serving-bucket。您稍后会使用此存储桶来更改存储类别:
export PROJECT_ID=$(gcloud config list --format 'value(core.project)' 2>/dev/null)
gcloud storage buckets create gs://${PROJECT_ID}-serving-bucket -l {{{project_0.default_region|REGION}}}
点击检查我的进度以验证是否完成了以下目标:
创建 Cloud Storage 存储桶
- 公开该存储桶:
gsutil acl ch -u allUsers:R gs://${PROJECT_ID}-serving-bucket
- 将文本文件添加到存储桶:
gcloud storage cp $WORKDIR/migrate-storage/testfile.txt gs://${PROJECT_ID}-serving-bucket
- 公开文件:
gsutil acl ch -u allUsers:R gs://${PROJECT_ID}-serving-bucket/testfile.txt
- 确认您可以访问该文件:
curl http://storage.googleapis.com/${PROJECT_ID}-serving-bucket/testfile.txt
输出将如下所示:
this is a test
点击检查我的进度以验证是否完成了以下目标:
公开 Cloud Storage 存储桶
- 创建第二个存储桶并将其命名为 idle-bucket,该存储桶不提供任何数据:
gcloud storage buckets create gs://${PROJECT_ID}-idle-bucket -l {{{project_0.default_region|REGION}}}
export IDLE_BUCKET_NAME=$PROJECT_ID-idle-bucket
点击检查我的进度以验证是否完成了以下目标:
创建另一个 Cloud Storage 存储桶
任务 3. 创建 Monitoring 信息中心
创建 Monitoring 指标范围
设置与您的 Google Cloud 项目关联的 Monitoring 指标范围。您可以按以下步骤创建一个新账号来免费试用 Monitoring。
- 在 Cloud 控制台中,依次点击导航菜单 (
 ) > Monitoring.
如果 Monitoring 概览页面打开,则表明您的指标范围项目已创建完毕。
-
在左侧面板中,依次点击信息中心 > 创建自定义信息中心。
-
将该信息中心命名为 Bucket Usage。
-
点击 + 添加 widget。
-
点击折线图。
-
在 Widget 名称部分,输入 Bucket Access。
-
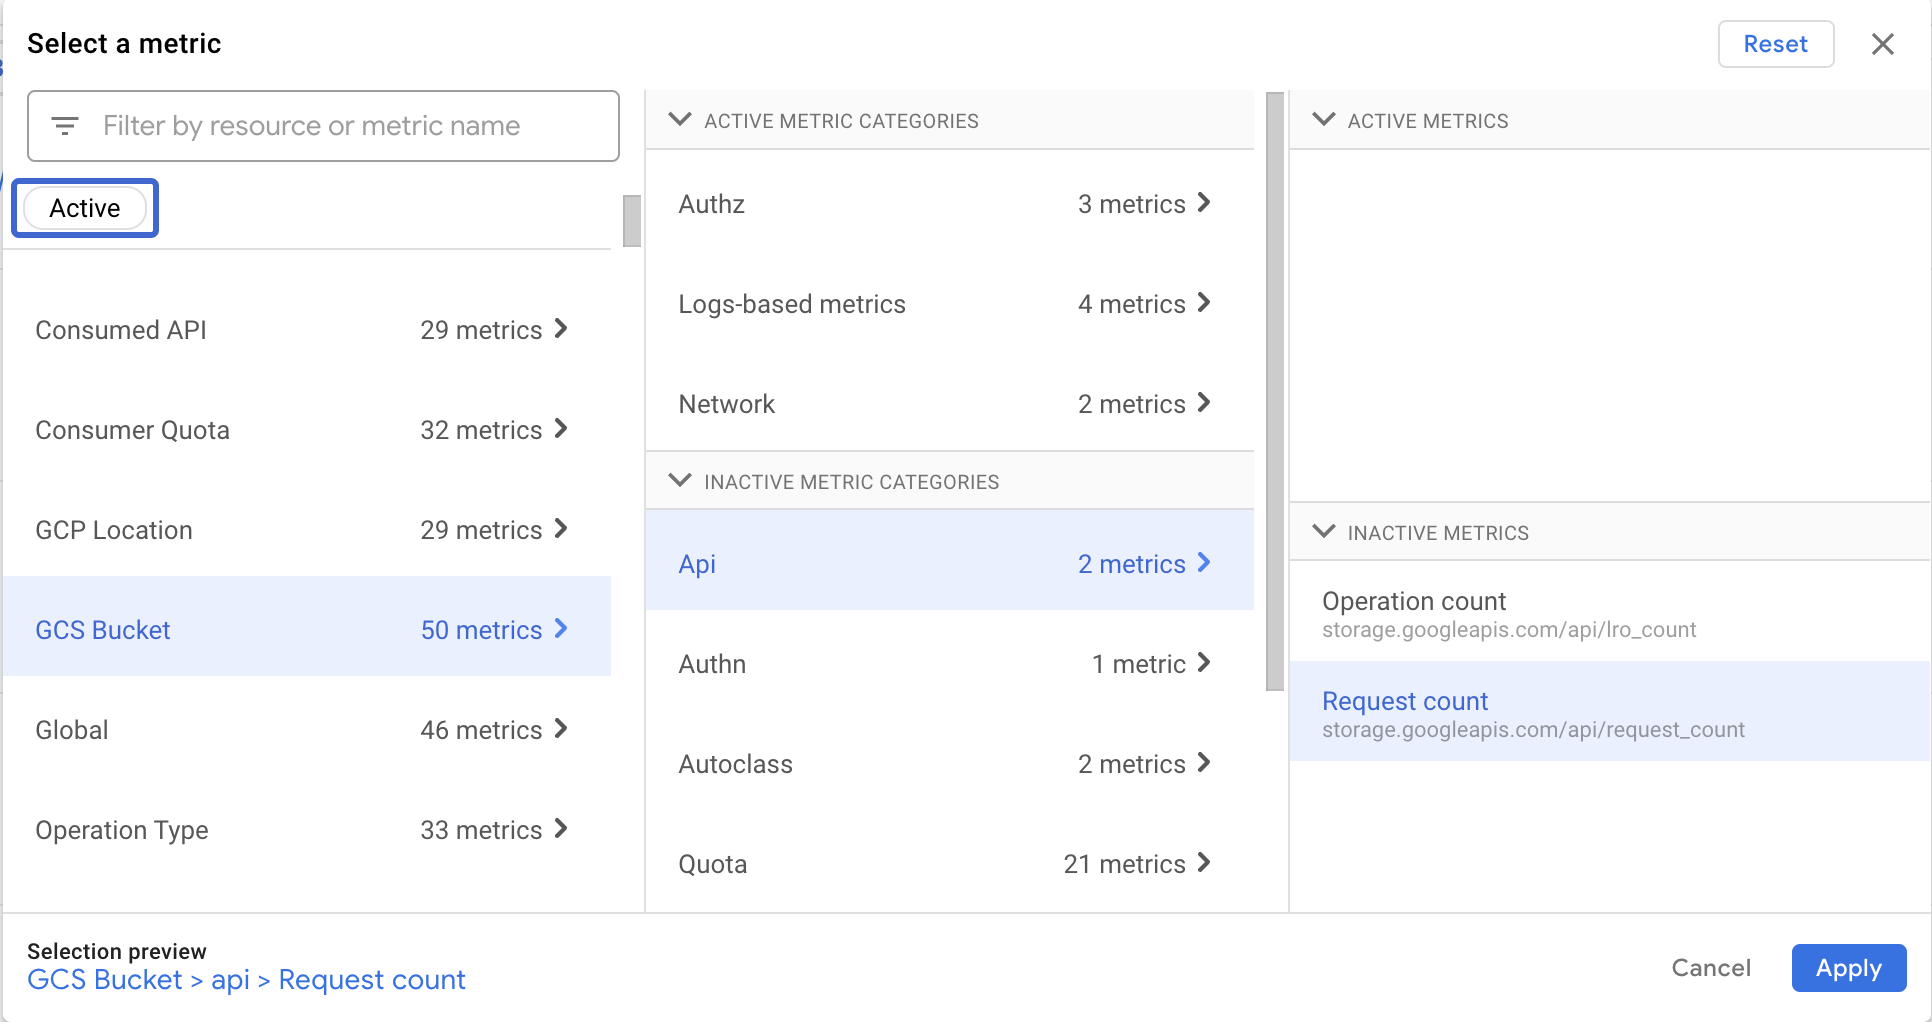
在选择一个指标部分,依次点击 GCS 存储桶 > API > 请求数指标,然后点击应用。
注意:如果您找不到请求数指标,请取消选中有效。
-
要按存储桶名称对指标进行分组,可以在分组依据下拉列表中选择 bucket_name。
-
点击 + 添加过滤条件。
如需按方法名称过滤,请执行以下操作:
- 在按指标标签过滤部分,选择方法。
- 在方法旁边的下拉菜单中,选择 ReadObject。
- 点击应用。
您已配置 Cloud Monitoring 以观察存储桶中的对象访问情况。该图表不显示任何数据,因为没有发送到 Cloud Storage 存储桶的数据流量。
任务 4. 为服务存储桶生成负载
配置好 Monitoring 后,请使用 Apache Bench 将数据流量发送到 serving-bucket 中。
- 在 Cloud Shell 中,将请求发送到服务存储桶中的对象:
ab -n 10000 http://storage.googleapis.com/$PROJECT_ID-serving-bucket/testfile.txt
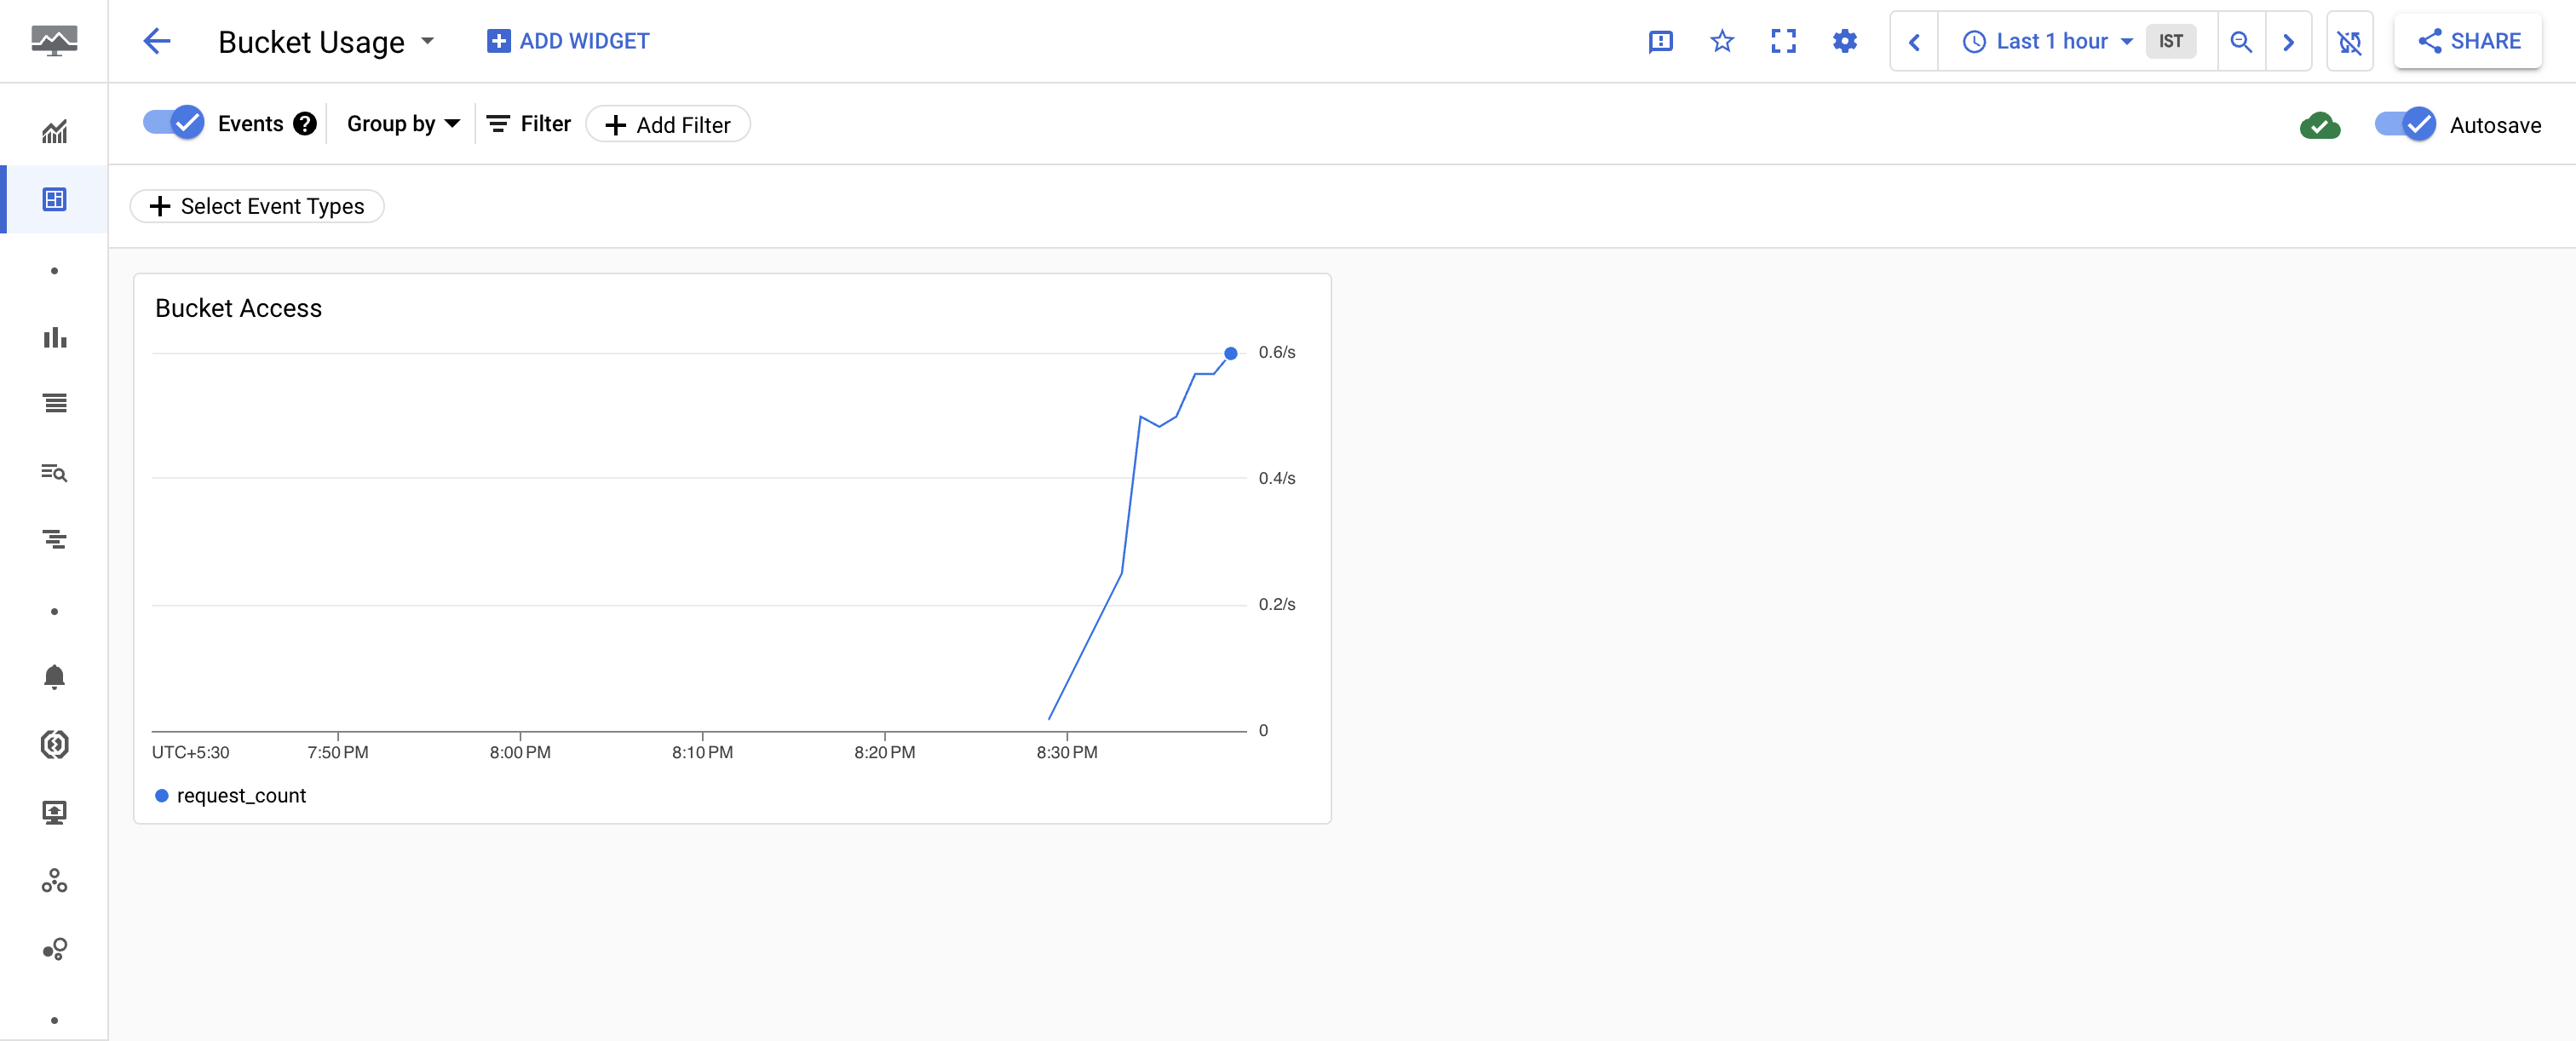
- 在左侧面板中,点击信息中心,然后点击名为 Bucket Usage 的信息中心的名称,即可查看“Bucket Access”图表。
注意:如果您之前关闭了此标签页,请依次选择导航菜单 > 查看所有产品 > 可观测性 > 监控,然后在左侧面板中,依次点击信息中心 > Bucket Usage。
注意:您需要等待至少 1 分钟,Bucket Usage 信息中心才会显示此图表。
- 查看数据流量详情。
您可能需要按 CTRL-C 键才能返回到命令提示符位置。
任务 5. 查看并部署 Cloud Run 函数
- 在 Cloud Shell 中,输入以下命令以查看将存储桶迁移到 Nearline Storage 类别中的 Cloud Run 函数代码:
cat $WORKDIR/migrate-storage/main.py | grep "migrate_storage(" -A 15
输出为:
def migrate_storage(request):
request_json = request.get_json(force=True)
bucket_name = request_json['incident']['resource_name']
print(f"bucket_name: {bucket_name}") # Print the bucket name
if not bucket_name:
print("Error: bucket_name is empty")
return "Invalid bucket name", 400
storage_client = storage.Client(project)
bucket = storage_client.get_bucket(bucket_name)
bucket.storage_class = "NEARLINE"
bucket.patch()
return "Bucket migrated successfully", 200
请注意,Cloud Run 函数会使用请求中传入的存储桶名称,将其存储类别更改为 Nearline。
- 更新 Python 脚本以使用您的项目 ID:
sed -i "s/<project-id>/$PROJECT_ID/" $WORKDIR/migrate-storage/main.py
- 停用 Cloud Run functions API:
gcloud services disable cloudfunctions.googleapis.com
- 重新启用 Cloud Run functions API:
gcloud services enable cloudfunctions.googleapis.com
- 导出项目编号:
export PROJECT_NUMBER=$(gcloud projects describe $PROJECT_ID --format="value(projectNumber)")
- 为您的开发者服务账号添加
artifactregistry.reader 权限:
gcloud projects add-iam-policy-binding $PROJECT_ID \
--member="serviceAccount:$PROJECT_NUMBER-compute@developer.gserviceaccount.com" \
--role="roles/artifactregistry.reader"
- 部署 Cloud Run 函数:
gcloud functions deploy migrate_storage --gen2 --trigger-http --runtime=python310 --region {{{project_0.default_region | Region}}}
系统出现提示时,请输入 Y 以启用项目对应的 API [run.googleapis.com],然后重试。如要允许未经过身份验证的调用,请执行相同操作。
注意:如果出现权限错误,请等待几分钟,然后再次尝试部署。
- 请将触发器网址保存到一个环境变量中,以便在下一部分中使用:
export FUNCTION_URL=$(gcloud functions describe migrate_storage --format=json --region {{{project_0.default_region | Region}}} | jq -r '.url')
点击检查我的进度以验证是否完成了以下目标:
部署 Cloud Run 函数
任务 6. 测试并验证提醒自动化
- 更新 JSON 文件中的存储桶名称
export IDLE_BUCKET_NAME=$PROJECT_ID-idle-bucket
sed -i "s/\\\$IDLE_BUCKET_NAME/$IDLE_BUCKET_NAME/" $WORKDIR/migrate-storage/incident.json
- 使用
incident.json 文件将测试通知发送到您部署的 Cloud Run 函数中:
envsubst < $WORKDIR/migrate-storage/incident.json | curl -X POST -H "Content-Type: application/json" $FUNCTION_URL -d @-
输出为:
Bucket migrated successfully
输出内容不以换行符终止,因此命令提示符会紧随其后。
- 确认空闲存储桶已迁移到 Nearline:
gsutil defstorageclass get gs://$PROJECT_ID-idle-bucket
输出为:
gs://<project-id>-idle-bucket: NEARLINE
点击检查我的进度以验证是否完成了以下目标:
确认存储桶已迁移到 Nearline
恭喜!
恭喜!在本实验中,您成功创建了两个 Cloud Storage 存储桶,向其中一个存储桶添加了一个对象,配置了 Cloud Monitoring 以跟踪存储桶访问权限,查看并部署了一个 Cloud Run 函数以将对象迁移到 Nearline 存储桶中,并使用 Cloud Monitoring 提醒对其进行了测试。
Google Cloud 培训和认证
…可帮助您充分利用 Google Cloud 技术。我们的课程会讲解各项技能与最佳实践,可帮助您迅速上手使用并继续学习更深入的知识。我们提供从基础到高级的全方位培训,并有点播、直播和虚拟三种方式选择,让您可以按照自己的日程安排学习时间。各项认证可以帮助您核实并证明您在 Google Cloud 技术方面的技能与专业知识。
上次更新手册的时间:2025 年 11 月 12 日
上次测试实验的时间:2025 年 11 月 12 日
版权所有 2026 Google LLC 保留所有权利。Google 和 Google 徽标是 Google LLC 的商标。其他所有公司名和产品名可能是其各自相关公司的商标。


