Overview
You will control access to GKE clusters using IAM. You will create a pod security policy to restrict privileged Pod creation, and you will test that policy. You will also perform IP address and credential rotation.
Note: For this lab, GKE Standard Mode will be used. The lab expores Pod Security Policies and it is not possible to create policies that override the built-in security settings in GKE Autopilot.
Objectives
In this lab, you learn how to perform the following tasks:
- Use IAM to control GKE access
- Create and use Pod security policies to control Pod creation
- Perform IP address and credential rotation
Note: For this lab, Google Skills has provisioned you with two user names available in the Connection Details dialog. In this lab, we will refer to these accounts as Username 1 and Username 2.
Task 1. Use IAM roles to grant administrative access to all the GKE clusters in the project
Sign in to the Google Cloud Console as the first user
- Sign in to the Google Cloud Console in an Incognito window as usual with the Username 1 provided. Note that both user names use the same password.
- On the Google Cloud Console title bar, click Activate Cloud Shell (
 ).
).
- Click Continue.
After a moment of provisioning, the Cloud Shell prompt appears.
Note: If you sign out of the Username 1 account, the Username 2 account may be deleted by Google Skills. So, please remain signed in to Username 1 until you are finished with this lab.
Sign in and explore the Google Cloud Console as the second user
- Open another tab in your incognito window.
- Browse to console.cloud.google.com.
- Click on the user icon in the top-right corner of the screen, and then click Add account.
- Sign in to the Google Cloud Console with the Username 2 provided. Again, note that both user names use the same password.
Note: Make sure you are on the Username 2 Google Cloud Console tab.
-
While logged in as Username 2, on the Navigation menu ( ), click Kubernetes Engine > Clusters.
-
Make sure that your lab Project ID is selected at the top of the page.
Notice that the option to create a cluster is disabled.
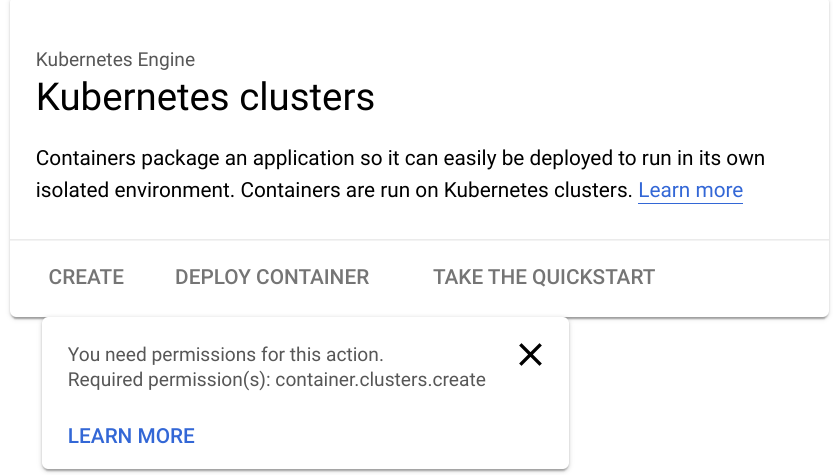
Note: Username 2 currently has access to the project, but only possess the Viewer role, which makes all resources in the project visible, but read-only.
Grant the GKE Admin IAM role to Username 2
You will now allow Username 2 to create a GKE cluster and deploy workloads by using primitive roles to grant a user permissions to administer all GKE clusters and manage resources inside those clusters in this project. The Username 1 account has project owner rights and you will use that account to grant Username 2 more rights.
- Switch back to the Username 1 Google Cloud Console tab.
Note: Make sure you are on the Username 1 Google Cloud Console tab.
-
On the Navigation menu (), click IAM & admin > IAM.
-
In the IAM console, locate the row that corresponds to Username 2, and then click on the pencil icon at the right-end of that row to edit that user's permissions.
-
Notice that Username 2 currently has the Viewer role, which provides read access to all resources within the project.
-
Click ADD ANOTHER ROLE to add another dropdown selection for roles.
-
In the Select a role dropdown box, choose Kubernetes Engine > Kubernetes Engine Cluster Admin.
-
Click SAVE.
Note: Username 2 now has access to administer all GKE clusters in the project and to manage resources within those clusters. If this level of access is too broad for your organization, you can restrict the user's authority within a GKE cluster by using Kubernetes Role-based Access Control.
Click Check my progress to verify the objective.
Grant the GKE Admin IAM Role to username 2
Test the access of Username 2
You will now verify your work by using Username 2 to create a GKE cluster.
- Switch back to the Username 2 Google Cloud Console tab.
Note: Make sure you are on the Username 2 Google Cloud Console tab.
- While logged in as Username 2, on the Navigation menu (), click Kubernetes Engine > Clusters.
You should now see that the option to create a cluster is now enabled. You may need to refresh the web browser tab for Username 2 to see the changes.
-
Click Create to begin creating a GKE cluster.
-
You can see Standard: You manage your cluster inside Create a cluster pop-up. Click Configure next to Standard: You manage your cluster.
Remember: For this lab, GKE Standard Mode must be used.
-
Set the name of the cluster to standard-cluster-1, if that is not the default.
-
Confirm that a zonal, rather than regional, cluster is selected.
-
Choose zone for the cluster, if that is not the default.
-
Leave all other values at their defaults and click Create.
The cluster begins provisioning, but soon fails.
Note: This step of the lab is intended to fail.
- Click the notification icon in the toolbar at the top of the screen to view the error message.
Username 2 still lacks some of the rights necessary to deploy a cluster. This is because GKE leverages Google Cloud Compute Engine instances for the nodes.
To deploy a GKE cluster, a user must also be assigned the iam.serviceAccountUser role on the Compute Engine default service account.
Grant the ServiceAccountUser IAM role to Username 2
You will now use IAM to grant Username 2 the iam.serviceAccountUser role so that Username 2 may successfully deploy a GKE cluster.
- Switch back to the Username 1 Google Cloud Console tab.
Note: Make sure you are on the Username 1 Google Cloud Console tab.
-
On the Navigation menu (), click IAM & admin > Service accounts.
-
In the IAM console, click the row that corresponds to the Compute Engine default service account to select it.
-
Click on Principals with access tab on the top navigation.
-
On the Permission page, click on Grant access.
The permissions information panel will open on the right side of the window.
- Type the username for Username 2 into the New principals box. You can copy this name from the Lab Details page.
- In the Select a role box, make sure Service Accounts > Service Account User is selected.
- Click Save.
Click Check my progress to verify the objective.
Grant the Service Account User IAM Role to Username 2
Verify that Username 2 can create a GKE cluster
You will now verify your work by using Username 2 to create a GKE cluster.
- Switch back to the Username 2 Google Cloud Console tab.
Note: Make sure you are on the Username 2 Google Cloud Console tab.
-
While logged in as Username 2, on the Navigation menu (), click Kubernetes Engine > Clusters. You may need to refresh your web browser.
-
Click Create to begin creating a GKE cluster.
-
You can see Standard: You manage your cluster inside Create a cluster pop-up. Click Configure next to Standard: You manage your cluster.
-
Set the name of the cluster to standard-cluster-1, if that is not the default.
-
Confirm that a zonal, rather than regional, cluster is selected.
-
Choose zone for the cluster, if that is not the default.
-
Leave all other values at their defaults and click Create.
Note: You need to wait a few minutes for the cluster deployment to complete.
The cluster will successfully deploy this time.
Click Check my progress to verify the objective.
Create a GKE cluster
Task 2. Define and use pod security admission
PodSecurity is a Kubernetes admission controller that lets you apply Pod Security Standards to Pods running on your GKE clusters. Pod Security Standards are predefined security policies that cover the high-level needs of Pod security in Kubernetes. These policies range from being highly permissive to highly restrictive.
In this task, you create a pod security policy that allows the creation of unprivileged Pods in the default namespace of the cluster. Unprivileged Pods do not allow users to execute code as root, and have limited access to devices on the host.
You create a ClusterRole that can then be used in a role binding that ties the policy to accounts that require the ability to deploy pods with unprivileged access.
Users that require the ability to deploy privileged Pods can be granted access to the built in PSP that is provided to allow admin users to deploy pods after Pod Security Policies are enabled.
When you have the components configured you will enable the PodSecurityPolicy controller, which enforces these policies, and then test how they impact users with different privileges.
Connect to the GKE cluster
- Switch back to the Username 1 Google Cloud Console tab.
Note: Make sure you are on the Username 1 Google Cloud Console tab.
- In Cloud Shell, type the following command to create environment variables for the Google Cloud zone and cluster name that were used to create the cluster for this lab:
export my_zone={{{project_0.default_zone | ZONE }}}
export my_cluster=standard-cluster-1
- Configure tab completion for the kubectl command-line tool:
source <(kubectl completion bash)
- Configure access to your cluster for kubectl:
gcloud container clusters get-credentials $my_cluster --zone $my_zone
Apply Pod Security Standards using PodSecurity
To use the PodSecurity admission controller, you must apply specific Pod Security Standards in specific modes to specific namespaces
Create new namespaces
Create namespaces in your cluster:
kubectl create ns baseline-ns
kubectl create ns restricted-ns
This command creates the following namespaces:
- baseline-ns: For permissive workloads
- restricted-ns: For highly restricted workloads
Use labels to apply security policies
Apply the following Pod Security Standards:
- baseline: Apply to baseline-ns in the warn mode
- restricted: Apply to restricted-ns in the enforce mode
kubectl label --overwrite ns baseline-ns pod-security.kubernetes.io/warn=baseline
kubectl label --overwrite ns restricted-ns pod-security.kubernetes.io/enforce=restricted
These commands achieve the following result:
- Workloads in the baseline-ns namespace that violate the baseline policy are allowed, and the client displays a warning message.
- Workloads in the restricted-ns namespace that violate the restricted policy are rejected, and GKE adds an entry to the audit logs.
Verify that the labels were added:
kubectl get ns --show-labels
The output is similar to the following:
baseline-ns Active 74s kubernetes.io/metadata.name=baseline-ns,pod-security.kubernetes.io/warn=baseline
restricted-ns Active 18s kubernetes.io/metadata.name=restricted-ns,pod-security.kubernetes.io/enforce=restricted
default Active 57m kubernetes.io/metadata.name=default
kube-public Active 57m kubernetes.io/metadata.name=kube-public
kube-system Active 57m kubernetes.io/metadata.name=kube-system
Click Check my progress to verify the objective.
Create the namespaces and labels
Test the configured policies
To verify that the PodSecurity admission controller works as intended, deploy a workload that violates the baseline and the restricted policy to both namespaces. The following example manifest deploys an nginx container that allows privilege escalation.
- Create and open a file called
psa-workload.yaml with nano using the following command:
nano psa-workload.yaml
- Once nano has opened, paste the following into the
psa-workload.yaml file:
apiVersion: v1
kind: Pod
metadata:
name: nginx
labels:
app: nginx
spec:
containers:
- name: nginx
image: nginx
securityContext:
privileged: true
-
Press Ctrl+O, and then press Enter to save your edited file.
-
Press Ctrl+X to exit the nano text editor.
-
Apply the manifest to the baseline-ns namespace:
kubectl apply -f psa-workload.yaml --namespace=baseline-ns
The output is similar to the following:
Warning: would violate PodSecurity "baseline:latest": privileged (container "nginx" must not set securityContext.privileged=true)
pod/nginx created
The baseline policy allows the Pod to deploy in the namespace.
- Verify that the Pod deployed successfully:
kubectl get pods --namespace=baseline-ns -l=app=nginx
- Apply the manifest to the restricted-ns namespace:
kubectl apply -f psa-workload.yaml --namespace=restricted-ns
The output is similar to the following:
Error from server (Forbidden): error when creating "workload.yaml": pods "nginx"
is forbidden: violates PodSecurity "restricted:latest": allowPrivilegeEscalation
!= false (container "nginx" must set securityContext.allowPrivilegeEscalation=false),
unrestricted capabilities (container "nginx" must set securityContext.capabilities.drop=["ALL"]),
runAsNonRoot != true (pod or container "nginx" must set securityContext.runAsNonRoot=true),
seccompProfile (pod or container "nginx" must set securityContext.seccompProfile.type
to "RuntimeDefault" or "Localhost")
The Pod won't deploy in the namespace. An audit entry is added to the log.
Click Check my progress to verify the objective.
Apply the manifest to the 'restricted-ns' namespace
View policy violations in the audit logs
Policy violations in the audit and enforce modes are recorded in the audit logs for your cluster. You can view these logs using the Logs Explorer in the Google Cloud console.
-
On the Google Cloud console title bar, type Logs Explorer in the Search field, then click Logs Explorer in the search results.
-
In the Query field, specify the following:
resource.type="k8s_cluster"
protoPayload.response.reason="Forbidden"
protoPayload.resourceName="core/v1/namespaces/restricted-ns/pods/nginx"
-
Click Run query.
-
In the Query results section, expand the Forbidden log entry. The details are similar to the following:
{
...
protoPayload: {
@type: "type.googleapis.com/google.cloud.audit.AuditLog"
authenticationInfo: {1}
authorizationInfo: [1]
methodName: "io.k8s.core.v1.pods.create"
request: {6}
requestMetadata: {2}
resourceName: "core/v1/namespaces/restricted-ns/pods/nginx"
response: {
@type: "core.k8s.io/v1.Status"
apiVersion: "v1"
code: 403
details: {2}
kind: "Status"
message: "pods "nginx" is forbidden: violates PodSecurity "restricted:latest": privileged
(container "nginx" must not set securityContext.privileged=true),
allowPrivilegeEscalation != false (container "nginx" must set
securityContext.allowPrivilegeEscalation=false), unrestricted capabilities
(container "nginx" must set securityContext.capabilities.drop=["ALL"]),
runAsNonRoot != true (pod or container "nginx" must set securityContext.runAsNonRoot=true),
seccompProfile (pod or container "nginx" must set securityContext.seccompProfile.type
to "RuntimeDefault" or "Localhost")"
metadata: {0}
reason: "Forbidden"
status: "Failure"
}
serviceName: "k8s.io"
status: {2}
}
receiveTimestamp: "2022-12-01T19:19:25.353235326Z"
resource: {2}
timestamp: "2022-12-01T19:19:21.469360Z"
}
(Optional) Task 3. Rotate IP Address and Credentials
You perform IP and credential rotation on your cluster. It is a secure practice to do so regularly to reduce credential lifetimes. While there are separate commands to rotate the serving IP and credentials, rotating credentials additionally rotates the IP as well.
- On Cloud Shell, execute the following command:
gcloud container clusters update $my_cluster --zone $my_zone --start-credential-rotation
- Enter
Y to continue.
- Leave the Cloud Shell open until the operation is complete.
After the command completes in the Cloud Shell the cluster will initiate the process to update each of the nodes. That process can take up to 15 minutes for your cluster. The process also automatically updates the kubeconfig entry for the current user.
- The cluster master now temporarily serves the new IP address in addition to the original address.
Note: You must update the kubeconfig file on any other system that uses kubectl or API to access the master before completing the rotation process to avoid losing access.
- To complete the credential and IP rotation tasks execute the following command:
gcloud container clusters update $my_cluster --zone $my_zone --complete-credential-rotation
This finalizes the rotation processes and removes the original cluster ip-address.
Note: If the credential rotation fails to complete and returns an error message, run the below command.
gcloud container clusters upgrade $my_cluster --node-pool=default-pool --zone $my_zone
-
Enter Y to continue.
-
After the cluster has successfully upgraded, re-execute the following command:
gcloud container clusters update $my_cluster --zone $my_zone --complete-credential-rotation
End your lab
When you have completed your lab, click End Lab. Google Skills removes the resources you’ve used and cleans the account for you.
You will be given an opportunity to rate the lab experience. Select the applicable number of stars, type a comment, and then click Submit.
The number of stars indicates the following:
- 1 star = Very dissatisfied
- 2 stars = Dissatisfied
- 3 stars = Neutral
- 4 stars = Satisfied
- 5 stars = Very satisfied
You can close the dialog box if you don't want to provide feedback.
For feedback, suggestions, or corrections, please use the Support tab.


