Este contenido aún no está optimizado para dispositivos móviles.
Para obtener la mejor experiencia, visítanos en una computadora de escritorio con un vínculo que te enviaremos por correo electrónico.
Descripción general
En BigQuery, los datos se organizan en conjuntos de datos de BigQuery. El esquema (o estructura) de cada tabla se define con nombres de columnas y tipos de datos. El esquema de una tabla puede afectar el rendimiento y el costo de las consultas en BigQuery, ya que determina la rapidez y eficiencia con las que BigQuery puede acceder a los datos de una tabla y procesarlos. BigQuery admite esquemas flexibles y es posible realizar cambios en el esquema sin tener que reescribir los datos.
El objetivo de este lab es proporcionar a los profesionales de Snowflake los conocimientos y las habilidades necesarios para comenzar a diseñar y aplicar esquemas de tablas de BigQuery eficaces. Cuando finalicen este lab, los profesionales de Snowflake tendrán una comprensión más profunda de cómo diseñar, optimizar y consultar esquemas de tablas en BigQuery.
En este lab, crearás conjuntos de datos y tablas de BigQuery para almacenar datos, crearás campos anidados y repetidos para mantener las relaciones en datos desnormalizados, y crearás tablas particionadas y agrupadas para optimizar el rendimiento de las consultas.
En este lab, aprenderás a realizar las siguientes tareas:
Crear conjuntos de datos y tablas en BigQuery
Crear y consultar campos anidados y repetidos en BigQuery
Crear y consultar tablas particionadas en BigQuery
Crear y consultar tablas agrupadas en BigQuery
Configuración y requisitos
En cada lab, recibirás un proyecto de Google Cloud y un conjunto de recursos nuevos por tiempo limitado y sin costo adicional.
Accede a Google Skills en una ventana de incógnito.
Ten en cuenta el tiempo de acceso del lab (por ejemplo, 1:15:00) y asegúrate de finalizarlo en el plazo asignado.
No existe una función de pausa. Si lo necesitas, puedes reiniciar el lab, pero deberás hacerlo desde el comienzo.
Cuando tengas todo listo, haz clic en Comenzar lab.
Anota las credenciales del lab (el nombre de usuario y la contraseña). Las usarás para acceder a la consola de Google Cloud.
Haz clic en Abrir la consola de Google.
Haz clic en Usar otra cuenta, copia las credenciales para este lab y pégalas en el mensaje emergente que aparece.
Si usas otras credenciales, se generarán errores o incurrirás en cargos.
Acepta las condiciones y omite la página de recursos de recuperación.
Cómo iniciar tu lab y acceder a la consola
Haz clic en el botón Comenzar lab. Si debes pagar por el lab, se abrirá una ventana emergente para que selecciones tu forma de pago.
A la izquierda, verás un panel con las credenciales temporales que debes usar para este lab.
Copia el nombre de usuario y, luego, haz clic en Abrir la consola de Google.
El lab inicia los recursos y abre otra pestaña que muestra la página Elige una cuenta.
Sugerencia: Abre las pestañas en ventanas separadas, una junto a la otra.
En la página Elige una cuenta, haz clic en Usar otra cuenta. Se abrirá la página de acceso.
Pega el nombre de usuario que copiaste del panel Detalles de la conexión. Luego, copia y pega la contraseña.
Nota: Debes usar las credenciales del panel Detalles de la conexión. No uses tus credenciales de Google Skills. Si tienes una cuenta propia de Google Cloud, no la utilices para este lab para no incurrir en cargos.
Haz clic para avanzar por las páginas siguientes:
Acepta los Términos y Condiciones.
No agregues opciones de recuperación o autenticación de dos factores (esta es una cuenta temporal).
No te registres para obtener pruebas gratuitas.
Después de un momento, se abrirá la consola de Cloud en esta pestaña.
Nota: Para ver el menú con una lista de los productos y servicios de Google Cloud, haz clic en el menú de navegación que se encuentra en la parte superior izquierda de la pantalla.
Tarea 1: Crea un conjunto de datos y tablas de BigQuery
En BigQuery, puedes usar el lenguaje de definición de datos (DDL) para crear conjuntos de datos y tablas. También puedes usar la sentencia de SQL LOAD DATA para cargar datos de uno o más archivos en una tabla nueva o existente.
Para obtener más información sobre el uso de sentencias DDL para crear conjuntos de datos y tablas de BigQuery, y sobre el uso de la sentencia de SQL LOAD DATA para cargar datos, revisa la documentación titulada Sentencia CREATE SCHEMA, Sentencia CREATE TABLE y Sentencia LOAD DATA.
En esta tarea, usarás DDL para crear un conjunto de datos y tablas en BigQuery y, luego, cargarás datos en las tablas nuevas con la sentencia LOAD DATA.
En el menú de navegación () de la consola de Google Cloud, en Analytics, haz clic en BigQuery.
Se abrirá el cuadro de mensaje "Te damos la bienvenida a BigQuery en la consola de Cloud". Este cuadro de mensaje contiene un vínculo a la guía de inicio rápido y las notas de la versión.
Haz clic en Listo.
En la barra de herramientas del espacio de trabajo de SQL, haz clic en el ícono Editor para abrir el editor de consultas en SQL.
En el editor de consultas, copia y pega la siguiente consulta y haz clic en Ejecutar:
CREATE SCHEMA IF NOT EXISTS
ticket_sales OPTIONS(
location="us");
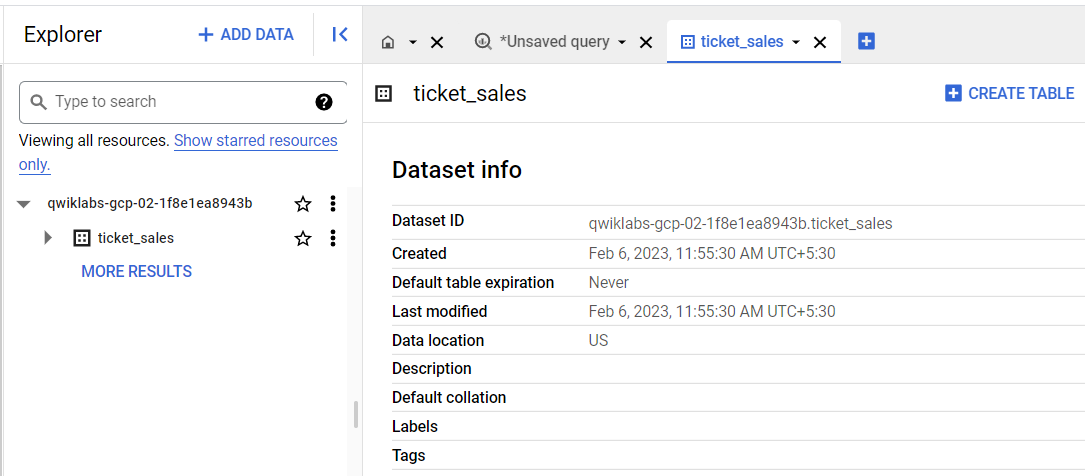
Esta consulta crea un nuevo conjunto de datos de BigQuery llamado ticket_sales. Ten en cuenta que la sentencia DDL usa el término SCHEMA para hacer referencia a una colección lógica de tablas, vistas y otros recursos, que en BigQuery se conoce como un conjunto de datos.
Expande el panel Explorador (lado izquierdo), que muestra el conjunto de datos y, luego, haz clic en el nombre del conjunto de datos ticket_sales para confirmar que se creó correctamente.
En el editor de consultas, ejecuta la siguiente consulta:
Esta consulta usa una definición de esquema de tabla explícita para cargar datos en la tabla sales desde un archivo CSV en Cloud Storage.
En el panel Resultados, se muestra un mensaje que indica que la sentencia LOAD se ejecutó correctamente.
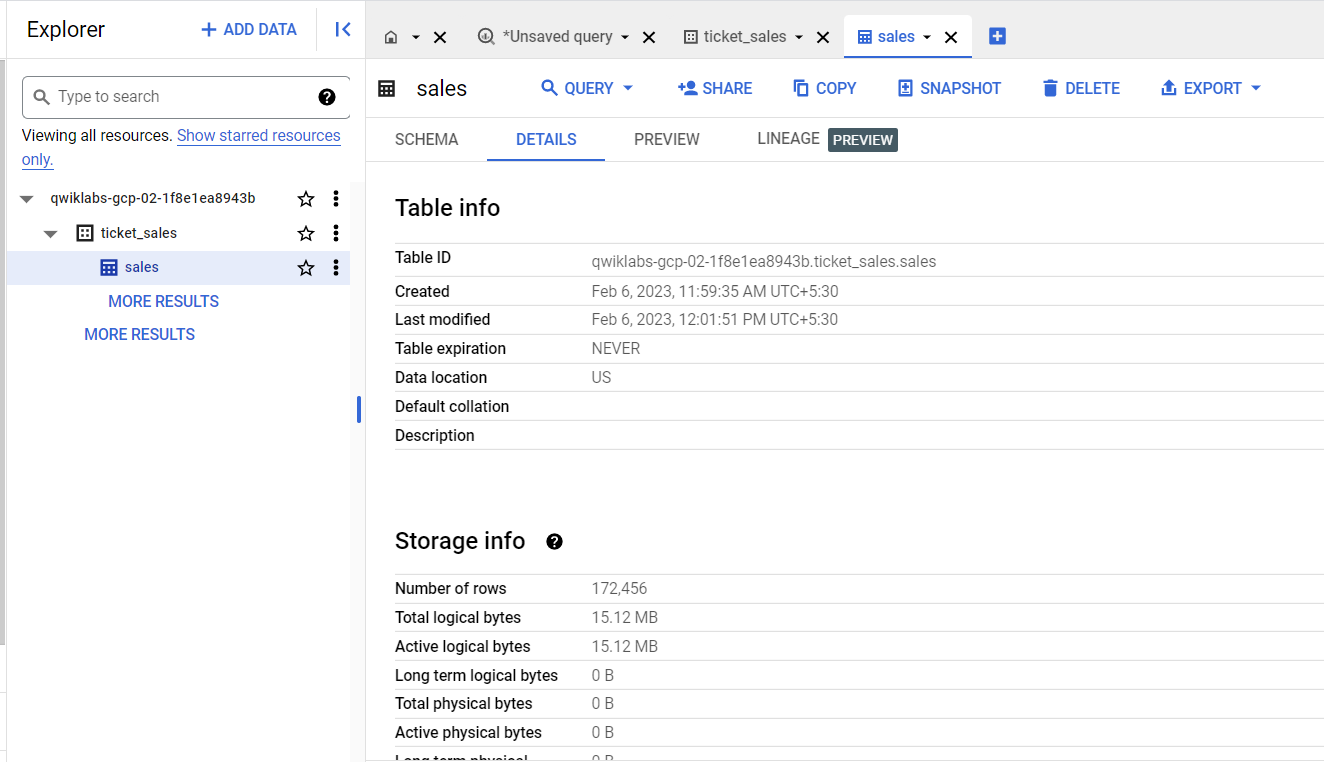
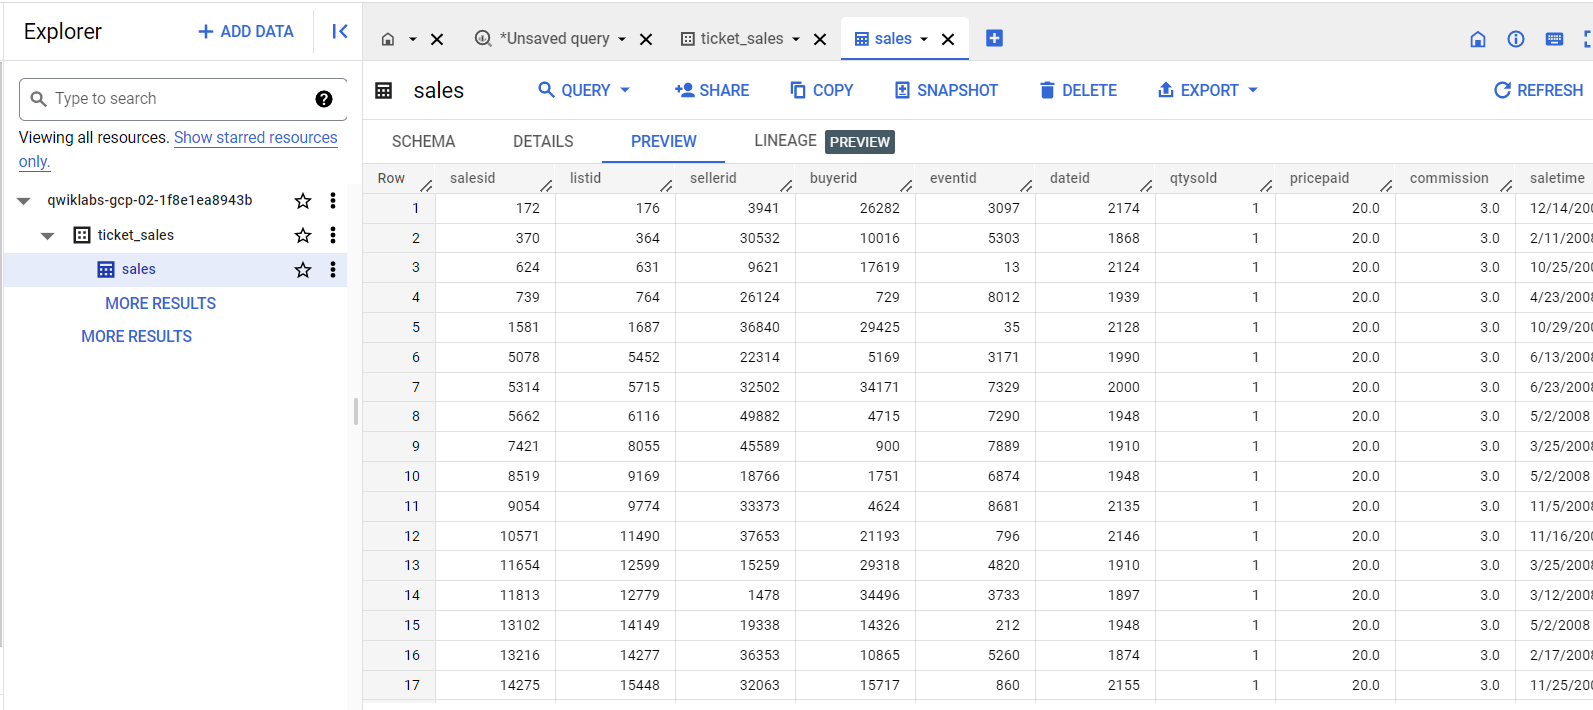
En el panel Explorador, haz clic en las pestañas Detalles y Vista previa para confirmar que los datos se cargaron en la tabla sales.
Puedes hacer clic en Actualizar (arriba a la derecha) para actualizar los datos en la pestaña Vista previa.
Haz clic en Revisar mi progreso para verificar el objetivo.
Crear un conjunto de datos y tablas de BigQuery
Ahora usaste sentencias de SQL en BigQuery para crear un conjunto de datos y una tabla, y cargar datos en ella. Practica la creación de otra tabla y la carga de datos para la información de eventos.
En el editor de consultas, ejecuta la siguiente consulta para crear una nueva tabla llamada events:
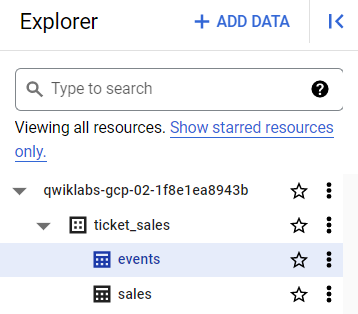
Revisa el panel Explorador y confirma que ahora hay dos tablas: una llamada sales y otra llamada events.
En el editor de consultas, ejecuta la siguiente consulta para cargar datos en la tabla events:
LOAD DATA INTO ticket_sales.events
FROM FILES (
skip_leading_rows=1,
format = 'CSV',
field_delimiter = ',',
max_bad_records = 10,
uris =['gs://tcd_repo/data/entertainment_media/ticket-sales/events.csv']);
Esta consulta usa la detección automática de esquemas para cargar datos en la tabla events desde un archivo CSV en Cloud Storage.
En el panel Resultados, se muestra un mensaje que indica que la sentencia LOAD se ejecutó correctamente.
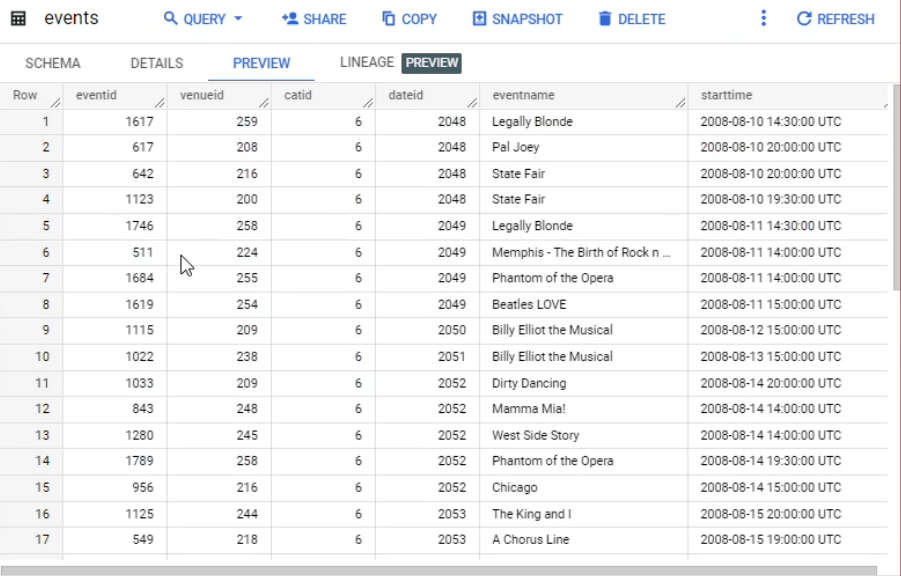
Haz clic en las pestañas Detalles y Vista previa para confirmar que los datos se cargaron en la tabla events.
Puedes hacer clic en Actualizar (arriba a la derecha) para actualizar los datos en la pestaña Vista previa.
Haz clic en Revisar mi progreso para verificar el objetivo.
Cargar datos en la tabla de eventos
Tarea 2: Crea y consulta campos anidados y repetidos
La desnormalización es una estrategia común para aumentar el rendimiento de la lectura en conjuntos de datos relacionales que se normalizaron con anterioridad. En BigQuery, la forma recomendada de desnormalizar los datos es usar campos anidados y repetidos. Puedes usar campos anidados y repetidos para mantener las relaciones en los datos desnormalizados, en lugar de aplanar por completo los datos.
Para obtener más información sobre los campos anidados y repetidos en BigQuery, revisa la documentación titulada Usa campos anidados y repetidos.
En esta tarea, aprenderás a crear y consultar campos anidados y repetidos en BigQuery.
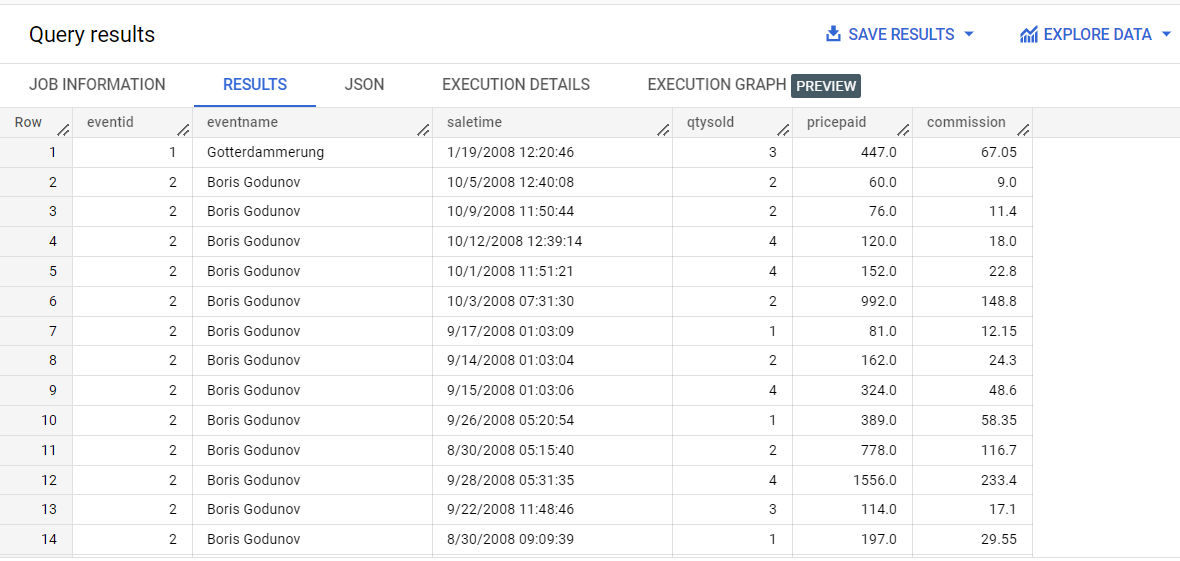
En el editor de consultas, ejecuta la siguiente consulta:
SELECT
e.eventid,
e.eventname,
s.saletime,
s.qtysold,
s.pricepaid,
s.commission
FROM
ticket_sales.events e
JOIN
ticket_sales.sales s
ON
e.eventid = s.eventid
ORDER BY
eventid, eventname;
Nota: Existe una relación de uno a varios entre la tabla de eventos y la tabla de ventas. Cuando ejecutas esta consulta, ves repetición en el lado "uno" de la relación de uno a varios. Por cada venta, el evento se repite. Para quitar la repetición, puedes agregar los datos de ventas en un array.
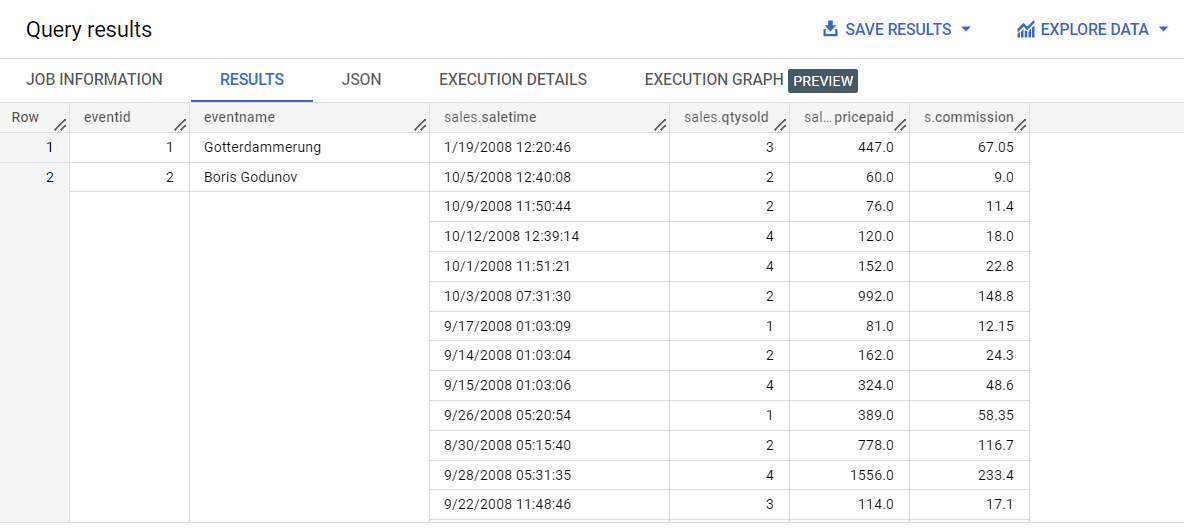
En el editor de consultas, ejecuta la siguiente consulta:
SELECT
e.eventid,
e.eventname,
ARRAY_AGG(STRUCT(
s.saletime,
s.qtysold,
s.pricepaid,
s.commission)) as sales
FROM
ticket_sales.events e
JOIN
ticket_sales.sales s
ON
e.eventid = s.eventid
GROUP BY
eventid, eventname
ORDER BY
eventid, eventname;
Si bien el SQL para el paso 2 es similar al SQL anterior del paso 1, observa la adición de las funciones ARRAY_AGG, STRUCT y GROUP BY.
Revisa los resultados de la consulta.
En lugar de repetir los datos en el lado “uno” de la relación de uno a varios, los datos del lado “varios” ahora están en un array de structs.
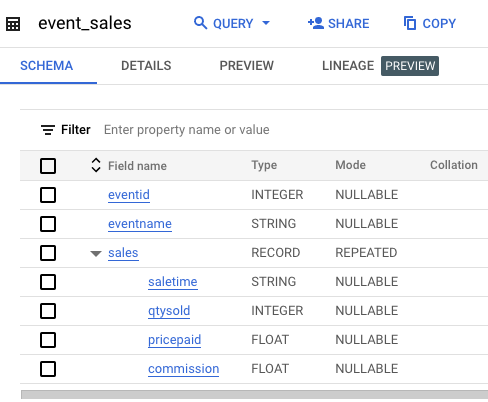
También puedes incluir la consulta anterior en una sentencia CREATE TABLE para crear una tabla jerárquica anidada.
En el editor de consultas, ejecuta la siguiente consulta:
CREATE OR REPLACE TABLE ticket_sales.event_sales
as (
SELECT
e.eventid,
e.eventname,
ARRAY_AGG(STRUCT(
s.saletime,
s.qtysold,
s.pricepaid,
s.commission)) as sales
FROM
ticket_sales.events e
JOIN
ticket_sales.sales s
ON
e.eventid = s.eventid
GROUP BY
eventid, eventname
);
Haz clic en Ir a la tabla y examina el esquema de la tabla.
El esquema incluye un campo anidado y repetido llamado sales, que contiene la hora de venta, la cantidad vendida, el precio pagado y la comisión de cada venta del evento.
Esta nueva estructura anidada y repetida cambia la forma en que escribes consultas.
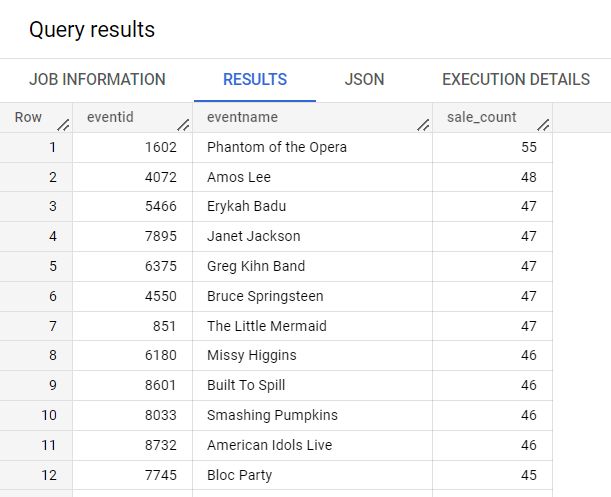
Para contar la cantidad de ventas por evento, ejecuta la siguiente consulta:
SELECT
eventid,
eventname,
ARRAY_LENGTH(sales) AS sale_count
FROM
ticket_sales.event_sales
ORDER BY
sale_count DESC;
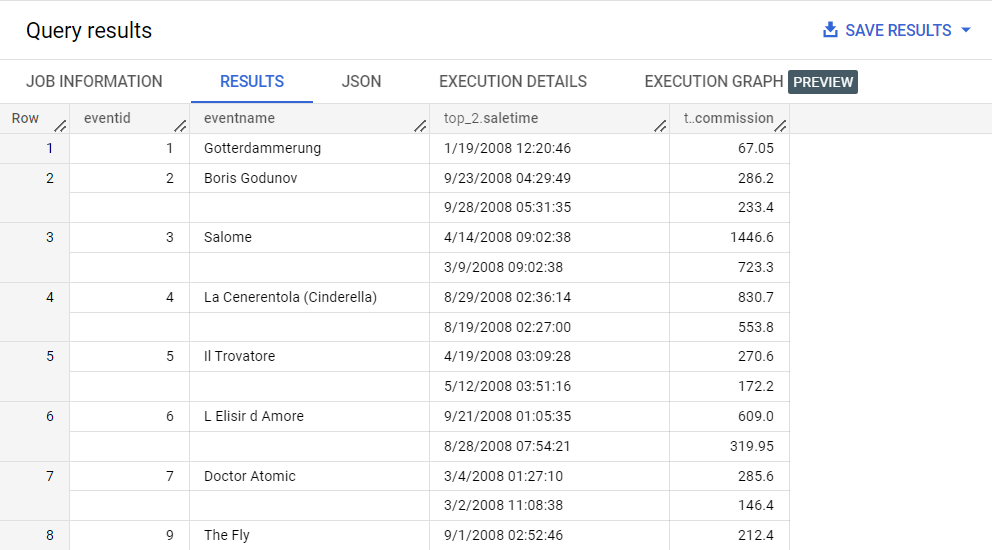
¿Qué pasaría si quisieras ver las comisiones más altas por evento? Eso requeriría hacer una consulta dentro del array. Para ello, debes anular el anidamiento (o aplanar) el array.
Para anular el anidamiento del array y, así, identificar las dos comisiones principales por evento, ejecuta lo siguiente:
SELECT
eventid,
eventname,
ARRAY((SELECT AS STRUCT saletime, commission FROM UNNEST(sales)
ORDER BY(commission) DESC LIMIT 2)) as top_2
FROM
ticket_sales.event_sales
ORDER BY
eventid;
El operador UNNEST se usa para aplanar el array de ventas, de modo que se pueda consultar, y esos resultados se convierten en un array.
Para obtener más información sobre el uso de UNNEST para aplanar arrays, consulta la documentación titulada Operador UNNEST.
Haz clic en Revisar mi progreso para verificar el objetivo.
Crear y consultar campos anidados y repetidos
Tarea 3: Crea y consulta tablas particionadas
En BigQuery, un método para reducir la cantidad de bytes procesados por una consulta es dividir una tabla grande en segmentos más pequeños llamados particiones y, luego, incluir un filtro en tus consultas para seleccionar solo los datos de la partición adecuada. Este proceso se conoce como reducción de particiones y se puede usar para reducir los costos de las consultas.
En esta tarea, aprenderás a crear y consultar tablas particionadas por unidad de tiempo (en una columna DATETIME) para minimizar la cantidad de bytes procesados por las consultas.
En el editor de consultas, pega el siguiente código, pero no hagas clic en Ejecutar:
SELECT * FROM ticket_sales.sales;
El validador de consultas de BigQuery proporciona una estimación de la cantidad de bytes que se procesarán antes de que ejecutes la consulta. Ten en cuenta el número estimado para esta consulta (15.12 MB).
Pega la siguiente consulta, pero no hagas clic en Ejecutar:
SELECT * FROM ticket_sales.sales
WHERE saletime = '12/14/2008 09:13:17';
Observa que la cantidad de bytes procesados es la misma que la de la consulta del paso 1 (15.12 MB), aunque la nueva consulta solo pide las ventas de una fecha específica.
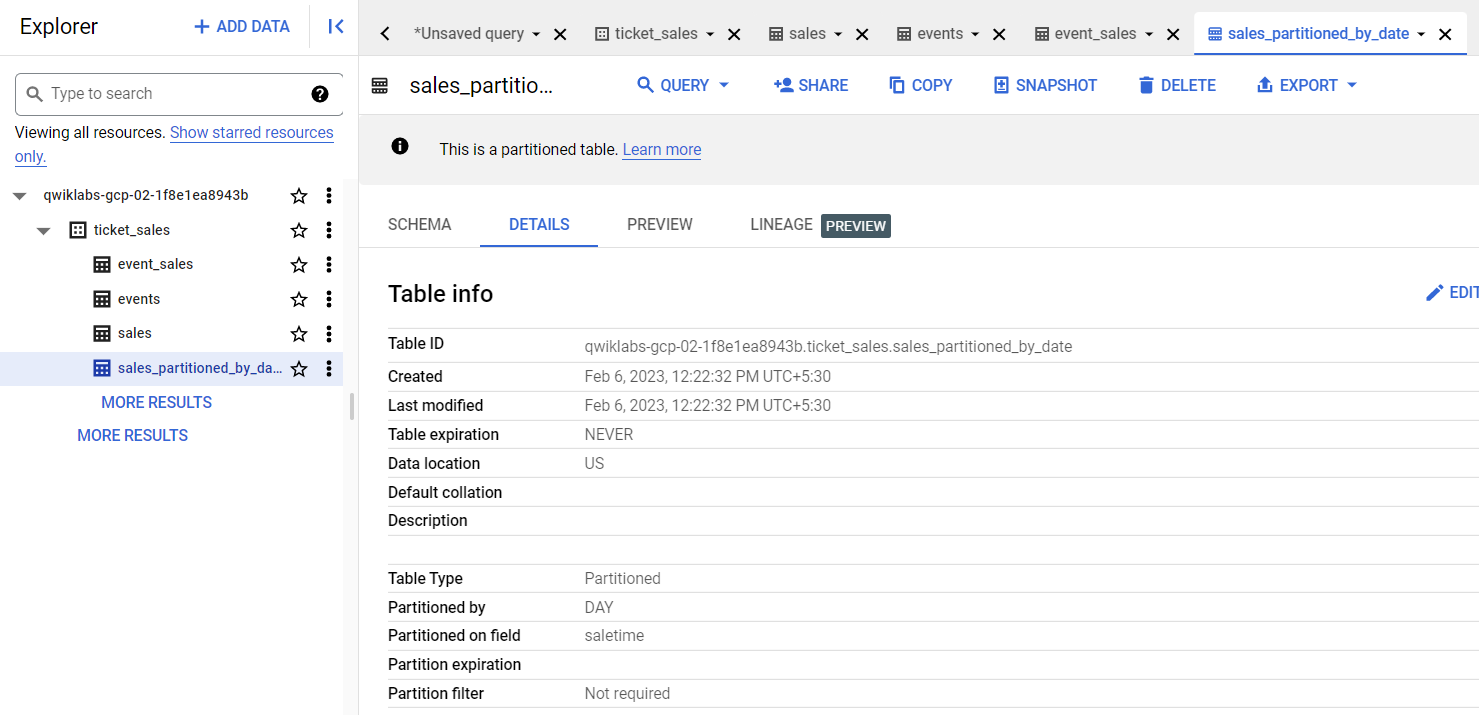
Para crear una nueva tabla de ventas que se particione diariamente por la columna saletime, ejecuta la siguiente consulta:
CREATE OR REPLACE TABLE
ticket_sales.sales_partitioned_by_date
PARTITION BY
DATETIME_TRUNC(saletime, DAY)
AS (
SELECT
* except (saletime),
PARSE_DATETIME( "%m/%d/%Y %H:%M:%S", saletime) as saletime
FROM
ticket_sales.sales );
Haz clic en la pestaña Details para confirmar que la tabla está particionada por DÍA en la columna llamada saletime.
Pega la siguiente consulta y observa la estimación más baja de datos que se procesarán (18.98 KB).
SELECT *
FROM ticket_sales.sales_partitioned_by_date
WHERE saletime = parse_datetime("%m/%d/%Y %H:%M:%S", '12/14/2008 09:13:17');
Haz clic en Ejecutar para recuperar los resultados de la consulta.
La consulta procesa menos datos (18.98 KB) porque se ejecuta en la tabla particionada. BigQuery puede usar la reducción de particiones para procesar menos datos, lo que puede generar un menor costo y consultas más rápidas.
Haz clic en Revisar mi progreso para verificar el objetivo.
Crear y consultar tablas particionadas
Tarea 4: Crea y consulta tablas agrupadas
Otro método para optimizar el rendimiento de las consultas en BigQuery es agrupar los valores dentro de una tabla para ordenar y agrupar los datos en bloques de almacenamiento lógicos. Las consultas que filtran o agregan según las columnas agrupadas solo analizan los bloques correspondientes a las columnas agrupadas, en lugar de la tabla completa o la partición de tabla. Este proceso se conoce como reducción de bloques y puede acelerar las uniones, las búsquedas, las agrupaciones y las ordenaciones.
En esta tarea, aprenderás a crear tablas agrupadas y a consultarlas para optimizar el rendimiento de las consultas.
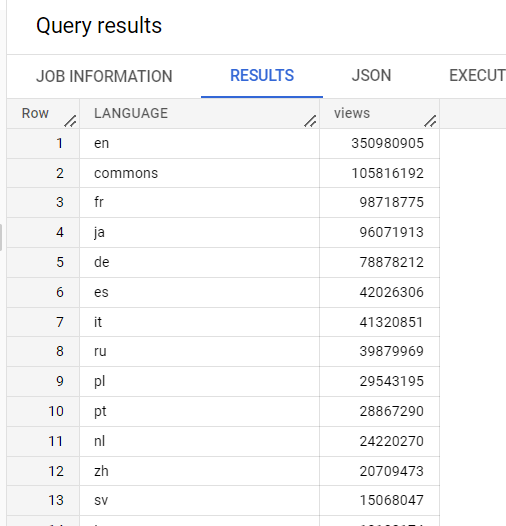
En el editor de consultas, ejecuta la siguiente consulta:
SELECT
LANGUAGE,
COUNT(views) AS views
FROM
`cloud-training-demos.wikipedia_benchmark.Wiki1B`
GROUP BY
LANGUAGE
ORDER BY
views DESC;
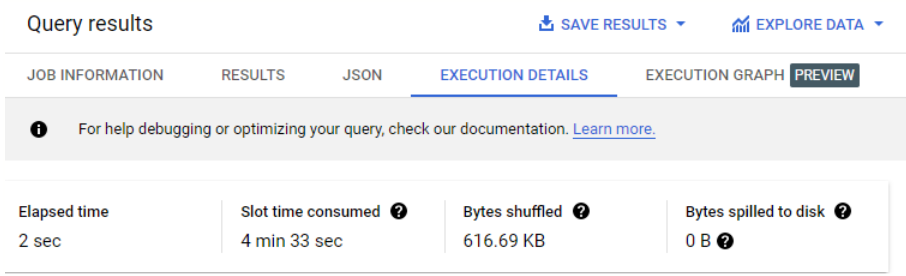
Esta consulta usa uno de los conjuntos de datos públicos de Google que contiene muchos datos (en este caso, 1,000 millones de filas). La consulta cuenta las vistas por idioma en una tabla de datos de Wikipedia.
En el panel Resultados, haz clic en la pestaña Detalles de la ejecución.
Ten en cuenta la cantidad de bytes transferidos (619.68 KB).
Para crear un nuevo conjunto de datos para los datos de Wikipedia, ejecuta la siguiente consulta:
CREATE SCHEMA IF NOT EXISTS
wiki_clustered OPTIONS(
location="us");
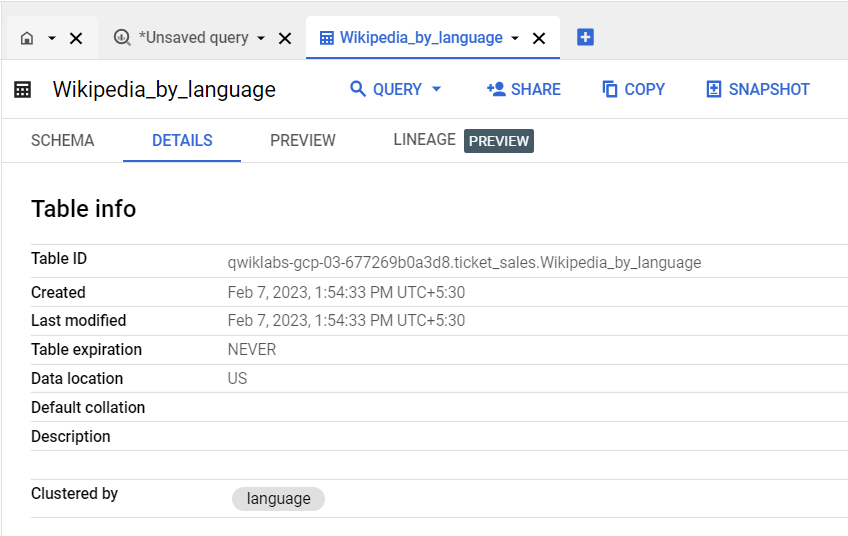
Para crear una tabla agrupada en la columna language, ejecuta la siguiente consulta:
CREATE OR REPLACE TABLE
wiki_clustered.Wikipedia_by_language
CLUSTER BY
language
AS (
SELECT * FROM `cloud-training-demos.wikipedia_benchmark.Wiki1B`);
Este comando puede tardar varios minutos en ejecutarse.
Revisa la pestaña Details de la tabla para confirmar que está agrupada en la columna llamada language.
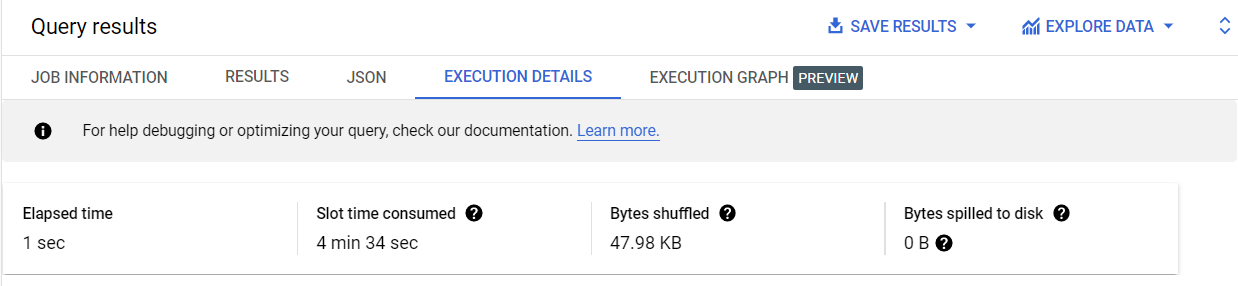
Para consultar la tabla agrupada, ejecuta la siguiente consulta:
SELECT
LANGUAGE,
COUNT(views) AS views
FROM
wiki_clustered.Wikipedia_by_language
GROUP BY
language
ORDER BY
views DESC;
En el panel Resultados, haz clic en la pestaña Detalles de la ejecución.
Observa que la cantidad de bytes transferidos es menor (47.98 KB) cuando se ejecuta la misma consulta en la tabla agrupada. Cuanto menos bytes se transfieran, más rápido será el tiempo de ejecución en BigQuery.
Haz clic en Revisar mi progreso para verificar el objetivo.
Crear y consultar tablas agrupadas
Finaliza el lab
Cuando hayas completado el lab, haz clic en Finalizar lab. Google Skills quitará los recursos que usaste y limpiará la cuenta.
Tendrás la oportunidad de calificar tu experiencia en el lab. Selecciona la cantidad de estrellas que corresponda, ingresa un comentario y haz clic en Enviar.
La cantidad de estrellas indica lo siguiente:
1 estrella = Muy insatisfecho
2 estrellas = Insatisfecho
3 estrellas = Ni satisfecho ni insatisfecho
4 estrellas = Satisfecho
5 estrellas = Muy satisfecho
Puedes cerrar el cuadro de diálogo si no deseas proporcionar comentarios.
Para enviar comentarios, sugerencias o correcciones, usa la pestaña Asistencia.
Copyright 2026 Google LLC. Todos los derechos reservados. Google y el logotipo de Google son marcas de Google LLC. El resto de los nombres de productos y empresas pueden ser marcas de las respectivas empresas a las que están asociados.
Los labs crean un proyecto de Google Cloud y recursos por un tiempo determinado
.
Los labs tienen un límite de tiempo y no tienen la función de pausa. Si finalizas el lab, deberás reiniciarlo desde el principio.
En la parte superior izquierda de la pantalla, haz clic en Comenzar lab para empezar
Usa la navegación privada
Copia el nombre de usuario y la contraseña proporcionados para el lab
Haz clic en Abrir la consola en modo privado
Accede a la consola
Accede con tus credenciales del lab. Si usas otras credenciales, se generarán errores o se incurrirá en cargos.
Acepta las condiciones y omite la página de recursos de recuperación
No hagas clic en Finalizar lab, a menos que lo hayas terminado o quieras reiniciarlo, ya que se borrará tu trabajo y se quitará el proyecto
Este contenido no está disponible en este momento
Te enviaremos una notificación por correo electrónico cuando esté disponible
¡Genial!
Nos comunicaremos contigo por correo electrónico si está disponible
Un lab a la vez
Confirma para finalizar todos los labs existentes y comenzar este
Usa la navegación privada para ejecutar el lab
Usar una ventana de incógnito o de navegación privada es la mejor forma de ejecutar
este lab. Así evitarás cualquier conflicto entre tu cuenta personal
y la cuenta de estudiante, lo que podría generar cargos adicionales en
tu cuenta personal.
En este lab, aprenderás a definir y consultar esquemas de tablas en BigQuery, lo que incluye cómo crear y consultar campos anidados y repetidos, tablas particionadas y tablas agrupadas.
Duración:
0 min de configuración
·
Acceso por 90 min
·
60 min para completar


 ) de la consola de Google Cloud, en Analytics, haz clic en BigQuery.