



Before you begin
- Labs create a Google Cloud project and resources for a fixed time
- Labs have a time limit and no pause feature. If you end the lab, you'll have to restart from the beginning.
- On the top left of your screen, click Start lab to begin

Create datasets and tables
/ 40
Add user 2 as principal and grant role to the dataset
/ 30
Run query as user 2 in project 2
/ 30
Create datasets and tables
/ 40
Add user 2 as principal and grant role to the dataset
/ 30
Run query as user 2 in project 2
/ 30
In Google Cloud, permissions are not assigned directly to users, groups, or service accounts. Instead, users, groups, or service accounts are granted access to basic, predefined, or custom Identity and Access Management (IAM) roles to give them permissions to perform actions on specific Google Cloud resources such as BigQuery. There are many predefined IAM roles for BigQuery that can be granted at various levels of the resource hierarchy including at the Google Cloud project level and the BigQuery dataset level.
A predefined IAM role can provide different permissions depending on which level of the Google Cloud hierarchy it is applied. For example, when applied at the BigQuery dataset level, the role of BigQuery data editor provides the ability to create, update, and delete the tables in the dataset. When the same role is applied at the Google Cloud project level, it provides the ability to create new BigQuery datasets in the project. Depending on your organization's needs and requirements, you can choose which roles to apply at which level of the Google Cloud hierarchy for any individual user, group, or service account to control access to BigQuery resources.
In this lab, you work in a simulated enterprise environment that has two Google Cloud projects and two users: one user with full access (project owner) on Project 1 and another user with limited access (project viewer) in Project 2. Using the two Google Cloud projects, you explore and test access to the Google Cloud projects and grant access to specific BigQuery datasets using predefined IAM roles.
In this lab, you learn how to:
Note: It can take 3 - 5 minutes for the lab environment to auto-generate two Google Cloud Projects and two user accounts.
For each lab, you get a new Google Cloud project and set of resources for a fixed time at no cost.
Sign in to Google Skills using an incognito window.
Note the lab's access time (for example, 1:15:00), and make sure you can finish within that time.
There is no pause feature. You can restart if needed, but you have to start at the beginning.
When ready, click Start lab.
Note your lab credentials (Username and Password). You will use them to sign in to the Google Cloud Console.
Click Open Google Console.
Click Use another account and copy/paste credentials for this lab into the prompts. If you use other credentials, you'll receive errors or incur charges.
Accept the terms and skip the recovery resource page.
Click the Start Lab button. If you need to pay for the lab, a dialog opens for you to select your payment method. On the right is the Lab setup and access panel with the following:
Note that the lab timer is located near the top of the page, showing the remaining time.
Click Open Google Cloud console (or right-click and select Open Link in Incognito Window if you are running the Chrome browser).
The lab spins up resources, and then opens another tab that shows the Sign in page.
Tip: Arrange the tabs in separate windows, side-by-side.
If necessary, copy the Username below and paste it into the Sign in dialog.
You can also find the Username in the Lab setup and access panel.
Click Next.
Copy the Password below and paste it into the Welcome dialog.
You can also find the Password in the Lab setup and access panel.
Click Next.
Click through the subsequent pages:
After a few moments, the Google Cloud console opens in this tab.

In this task, you work in Project 1 (
In a new Incognito window, click Open Google Console for Project 1 (
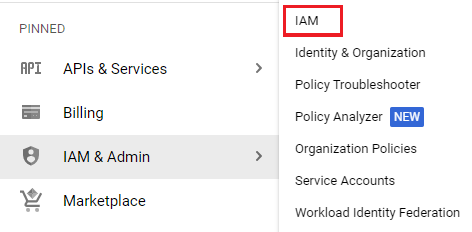
In the Google Cloud console, in the Navigation menu (
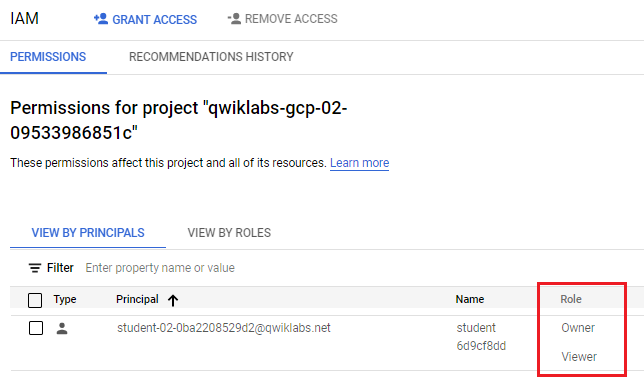
The IAM page displays permissions at the project level for all principals (users). As a project owner, User 1 can access and modify IAM permissions in Project 1.
The drop-down menu will show the project ID for Project 1 in the drop-down menu:
In this task, you continue to work in Project 1 (
In the Google Cloud console, in the Navigation menu (
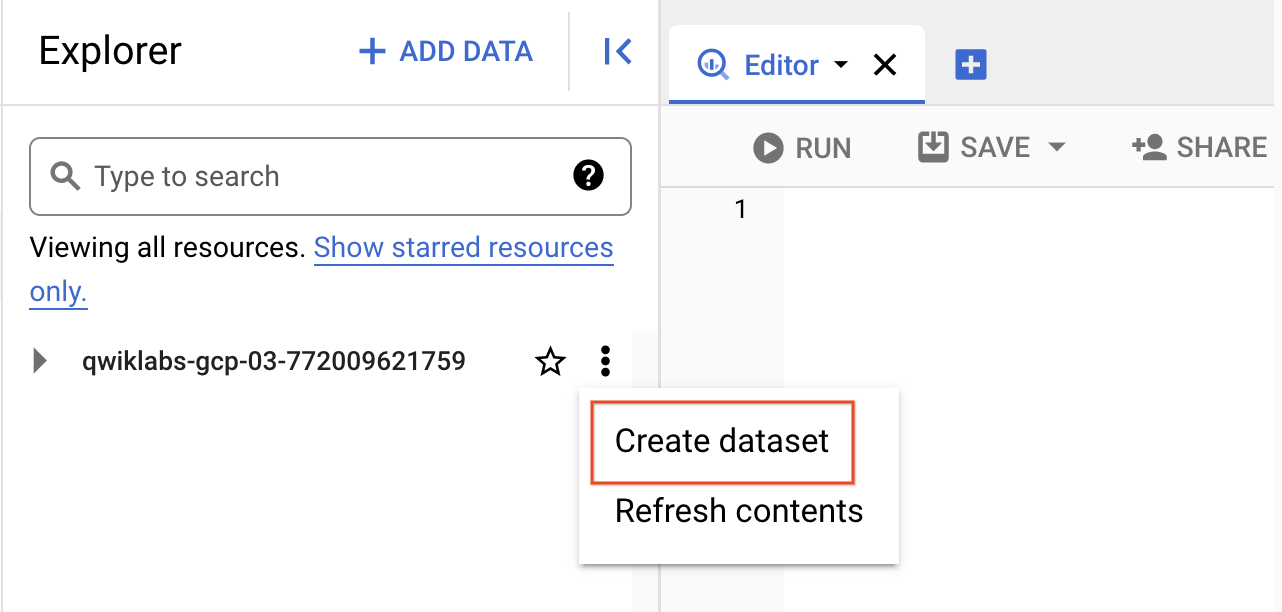
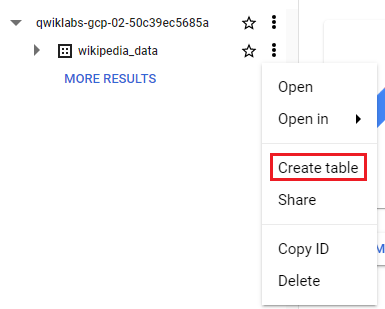
In the Explorer pane (left side pane), click View Action (three vertical dots) next to your Project ID, and select Create dataset.
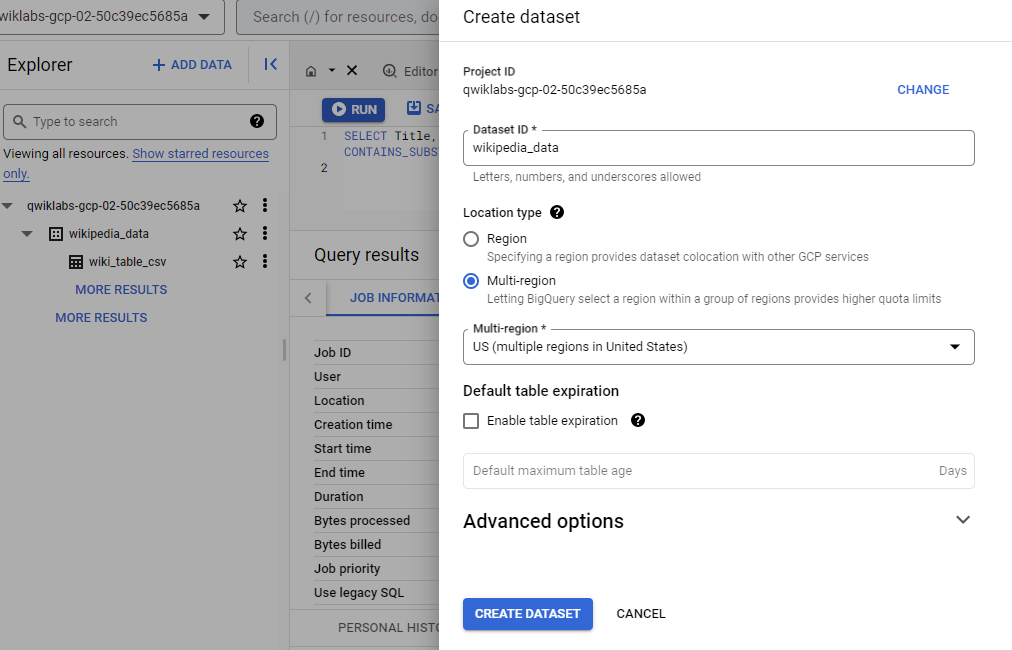
For Dataset ID, type: wikipedia_data
For Location type, select Multi-region and US (multiple regions in United States).
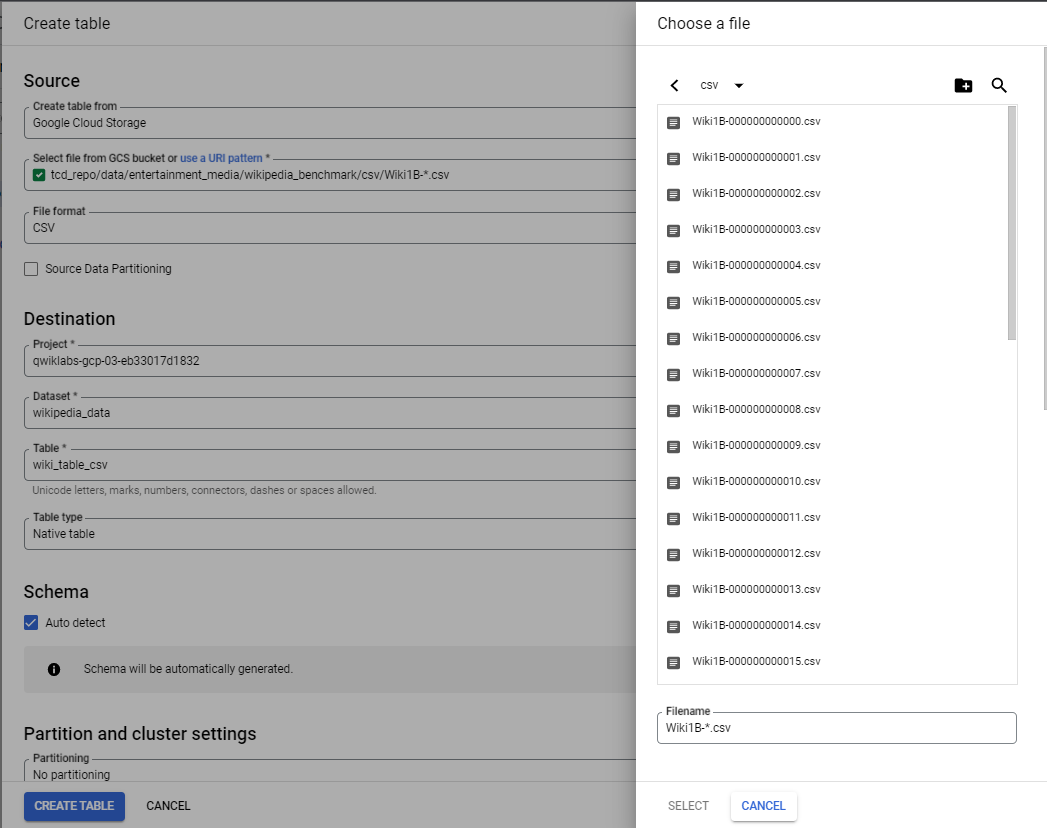
For Create table from, select Google Cloud Storage.
For Select file from GCS bucket, type: tcd_repo/data/entertainment_media/wikipedia_benchmark/csv/Wiki1B-*.csv
The file format will update to CSV.
For Project, leave the default value (
For Dataset, leave the default value (wikipedia_data).
For Table, type: wiki_table_csv
For Table type, leave the default value (Native table).
In the Schema section, enable the Auto detect checkbox.
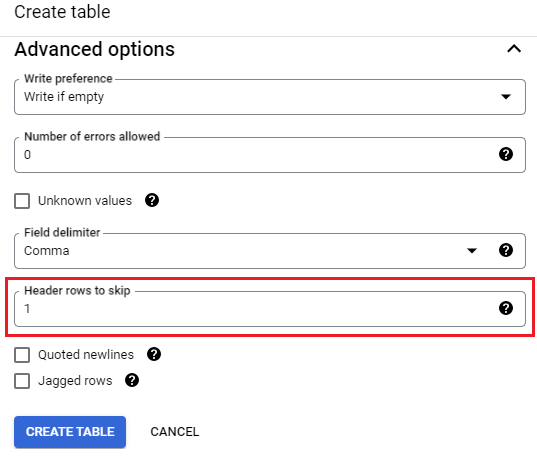
Expand the Advanced options section.
For Header rows to skip, type 1
Using the newly populated data, this query counts the number of views for Wikipedia articles with "GOOGLE" in the title.
Click Check my progress to verify the objective.
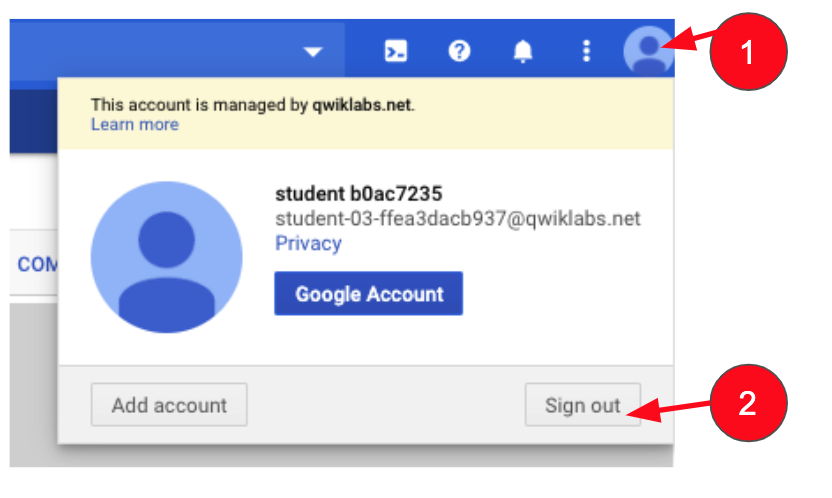
Click on the profile icon on the top right of the Google Cloud console.
Click Sign out.
If asked to confirm, click Leave.
In this task, you work in Project 2 (
In a new Incognito window, click Open Google Console for Project 2 (
At the top of the Google Cloud console, click on the Select a Project dropdown menu to see a list of projects that User 2 is logged into.
The drop-down menu will show the project ID for Project 2 in the drop-down menu:
), click IAM & Admin > IAM.User 2 (
In this task, you continue to work in Project 2 (
In the Google Cloud console, in the Navigation menu (
In the query editor, run the following query, replacing ProjectID with the Project 1 ID (
Click on the profile icon on the top right of the Google Cloud console.
Click Sign out.
If asked to confirm, click Leave.
You can assign BigQuery roles to users that do not have access to the Google Cloud project that hosts the data. This flexibility makes it easy to control and customize the level of access provided to any user, group, or service account because users can run queries in their own projects on only the specific data that they have been granted access to, even if that is hosted in other Google Cloud projects.
In this task, you return to work in Project 1 (
Using the Google Cloud console, you assign the BigQuery data editor role on the dataset named wikipedia_data in Project 1 to User 2.
In a new Incognito window, click Open Google Console for Project 1 (
In the Google Cloud console, in the Navigation menu (
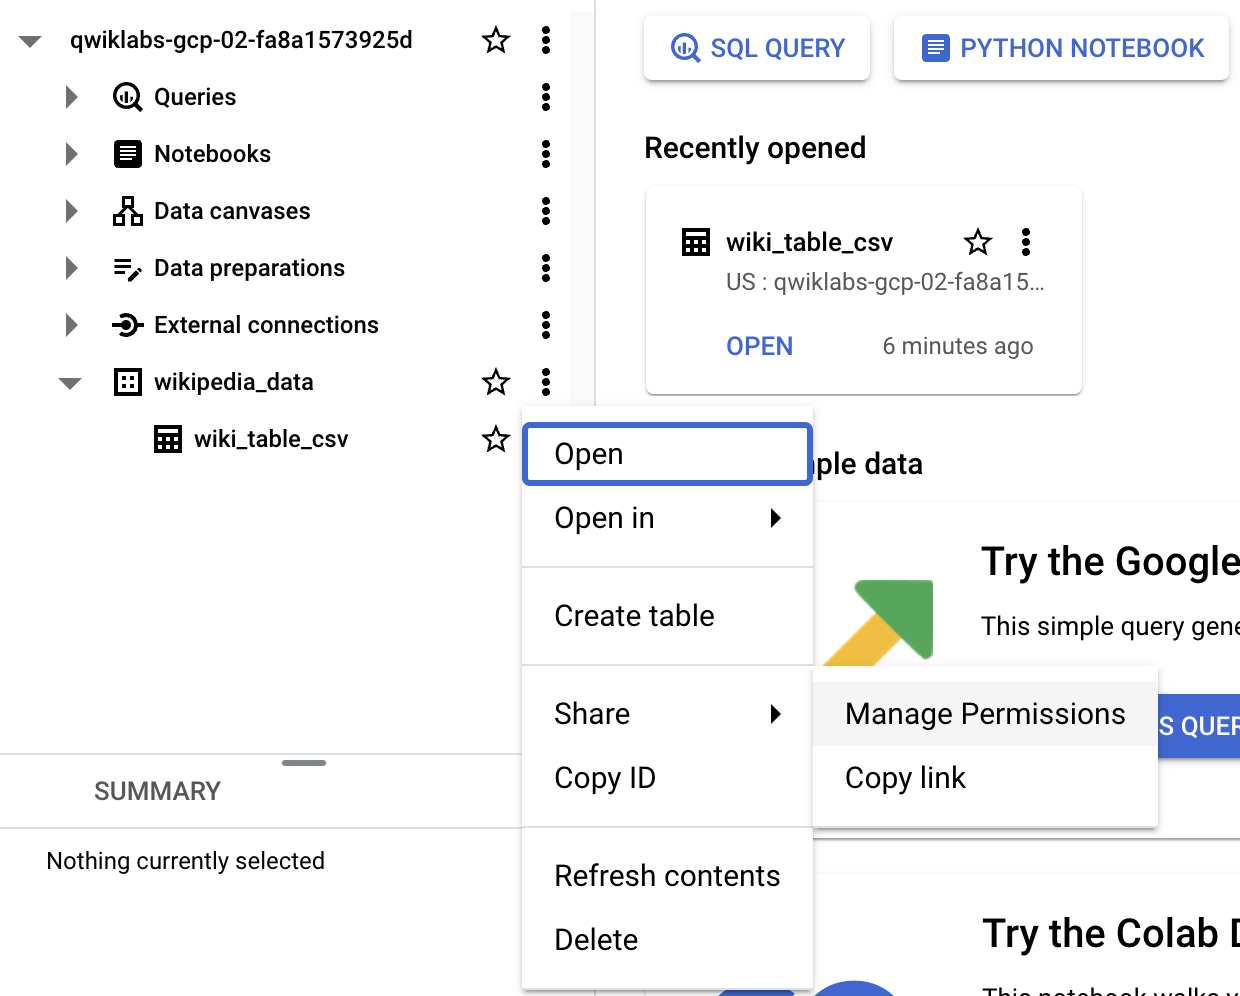
In the Explorer pane, click View Action (three vertical dots) next to wikipedia_data, and select Share > Manage Permissions.
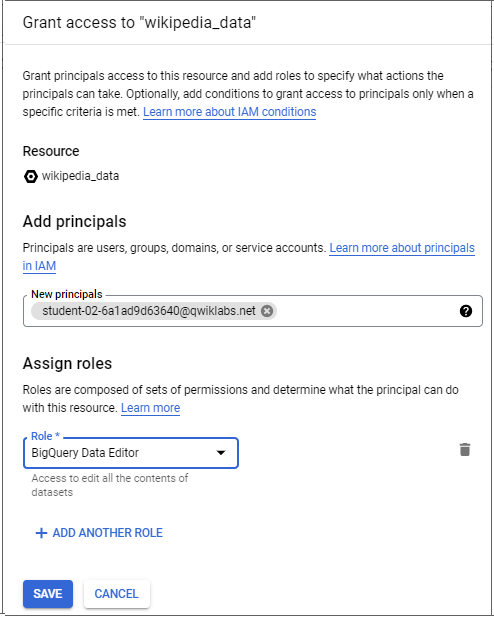
Click Add principal.
For New principals, enter the email for User 2:
For Select a role, select BigQuery Data Editor under BigQuery.
Click Check my progress to verify the objective.
Click on the profile icon on the top right of the Google Cloud console.
Click Sign out.
If asked to confirm, click Leave.
For this task, you return to work in Project 2 (
In a new Incognito window, click Open Google Console for Project 2 (
At the top of the Google Cloud console, click on the Select a Project dropdown menu to see a list of projects that User 2 is logged into.
Notice that as User 2, you can still only see Project 2 because you were not granted access to Project 1. User 2 was only granted access to the BigQuery dataset in Project 1, not the actual project.
ProjectID with the Project 1 ID (As User 2, you can now successfully run the query on the BigQuery dataset in Project 1. Assigning the role of BigQuery data editor on the BigQuery dataset allows User 2 to run queries on the tables in the BigQuery dataset (and more actions including creating, modifying, and deleting tables), even though User 2 does not have direct access to Project 1.
Click Check my progress to verify the objective.
When you have completed your lab, click End Lab. Google Skills removes the resources you’ve used and cleans the account for you.
You will be given an opportunity to rate the lab experience. Select the applicable number of stars, type a comment, and then click Submit.
The number of stars indicates the following:
You can close the dialog box if you don't want to provide feedback.
For feedback, suggestions, or corrections, please use the Support tab.
Copyright 2026 Google LLC All rights reserved. Google and the Google logo are trademarks of Google LLC. All other company and product names may be trademarks of the respective companies with which they are associated.



This content is not currently available
We will notify you via email when it becomes available

Great!
We will contact you via email if it becomes available


One lab at a time
Confirm to end all existing labs and start this one
Complete this quick step to start your lab.