


시작하기 전에
- 실습에서는 정해진 기간 동안 Google Cloud 프로젝트와 리소스를 만듭니다.
- 실습에는 시간 제한이 있으며 일시중지 기능이 없습니다. 실습을 종료하면 처음부터 다시 시작해야 합니다.
- 화면 왼쪽 상단에서 실습 시작을 클릭하여 시작합니다.
Estimate the amount of data processed by a query
/ 20
Determine slot usage using SQL query
/ 20
Complete a dry run of a query
/ 20

대규모 데이터 세트를 저장하고 쿼리할 때 올바른 인프라를 사용하지 않으면 많은 시간과 비용이 들 수 있습니다. BigQuery는 Google 인프라의 처리 능력을 사용하여 빠르고 비용 효율적인 쿼리를 지원하는 완전 관리형 서버리스 엔터프라이즈 데이터 웨어하우스입니다. BigQuery에서는 스토리지와 컴퓨팅 리소스가 분리되어 있으므로 조직의 요구사항에 맞춰 유연하게 데이터를 저장하고 쿼리할 수 있습니다.
BigQuery를 사용하면 Google Cloud 콘솔의 BigQuery 쿼리 검사기, bq 명령줄 도구의 dry-run 플래그, Google Cloud 가격 계산기, API 및 클라이언트 라이브러리 등의 다양한 도구를 사용하여 쿼리 리소스 사용량과 비용을 쉽게 추정할 수 있습니다.
이 실습에서는 쿼리를 실행하기 전에 처리할 데이터 양을 BigQuery 쿼리 검사기와 bq 명령줄 도구를 사용하여 추정합니다. 또한 쿼리가 성공적으로 실행된 후의 리소스 사용량을 SQL 쿼리와 API를 사용하여 확인할 수도 있습니다.
이 실습에서는 다음을 수행하는 방법에 대해 알아봅니다.
각 실습에서는 정해진 기간 동안 새 Google Cloud 프로젝트와 리소스 집합이 무료로 제공됩니다.
시크릿 창을 사용하여 Google Skills에 로그인합니다.
실습 사용 가능 시간(예: 1:15:00)을 참고하여 해당 시간 내에 완료합니다.
일시중지 기능은 없습니다. 필요한 경우 다시 시작할 수 있지만 처음부터 시작해야 합니다.
준비가 되면 실습 시작을 클릭합니다.
실습 사용자 인증 정보(사용자 이름 및 비밀번호)를 기록해 두세요. Google Cloud Console에 로그인합니다.
Google Console 열기를 클릭합니다.
다른 계정 사용을 클릭한 다음, 안내 메시지에 이 실습에 대한 사용자 인증 정보를 복사하여 붙여넣습니다. 다른 사용자 인증 정보를 사용하는 경우 오류가 발생하거나 요금이 부과됩니다.
약관에 동의하고 리소스 복구 페이지를 건너뜁니다.
실습 시작 버튼을 클릭합니다. 실습 비용을 결제해야 하는 경우 결제 수단을 선택할 수 있는 팝업이 열립니다. 왼쪽에 있는 패널에서 이 실습에 사용해야 하는 임시 사용자 인증 정보를 확인할 수 있습니다.
사용자 이름을 복사한 다음 Google 콘솔 열기를 클릭합니다. 실습에서 리소스가 실행되며 계정 선택 페이지를 표시하는 다른 탭이 열립니다.
계정 선택 페이지에서 다른 계정 사용을 클릭합니다. 로그인 페이지가 열립니다.
연결 세부정보 패널에서 복사한 사용자 이름을 붙여넣습니다. 그런 다음 비밀번호를 복사하여 붙여넣습니다.
잠시 후 Cloud 콘솔이 이 탭에서 열립니다.

Google Cloud Shell은 다양한 개발 도구가 탑재된 가상 머신으로, 5GB의 영구 홈 디렉터리를 제공하며 Google Cloud에서 실행됩니다.
Google Cloud Shell을 사용하면 명령줄을 통해 Google Cloud 리소스에 액세스할 수 있습니다.
Cloud 콘솔의 오른쪽 상단 툴바에서 'Cloud Shell 열기' 버튼을 클릭합니다.
계속을 클릭합니다.
환경을 프로비저닝하고 연결하는 데 몇 분 정도 소요됩니다. 연결되면 사용자가 미리 인증되어 프로젝트가 PROJECT_ID로 설정됩니다. 예:
gcloud는 Google Cloud의 명령줄 도구입니다. Cloud Shell에 사전 설치되어 있으며 명령줄 자동 완성을 지원합니다.
출력:
출력 예시:
출력:
출력 예시:
Google Cloud 콘솔에 쿼리를 입력하면 BigQuery 쿼리 검사기가 쿼리 문법을 확인하고 쿼리에서 처리할 바이트 수를 추정합니다.
이 작업에서는 BigQuery 공개 데이터 세트 프로그램에서 관리하는 공개 데이터 세트(New York Citi Bikes)를 쿼리합니다. 이 데이터 세트를 바탕으로 쿼리 검사기를 이용해 SQL 쿼리를 검증하는 방법과 쿼리를 실행하기 전에 쿼리에서 처리할 데이터 양을 추정하는 방법을 알아봅니다.
 )에서 '분석' 아래의 BigQuery를 클릭합니다.
'Cloud 콘솔의 BigQuery에 오신 것을 환영합니다.'라는 메시지 상자가 열립니다. 이 메시지 상자에서는 빠른 시작 가이드 및 출시 노트로 연결되는 링크가 제공됩니다.
완료를 클릭합니다.
SQL 작업공간 툴바에서 편집기 탭을 클릭하여 SQL 쿼리 편집기를 엽니다.
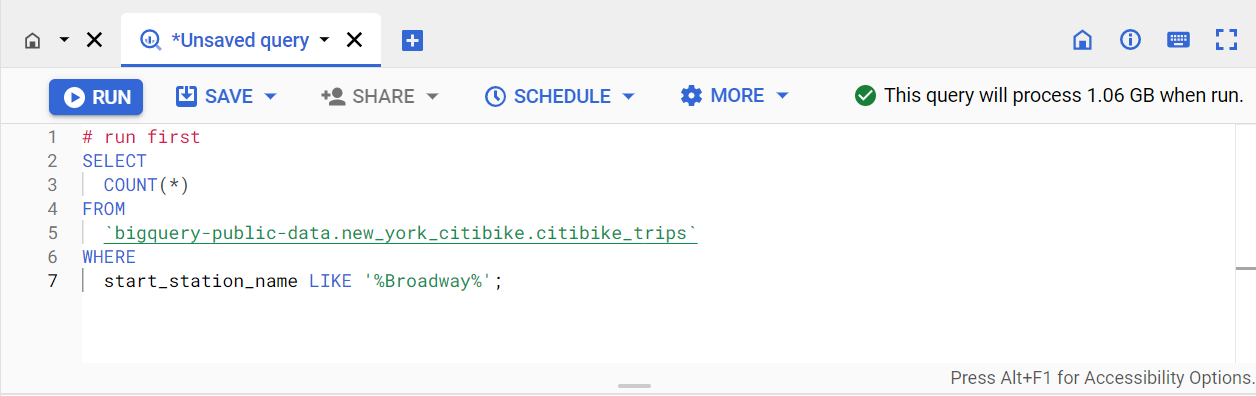
이 쿼리를 실행하면 citibike_trips 테이블의 start_station_name 열에 'Broadway'라는 텍스트가 포함된 정거장 이름의 개수가 반환됩니다.
쿼리 편집기에서 코드를 추가하거나 수정하면 BigQuery에서 쿼리 검사기를 자동으로 실행합니다.
쿼리가 유효한지 여부에 따라 쿼리 편집기 위에 녹색 또는 빨간색 체크표시가 표시됩니다. 쿼리가 유효한 경우 검사기는 쿼리를 실행할 때 처리되는 데이터 양도 함께 표시합니다.
쿼리 검사기에 따르면 이 쿼리는 실행 시 1.06GB를 처리합니다.
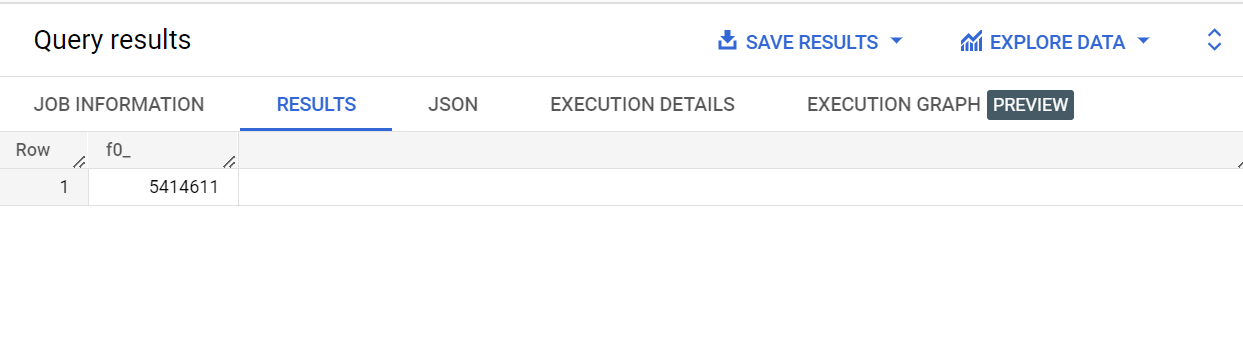
이 쿼리는 'Broadway'라는 텍스트가 포함된 레코드 수(5,414,611)를 start_station_name이라는 열에 반환합니다.
내 진행 상황 확인하기를 클릭하여 목표를 확인합니다.
BigQuery는 슬롯(가상 CPU)을 사용하여 SQL 쿼리를 실행하며 쿼리 크기와 복잡성에 따라 각 쿼리에 필요한 슬롯 수를 자동으로 계산합니다. Google Cloud 콘솔에서 쿼리를 실행하면 쿼리를 실행하는 데 사용된 리소스 양의 요약과 결과가 모두 표시됩니다.
이 작업에서는 이전 작업에서 실행된 쿼리의 작업 ID를 식별하고 이를 새 SQL 쿼리에서 사용하여 쿼리 작업 관련 추가 정보를 가져옵니다.
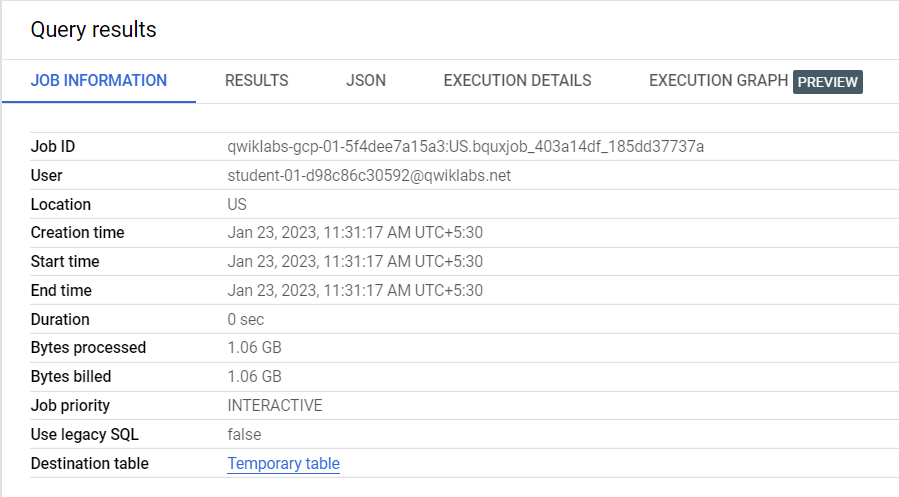
예를 들어 값 qwiklabs-gcp-01-5f4dee7a15a3:US.bquxjob_403a14df_185dd37737a는 프로젝트 ID로 시작하여 작업이 실행된 위치를 표시한 후 작업 ID로 끝납니다. :US.의 문법은 작업이 실행된 위치를 식별합니다.
프로젝트 ID는 첫 번째 부분인 qwiklabs-gcp-01-5f4dee7a15a3(:US. 이전 부분)이고 작업 ID는 마지막 부분인 bquxjob_403a14df_185dd37737a(:US. 이후 부분)입니다.
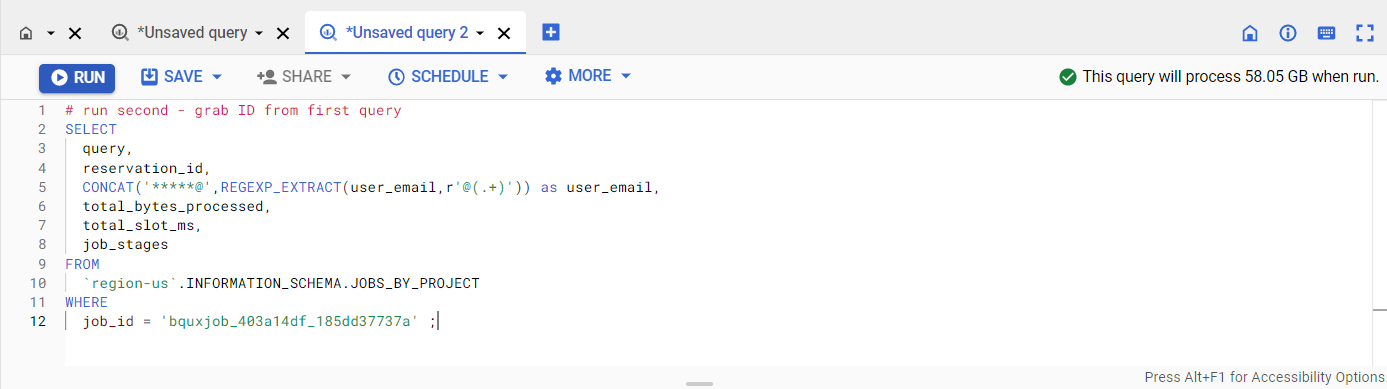
'YOUR_ID'를 작업 ID(예: 'bquxjob_403a14df_185dd37737a')로 바꿉니다.이 쿼리를 실행하면 이전에 Citi Bikes 공개 데이터 세트에서 실행된 쿼리 작업의 슬롯 사용량이 반환됩니다.
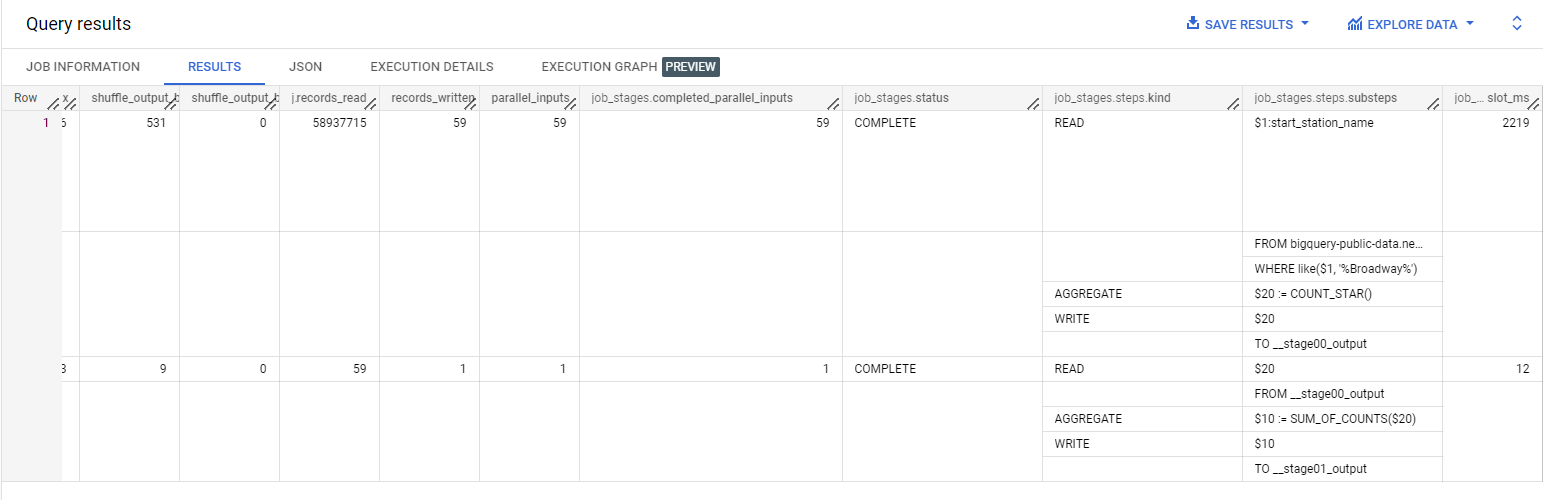
이 쿼리의 출력은 각 쿼리 단계와 해당 단계의 관련 슬롯 사용량을 보여주는 테이블을 제공합니다.
쿼리 내 개별 작업은 단일 슬롯에서 실행되므로 job_stages.completed_parallel_inputs라는 열의 값 합계는 쿼리를 실행하는 데 사용된 총 슬롯 수입니다.
하지만 할당된 첫 번째 작업을 완료하면 단일 슬롯을 다시 할당해 다른 작업을 완료할 수 있습니다.
따라서 쿼리를 실행하는 데 사용된 총 슬롯 시간(total_slot_ms라는 열에 제공된 값)도 반드시 이해해야 합니다. 특히 전체 쿼리 작업과 각 쿼리 단계에 대해 슬롯 시간(밀리초 또는 ms 단위)이 제공되며, 이는 해당 단계를 완료하는 데 사용된 슬롯 시간을 나타냅니다.
예를 들어 150개의 작업을 완료할 수 있는 쿼리에서도 각 작업이 빠르게 실행된다면, 쿼리는 실제로 150개보다 적은 수의 슬롯(예: 100개)을 사용할 수 있습니다.
내 진행 상황 확인하기를 클릭하여 목표를 확인합니다.
API를 사용하여 특정 쿼리 작업 관련 정보를 가져올 수도 있습니다. BigQuery에서는 서버에 요청을 전송하여 API를 직접 사용하거나 선호하는 언어(C#, Go, Java, Node.js, PHP, Python, Ruby)로 클라이언트 라이브러리를 사용할 수 있습니다.
이 작업에서는 Google API 탐색기를 사용하여 BigQuery API를 테스트하고 이전 작업에서 실행한 쿼리의 슬롯 사용량을 가져옵니다.
새 시크릿 모드 브라우저 탭에서 jobs.get 메서드의 BigQuery API 페이지로 이동합니다.
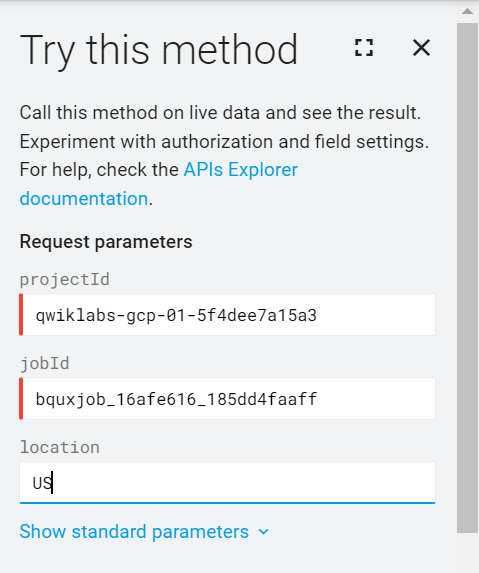
이 메서드 사용해 보기 창에 이전 작업에서 확인한 프로젝트 ID와 작업 ID를 입력합니다.
예를 들어 프로젝트 ID는 qwiklabs-gcp-01-5f4dee7a15a3이고 작업 ID는 bquxjob_403a14df_185dd37737a입니다.
로그인을 확인하라는 메시지가 표시되면 이전 작업에서 Google Cloud에 로그인하는 데 사용한 학생 사용자 이름(
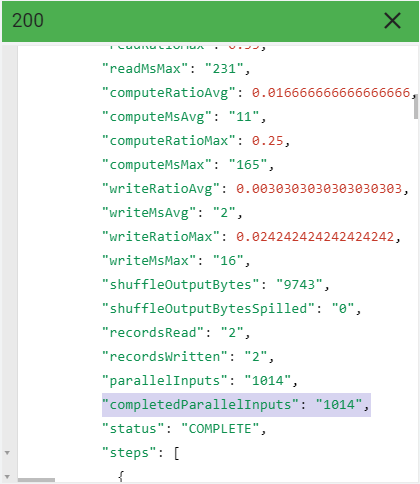
첫 번째 단계에서 완료된 병렬 입력의 값을 확인하려면 statistics > query > queryPlan > name: S00 > completedParallelInputs까지 아래로 스크롤합니다.
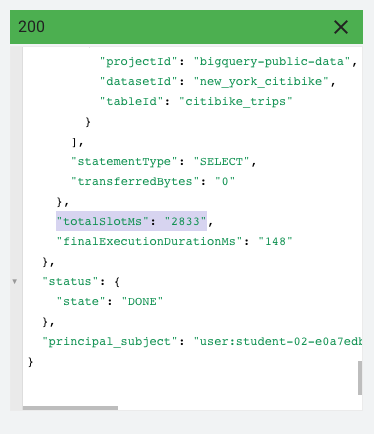
전체 쿼리 작업에 사용된 총 슬롯을 확인하려면 결과 끝까지 스크롤하여 totalSlotMs 값을 검토합니다.
bq 명령줄 도구에서 --dry_run 플래그를 사용하여 쿼리를 실행하기 전에 쿼리에서 읽은 바이트 수를 추정할 수 있습니다. API 또는 클라이언트 라이브러리를 사용하여 쿼리 작업을 제출할 때 dryRun 파라미터를 사용할 수도 있습니다. 쿼리의 드라이 런은 쿼리 슬롯을 사용하지 않으며 드라이 런에 대한 요금은 청구되지 않습니다.
이 작업에서는 Cloud Shell에서 bq 명령줄 도구를 사용하여 쿼리의 드라이 런을 완료하는 방법을 알아봅니다.
출력에는 결과를 가져오기 위해 쿼리를 실행하기 전에 쿼리에서 처리할 예상 바이트 수가 표시됩니다.
이제 쿼리에서 처리할 바이트 수를 파악했으니, 워크플로의 다음 단계를 결정할 수 있습니다.
내 진행 상황 확인하기를 클릭하여 목표를 확인합니다.
실습을 완료하면 실습 종료를 클릭합니다. Google Skills에서 사용된 리소스를 자동으로 삭제하고 계정을 지웁니다.
실습 경험을 평가할 수 있습니다. 해당하는 별표 수를 선택하고 의견을 입력한 후 제출을 클릭합니다.
별점의 의미는 다음과 같습니다.
의견을 제공하고 싶지 않다면 대화상자를 닫으면 됩니다.
의견이나 제안 또는 수정할 사항이 있다면 지원 탭을 사용하세요.
Copyright 2026 Google LLC All rights reserved. Google 및 Google 로고는 Google LLC의 상표입니다. 기타 모든 회사명 및 제품명은 해당 업체의 상표일 수 있습니다.


현재 이 콘텐츠를 이용할 수 없습니다
이용할 수 있게 되면 이메일로 알려드리겠습니다.

감사합니다
이용할 수 있게 되면 이메일로 알려드리겠습니다.

한 번에 실습 1개만 가능
모든 기존 실습을 종료하고 이 실습을 시작할지 확인하세요.