GSP480

Overview
This lab will show you how to improve the security of your Kubernetes Engine by applying fine-grained restrictions to network communication.
The Principle of Least Privilege
is widely recognized as an important design consideration in enhancing the protection of critical systems from faults and malicious behavior. It suggests that every component must be able to access only the information and resources that are necessary for its legitimate purpose. This document demonstrates how the Principle of Least Privilege can be implemented within the Kubernetes Engine network layer.
Network connections can be restricted at two tiers of your Kubernetes Engine infrastructure. The first, and coarser grained, mechanism is the application of Firewall Rules at the Network, Subnetwork, and Host levels. These rules are applied outside of the Kubernetes Engine at the VPC level.
While Firewall Rules are a powerful security measure, and Kubernetes enables you to define even finer grained rules via Network Policies. Network Policies are used to limit intra-cluster communication. Network policies do not apply to pods attached to the host's network namespace.
For this lab you will provision a private Kubernetes Engine cluster and a bastion host with which to access it. A bastion host provides a single host that has access to the cluster, which, when combined with a private Kubernetes network, ensures that the cluster isn't exposed to malicious behavior from the internet at large. Bastions are particularly useful when you do not have VPN access to the cloud network.
Within the cluster, a simple HTTP server and two client pods will be provisioned. You will learn how to use a Network Policy and labeling to only allow connections from one of the client pods.
This lab was created by GKE Helmsman engineers to give you a better understanding of GKE Binary Authorization. You can view this demo by running gsutil cp -r gs://spls/gke-binary-auth/* . and cd gke-binary-auth-demo command in cloud shell. We encourage any and all to contribute to our assets!
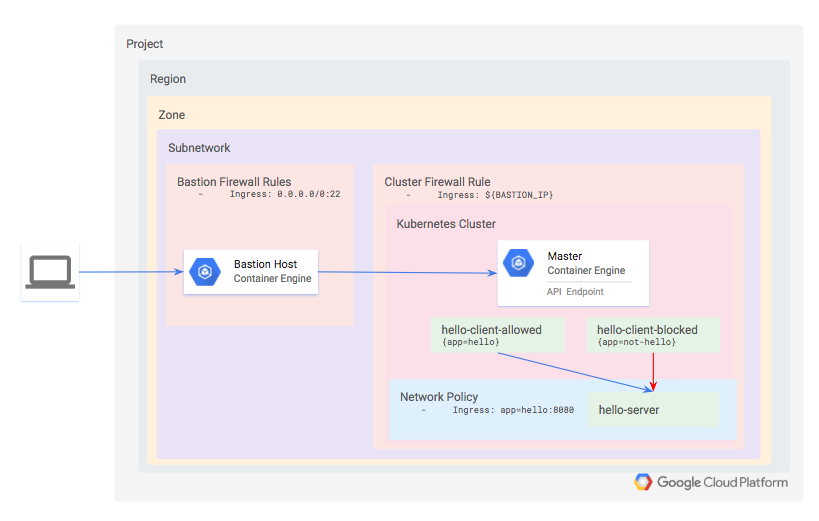
Architecture
You will define a private, standard mode Kubernetes cluster that uses Dataplane V2. Dataplane V2 has network policies enabled by default.
Since the cluster is private, neither the API nor the worker nodes will be accessible from the internet. Instead, you will define a bastion host and use a firewall rule to enable access to it. The bastion's IP address is defined as an authorized network for the cluster, which grants it access to the API.
Within the cluster, provision three workloads:
- hello-server: this is a simple HTTP server with an internally-accessible endpoint
- hello-client-allowed: this is a single pod that repeatedly attempts to access hello-server. The pod is labeled such that the Network Policy will allow it to connect to hello-server.
- hello-client-blocked: this runs the same code as hello-client-allowed but the pod is labeled such that the Network Policy will not allow it to connect to hello-server.
Setup and requirements
Before you click the Start Lab button
Read these instructions. Labs are timed and you cannot pause them. The timer, which starts when you click Start Lab, shows how long Google Cloud resources are made available to you.
This hands-on lab lets you do the lab activities in a real cloud environment, not in a simulation or demo environment. It does so by giving you new, temporary credentials you use to sign in and access Google Cloud for the duration of the lab.
To complete this lab, you need:
- Access to a standard internet browser (Chrome browser recommended).
Note: Use an Incognito (recommended) or private browser window to run this lab. This prevents conflicts between your personal account and the student account, which may cause extra charges incurred to your personal account.
- Time to complete the lab—remember, once you start, you cannot pause a lab.
Note: Use only the student account for this lab. If you use a different Google Cloud account, you may incur charges to that account.
How to start your lab and sign in to the Google Cloud console
-
Click the Start Lab button. If you need to pay for the lab, a dialog opens for you to select your payment method.
On the right is the Lab setup and access panel with the following:
- The Open Google Cloud console button
- The temporary credentials (username and password) that you must use for this lab
- Other information, if needed, to step through this lab
Note that the lab timer is located near the top of the page, showing the remaining time.
-
Click Open Google Cloud console (or right-click and select Open Link in Incognito Window if you are running the Chrome browser).
The lab spins up resources, and then opens another tab that shows the Sign in page.
Tip: Arrange the tabs in separate windows, side-by-side.
Note: If you see the Choose an account dialog, click Use Another Account.
-
If necessary, copy the Username below and paste it into the Sign in dialog.
{{{user_0.username | "Username"}}}
You can also find the Username in the Lab setup and access panel.
-
Click Next.
-
Copy the Password below and paste it into the Welcome dialog.
{{{user_0.password | "Password"}}}
You can also find the Password in the Lab setup and access panel.
-
Click Next.
Important: You must use the credentials the lab provides you. Do not use your Google Cloud account credentials.
Note: Using your own Google Cloud account for this lab may incur extra charges.
-
Click through the subsequent pages:
- Accept the terms and conditions.
- Do not add recovery options or two-factor authentication (because this is a temporary account).
- Do not sign up for free trials.
After a few moments, the Google Cloud console opens in this tab.
Note: To access Google Cloud products and services, click the Navigation menu or type the service or product name in the Search field.

Activate Cloud Shell
Cloud Shell is a virtual machine that is loaded with development tools. It offers a persistent 5GB home directory and runs on the Google Cloud. Cloud Shell provides command-line access to your Google Cloud resources.
-
Click Activate Cloud Shell  at the top of the Google Cloud console.
-
Click through the following windows:
- Continue through the Cloud Shell information window.
- Authorize Cloud Shell to use your credentials to make Google Cloud API calls.
When you are connected, you are already authenticated, and the project is set to your Project_ID, . The output contains a line that declares the Project_ID for this session:
Your Cloud Platform project in this session is set to {{{project_0.project_id | "PROJECT_ID"}}}
gcloud is the command-line tool for Google Cloud. It comes pre-installed on Cloud Shell and supports tab-completion.
- (Optional) You can list the active account name with this command:
gcloud auth list
- Click Authorize.
Output:
ACTIVE: *
ACCOUNT: {{{user_0.username | "ACCOUNT"}}}
To set the active account, run:
$ gcloud config set account `ACCOUNT`
- (Optional) You can list the project ID with this command:
gcloud config list project
Output:
[core]
project = {{{project_0.project_id | "PROJECT_ID"}}}
Note: For full documentation of gcloud, in Google Cloud, refer to the gcloud CLI overview guide.
Clone demo
- Copy the resources needed for this lab exercise from a Cloud Storage bucket:
gsutil cp -r gs://spls/gsp480/gke-network-policy-demo .
- Go into the directory for the demo:
cd gke-network-policy-demo
- Make the demo files executable:
chmod -R 755 *
Task 1. Lab setup
First, set the Google Cloud region and zone.
- Set the Google Cloud region.
gcloud config set compute/region "{{{project_0.default_region|placeholder}}}"
- Set the Google Cloud zone.
gcloud config set compute/zone "{{{project_0.default_zone|placeholder}}}"
This lab will use the following Google Cloud Service APIs, and have been enabled for you:
compute.googleapis.comcontainer.googleapis.comcloudbuild.googleapis.com
In addition, the Terraform configuration takes three parameters to determine where the Kubernetes Engine cluster should be created:
For simplicity, these parameters are specified in a file named terraform.tfvars, in the terraform directory.
- To ensure the appropriate APIs are enabled and to generate the
terraform/terraform.tfvars file based on your gcloud defaults, run:
make setup-project
- Type
y when asked to confirm.
This will enable the necessary Service APIs, and it will also generate a terraform/terraform.tfvars file with the following keys.
- Verify the values themselves will match the output of
gcloud config list by running:
cat terraform/terraform.tfvars
Provisioning the Kubernetes Engine cluster
- Next, apply the Terraform configuration within the project root:
make tf-apply
- When prompted, review the generated plan and enter
yes to deploy the environment.
This will take several minutes to deploy.
Task 2. Validation
Terraform outputs a message when the cluster's been successfully created.
...snip...
google_container_cluster.primary: Still creating... (3m0s elapsed)
google_container_cluster.primary: Still creating... (3m10s elapsed)
google_container_cluster.primary: Still creating... (3m20s elapsed)
google_container_cluster.primary: Still creating... (3m30s elapsed)
google_container_cluster.primary: Creation complete after 3m34s (ID: gke-demo-cluster)
Apply complete! Resources: 5 added, 0 changed, 0 destroyed.
Test completed task
Click Check my progress to verify your performed task. If you have successfully deployed necessary infrastructure with Terraform, you will see an assessment score.
Use Terraform to set up the necessary infrastructure (Lab setup)
- Now ssh into the bastion for the remaining steps:
gcloud compute ssh gke-demo-bastion
Existing versions of kubectl and custom Kubernetes clients contain provider-specific code to manage authentication between the client and Google Kubernetes Engine. Starting with v1.26, this code will no longer be included as part of the OSS kubectl. GKE users will need to download and use a separate authentication plugin to generate GKE-specific tokens. This new binary, gke-gcloud-auth-plugin, uses the Kubernetes Client-go Credential Plugin mechanism to extend kubectl’s authentication to support GKE. For more information, you can check out the following documentation.
To have kubectl use the new binary plugin for authentication instead of using the default provider-specific code, use the following steps.
- Once connected, run the following command to install the
gke-gcloud-auth-plugin on the VM.
sudo apt-get install google-cloud-sdk-gke-gcloud-auth-plugin
- Set
export USE_GKE_GCLOUD_AUTH_PLUGIN=True in ~/.bashrc:
echo "export USE_GKE_GCLOUD_AUTH_PLUGIN=True" >> ~/.bashrc
- Run the following command:
source ~/.bashrc
- Run the following command to force the config for this cluster to be updated to the Client-go Credential Plugin configuration.
gcloud container clusters get-credentials gke-demo-cluster --zone {{{project_0.default_zone|placeholder}}}
On success, you should see this message:
kubeconfig entry generated for gke-demo-cluster.
The newly-created cluster will now be available for the standard kubectl commands on the bastion.
Task 3. Installing the hello server
The test application consists of one simple HTTP server, deployed as hello-server, and two clients, one of which will be labeled app=hello and the other app=not-hello.
All three services can be deployed by applying the hello-app manifests.
- On the bastion, run:
kubectl apply -f ./manifests/hello-app/
Output:
deployment.apps/hello-client-allowed created
deployment.apps/hello-client-blocked created
service/hello-server created
deployment.apps/hello-server created
- Verify all three pods have been successfully deployed:
kubectl get pods
You will see one running pod for each of hello-client-allowed, hello-client-blocked,
and hello-server deployments.
NAME READY STATUS RESTARTS AGE
hello-client-allowed-7d95fcd5d9-t8fsk | 1/1 Running 0 14m
hello-client-blocked-6497db465d-ckbn8 | 1/1 Running 0 14m
hello-server-7df58f7fb5-nvcvd | 1/1 Running 0 14m
Test completed task
Click Check my progress to verify your performed task. If you have successfully deployed a simple HTTP hello server, you will see an assessment score.
Installing the hello server
Task 4. Confirming default access to the hello server
- First, tail the "allowed" client:
kubectl logs --tail 10 -f $(kubectl get pods -oname -l app=hello)
Press CTRL+C to exit.
- Second, tail the logs of the "blocked" client:
kubectl logs --tail 10 -f $(kubectl get pods -oname -l app=not-hello)
- Press CTRL+C to exit.
You will notice that both pods are successfully able to connect to the hello-server service. This is because you have not yet defined a Network Policy to restrict access. In each of these windows you should see successful responses from the server.
Hostname: hello-server-7df58f7fb5-nvcvd
Hello, world!
Version: 1.0.0
Hostname: hello-server-7df58f7fb5-nvcvd
Hello, world!
Version: 1.0.0
Hostname: hello-server-7df58f7fb5-nvcvd
...
Task 5. Restricting access with a Network Policy
Now you will block access to the hello-server pod from all pods that are not labeled with app=hello.
The policy definition you'll use is contained in manifests/network-policy.yaml
- Apply the policy with the following command:
kubectl apply -f ./manifests/network-policy.yaml
Output:
networkpolicy.networking.k8s.io/hello-server-allow-from-hello-client created
- Tail the logs of the "blocked" client again:
kubectl logs --tail 10 -f $(kubectl get pods -oname -l app=not-hello)
You'll now see that the output looks like this in the window tailing the "blocked" client:
wget: download timed out
wget: download timed out
wget: download timed out
wget: download timed out
wget: download timed out
wget: download timed out
wget: download timed out
wget: download timed out
wget: download timed out
...
The network policy has now prevented communication to the hello-server from the unlabeled pod.
- Press CTRL+C to exit.
Task 6. Restricting namespaces with Network Policies
In the previous example, you defined a network policy that restricts connections based on pod labels. It is often useful to instead label entire namespaces, particularly when teams or applications are granted their own namespaces.
You'll now modify the network policy to only allow traffic from a designated namespace, then you'll move the hello-allowed pod into that new namespace.
- First, delete the existing network policy:
kubectl delete -f ./manifests/network-policy.yaml
Output:
networkpolicy.networking.k8s.io "hello-server-allow-from-hello-client" deleted
- Create the namespaced version:
kubectl create -f ./manifests/network-policy-namespaced.yaml
Output:
networkpolicy.networking.k8s.io/hello-server-allow-from-hello-client created
- Now observe the logs of the
hello-allowed-client pod in the default namespace:
kubectl logs --tail 10 -f $(kubectl get pods -oname -l app=hello)
You will notice it is no longer able to connect to the hello-server.
-
Press CTRL+C to exit.
-
Finally, deploy a second copy of the hello-clients app into the new namespace.
kubectl -n hello-apps apply -f ./manifests/hello-app/hello-client.yaml
Output:
deployment.apps/hello-client-allowed created
deployment.apps/hello-client-blocked created
Test completed task
Click Check my progress to verify your performed task. If you have successfully deployed a second copy of the hello-clients app into the new namespace, you will see an assessment score.
Deploy a second copy of the hello-clients app into the new namespace
Task 7. Validation
Next, check the logs for the two new hello-app clients.
- View the logs for the "hello" labeled app in the app in the
hello-apps namespace by running:
kubectl logs --tail 10 -f -n hello-apps $(kubectl get pods -oname -l app=hello -n hello-apps)
Output:
Hostname: hello-server-6c6fd59cc9-7fvgp
Hello, world!
Version: 1.0.0
Hostname: hello-server-6c6fd59cc9-7fvgp
Hello, world!
Version: 1.0.0
Hostname: hello-server-6c6fd59cc9-7fvgp
Hello, world!
Version: 1.0.0
Hostname: hello-server-6c6fd59cc9-7fvgp
Hello, world!
Version: 1.0.0
Hostname: hello-server-6c6fd59cc9-7fvgp
Both clients are able to connect successfully because as of Kubernetes 1.10.x NetworkPolicies do not support restricting access to pods within a given namespace. You can allowlist by pod label, namespace label, or allowlist the union (i.e. OR) of both. But you cannot yet allowlist the intersection (i.e. AND) of pod labels and namespace labels.
- Press CTRL+C to exit.
Task 8. Teardown
Qwiklabs will take care of shutting down all the resources used for this lab, but here’s what you would need to do to clean up your own environment to save on cost and to be a good cloud citizen:
- Log out of the bastion host:
exit
- Run the following to destroy the environment:
make teardown
Output:
...snip...
google_compute_subnetwork.cluster-subnet: Still destroying... (ID: us-east1/kube-net-subnet, 20s elapsed)
google_compute_subnetwork.cluster-subnet: Destruction complete after 25s
google_compute_network.gke-network: Destroying... (ID: kube-net)
google_compute_network.gke-network: Still destroying... (ID: kube-net, 10s elapsed)
google_compute_network.gke-network: Still destroying... (ID: kube-net, 20s elapsed)
google_compute_network.gke-network: Destruction complete after 26s
Destroy complete! Resources: 5 destroyed.
Task 9. Troubleshooting in your own environment
The install script fails with a "permission denied" error when running Terraform
The credentials that Terraform is using do not provide the necessary permissions to create resources in the selected projects. Ensure that the account listed in gcloud config list has necessary permissions to create resources. If it does, regenerate the application default credentials using gcloud auth application-default login.
Invalid fingerprint error during Terraform operations
Terraform occasionally complains about an invalid fingerprint, when updating certain resources.
If you see the error below, simply re-run the command. 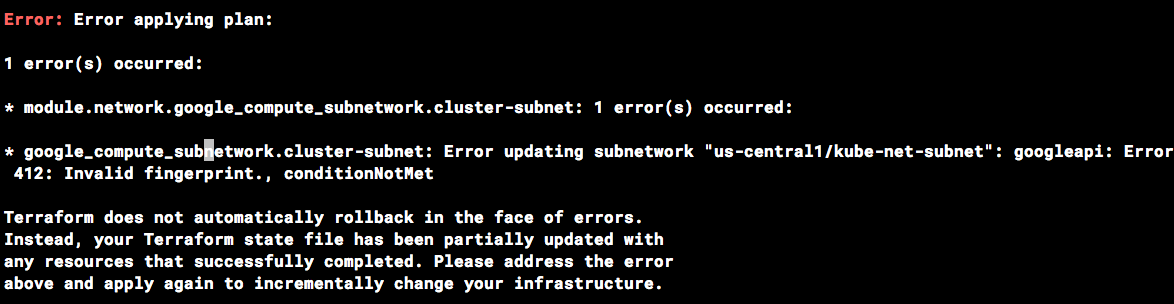
Congratulations!
You improved the security of your Kubernetes Engine by applying fine-grained restrictions to network communication.
Next steps / Learn more
Google Cloud training and certification
...helps you make the most of Google Cloud technologies. Our classes include technical skills and best practices to help you get up to speed quickly and continue your learning journey. We offer fundamental to advanced level training, with on-demand, live, and virtual options to suit your busy schedule. Certifications help you validate and prove your skill and expertise in Google Cloud technologies.
Manual Last Updated on May 20, 2026
Lab Last Tested: February 20, 2026
Copyright 2026 Google LLC. This software is provided as-is, without warranty or representation for any use or purpose. Your use of it is subject to your agreement with Google.


