Konten ini belum dioptimalkan untuk perangkat seluler.
Untuk pengalaman terbaik, kunjungi kami dengan komputer desktop menggunakan link yang dikirim melalui email.
Overview
In this lab you:
Implement a pipeline that has branches
Filter data before writing
Add custom command line parameters to a pipeline
Convert a custom pipeline into a custom Dataflow Flex Template
Run a Dataflow flex template
Prerequisites:
Basic familiarity with Python
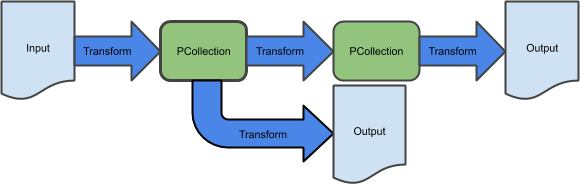
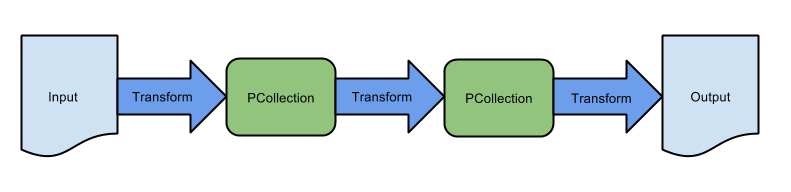
In the previous lab, you created a basic extract-transform-load sequential pipeline and used an equivalent Dataflow Template to ingest batch data storage on Google Cloud Storage. This pipeline consists of a sequence of transformations:
Many pipelines will not exhibit such simple structure though. In this lab, you build a more sophisticated, non-sequential pipeline.
The use case here is to optimize resource consumption. Products vary with respect to how they consume resources. Additionally, not all data is used in the same way within a business; some data will be regularly queried, for example, within analytic workloads, and some data will only be used for recovery. In this lab, you optimize the pipeline from the first lab for resource consumption, by storing only data that analysts will use in BigQuery while archiving other data in a very-low-cost highly durable storage service, Coldline storage in Google Cloud Storage.
Setup and requirements
Lab setup
For each lab, you get a new Google Cloud project and set of resources for a fixed time at no cost.
Sign in to Google Skills using an incognito window.
Note the lab's access time (for example, 1:15:00), and make sure you can finish within that time.
There is no pause feature. You can restart if needed, but you have to start at the beginning.
When ready, click Start lab.
Note your lab credentials (Username and Password). You will use them to sign in to the Google Cloud Console.
Click Open Google Console.
Click Use another account and copy/paste credentials for this lab into the prompts.
If you use other credentials, you'll receive errors or incur charges.
Accept the terms and skip the recovery resource page.
Check project permissions
Before you begin your work on Google Cloud, you need to ensure that your project has the correct permissions within Identity and Access Management (IAM).
In the Google Cloud console, on the Navigation menu (), select IAM & Admin > IAM.
Confirm that the default compute Service Account {project-number}-compute@developer.gserviceaccount.com is present and has the editor role assigned. The account prefix is the project number, which you can find on Navigation menu > Cloud Overview > Dashboard.
Note: If the account is not present in IAM or does not have the editor role, follow the steps below to assign the required role.
In the Google Cloud console, on the Navigation menu, click Cloud Overview > Dashboard.
Copy the project number (e.g. 729328892908).
On the Navigation menu, select IAM & Admin > IAM.
At the top of the roles table, below View by Principals, click Grant Access.
Replace {project-number} with your project number.
For Role, select Project (or Basic) > Editor.
Click Save.
Workbench Instances development environment setup
For this lab, you will be running all commands in a terminal from your Instance notebook.
In the Google Cloud console, from the Navigation menu (), select Vertex AI > Dashboard.
Click Enable All Recommended APIs.
In the Navigation menu, click Workbench.
At the top of the Workbench page, ensure you are in the Instances view.
Click Create New.
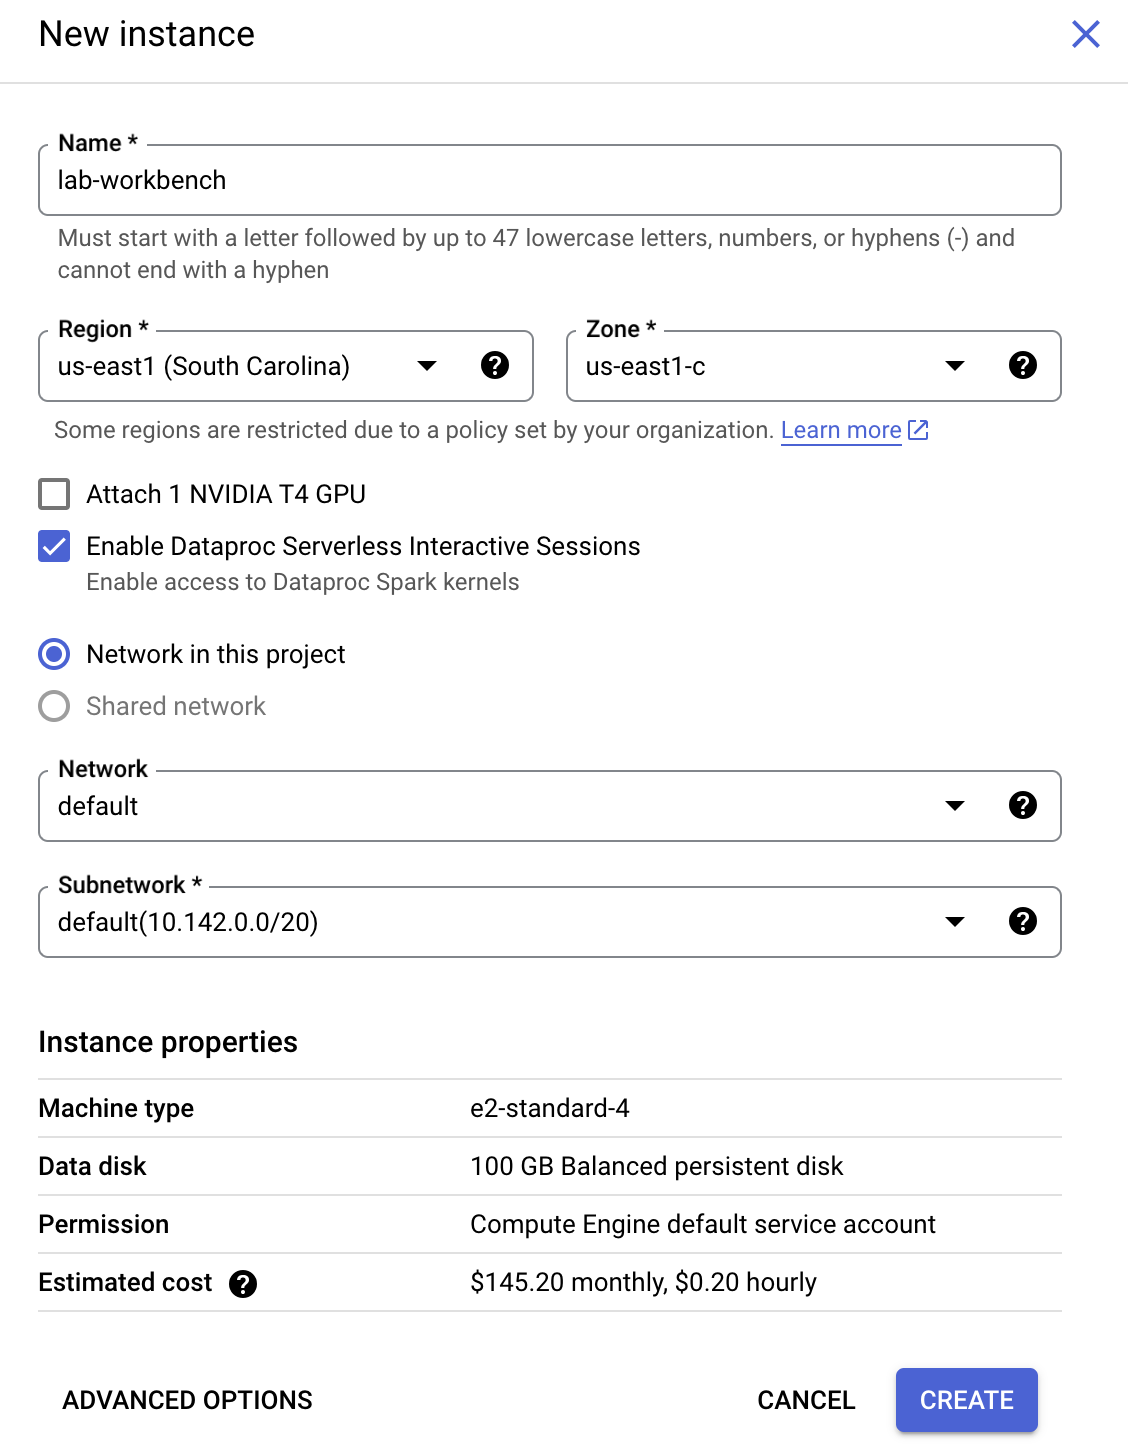
Configure the Instance:
Name: lab-workbench
Region: Set the region to
Zone: Set the zone to
Advanced Options (Optional): If needed, click "Advanced Options" for further customization (e.g., machine type, disk size).
Click Create.
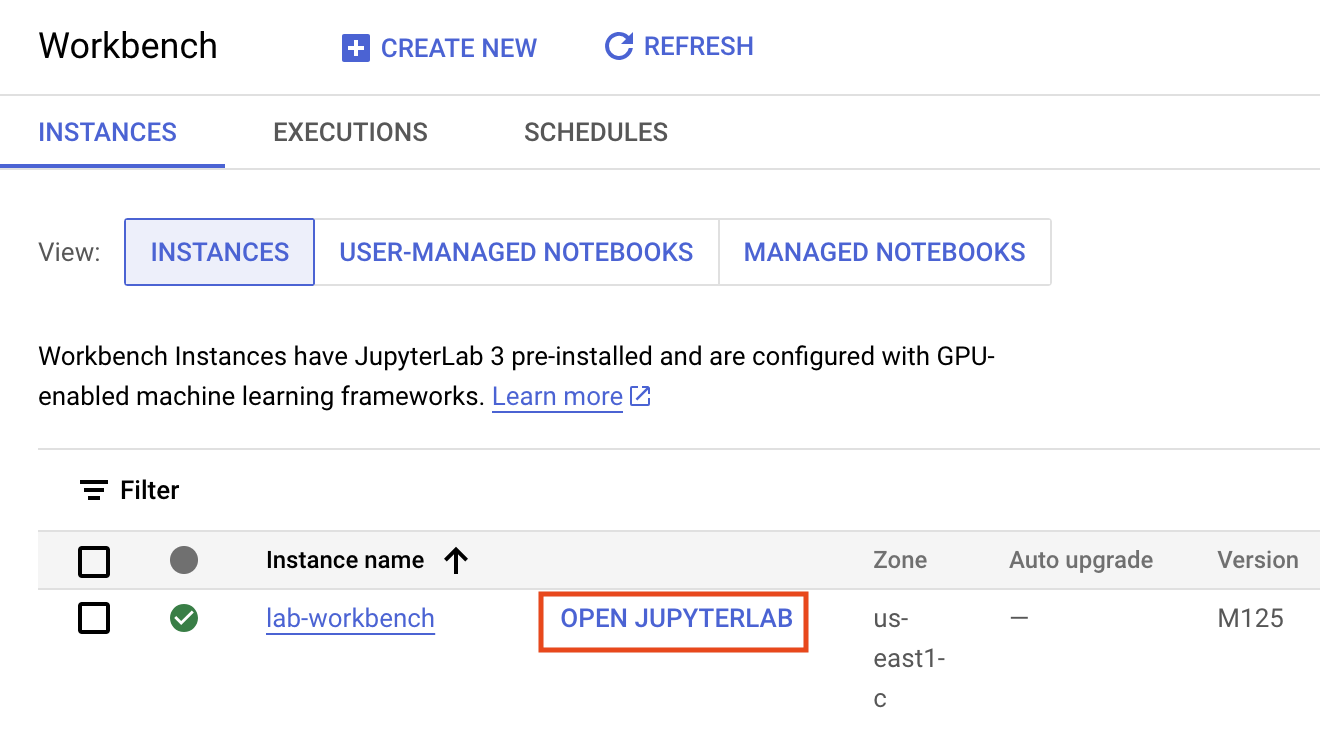
This will take a few minutes to create the instance. A green checkmark will appear next to its name when it's ready.
Click Open Jupyterlab next to the instance name to launch the JupyterLab interface. This will open a new tab in your browser.
Next, click Terminal. This will open up a terminal where you can run all the commands in this lab.
Download Code Repository
Next you will download a code repository for use in this lab.
In the terminal you just opened, enter the following:
git clone https://github.com/GoogleCloudPlatform/training-data-analyst
cd /home/jupyter/training-data-analyst/quests/dataflow_python/
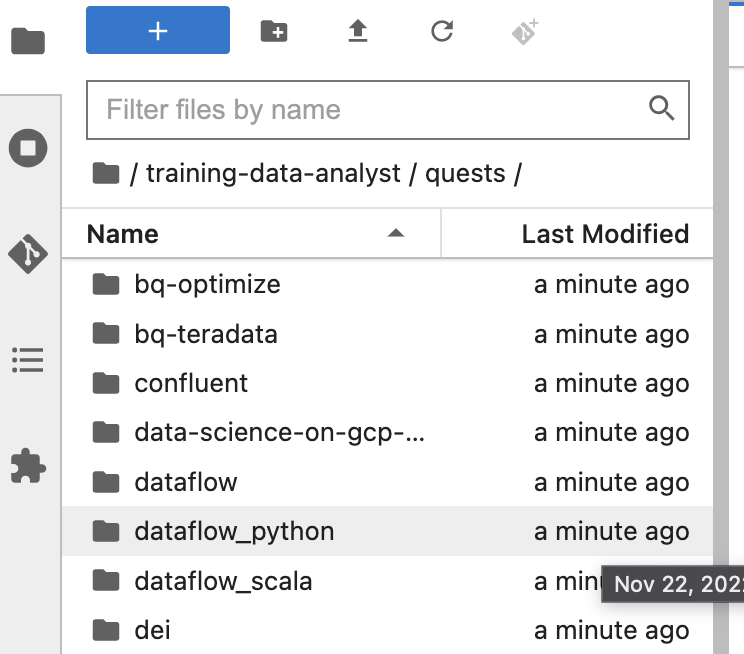
On the left panel of your notebook environment, in the file browser, you will notice the training-data-analyst repo added.
Navigate into the cloned repo /training-data-analyst/quests/dataflow_python/. You will see a folder for each lab, which is further divided into a lab sub-folder with code to be completed by you, and a solution sub-folder with a fully workable example to reference if you get stuck.
Note: To open a file for editing purposes, simply navigate to the file and click on it. This will open the file, where you can add or modify code.
Click Check my progress to verify the objective.
Create notebook instance and clone course repo
Lab Part 1: Writing branching pipelines
In this part of the lab, you write a branching pipeline that writes data to both Google Cloud Storage and to BigQuery.
Multiple transforms process the same PCollection
One way of writing a branching pipeline is to apply two different transforms to the same PCollection, resulting in two different PCollections.
# Create GCS buckets and BQ dataset
cd $BASE_DIR/../..
source create_batch_sinks.sh
# Generate event dataflow
source generate_batch_events.sh
# Change to the directory containing the practice version of the code
cd $BASE_DIR
Open up my_pipeline.py in your IDE, which can be found in 2_Branching_Pipelines/labs/. Scroll down to the run() method, where the body of the pipeline is defined. It currently looks as follows:
Modify this code by adding a new branching transform that writes to Cloud Storage using textio.WriteToText before the each element is converted from json to dict.
If you get stuck in this or later sections, refer to the solution, which can be found here
Click Check my progress to verify the objective.
Setup the data environment
Task 2: Filter data by field
At the moment, the new pipeline doesn’t actually consumes less resources, since all data are being stored twice. To start improving resource consumption, we need to reduce the amount of duplicated data. The Google Cloud Storage bucket is intended to function as archival and backup storage, so it’s important that all data be stored there. However, not all data necessarily need to be sent to BigQuery.
Let’s assume that data analysts often look at what resources users access on the website, and how those access patterns differ as a function of geography and time. Only a subset of the fields would be necessary. Since we have parsed the json elements into dictionaries, we can easily use the pop method to drop a field from within a Python callable:
def drop_field(element):
element.pop('field_name')
return element
To complete this task, use a Python callable with beam.Map to drop the field user_agent, which our analysts will not be using in BigQuery.
Task 3: Filter data by element
There are many ways of filtering in Apache Beam. Since we are working with a PCollection of Python dictionaries, the easiest manner will be to leverage a lambda (anonymous) function as our filter, a function returning a boolean value, with beam.Filter. For example:
purchases | beam.Filter(lambda element : element['cost_cents'] > 20*100)
To complete this task, add a beam.Filter transform to the pipeline. You may filter on whatever criteria you wish, but as a suggestion try eliminating rows where num_bytes is greater than or equal to 120.
Task 4: Adding custom command-line parameters
The pipeline currently has a number of parameters hard-coded into it, including the path to the input and the location of the table in BigQuery. However, the pipeline would be more useful if it could read any json file in Cloud Storage. Adding this feature requires adding to the set of command-line parameters.
Currently, we use an ArgumentParser to read in and parse command-line arguments. We then pass these arguments into the PipelineOptions() object we specify when creating our pipeline.
parser = argparse.ArgumentParser(description='...')
# Define and parse arguments
options = PipelineOptions()
# Set options values from options
p = beam.Pipeline(options=options)
The PipelineOptions is used to interpret the options being read by the ArgumentParser. To add a new command-line argument to the parser, we can use the syntax:
To complete this task, add command-line parameters for the input path, the Google Cloud Storage output path, and the BigQuery table name and update the pipeline code to access those parameters instead of constants.
Task 5: Add NULLABLE fields to your pipeline
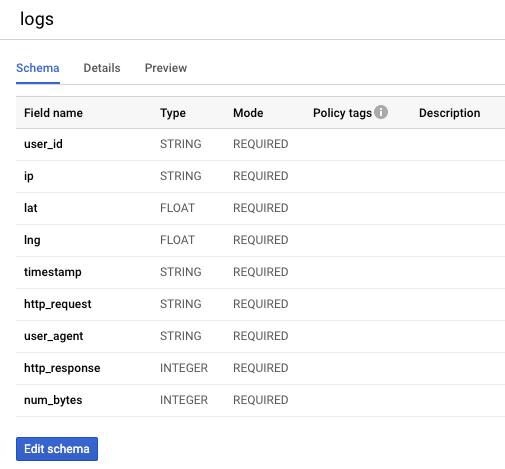
You may have noticed that the BigQuery table created in the last lab had a schema with all REQUIRED fields like this:
It may be desirable to create an Apache Beam schema with NULLABLE fields where data is missing, both for the pipeline execution itself and then a resulting BigQuery table with a schema that reflects this.
We can update the JSON BigQuery schema by adding a new property mode for a field we wish to be nullable:
To complete this task, mark the lat and lon fields as nullable in BigQuery schema
Task 6: Run your pipeline from the command line
To complete this task, run your pipeline from the command line and pass the appropriate parameters. Remember to take note of the resulting BigQuery schema for NULLABLE fields. Your code should look something like this:
# Set up environment variables
export PROJECT_ID=$(gcloud config get-value project)
export REGION={{{project_0.startup_script.lab_region|Region}}}
export BUCKET=gs://${PROJECT_ID}
export COLDLINE_BUCKET=${BUCKET}-coldline
export PIPELINE_FOLDER=${BUCKET}
export RUNNER=DataflowRunner
export INPUT_PATH=${PIPELINE_FOLDER}/events.json
export OUTPUT_PATH=${PIPELINE_FOLDER}-coldline/pipeline_output
export TABLE_NAME=${PROJECT_ID}:logs.logs_filtered
cd $BASE_DIR
python3 my_pipeline.py \
--project=${PROJECT_ID} \
--region=${REGION} \
--stagingLocation=${PIPELINE_FOLDER}/staging \
--tempLocation=${PIPELINE_FOLDER}/temp \
--runner=${RUNNER} \
--inputPath=${INPUT_PATH} \
--outputPath=${OUTPUT_PATH} \
--tableName=${TABLE_NAME}
If your pipeline is building successfully, but you're seeing a lot of errors due to code or misconfiguration in the Dataflow service, you can set RUNNER back to 'DirectRunner' to run it locally and receive faster feedback. This approach works in this case because the dataset is small and you are not using any features that aren't supported by DirectRunner.
Task 7: Verify the pipeline’s results
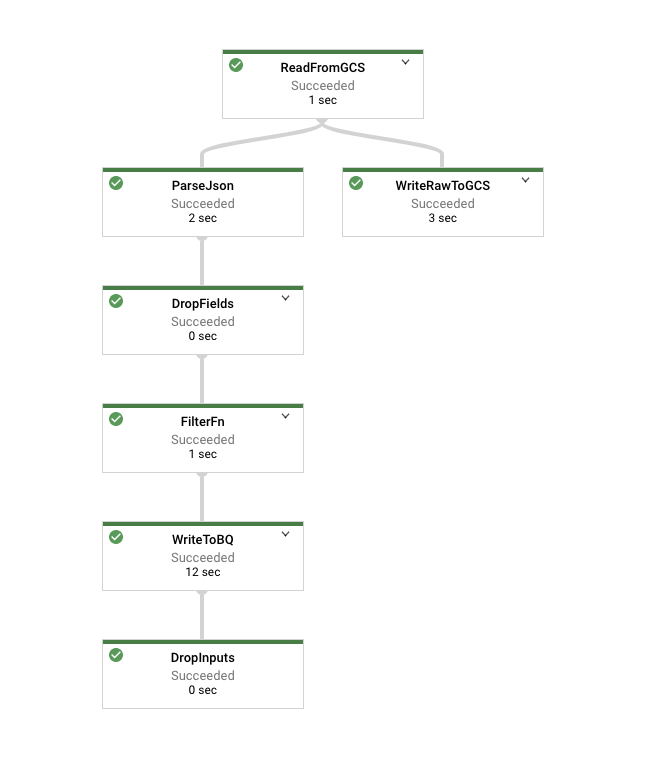
Navigate to the Cloud Dataflow Jobs page and look at the job as it’s running. Its graph should resemble the following:
Click on the node representing your Filter function, which in the above picture is called FilterFn. In the panel that appears on the right hand side, you should see that more elements were added as inputs than were written as outputs.
Now click on the node representing the write to Cloud Storage. Since all elements were written, this number should agree with the number of elements in the input to the Filter function.
Once pipeline has finished, examine the results in BigQuery by querying your table. Note that the number of records in the table should agree with the number of elements that were output by the Filter function.
Click Check my progress to verify the objective.
Run your pipeline from the command line
Lab Part 2: Custom Dataflow Templates
A pipeline that accepts command-line parameters is vastly more useful than one with those parameters hard-coded. However, running it requires creating a development environment. An even better option for pipelines that are expected to be re-run by a variety of different users or in a variety of different contexts would be to use a Dataflow Template.
There are many Dataflow Templates that have been created already as part of Google Cloud Platform, which you can explore here. But none of them perform the same function as the pipeline in this lab. Instead, in this part of the lab, you convert the pipeline into a newer custom Dataflow Flex Template (as opposed to custom Traditional Template).
Converting a pipeline into a custom Flex Dataflow Template requires the use a Docker container to package up not just your code but the dependencies, a Dockerfile to describe what code to build, Cloud Build to build the underlying container that will be executed at runtime to create the actual job, and a metadata file to describe the job parameters.
Task 1: Create a custom Dataflow Flex Template container image
First, enable Kaniko cache use by default. Kaniko caches container build artifacts, so using this option speeds up subsequent builds. We will also use pip3 freeze to record the packages and their versions being used in our environment.
gcloud config set builds/use_kaniko True
Next, we will create our Dockerfile. This will specify the code and the dependencies we need to use.
a. To complete this task, create a New File in the dataflow_python/2_Branching_Pipelines/lab folder in the file explorer of your IDE.
b. To create New File, click on File >> New >> Text File
c. Rename the file name as Dockerfile, to rename the file name right click on it.
d. Open Dockerfile in the editorial panel, click on file to open it.
e. Copy the below code to the Dockerfile file and save it:
FROM gcr.io/dataflow-templates-base/python3-template-launcher-base
ARG WORKDIR=/dataflow/template
RUN mkdir -p ${WORKDIR}
WORKDIR ${WORKDIR}
RUN apt-get update && apt-get install -y libffi-dev && rm -rf /var/lib/apt/lists/*
COPY my_pipeline.py .
ENV FLEX_TEMPLATE_PYTHON_PY_FILE="${WORKDIR}/my_pipeline.py"
RUN python3 -m pip install apache-beam[gcp]
Finally, use Cloud Build to build the container image.
This will take a few minutes to build and push the container.
Click Check my progress to verify the objective.
Create a custom Dataflow Flex Template container image
Task 2: Create and stage the flex template
To run a template, you need to create a template spec file in a Cloud Storage containing all of the necessary information to run the job, such as the SDK information and metadata.
a. Create a New File in the dataflow_python/2_Branching_Pipelines/lab folder in the file explorer of your IDE.
b. To create New File, click on File >> New >> Text File.
c. Rename the file name as metadata.json, to rename the file name right click on it.
d. Open metadata.json file in the editor panel. To open the file right click on the metadata.json file then select open With >> Editor.
e. To complete this task, create a metadata.json file in the following format that accounts for all of the input parameters your pipeline expects. Refer to the solution here if you need. This does require you to write your own parameter regex checking. While not best practice, ".*" will match on any input.
{
"name": "My Branching Pipeline",
"description": "A branching pipeline that writes raw to GCS Coldline, and filtered data to BQ",
"parameters": [
{
"name": "inputPath",
"label": "Input file path.",
"helpText": "Path to events.json file.",
"regexes": [
".*\\.json"
]
},
{
"name": "outputPath",
"label": "Output file location",
"helpText": "GCS Coldline Bucket location for raw data",
"regexes": [
"gs:\\/\\/[a-zA-z0-9\\-\\_\\/]+"
]
},
{
"name": "tableName",
"label": "BigQuery output table",
"helpText": "BigQuery table spec to write to, in the form 'project:dataset.table'.",
"regexes": [
"[^:]+:[^.]+[.].+"
]
}
]
}
Then build and stage the actual template:
export TEMPLATE_PATH="gs://${PROJECT_ID}/templates/mytemplate.json"
# Will build and upload the template to GCS
# You may need to opt-in to beta gcloud features
gcloud beta dataflow flex-template build $TEMPLATE_PATH \
--image "$TEMPLATE_IMAGE" \
--sdk-language "PYTHON" \
--metadata-file "metadata.json"
Verify that the file has been uploaded to the template location in Cloud Storage.
Click Check my progress to verify the objective.
Create and stage the flex template
Task 3: Execute the template from the UI
To complete this task, follow the instructions below.
Select Custom Template from the Dataflow template drop-down menu.
Enter the Cloud Storage path to your template file in the template Cloud Storage path field.
Input the appropriate items under Required parameters
a. For Input file path, enter
b. For Output file location, enter
c. For BigQuery output table, enter
Click Run Job.
Note: You don't need to specify a staging bucket; Dataflow will create a private one in your project using your project number, similar to
Examine the Compute Engine console and you will see a temporary launcher VM that is created to execute your container and initiate your pipeline with the provided parameters.
Task 4: Execute the template using gcloud
One of the benefits of using Dataflow Templates is the ability to execute them from a wider variety of contexts, other than a development environment. To demonstrate this, use gcloud to execute a Dataflow Template from the command line.
To complete this task, execute the following command in your terminal, modifying the parameters as appropriate:
Click Check my progress to verify the objective.
Execute the template from the UI and using gcloud
End your lab
When you have completed your lab, click End Lab. Google Skills removes the resources you’ve used and cleans the account for you.
You will be given an opportunity to rate the lab experience. Select the applicable number of stars, type a comment, and then click Submit.
The number of stars indicates the following:
1 star = Very dissatisfied
2 stars = Dissatisfied
3 stars = Neutral
4 stars = Satisfied
5 stars = Very satisfied
You can close the dialog box if you don't want to provide feedback.
For feedback, suggestions, or corrections, please use the Support tab.
Copyright 2026 Google LLC All rights reserved. Google and the Google logo are trademarks of Google LLC. All other company and product names may be trademarks of the respective companies with which they are associated.
Lab membuat project dan resource Google Cloud untuk jangka waktu tertentu
Lab memiliki batas waktu dan tidak memiliki fitur jeda. Jika lab diakhiri, Anda harus memulainya lagi dari awal.
Di kiri atas layar, klik Start lab untuk memulai
Gunakan penjelajahan rahasia
Salin Nama Pengguna dan Sandi yang diberikan untuk lab tersebut
Klik Open console dalam mode pribadi
Login ke Konsol
Login menggunakan kredensial lab Anda. Menggunakan kredensial lain mungkin menyebabkan error atau dikenai biaya.
Setujui persyaratan, dan lewati halaman resource pemulihan
Jangan klik End lab kecuali jika Anda sudah menyelesaikan lab atau ingin mengulanginya, karena tindakan ini akan menghapus pekerjaan Anda dan menghapus project
Konten ini tidak tersedia untuk saat ini
Kami akan memberi tahu Anda melalui email saat konten tersedia
Bagus!
Kami akan menghubungi Anda melalui email saat konten tersedia
Satu lab dalam satu waktu
Konfirmasi untuk mengakhiri semua lab yang ada dan memulai lab ini
Gunakan penjelajahan rahasia untuk menjalankan lab
Menggunakan jendela Samaran atau browser pribadi adalah cara terbaik untuk menjalankan lab ini. Langkah ini akan mencegah konflik antara akun pribadi Anda dan akun Siswa, yang dapat menyebabkan tagihan ekstra pada akun pribadi Anda.
In this lab you a) implement a pipeline that has branches b) filter data before write c) add custom command line parameters to a pipeline d) Convert a custom pipeline into a Dataflow Flex Template and e) run a Dataflow Flex Template.

 ), select IAM & Admin > IAM.
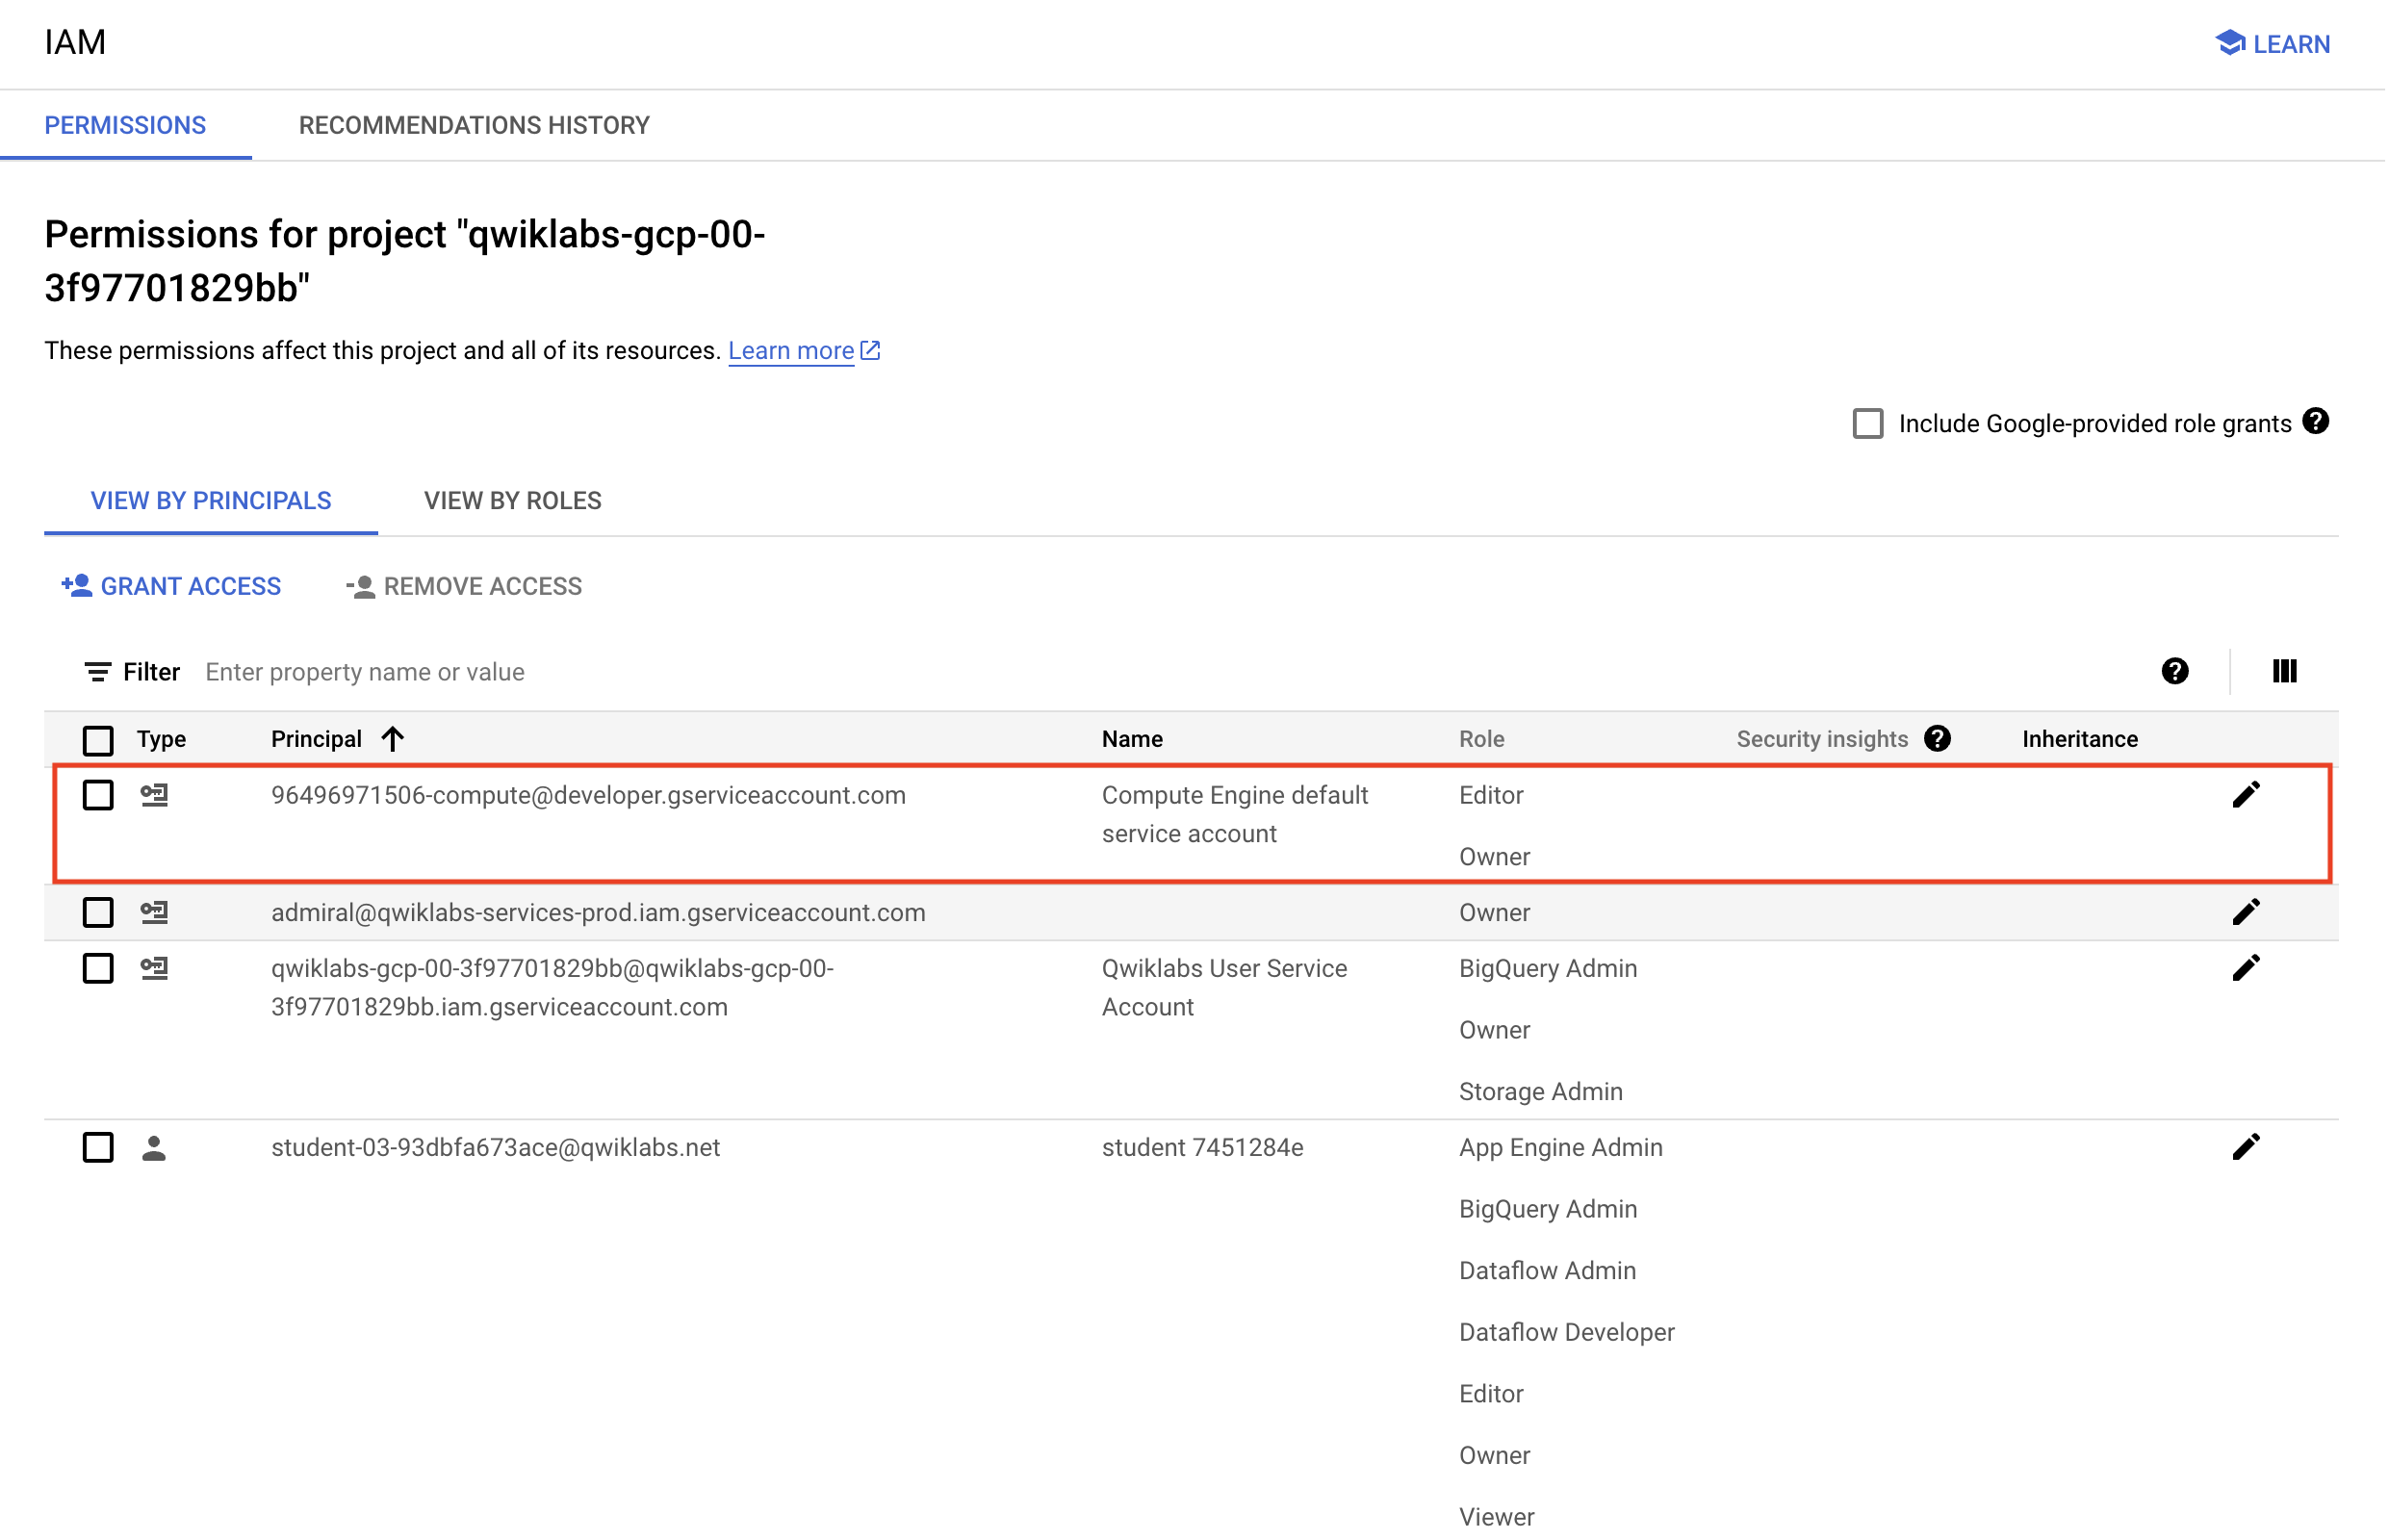
 Create New.