GSP1051

概览
Cloud Spanner 是 Google 的全托管式、可横向扩缩关系型数据库服务。金融服务、游戏、零售及众多其他行业的客户都信赖该服务,依托其运行自身要求最严苛的工作负载。在此类场景下进行大规模部署时,服务的一致性和可用性都至关重要。
在本实验中,您将构建并部署一个连接至 Cloud Spanner 实例的 Node.js 应用。该 Node.js 应用是一款名为 OmegaTrade 的股票价格可视化工具。OmegaTrade 应用将股票价格存储在 Cloud Spanner 中,并使用 Google Charts 生成可视化图表。
后端服务采用 Node.js Express 框架,并借助默认的连接池、会话和超时能力与 Cloud Spanner 连接。
您将执行的操作
- 配置项目环境
- 下载并检查应用代码
- 部署后端应用组件
- 将示例股票交易数据导入数据库
- 部署前端应用组件
- 在 OmegaTrade 应用中执行操作
设置和要求
点击“开始实验”按钮前的注意事项
请阅读以下说明。实验是计时的,并且您无法暂停实验。计时器在您点击开始实验后即开始计时,显示 Google Cloud 资源可供您使用多长时间。
此实操实验可让您在真实的云环境中开展实验活动,免受模拟或演示环境的局限。为此,我们会向您提供新的临时凭据,您可以在该实验的规定时间内通过此凭据登录和访问 Google Cloud。
为完成此实验,您需要:
- 能够使用标准的互联网浏览器(建议使用 Chrome 浏览器)。
注意:请使用无痕模式(推荐)或无痕浏览器窗口运行此实验。这可以避免您的个人账号与学生账号之间发生冲突,这种冲突可能导致您的个人账号产生额外费用。
注意:请仅使用学生账号完成本实验。如果您使用其他 Google Cloud 账号,则可能会向该账号收取费用。
如何开始实验并登录 Google Cloud 控制台
-
点击开始实验按钮。如果该实验需要付费,系统会打开一个对话框供您选择支付方式。右侧是实验设置和访问权限面板,其中包含以下内容:
-
打开 Google Cloud 控制台按钮
- 您在本实验中必须使用的临时凭证(用户名和密码)
- 帮助您逐步完成该实验所需的其他信息(如果需要)
请注意,实验计时器位于页面顶部附近,将显示剩余时间。
-
点击打开 Google Cloud 控制台(如果您使用的是 Chrome 浏览器,请右键点击并选择在无痕式窗口中打开链接)。
该实验会启动资源并打开另一个标签页,显示“登录”页面。
提示:可以将这些标签页分别放在不同的窗口中,并排显示。
注意:如果您看见选择账号对话框,请点击使用其他账号。
-
如有必要,请复制下方的用户名,然后将其粘贴到登录对话框中。
{{{user_0.username | "<用户名>"}}}
您也可以在实验设置和访问权限面板中找到“用户名”。
-
点击下一步。
-
复制下面的密码,然后将其粘贴到欢迎对话框中。
{{{user_0.password | "<密码>"}}}
您也可以在实验设置和访问权限面板中找到“密码”。
-
点击下一步。
重要提示:您必须使用实验提供的凭证。请勿使用您的 Google Cloud 账号凭证。
注意:在本实验中使用您自己的 Google Cloud 账号可能会产生额外费用。
-
依次点击进入后续页面:
- 接受条款及条件。
- 由于这是临时账号,请勿添加账号恢复选项或双重身份验证。
- 请勿注册免费试用。
片刻之后,系统会在此标签页中打开 Google Cloud 控制台。
注意:如需访问 Google Cloud 产品和服务,请点击导航菜单,或在搜索字段中输入服务或产品的名称。

激活 Cloud Shell
Cloud Shell 是一种装有开发者工具的虚拟机。它提供了一个永久性的 5GB 主目录,并且在 Google Cloud 上运行。Cloud Shell 提供可用于访问您的 Google Cloud 资源的命令行工具。
-
点击 Google Cloud 控制台顶部的激活 Cloud Shell  。
。
-
在弹出的窗口中执行以下操作:
- 继续完成 Cloud Shell 信息窗口中的设置。
- 授权 Cloud Shell 使用您的凭据进行 Google Cloud API 调用。
如果您连接成功,即表示您已通过身份验证,且项目 ID 会被设为您的 Project_ID 。输出内容中有一行说明了此会话的 Project_ID:
Your Cloud Platform project in this session is set to {{{project_0.project_id | "PROJECT_ID"}}}
gcloud 是 Google Cloud 的命令行工具。它已预先安装在 Cloud Shell 上,且支持 Tab 自动补全功能。
- (可选)您可以通过此命令列出活跃账号名称:
gcloud auth list
- 点击授权。
输出:
ACTIVE: *
ACCOUNT: {{{user_0.username | "ACCOUNT"}}}
To set the active account, run:
$ gcloud config set account `ACCOUNT`
- (可选)您可以通过此命令列出项目 ID:
gcloud config list project
输出:
[core]
project = {{{project_0.project_id | "PROJECT_ID"}}}
注意:如需查看在 Google Cloud 中使用 gcloud 的完整文档,请参阅 gcloud CLI 概览指南。
Cloud Spanner 实例
为让您能够更快完成本实验,已为您自动创建 OmegaTrade 应用所需的 Cloud Spanner 实例、数据库和表。
以下是详细信息,供您参考:
| 项 |
名称 |
详细信息 |
| Cloud Spanner 实例 |
omegatrade-instance |
这是项目级实例 |
| Cloud Spanner 数据库 |
omegatrade-db |
这是实例专属数据库 |
| 表 |
Users |
包含用户账号 |
| 表 |
Companies |
包含公司名称和股票代码 |
| 表 |
CompanyStocks |
包含股票价值 |
| 表 |
Simulations |
跟踪每次模拟的状态 |
任务 1. 启用必需的 Google Cloud API
首先,启用 Cloud Spanner、Artifact Registry 和 Cloud Run 对应的 Google Cloud API。
- 在 Cloud Shell 中,输入以下命令:
gcloud services enable spanner.googleapis.com
gcloud services enable artifactregistry.googleapis.com
gcloud services enable run.googleapis.com
任务 2. 下载并检查应用代码
- 下载本实验要使用的代码库。在 Cloud Shell 中,输入以下命令:
git clone https://github.com/GoogleCloudPlatform/training-data-analyst
- 前往包含应用代码的文件夹。
cd training-data-analyst/courses/cloud-spanner/omegatrade/
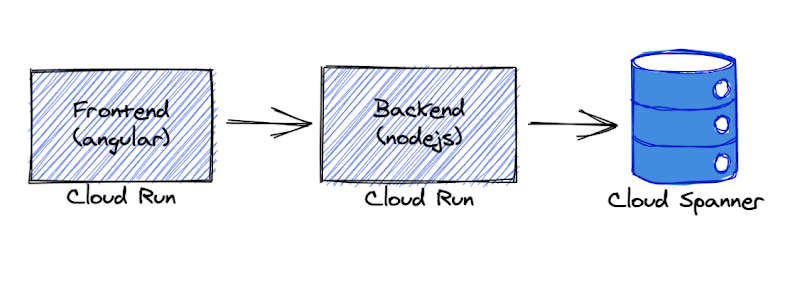
- 代码主要分为两部分:后端和前端。应用架构如下图所示:
-
该应用依赖一个名为 .env 的部署专属文件,以与 Cloud Spanner 实例实现正常通信。您将在下一个任务中创建此文件。
-
就后端而言,与 Cloud Spanner 表相关的部分绑定和交互由 Node.js 模型负责管理,其中三个模型文件 company.model.js、simulation.model.js 和 user.model.js 存放在 models 文件夹中。执行以下命令,前往 models 文件夹:
cd backend/app/models
- 执行以下命令,检查 company.model.js 文件。该文件包含与 companies 数据表交互的数据库操作。
more company.model.js
按空格键可逐页浏览该文件直至末尾。如果您想提前关闭文件,可输入 q 以关闭 more 命令。
- 前端与 Node.js 后端中的这些模型及其他结构的部分交互,是通过位于 components 文件夹中的 Angular 组件实现的。执行以下命令,前往 components 文件夹:
cd ../../../frontend/src/app/components
-
例如,company 组件包含用于管理和更新公司信息的基本应用代码。
-
执行以下命令,检查 manage-company.component.ts TypeScript 配置文件。该文件包含用于删除或修改公司信息的方法,以及其他操作对应的方法。
more company/manage-company/manage-company.component.ts
按空格键可逐页浏览该文件直至末尾。如果您想提前关闭文件,可输入 q 以关闭 more 命令。
任务 3. 构建并部署后端组件
- 前往包含构建和部署后端所需代码的文件夹。
cd ../../../../backend
- 创建 .env 文件。如前文所述,该文件包含项目专属信息,确保应用的后端组件能够与 Cloud Spanner 实例进行通信。
在 Cloud Shell 中,输入以下命令调用 Nano 文本编辑器,并创建一个新的 .env 文件。
nano .env
粘贴下方列出的代码块。
PROJECTID = {{{project_0.project_id|Project ID}}}
INSTANCE = omegatrade-instance
DATABASE = omegatrade-db
JWT_KEY = w54p3Y?4dj%8Xqa2jjVC84narhe5Pk
EXPIRE_IN = 30d
按 Ctrl+X 退出 Nano,按 Y 确认更新,然后按 Enter 保存更改。
- 在继续操作之前,您必须安装 npm 的更新组件,以便后端能够正确编译。npm 是 JavaScript 的软件包管理器。npm 是 JavaScript 运行时环境 Node.js 的默认软件包管理器。
nvm install 22.6
npm install npm -g
npm install --loglevel=error
- 接下来,使用代码库文件夹中提供的参考 Dockerfile 构建后端应用。
docker build -t gcr.io/{{{project_0.project_id|Project ID}}}/omega-trade/backend:v1 -f dockerfile.prod .
注意:在构建过程中,如果出现任何 npm notice... 消息,可以忽略不管
- 在推送新的应用软件包之前,在 Cloud Shell 中执行以下命令来设置配置权限。
当系统提示您是否要继续时,输入“y”。
gcloud auth configure-docker
- 将新创建的应用软件包推送到 Qwiklabs 项目的 Artifact Registry。
docker push gcr.io/{{{project_0.project_id|Project ID}}}/omega-trade/backend:v1
- 最后,使用 Cloud Run 部署后端应用。Cloud Run 是一种无服务器部署框架,它会接管基础设施管理工作,并根据流量情况几乎实时地自动进行扩缩容。
gcloud run deploy omegatrade-backend --platform managed --region {{{project_0.default_region|Default Region}}} --image gcr.io/{{{project_0.project_id|Project ID}}}/omega-trade/backend:v1 --memory 512Mi --allow-unauthenticated
- 复制部署结束时提供的网址。将该网址保存在记事本、文本文件或其他便于访问的位置。此网址将提供给前端应用,以确保界面可以通过后端与 Cloud Spanner 数据库进行正常通信。
后端服务网址将采用以下格式:
https://omegatrade-backend-zzzyyyxx1x-uw.a.run.app
任务 4. 将示例股票交易数据导入数据库
- 如需导入示例公司和股票数据,请在当前(主后端)文件夹中执行以下命令。
unset SPANNER_EMULATOR_HOST
node seed-data.js
- 您会收到确认消息,告知表已成功加载。
Inserting Companies...
done
Inserting Simulations...
done
Inserting Stocks...
done
Data Loaded successfully
- 点击检查我的进度以验证是否完成了以下目标:
将示例股票交易数据导入数据库
任务 5. 构建并部署前端组件
- 前往包含前端代码的目录。具体请前往 environments 文件夹,更新配置文件以指向您的后端组件。
cd ../frontend/src/environments
- 在 Cloud Shell 中,输入以下命令调用 Nano 文本编辑器,并打开 environment.ts 文件。
nano environment.ts
- 小心删除字符串 http://localhost:3000,并将其替换为您的后端网址。
注意:请务必保留网址中的 /api/v1/ 部分
按 Ctrl+X 退出 Nano,按 Y 确认更新,然后按 Enter 保存更改。
更新后的 environment.ts 文件应类似以下示例。
export const environment = {
production: false,
name: "dev",
// change baseUrl according to backend URL
baseUrl:"https://omegatrade-backend-zzzyyyxx1x-uw.a.run.app/api/v1/",
// change clientId to actual value you have received from Oauth console
clientId: ""
};
- 前往主前端文件夹。
cd ../..
- 安装 npm 的更新组件,以便前端能够正确编译。
npm install npm -g
npm install --loglevel=error
注意:在安装过程中,如果出现任何 npm WARN config... 消息,可以忽略不管
- 接下来,使用代码库文件夹中提供的参考 Dockerfile 构建前端应用。前端构建可能需要 5 到 10 分钟才能完成。
docker build -t gcr.io/{{{project_0.project_id|Project ID}}}/omegatrade/frontend:v1 -f dockerfile .
注意:在构建流程中,如果出现任何 npm notice... 消息,可以忽略不管
- 将新创建的应用软件包推送到 Qwiklabs 项目的 Artifact Registry。
docker push gcr.io/{{{project_0.project_id|Project ID}}}/omegatrade/frontend:v1
- 最后,使用 Cloud Run 部署前端应用。
gcloud run deploy omegatrade-frontend --platform managed --region {{{project_0.default_region|Default Region}}} --image gcr.io/{{{project_0.project_id|Project ID}}}/omegatrade/frontend:v1 --allow-unauthenticated
- 前端服务网址将采用以下格式。您可以直接点击网址打开,也可以复制网址将其粘贴至新标签页中。
https://omegatrade-frontend-zzzyyyxx1x-uw.a.run.app
任务 6. 在 OmegaTrade 应用中执行操作
-
在应用启动页面上,点击注册链接。
-
使用以下详细信息为一家名为 Spanner1 的虚构公司创建新账号。
| 项 |
值 |
| 公司邮箱 |
admin@spanner1.com |
| 全名 |
Spanner1 Admin |
| 密码 |
Spanner1 |
| 确认密码 |
Spanner1 |
-
您的账号将创建完成,系统会自动登录。
-
如需查看 OmegaTrade 应用,请前往信息中心,从选择器中选择 Foobar Inc,查看该公司的股票表现图表。您将看到 Foobar Inc 在一段时期内的一系列模拟股价数据。
-
前往管理公司,添加 Spanner1 作为新公司。
-
点击页面右侧的新增公司。在弹出式窗口中,输入以下值:
| 项 |
值 |
| 公司名称 |
Spanner1 |
| 短代码 |
SPN |
然后,点击保存。
-
Spanner1 现已位于公司列表中。
-
前往信息中心,如果 Spanner1 尚未选中,请选择该选项。您会看到 Spanner1 中没有任何模拟数据。点击标有此处的链接,生成模拟。
-
在模拟数据中,提供以下详细信息:
| 项 |
值 |
| 选择公司 |
Spanner1 |
| 选择时间间隔 |
5 |
| 记录条数 |
50 |
然后点击模拟。
-
前往信息中心,随着模拟进程的推进,该界面会立即更新 Spanner1 对应的图表。模拟需要 3 到 6 分钟才能完成。
-
您还可以通过 OmegaTrade 应用修改现有公司信息。在管理公司标签页中,点击 Acme Corp 对应的操作下的铅笔图标。
-
将公司名称变更为 Coyote Inc。请注意,短代码无法在界面中变更。点击更新,关闭窗口并确认变更。
-
公司名称会立即更新。前往信息中心,您会看到 Acme Corp 已不再显示,取而代之的是 Coyote Inc。
-
偶尔会需要进行超出应用代码处理能力的数据变更。作为授权用户,您可通过直接修改 Cloud Spanner 数据库中的数据,更新 OmegaTrade 应用中使用的数据。
-
在 Cloud 控制台中,依次点击导航菜单 ( ) > 查看所有产品 > 数据库 > Spanner。
-
如弹出任何确认或信息窗口,请点击确认。
-
点击 omegatrade-instance 名称,然后在数据库下点击 omegatrade-db。在页面底部的数据表列表中,点击 companies。
-
点击左侧窗格中的数据,查看表内容。
-
您需要变更 Bar Industries 实体的名称。
-
点击 Bar Industries 行对应的复选框。然后在表格行上方列出的选项中,点击修改。
-
系统会跳转至 Spanner Studio。点击 + 新标签页。输入以下查询,将 companyName 的值从 Bar Industries 变更为 Consolidated Enterprises Inc。
UPDATE
companies
SET
companyName='Consolidated Enterprises Inc'
WHERE
companyName='Bar Industries';
注意:在 Cloud Spanner 查询窗口中,您可以变更短代码值。按照设计,应用代码不允许通过界面变更该数值。
-
点击运行以处理变更。
-
返回应用页面,刷新浏览器,然后前往信息中心标签页。您会看到 Bar Industries 已不再显示,取而代之的是 Consolidated Enterprises Inc。
恭喜!
您现在已部署了一个连接至 Cloud Spanner 实例的 Node.js 应用,不仅通过该应用对数据库执行了基础操作,还直接在该数据库中修改了数据。
Google Cloud 培训和认证
…可帮助您充分利用 Google Cloud 技术。我们的课程会讲解各项技能与最佳实践,可帮助您迅速上手使用并继续学习更深入的知识。我们提供从基础到高级的全方位培训,并有点播、直播和虚拟三种方式选择,让您可以按照自己的日程安排学习时间。各项认证可以帮助您核实并证明您在 Google Cloud 技术方面的技能与专业知识。
上次更新手册的时间:2025 年 12 月 31 日
上次测试实验的时间:2025 年 12 月 31 日
版权所有 2026 Google LLC 保留所有权利。Google 和 Google 徽标是 Google LLC 的商标。其他所有公司名和产品名可能是其各自相关公司的商标。


