GSP1077

概要
Cloud Build は、Google Cloud でビルドを実行するサービスです。ソースコードのインポートやビルドの実行などが可能です。
このラボでは、commit されたコードからコンテナ イメージを自動的にビルドし、そのイメージを Artifact Registry に格納して、Git リポジトリの Kubernetes マニフェストを更新し、更新したマニフェストを使用してアプリケーションを Google Kubernetes Engine にデプロイする継続的インテグレーションと継続的デプロイ(CI / CD)パイプラインを作成します。
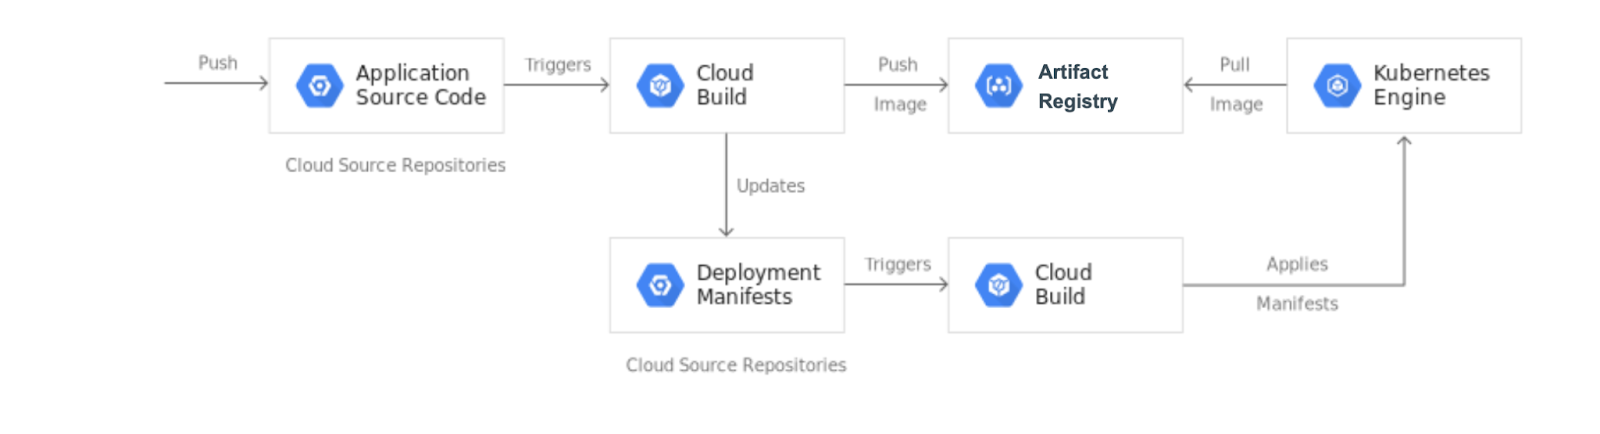
このラボでは 2 つの Git リポジトリを作成します。
-
app: アプリケーションのソースコードが含まれます。
-
env: Kubernetes Deployment のマニフェストが含まれます。
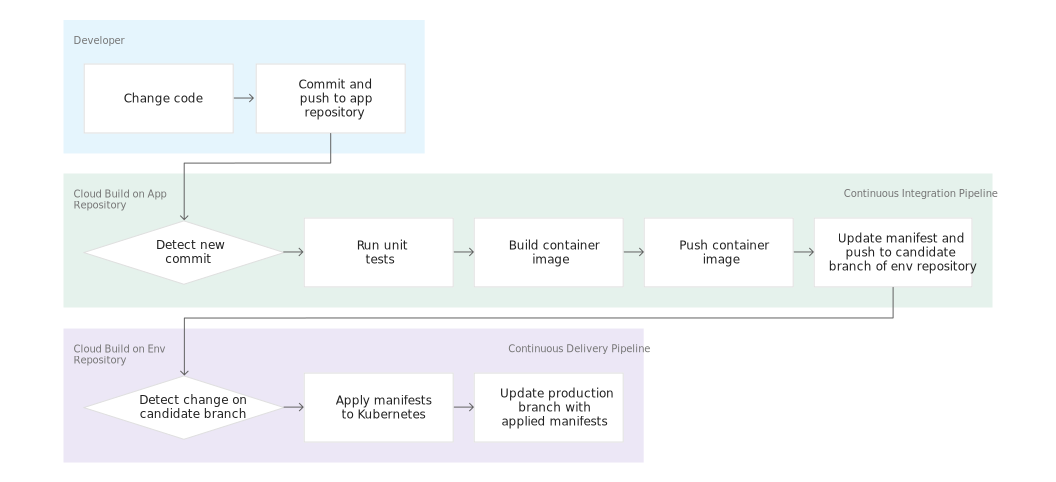
app リポジトリに変更を push すると、Cloud Build パイプラインはテストを実施し、コンテナ イメージを構築して、Artifact Registry に変更を push します。イメージを push した後、Cloud Build は Deployment マニフェストを更新して env リポジトリに push します。これにより、マニフェストを GKE クラスタに適用する別の Cloud Build パイプラインがトリガーされ、正常終了した場合は、マニフェストが env リポジトリの別のブランチに格納されます。
ライフサイクルと用途が異なるため、app リポジトリと env リポジトリは別々に格納されます。app リポジトリは特定のアプリケーション専用であり、主に実際の人間が使用します。env リポジトリは複数のアプリケーションで共有される場合があり、自動化されたシステム(Cloud Build など)で使用されます。env リポジトリにはいくつかのブランチがあり、それぞれ特定の環境にマッピングされ、特定のコンテナ イメージを参照しますが、app リポジトリはこれとは異なります。
このラボを終了すると、次のことを簡単に行うことができるシステムが完成します。
- Cloud Build の履歴を確認して、失敗したデプロイと成功したデプロイを区別する。
-
env リポジトリの production ブランチを確認して、現在使用されているマニフェストにアクセスする。
- 対応する Cloud Build ビルドを再実行して、以前のバージョンにロールバックする。
目標
このラボでは、次のタスクの実施方法について学びます。
- Kubernetes Engine クラスタを作成する。
- GitHub リポジトリを作成する。
- GitHub リポジトリから Cloud Build をトリガーする。
- Cloud Build でテストを自動化し、デプロイ可能なコンテナ イメージを公開する。
- Kubernetes Engine クラスタにデプロイされたリソースを Cloud Build で管理する。
設定と要件
[ラボを開始] ボタンをクリックする前に
こちらの説明をお読みください。ラボには時間制限があり、一時停止することはできません。タイマーは、Google Cloud のリソースを利用できる時間を示しており、[ラボを開始] をクリックするとスタートします。
このハンズオンラボでは、シミュレーションやデモ環境ではなく実際のクラウド環境を使って、ラボのアクティビティを行います。そのため、ラボの受講中に Google Cloud にログインおよびアクセスするための、新しい一時的な認証情報が提供されます。
このラボを完了するためには、下記が必要です。
- 標準的なインターネット ブラウザ(Chrome を推奨)
注: このラボの実行には、シークレット モード(推奨)またはシークレット ブラウジング ウィンドウを使用してください。これにより、個人アカウントと受講者アカウント間の競合を防ぎ、個人アカウントに追加料金が発生しないようにすることができます。
- ラボを完了するための時間(開始後は一時停止できません)
注: このラボでは、受講者アカウントのみを使用してください。別の Google Cloud アカウントを使用すると、そのアカウントに料金が発生する可能性があります。
ラボを開始して Google Cloud コンソールにログインする方法
-
[ラボを開始] ボタンをクリックします。ラボの料金をお支払いいただく必要がある場合は、表示されるダイアログでお支払い方法を選択してください。
右側の [ラボの設定とアクセス] パネルには、以下が表示されます。
- [Google Cloud コンソールを開く] ボタン
- このラボで使用する一時的な認証情報(ユーザー名とパスワード)
- このラボを行うために必要なその他の情報(ある場合)
ラボのタイマーはページの上部に表示され、残り時間が示されます。
-
[Google Cloud コンソールを開く] をクリックします(Chrome ブラウザを使用している場合は、右クリックして [シークレット ウィンドウで開く] を選択します)。
ラボでリソースがスピンアップし、別のタブで [ログイン] ページが表示されます。
ヒント: タブをそれぞれ別のウィンドウで開き、並べて表示しておきましょう。
注: [アカウントの選択] ダイアログが表示された場合は、[別のアカウントを使用] をクリックします。
-
必要に応じて、下のユーザー名をコピーして、[ログイン] ダイアログに貼り付けます。
{{{user_0.username | "Username"}}}
[ラボの設定とアクセス] パネルでもユーザー名を確認できます。
-
[次へ] をクリックします。
-
以下のパスワードをコピーして、[ようこそ] ダイアログに貼り付けます。
{{{user_0.password | "Password"}}}
[ラボの設定とアクセス] パネルでもパスワードを確認できます。
-
[次へ] をクリックします。
重要: ラボで指定された認証情報を使用する必要があります。ご自身の Google Cloud アカウントの認証情報は使用しないでください。
注: このラボでご自身の Google Cloud アカウントを使用すると、追加料金が発生する場合があります。
-
その後のページはクリックして先に進みます。
- 利用規約に同意します。
- 一時的なアカウントなので、復元オプションや 2 要素認証プロセスは設定しないでください。
- 無料トライアルには登録しないでください。
しばらくすると、このタブで Google Cloud コンソールが開きます。
注: Google Cloud のプロダクトやサービスにアクセスするには、ナビゲーション メニューをクリックするか、[検索] フィールドにサービス名またはプロダクト名を入力します。

Cloud Shell をアクティブにする
Cloud Shell は、開発ツールと一緒に読み込まれる仮想マシンです。5 GB の永続ホーム ディレクトリが用意されており、Google Cloud で稼働します。Cloud Shell を使用すると、コマンドラインで Google Cloud リソースにアクセスできます。
-
Google Cloud コンソールの上部にある「Cloud Shell をアクティブにする」アイコン  をクリックします。
-
ウィンドウで次の操作を行います。
- Cloud Shell 情報ウィンドウで操作を進めます。
- Cloud Shell が認証情報を使用して Google Cloud API を呼び出すことを承認します。
接続した時点で認証が完了しており、プロジェクトに各自の Project_ID、 が設定されます。出力には、このセッションの PROJECT_ID を宣言する次の行が含まれています。
Your Cloud Platform project in this session is set to {{{project_0.project_id | "PROJECT_ID"}}}
gcloud は Google Cloud のコマンドライン ツールです。このツールは、Cloud Shell にプリインストールされており、タブ補完がサポートされています。
- (省略可)次のコマンドを使用すると、有効なアカウント名を一覧表示できます。
gcloud auth list
- [承認] をクリックします。
出力:
ACTIVE: *
ACCOUNT: {{{user_0.username | "ACCOUNT"}}}
To set the active account, run:
$ gcloud config set account `ACCOUNT`
- (省略可)次のコマンドを使用すると、プロジェクト ID を一覧表示できます。
gcloud config list project
出力:
[core]
project = {{{project_0.project_id | "PROJECT_ID"}}}
注: Google Cloud における gcloud ドキュメントの全文については、gcloud CLI の概要ガイドをご覧ください。
タスク 1. ラボを初期化する
このタスクでは、環境を次のように設定します。
- プロジェクト ID とプロジェクト番号を変数としてインポートする
- GKE、Cloud Build、Secret Manager、Artifact Analysis の API を有効にする
- Artifact Registry Docker リポジトリを作成する
- このラボのサンプル アプリケーションをデプロイする GKE クラスタを作成する
- Cloud Shell で、次のコマンドを実行してプロジェクト ID とプロジェクト番号を設定します。これらを変数
PROJECT_ID と PROJECT_NUMBER として保存します。
export PROJECT_ID=$(gcloud config get-value project)
export PROJECT_NUMBER=$(gcloud projects describe $PROJECT_ID --format='value(projectNumber)')
export REGION={{{ project_0.default_region }}}
gcloud config set compute/region $REGION
次に、Google Cloud プロジェクトを使用するための準備を行います。具体的には、必要な API を有効にし、Cloud Shell の Git 構成を初期化して、後ほど使用するサンプルコードをダウンロードします。
- 次のコマンドを実行して、GKE、Cloud Build、Secret Manager、Artifact Analysis の API を有効にします。
gcloud services enable container.googleapis.com \
cloudbuild.googleapis.com \
secretmanager.googleapis.com \
containeranalysis.googleapis.com
-
my-repository という名前の Artifact Registry Docker リポジトリを リージョンに作成します。このリポジトリにコンテナ イメージを保存します。
gcloud artifacts repositories create my-repository \
--repository-format=docker \
--location=$REGION
- このラボのサンプル アプリケーションをデプロイする GKE クラスタを作成します。
gcloud container clusters create hello-cloudbuild --num-nodes 1 --region $REGION
- 次のコマンドを実行して、Cloud Shell で Git と GitHub を構成します。
curl -sS https://webi.sh/gh | sh
gh auth login
gh api user -q ".login"
GITHUB_USERNAME=$(gh api user -q ".login")
git config --global user.name "${GITHUB_USERNAME}"
git config --global user.email "${USER_EMAIL}"
echo ${GITHUB_USERNAME}
echo ${USER_EMAIL}
Enter キーを押してデフォルト オプションを受け入れます。CLI ツールに表示される手順に沿って、ウェブブラウザで GitHub にログインします。正常にログインできた場合、GitHub ユーザー名が表示されます。
[進行状況を確認] をクリックして、目標に沿って進んでいることを確認します。
サービスを有効にして Artifact Registry と GKE クラスタを作成する
タスク 2. GitHub リポジトリで Git リポジトリを作成する
GitHub は、コードの保存、共有、他のユーザーとの共同記述に使用できるプラットフォームです。Git はバージョン管理システムです。ファイルを GitHub にアップロードすると、「Git リポジトリ」に保存されます。つまり、GitHub でファイルに変更を加える(「commit」する)と、Git が自動的に変更の追跡と管理を開始します。詳しくは、GitHub と Git についてをご覧ください。
このタスクでは、2 つの Git リポジトリ(hello-cloudbuild-app と hello-cloudbuild-env)を作成し、いくつかのサンプルコードを使用して hello-cloudbuild-app を初期化します。
- Cloud Shell で次のコマンドを実行して、2 つの Git リポジトリを作成します。
gh repo create hello-cloudbuild-app --private
gh repo create hello-cloudbuild-env --private
- Cloud Storage からサンプルコードをダウンロードします。
cd ~
mkdir hello-cloudbuild-app
gcloud storage cp -r gs://spls/gsp1077/gke-gitops-tutorial-cloudbuild/* hello-cloudbuild-app
- GitHub リポジトリをリモートとして構成します。
cd ~/hello-cloudbuild-app
export REGION={{{project_0.default_region | "REGION"}}}
sed -i "s/us-central1/$REGION/g" cloudbuild.yaml
sed -i "s/us-central1/$REGION/g" cloudbuild-delivery.yaml
sed -i "s/us-central1/$REGION/g" cloudbuild-trigger-cd.yaml
sed -i "s/us-central1/$REGION/g" kubernetes.yaml.tpl
PROJECT_ID=$(gcloud config get-value project)
git init
git config credential.helper gcloud.sh
git remote add google https://github.com/${GITHUB_USERNAME}/hello-cloudbuild-app
git branch -m master
git add . && git commit -m "initial commit"
クローンを作成したコードには、単純な「Hello World」アプリケーションが含まれています。
from flask import Flask
app = Flask('hello-cloudbuild')
@app.route('/')
def hello():
return "Hello World!\n"
if __name__ == '__main__':
app.run(host = '0.0.0.0', port = 8080)
タスク 3. Cloud Build でコンテナ イメージを作成する
このタスクでは、既存の Dockerfile を使用して、Cloud Build でコンテナ イメージを作成して保存します。
以前にクローンを作成したコードには、Docker ファイルが含まれています。
FROM python:3.7-slim
RUN pip install flask
WORKDIR /app
COPY app.py /app/app.py
ENTRYPOINT ["python"]
CMD ["/app/app.py"]
この Dockerfile を使用して、Cloud Build でコンテナ イメージを作成し、Artifact Registry に保存できます。
- Cloud Shell で次のコマンドを使用して、最新の commit に基づいて Cloud Build ビルドを作成します。
cd ~/hello-cloudbuild-app
COMMIT_ID="$(git rev-parse --short=7 HEAD)"
gcloud builds submit --tag="${REGION}-docker.pkg.dev/${PROJECT_ID}/my-repository/hello-cloudbuild:${COMMIT_ID}" .
このコマンドを実行すると、Cloud Build はコンテナ イメージの作成によって生成されたログをターミナルにストリーミングします。
- ビルドが完了したら、Google のタイトルバーで、[検索] フィールドに「Artifact Registry」と入力し、検索結果から [Artifact Registry] をクリックします。新しいコンテナ イメージが Artifact Registry 内で実際に利用可能になっていることを確認します。my-repository をクリックして、イメージ リストで
hello-cloudbuild イメージがあることを確認します。
[進行状況を確認] をクリックして、目標に沿って進んでいることを確認します。
Cloud Build でコンテナ イメージを作成する
タスク 4. 継続的インテグレーション(CI)パイプラインを作成する
このタスクでは、小規模な単体テストを自動的に実施し、コンテナ イメージを構築して Artifact Registry に push するように Cloud Build を構成します。GitHub リポジトリに新しい commit を push すると、このパイプラインが自動的にトリガーされます。
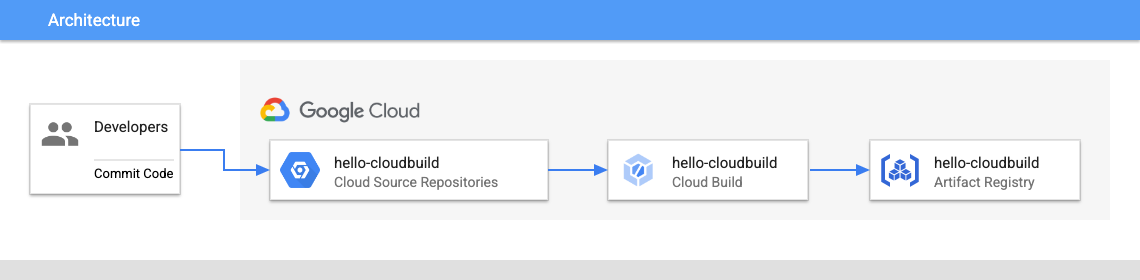
すでにコードに含まれている cloudbuild.yaml ファイルがこのパイプラインの構成です。
-
コンソールのタイトルバーにある [検索] フィールドに「Cloud Build トリガー」と入力し、検索結果から [トリガー] をクリックします。
-
[トリガーを作成] をクリックします。
-
[名前] に「hello-cloudbuild」と入力します。[リージョン] を に設定します。
-
[イベント] を [ブランチに push する] に設定します。
-
[ソース] の [リポジトリ] で、[新しいリポジトリに接続] をクリックします。
-
[GitHub(Cloud Build GitHub アプリ)] を選択します。[続行] をクリックします。
-
ユーザー名とパスワードを使用して、ソース リポジトリに対する認証を行います。
-
[リポジトリ] で [[your-github-username]/hello-cloudbuild-app] を選択します。[OK] をクリックします。
a. 「GitHub アプリは、どのリポジトリにもインストールされていません」というポップアップが表示された場合は、次の手順を行います。
i. [Google Cloud Build のインストール] をクリックします。Cloud Build GitHub アプリを個人アカウントにインストールします。GitHub アカウントを使用してインストールを許可します。
ii. [Repository access] で、[Only select repositories] を選択します。[Select the repositories] メニューをクリックし、[_[your-github-username]_/hello-cloudbuild-app] と [_[your-github-username]_/hello-cloudbuild-env] を選択します。
iii. [Install] をクリックします。
b. Cloud Build GitHub アプリがアカウントにすでにインストールされている場合は、GitHub のリポジトリを編集するオプションが表示されます。
i. [Repository access] で、[Only select repositories] を選択します。[Select repositories] メニューをクリックし、リポジトリ [_[your-github-username]_/hello-cloudbuild-app] と [_[your-github-username]_/hello-cloudbuild-env] を選択します。ii. [Save] をクリックします。
-
[私は、接続サービスを提供するために、選択したリポジトリの GitHub コンテンツが...] に同意します。
-
[接続] をクリックします。
-
[ブランチ] に「.(任意のブランチ)」と入力します。
-
[構成] セクションで、[タイプ] を [Cloud Build 構成ファイル] に設定します。
-
[ロケーション] フィールドで、/ の後に「cloudbuild.yaml」と入力します。
-
[サービス アカウント] を [Compute Engine のデフォルトのサービス アカウント] に設定します。
-
[作成] をクリックします。
トリガーが作成されたら Cloud Shell に戻り、アプリケーション コードを GitHub リポジトリに push して、Cloud Build で CI パイプラインをトリガーします。
- このトリガーを開始するには次のコマンドを実行します。
cd ~/hello-cloudbuild-app
git add .
git commit -m "Type Any Commit Message here"
git push google master
- Cloud Build ページの左側のペインで [ダッシュボード] をクリックします。
- ビルドが実行中または最近終了したことを確認します。ビルドをクリックすると、その実行を追跡し、ログを確認できます。
[進行状況を確認] をクリックして、目標に沿って進んでいることを確認します。
継続的インテグレーション(CI)パイプラインを作成する
タスク 5. SSH 認証鍵を使用してビルドから GitHub にアクセスする
このステップでは、Secret Manager と Cloud Build を使用して、限定公開 GitHub リポジトリにアクセスします。
SSH 認証鍵を作成する
-
Cloud Shell で、ホーム ディレクトリに移動します。
cd ~
-
workingdir という名前の新しいディレクトリを作成し、そのディレクトリに移動します。
mkdir workingdir
cd workingdir
-
新しい GitHub SSH 認証鍵を作成します。[your-github-email] は個人でご利用の GitHub メールアドレスに置き換えます。
ssh-keygen -t rsa -b 4096 -N '' -f id_github -C [your-github-email]
このステップでは、id_github と id_github.pub という 2 つのファイルが作成されます。
- Cloud Shell のアクションバーで、その他アイコン(
 )をクリックし、[ダウンロード]、[ファイル ブラウザの切り替え] の順にクリックして、
dropdown フォルダと workingdir フォルダを選択し、ローカルマシンに id_github ファイルをダウンロードします。
Secret Manager に限定公開の SSH 認証鍵を保存する
-
コンソールのタイトルバーに「Secret Manager」と入力し、検索結果から [Secret Manager] をクリックします。
-
[シークレットの作成] をクリックします。
-
[名前] を「ssh_key_secret」に設定します。
-
[シークレット値] を [アップロード] に設定し、id_github ファイルをアップロードします。
-
他の設定はデフォルトのままにします。
-
[シークレットの作成] をクリックします。
これにより、id_github ファイルが Secret Manager にアップロードされます。
公開 SSH 認証鍵を非公開リポジトリのデプロイキーに追加する
-
お使いの GitHub アカウントにログインします。
-
右上にあるプロフィール写真をクリックし、[Your profile] をクリックします。
-
プロフィールページで [Repositories] をクリックし、hello-cloudbuild-env リポジトリをクリックします。
-
リポジトリで [Settings] をクリックします。
-
左側のペインで [Deploy Keys] をクリックし、[Add deploy key] をクリックします。
-
タイトルに「SSH_KEY」と入力し、Cloud Shell の workingdir/id_github.pub から公開 SSH 認証鍵を貼り付けます。
-
[Allow write access] を選択してこの鍵にリポジトリへの書き込みアクセス権を付与します。書き込みアクセス権を持つデプロイキーを使用すると、デプロイをリポジトリに push できます。
-
[Add key] をクリックします。
-
ディスクから SSH 認証鍵を削除します。
rm id_github*
サービス アカウントに Secret Manager へのアクセス権を付与する
次のコマンドを入力して、サービス アカウントに Secret Manager へのアクセス権を付与します。
gcloud projects add-iam-policy-binding ${PROJECT_NUMBER} \
--member=serviceAccount:${PROJECT_NUMBER}-compute@developer.gserviceaccount.com \
--role=roles/secretmanager.secretAccessor
[進行状況を確認] をクリックして、目標に沿って進んでいることを確認します。
SSH 認証鍵を使用してビルドから GitHub にアクセスする
タスク 6. テスト環境と CD パイプラインを作成する
Cloud Build は継続的デリバリー パイプラインにも使用できます。commit が hello-cloudbuild-env リポジトリの candidate ブランチに push されるたびにパイプラインが実行されます。パイプラインは、新しいバージョンのマニフェストを Kubernetes クラスタに適用し、正常に終了した場合はマニフェストを production ブランチにコピーします。このプロセスには次のような特徴があります。
- candidate ブランチはデプロイ試行の履歴です。
- production ブランチは成功したデプロイの履歴です。
- 成功したデプロイと失敗したデプロイは Cloud Build で確認できます。
- Cloud Build で対応するビルドを再実行することで、以前のデプロイにロールバックできます。また、ロールバックによって production ブランチが更新され、デプロイの履歴が正確に反映されます。
次に、継続的インテグレーション パイプラインを変更して hello-cloudbuild-env リポジトリの candidate ブランチを更新し、継続的デリバリー パイプラインをトリガーします。
Cloud Build に GKE へのアクセス権を付与する
Kubernetes クラスタにアプリケーションをデプロイするには、Cloud Build に Kubernetes Engine デベロッパーの Identity and Access Management ロールが必要です。
- Cloud Shell で、次のコマンドを実行します。
cd ~
PROJECT_NUMBER="$(gcloud projects describe ${PROJECT_ID} --format='get(projectNumber)')"
gcloud projects add-iam-policy-binding ${PROJECT_NUMBER} \
--member=serviceAccount:${PROJECT_NUMBER}@cloudbuild.gserviceaccount.com \
--role=roles/container.developer
hello-cloudbuild-env リポジトリを 2 つのブランチ(production と candidate)と、デプロイ プロセスを記述した Cloud Build 構成ファイルで初期化する必要があります。
まず、hello-cloudbuild-env リポジトリのクローンを作成し、まだ空の production ブランチを作成します。
- Cloud Shell で、Cloud Storage からサンプルコードをダウンロードします。
mkdir hello-cloudbuild-env
gcloud storage cp -r gs://spls/gsp1077/gke-gitops-tutorial-cloudbuild/* hello-cloudbuild-env
cd hello-cloudbuild-env
export REGION={{{project_0.default_region | "REGION"}}}
sed -i "s/us-central1/$REGION/g" cloudbuild.yaml
sed -i "s/us-central1/$REGION/g" cloudbuild-delivery.yaml
sed -i "s/us-central1/$REGION/g" cloudbuild-trigger-cd.yaml
sed -i "s/us-central1/$REGION/g" kubernetes.yaml.tpl
- Cloud Build が GitHub に接続するには、Cloud Build のビルド環境の
known_hosts ファイルに公開 SSH 認証鍵を追加する必要があります。hello-cloudbuild-env ディレクトリに known_hosts.github という名前のファイルを作成し、このファイルに公開 SSH 認証鍵を追加して、ファイルに必要な権限を付与します。
cd ~/hello-cloudbuild-env
ssh-keyscan -t rsa github.com > known_hosts.github
chmod +x known_hosts.github
git init
git config credential.helper gcloud.sh
git remote add google https://github.com/${GITHUB_USERNAME}/hello-cloudbuild-env
git branch -m master
git add . && git commit -m "initial commit"
git push google master
cd ~/hello-cloudbuild-env
git checkout -b production
- 次に、
hello-cloudbuild-env リポジトリにある cloudbuild.yaml ファイルを置き換えて、変更を commit します。
cd ~/hello-cloudbuild-env
-
hello-cloudbuild-env リポジトリの cloudbuild.yaml を次のコードに置き換えます。[your-github-username] はお使いの GitHub ユーザー名に置き換えます。
# Copyright 2018 Google LLC
#
# Licensed under the Apache License, Version 2.0 (the "License");
# you may not use this file except in compliance with the License.
# You may obtain a copy of the License at
#
# https://www.apache.org/licenses/LICENSE-2.0
#
# Unless required by applicable law or agreed to in writing, software
# distributed under the License is distributed on an "AS IS" BASIS,
# WITHOUT WARRANTIES OR CONDITIONS OF ANY KIND, either express or implied.
# See the License for the specific language governing permissions and
# limitations under the License.
# [START cloudbuild-delivery]
steps:
# This step deploys the new version of our container image
# in the hello-cloudbuild Kubernetes Engine cluster.
- name: 'gcr.io/cloud-builders/kubectl'
id: Deploy
args:
- 'apply'
- '-f'
- 'kubernetes.yaml'
env:
- 'CLOUDSDK_COMPUTE_REGION={{{ project_0.default_region }}}'
- 'CLOUDSDK_CONTAINER_CLUSTER=hello-cloudbuild'
# Access the id_github file from Secret Manager, and setup SSH
- name: 'gcr.io/cloud-builders/git'
secretEnv: ['SSH_KEY']
entrypoint: 'bash'
args:
- -c
- |
echo "$$SSH_KEY" >> /root/.ssh/id_rsa
chmod 400 /root/.ssh/id_rsa
cp known_hosts.github /root/.ssh/known_hosts
volumes:
- name: 'ssh'
path: /root/.ssh
# Clone the repository
- name: 'gcr.io/cloud-builders/git'
args:
- clone
- --recurse-submodules
- git@github.com:${GITHUB-USERNAME}/hello-cloudbuild-env.git
volumes:
- name: ssh
path: /root/.ssh
# This step copies the applied manifest to the production branch
# The COMMIT_SHA variable is automatically
# replaced by Cloud Build.
- name: 'gcr.io/cloud-builders/gcloud'
id: Copy to production branch
entrypoint: /bin/sh
args:
- '-c'
- |
set -x && \
cd hello-cloudbuild-env && \
git config user.email $(gcloud auth list --filter=status:ACTIVE --format='value(account)')
sed "s/GOOGLE_CLOUD_PROJECT/${PROJECT_ID}/g" kubernetes.yaml.tpl | \
git fetch origin production && \
# Switch to the production branch and copy the kubernetes.yaml file from the candidate branch
git checkout production && \
git checkout $COMMIT_SHA kubernetes.yaml && \
# Commit the kubernetes.yaml file with a descriptive commit message
git commit -m "Manifest from commit $COMMIT_SHA
$(git log --format=%B -n 1 $COMMIT_SHA)" && \
# Push the changes back to Cloud Source Repository
git push origin production
volumes:
- name: ssh
path: /root/.ssh
availableSecrets:
secretManager:
- versionName: projects/${PROJECT_NUMBER}/secrets/ssh_key_secret/versions/1
env: 'SSH_KEY'
# [END cloudbuild-delivery]
options:
logging: CLOUD_LOGGING_ONLY
git add .
git commit -m "Create cloudbuild.yaml for deployment"
cloudbuild.yaml ファイルには、Cloud Build で実行されるデプロイ プロセスが記述されています。次の 2 つのステップがあります。
- Cloud Build が GKE クラスタにマニフェストを適用します。
- 正常に終了すると、Cloud Build はマニフェストを production ブランチにコピーします。
- candidate ブランチを作成し、両方のブランチを GitHub リポジトリで使用できるように push します。
git checkout -b candidate
git push google production
git push google candidate
継続的デリバリー パイプラインのトリガーを作成する
-
コンソールのタイトルバーに「Cloud Build トリガー」と入力し、[トリガー] をクリックします。
-
[トリガーを作成] をクリックします。
-
[名前] を「hello-cloudbuild-deploy」に設定します。[リージョン] を に設定します。
-
[イベント] で [ブランチに push する] を選択します。
-
[ソース] の [リポジトリ] で、[新しいリポジトリに接続] をクリックします。
a. [GitHub(Cloud Build GitHub アプリ)] を選択します。[続行] をクリックします。
b. GitHub のユーザー名とパスワードを使用して、ソース リポジトリに対する認証を行います。
c. [your-github-username]/hello-cloudbuild-env リポジトリを選択します。[OK] をクリックします。
d. [私は、接続サービスを提供するために、選択したリポジトリの GitHub コンテンツが..] を選択します。
e. [接続] をクリックします。
-
[リポジトリ] で、[[your-github-username]/hello-cloudbuild-env] を選択します。
-
[ソース] で、[ブランチ] として [^candidate$] を選択します。
-
[ビルド構成] で [Cloud Build 構成ファイル] を選択します。
-
[Cloud Build 構成ファイルの場所] フィールドで、/ の後に「cloudbuild.yaml」と入力します。
-
[サービス アカウント] を [Compute Engine のデフォルトのサービス アカウント] に設定します。
-
[作成] をクリックします。
-
hello-cloudbuild-app ディレクトリに known_hosts.github という名前のファイルを作成し、このファイルに公開 SSH 認証鍵を追加して、ファイルに必要な権限を付与します。
cd ~/hello-cloudbuild-app
ssh-keyscan -t rsa github.com > known_hosts.github
chmod +x known_hosts.github
git add .
git commit -m "Adding known_host file."
git push google master
継続的デリバリー パイプラインをトリガーするように継続的インテグレーション パイプラインを変更する
次に、Kubernetes マニフェストの新しいバージョンを生成して hello-cloudbuild-env リポジトリに push し、継続的デリバリー パイプラインをトリガーする手順を継続的インテグレーション パイプラインに追加します。
-
app リポジトリ用の cloudbuild.yaml ファイルの拡張版をコピーします。
cd ~/hello-cloudbuild-app
cloudbuild.yaml ファイルには、新しい Kubernetes マニフェストを生成して継続的デリバリー パイプラインをトリガーする手順が追加されています。
ビルドを構成する
-
hello-cloudbuild-app リポジトリの cloudbuild.yaml を次のコードに置き換えます。${GITHUB_USERNAME} はお使いの GitHub ユーザー名に置き換えます。
# Copyright 2018 Google LLC
#
# Licensed under the Apache License, Version 2.0 (the "License");
# you may not use this file except in compliance with the License.
# You may obtain a copy of the License at
#
# https://www.apache.org/licenses/LICENSE-2.0
#
# Unless required by applicable law or agreed to in writing, software
# distributed under the License is distributed on an "AS IS" BASIS,
# WITHOUT WARRANTIES OR CONDITIONS OF ANY KIND, either express or implied.
# See the License for the specific language governing permissions and
# limitations under the License.
# [START cloudbuild]
steps:
# This step runs the unit tests on the app
- name: 'python:3.7-slim'
id: Test
entrypoint: /bin/sh
args:
- -c
- 'pip install flask && python test_app.py -v'
# This step builds the container image.
- name: 'gcr.io/cloud-builders/docker'
id: Build
args:
- 'build'
- '-t'
- '{{{ project_0.default_region }}}-docker.pkg.dev/$PROJECT_ID/my-repository/hello-cloudbuild:$SHORT_SHA'
- '.'
# This step pushes the image to Artifact Registry
# The PROJECT_ID and SHORT_SHA variables are automatically
# replaced by Cloud Build.
- name: 'gcr.io/cloud-builders/docker'
id: Push
args:
- 'push'
- '{{{ project_0.default_region }}}-docker.pkg.dev/$PROJECT_ID/my-repository/hello-cloudbuild:$SHORT_SHA'
# [END cloudbuild]
# Access the id_github file from Secret Manager, and setup SSH
- name: 'gcr.io/cloud-builders/git'
secretEnv: ['SSH_KEY']
entrypoint: 'bash'
args:
- -c
- |
echo "$$SSH_KEY" >> /root/.ssh/id_rsa
chmod 400 /root/.ssh/id_rsa
cp known_hosts.github /root/.ssh/known_hosts
volumes:
- name: 'ssh'
path: /root/.ssh
# Clone the repository
- name: 'gcr.io/cloud-builders/git'
args:
- clone
- --recurse-submodules
- git@github.com:${GITHUB-USERNAME}/hello-cloudbuild-env.git
volumes:
- name: ssh
path: /root/.ssh
# [START cloudbuild-trigger-cd]
# This step clones the hello-cloudbuild-env repository
- name: 'gcr.io/cloud-builders/gcloud'
id: Change directory
entrypoint: /bin/sh
args:
- '-c'
- |
cd hello-cloudbuild-env && \
git checkout candidate && \
git config user.email $(gcloud auth list --filter=status:ACTIVE --format='value(account)')
volumes:
- name: ssh
path: /root/.ssh
# This step generates the new manifest
- name: 'gcr.io/cloud-builders/gcloud'
id: Generate manifest
entrypoint: /bin/sh
args:
- '-c'
- |
sed "s/GOOGLE_CLOUD_PROJECT/${PROJECT_ID}/g" kubernetes.yaml.tpl | \
sed "s/COMMIT_SHA/${SHORT_SHA}/g" > hello-cloudbuild-env/kubernetes.yaml
volumes:
- name: ssh
path: /root/.ssh
# This step pushes the manifest back to hello-cloudbuild-env
- name: 'gcr.io/cloud-builders/gcloud'
id: Push manifest
entrypoint: /bin/sh
args:
- '-c'
- |
set -x && \
cd hello-cloudbuild-env && \
git add kubernetes.yaml && \
git commit -m "Deploying image {{{ project_0.default_region }}}-docker.pkg.dev/$PROJECT_ID/my-repository/hello-cloudbuild:${SHORT_SHA}
Built from commit ${COMMIT_SHA} of repository hello-cloudbuild-app
Author: $(git log --format='%an <%ae>' -n 1 HEAD)" && \
git push origin candidate
volumes:
- name: ssh
path: /root/.ssh
availableSecrets:
secretManager:
- versionName: projects/${PROJECT_NUMBER}/secrets/ssh_key_secret/versions/1
env: 'SSH_KEY'
# [END cloudbuild-trigger-cd]
options:
logging: CLOUD_LOGGING_ONLY
注: このパイプラインでは、単純な sed を使用して、マニフェスト テンプレートをレンダリングしています。実際には、kustomize や skaffold などの専用ツールを使用すると、マニフェスト テンプレートのレンダリングをより細かく制御できるため、メリットがあります。
- 変更を commit して GitHub リポジトリに push します。
cd ~/hello-cloudbuild-app
git add cloudbuild.yaml
git commit -m "Trigger CD pipeline"
git push google master
これにより、Cloud Build の継続的インテグレーション パイプラインがトリガーされます。
[進行状況を確認] をクリックして、目標に沿って進んでいることを確認します。
テスト環境と CD パイプラインを作成する
タスク 7. Cloud Build パイプラインを確認する
このタスクでは、コンソールで Cloud Build パイプラインを確認します。
- コンソールの Cloud Build ページで、左側のペインにある [ダッシュボード] をクリックします。
- トリガー hello-cloudbuild-app をクリックし、その実行を追跡してログを確認します。このパイプラインの最後の手順では、新しいマニフェストが
hello-cloudbuild-env リポジトリに push され、これにより継続的デリバリー パイプラインがトリガーされます。
- [ダッシュボード] のメイン画面に戻ります。
-
hello-cloudbuild-env リポジトリでビルドが実行中または最近終了したことを確認します。
ビルドをクリックすると、その実行を追跡し、ログを確認できます。
タスク 8. パイプライン全体をテストする
これで、CI / CD パイプライン全体が構成されました。このタスクでは、エンドツーエンドのテストを行います。
- コンソールのナビゲーション メニュー(
 )で、[Kubernetes Engine]、[Gateway、Service、Ingress]、[Services] の順にクリックします。
リストに hello-cloudbuild という名前の単一の Service が含まれています。これは実行された継続的デリバリー ビルドによって作成されたものです。
-
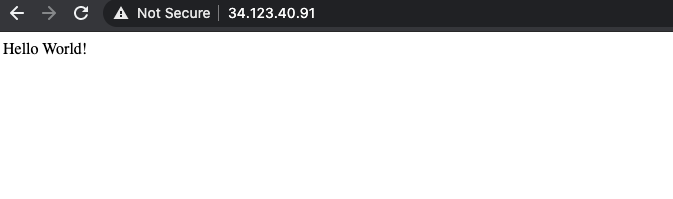
hello-cloudbuild Service のエンドポイントをクリックします。「Hello World!」と表示されます。エンドポイントがない場合や、ロードバランサのエラーが発生した場合は、ロードバランサが完全に初期化されるまで数分待つ必要があります。表示されない場合は、[更新] をクリックしてページを更新します。
- Cloud Shell で、アプリケーションと単体テストの両方で「Hello World」を「Hello Cloud Build」に置き換えます。
cd ~/hello-cloudbuild-app
sed -i 's/Hello World/Hello Cloud Build/g' app.py
sed -i 's/Hello World/Hello Cloud Build/g' test_app.py
- 変更を commit して GitHub リポジトリに push します。
git add app.py test_app.py
git commit -m "Hello Cloud Build"
git push google master
- これにより、CI / CD パイプライン全体がトリガーされます。
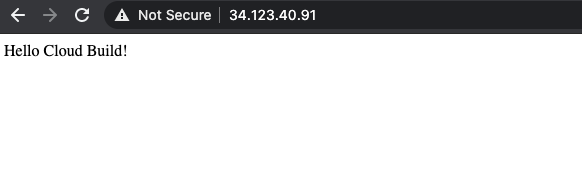
数分後、ブラウザでアプリケーションを再読み込みします。「Hello Cloud Build!」と表示されます。
タスク 9. ロールバックをテストする
このタスクでは、「Hello World!」と表示するアプリケーションのバージョンにロールバックします。
- コンソールのタイトルバーにある [検索] フィールドに「Cloud Build ダッシュボード」と入力し、検索結果から [
Cloud Build] をクリックします。左側のペインで [ダッシュボード] が選択されていることを確認します。
-
hello-cloudbuild-env リポジトリの [ビルド履歴] の下にある [すべて表示] をクリックします。
- 利用可能な 2 番目に新しいビルドをクリックします。
- [再ビルド] をクリックします。
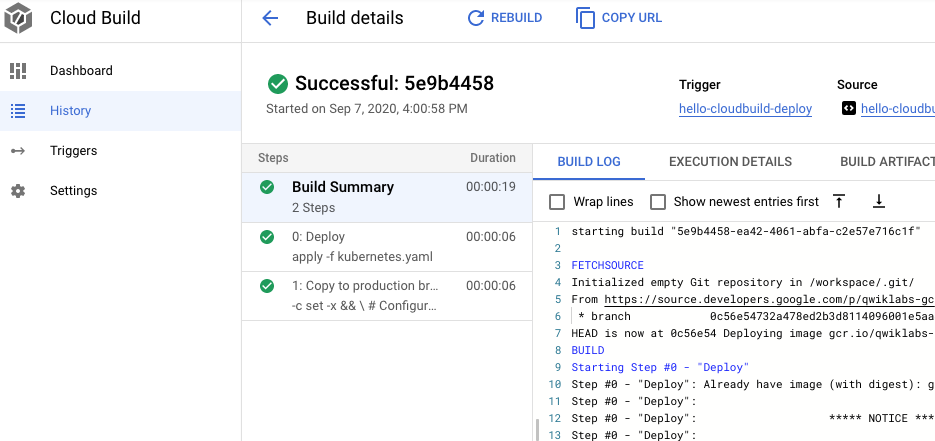
ビルドが完了したら、ブラウザでアプリケーションを再読み込みします。再び「Hello World!」と表示されます。
お疲れさまでした
Cloud Build を使用して、Google Cloud の GKE で継続的インテグレーション パイプラインの作成とロールバックを実行できるようになりました。
Google Cloud トレーニングと認定資格
Google Cloud トレーニングと認定資格を通して、Google Cloud 技術を最大限に活用できるようになります。必要な技術スキルとベスト プラクティスについて取り扱うクラスでは、学習を継続的に進めることができます。トレーニングは基礎レベルから上級レベルまであり、オンデマンド、ライブ、バーチャル参加など、多忙なスケジュールにも対応できるオプションが用意されています。認定資格を取得することで、Google Cloud テクノロジーに関するスキルと知識を証明できます。
マニュアルの最終更新日: 2026 年 2 月 20 日
ラボの最終テスト日: 2026 年 2 月 20 日
Copyright 2026 Google LLC. All rights reserved. Google および Google のロゴは Google LLC の商標です。その他すべての企業名および商品名はそれぞれ各社の商標または登録商標です。







