


准备工作
- 实验会创建一个 Google Cloud 项目和一些资源,供您使用限定的一段时间
- 实验有时间限制,并且没有暂停功能。如果您中途结束实验,则必须重新开始。
- 在屏幕左上角,点击开始实验即可开始

This lab shows you the benefits of using Anthos Service Mesh to manage a microservices-based application deployed across multiple GKE clusters. Microservices are the centric component of a modern application. Organizations, teams, and products are organized to build resilient, secure, scalable services that solve customer needs.
Every service needs four qualities: resiliency, scale, security, and ease of management. Resiliency is important because services need to adapt to infrastructure and machine or human error. Scale allows services to run across clusters, regions, and zones to fulfill customer requests in a timely fashion. Security means encrypting all traffic between services and being able to implement and enforce policies to and from every service. Ease of management involves being able to observe metrics in a service, deliver traffic to the right service, and reliably roll out new versions.
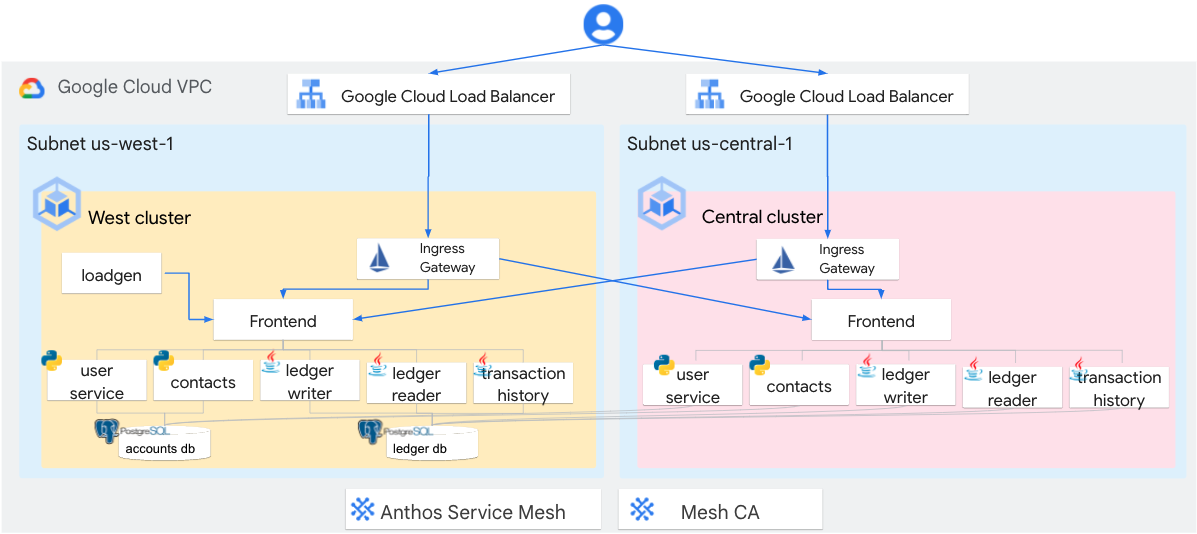
To provide resiliency, you must be able to recover from infrastructure failure such as losing a cluster where a service might be running. To do this, you can run a service in multiple clusters with the so-called distributed services. A distributed service is a set of Kubernetes services that acts as a single logical service. Distributed services are more resilient than Kubernetes services because they run on multiple Kubernetes clusters in the same namespace.
A distributed service provides multi-regional availability and remains up even if one or more GKE clusters are down, but only if the healthy clusters can serve the desired load. Running distributed services makes cluster lifecycle management easier because you can bring clusters down for maintenance or upgrades while other clusters service traffic. In order to create a distributed service, service mesh functionality provided by Anthos Service Mesh is used to link services running on multiple clusters together to act as a single logical service.
Two GKE clusters called gke-region1 and gke-region2 have been provisioned in gke-region2 can seamlessly communicate with a pod on gke-region1. Additionally, the Bank of Anthos application has been deployed across these two clusters as shown in the following diagram.
In this lab, you learn how to perform the following tasks:
In this task, you perform initialization steps for your lab.
For each lab, you get a new Google Cloud project and set of resources for a fixed time at no cost.
Sign in to Google Skills using an incognito window.
Note the lab's access time (for example, 1:15:00), and make sure you can finish within that time.
There is no pause feature. You can restart if needed, but you have to start at the beginning.
When ready, click Start lab.
Note your lab credentials (Username and Password). You will use them to sign in to the Google Cloud Console.
Click Open Google Console.
Click Use another account and copy/paste credentials for this lab into the prompts. If you use other credentials, you'll receive errors or incur charges.
Accept the terms and skip the recovery resource page.
After you complete the initial sign-in steps, the project dashboard appears.
Google Cloud Shell is a virtual machine that is loaded with development tools. It offers a persistent 5GB home directory and runs on the Google Cloud.
Google Cloud Shell provides command-line access to your Google Cloud resources.
In Cloud console, on the top right toolbar, click the Open Cloud Shell button.
Click Continue.
It takes a few moments to provision and connect to the environment. When you are connected, you are already authenticated, and the project is set to your PROJECT_ID. For example:
gcloud is the command-line tool for Google Cloud. It comes pre-installed on Cloud Shell and supports tab-completion.
Output:
Example output:
Output:
Example output:
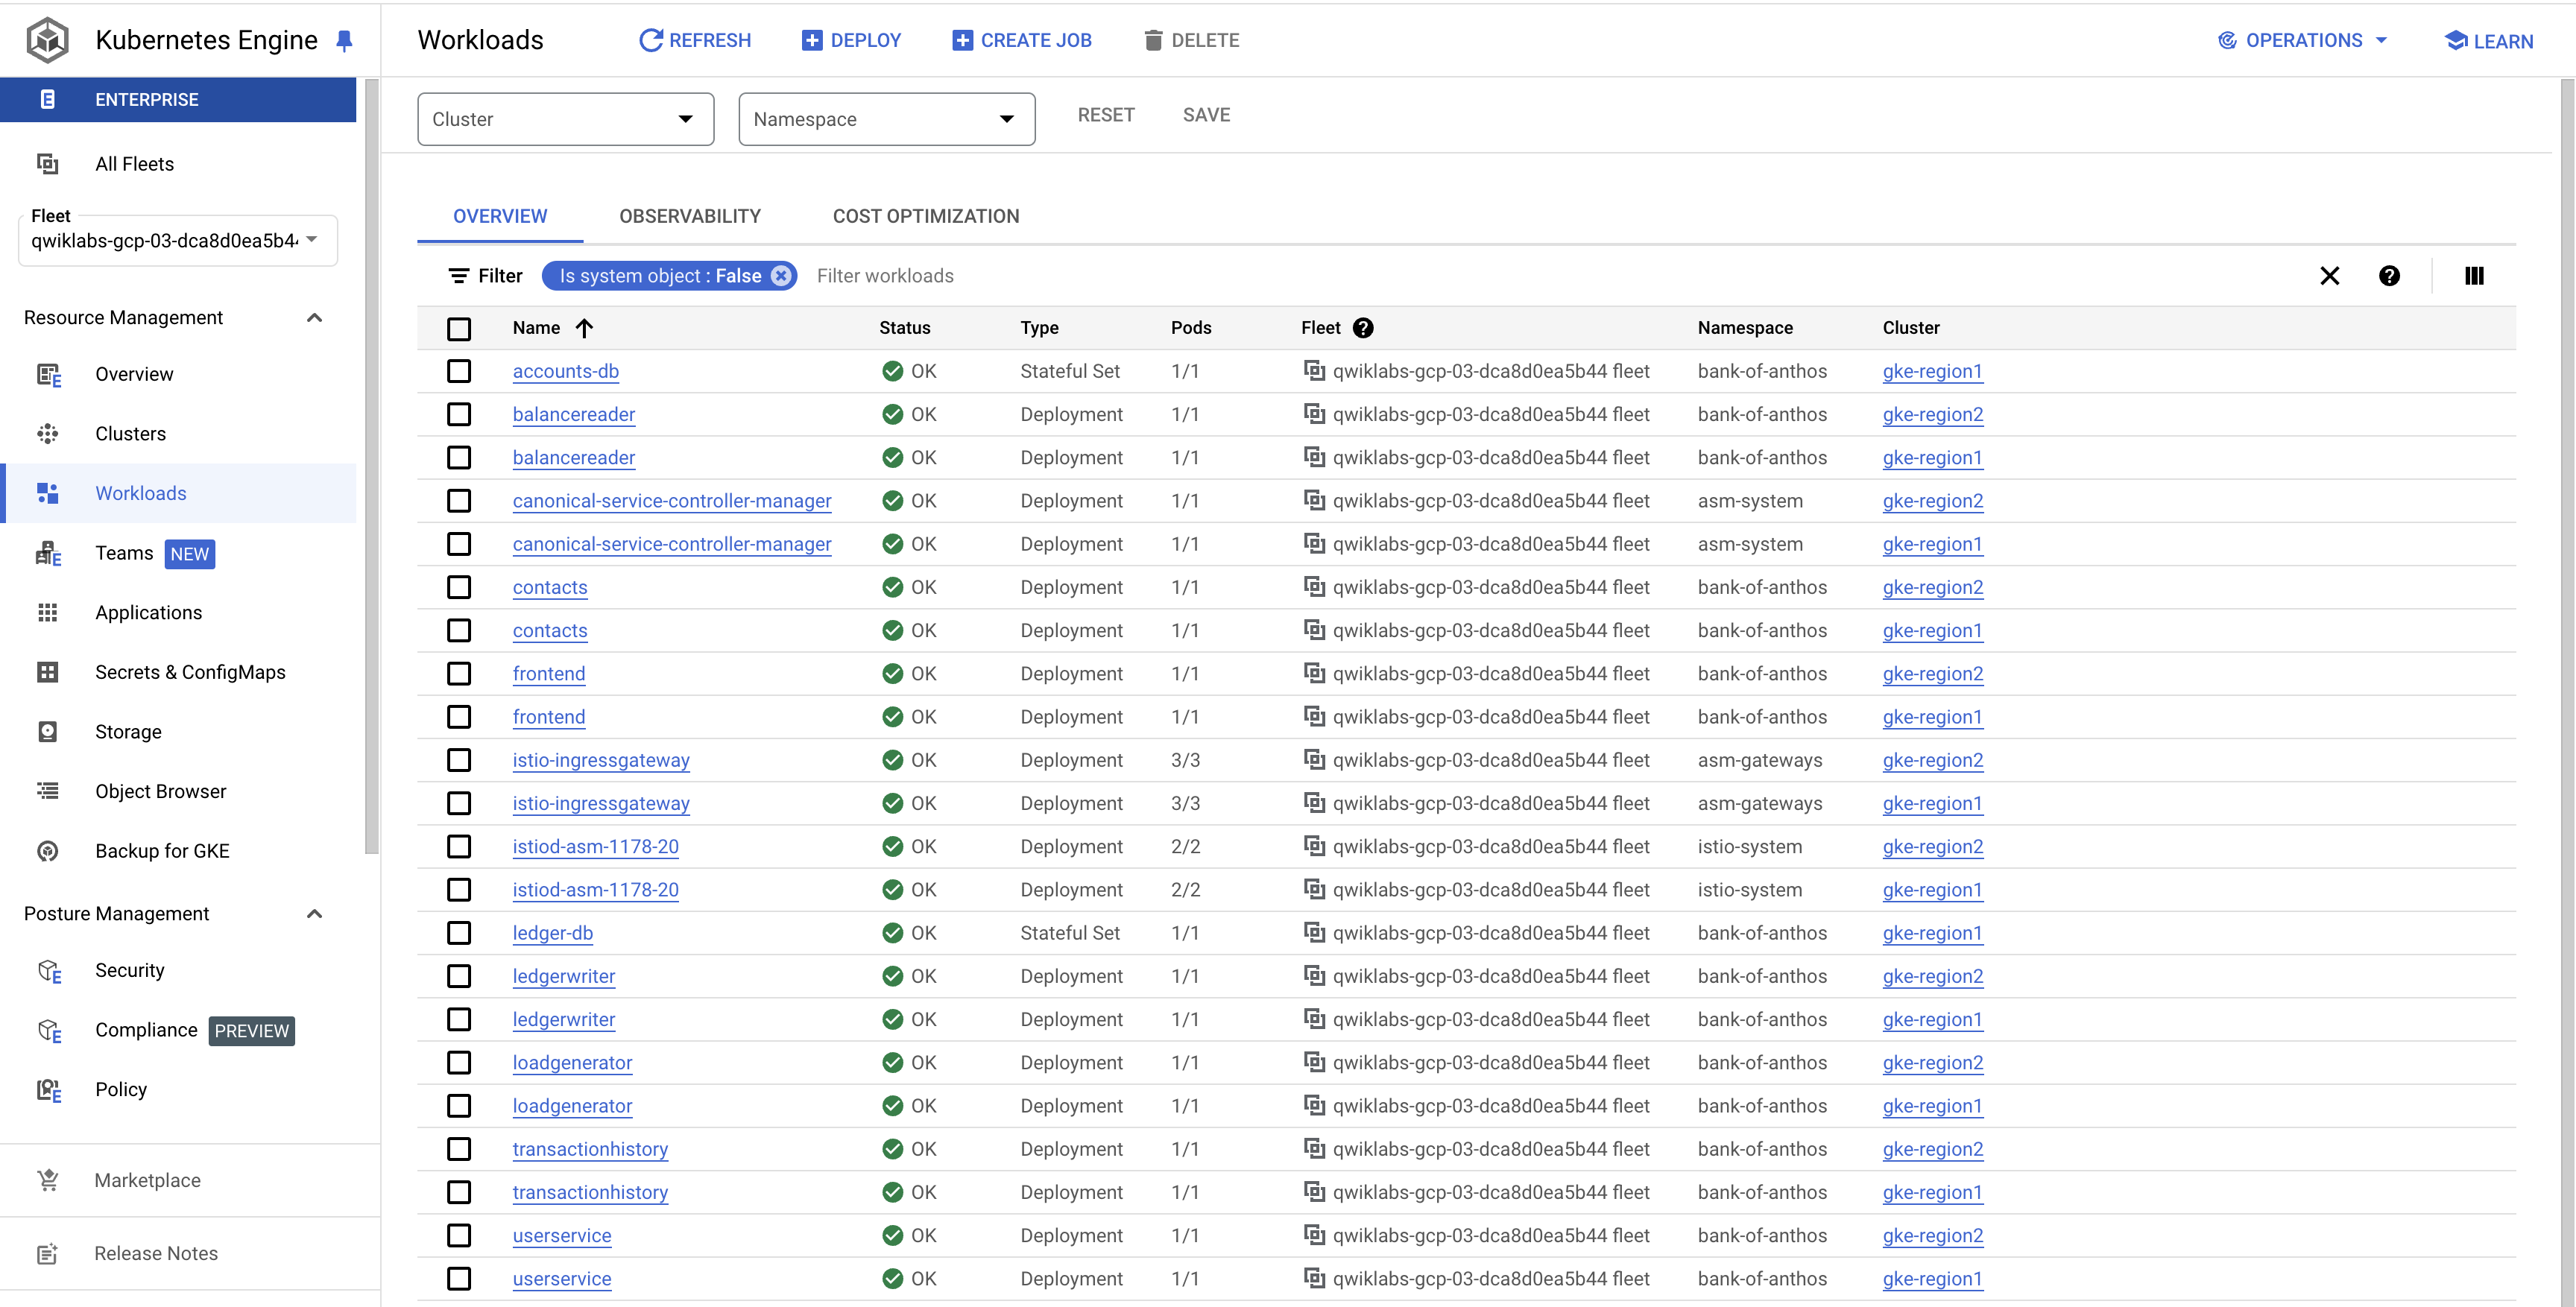
On the Navigation menu, click Kubernetes Engine > Clusters, and verify that two Anthos clusters are registered.
In the navigation pane, click Workloads, and verify that every microservice is deployed on both GKE clusters except from the two databases, accounts-db and ledger-db, which are only running in gke-region1.
This component provides a public IP address, creates a Cloud Load Balancer, and enables access to the application from outside the cluster.
To open websites, click on the IP addresses for each of the instances of istio-ingressgateway.
This will open the sign-in page for each website.
Click Sign In to sign in with an existing test user.
Deposit funds or send a payment, which will create a new transaction on the shared database.
Refresh the pages and confirm that both Transaction History and Current Balance are the same across clusters.
In this task, you delete all frontend pods in one cluster to force the traffic to be routed to the other cluster from the ingress gateway. That simulates a scenario where an application might be unavailable due to an upgrade or a spike in traffic.
In the Google Cloud Console, return to Kubernetes Engine > Workloads.
To open the dashboard, click on the frontend deployment in the gke-region2 cluster.
On the Actions dropdown, select Scale > Edit replicas.
Enter 0 replicas, and click Scale.
Return to the istio-ingressgateways IP addresses that you opened before.
The application should continue to work.
Congratulations! You successfully tested your application resiliency. You removed all pods from one cluster, and the application continued to work without experiencing any downtime.
To return to the home page of the Anthos Service Mesh dashboard, on the Navigation menu, click Anthos > Service Mesh.
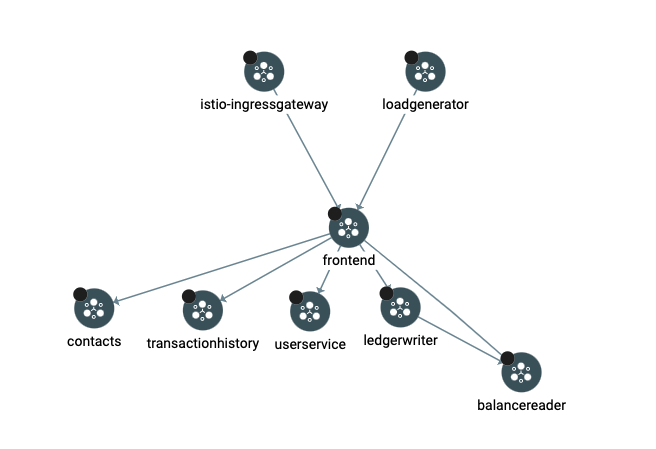
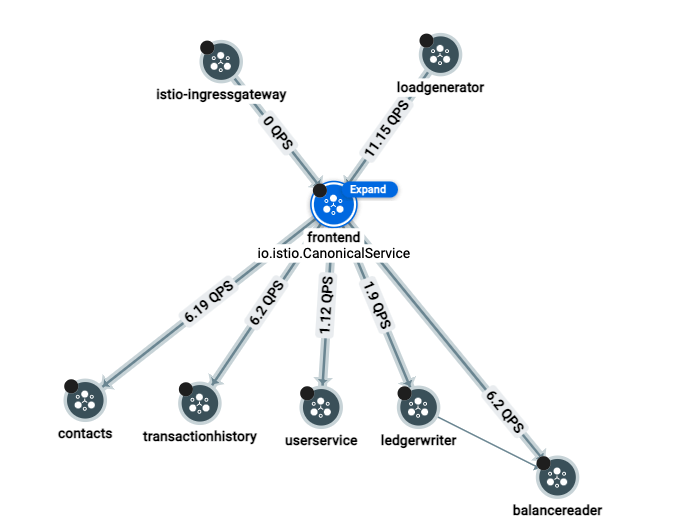
Under Topology View. A chart that represents your service mesh is displayed.
Take a couple of minutes to explore further and better understand the architecture of the application. You can rearrange nodes, drill down into workloads to see constituent deployments and pods, change time spans, investigate queries per second (QPS), etc.
Under List View. A list of distributed services in your mesh across your two clusters is displayed.
Click on the frontend service. This displays an overview of the inbound and outbound services it is communicating with. Also, you can see the golden signals: latency, traffic, errors, and saturation.
Click Metrics. This displays a default dashboard that is automatically created for each service on a mesh. It provides breakdown metrics on requests per second, error rates, latencies, and more.
Click Health. Here you can create Service Level Objectives (SLOs) to make sure that your metrics are always within certain parameters, so that you can monitor and alert when certain thresholds are surpassed.
Click Create SLO.
Select Latency as the metric, and click Continue.
Set the latency threshold to 350 ms, and click Continue.
Set the Period length to Calendar day, and set the Goal to 99.5%.
Click Continue.
Review the details and check the JSON object in case you might want to automate this operation in the future, and then click Create SLO.
Notice that the created SLO is already out-of-budget. You could also set up an alert so that when this happens you can investigate any possible problems. This helps you understand and tune your services to provide a better user experience.
Congratulations!You learned to view the topology of your service mesh, viewed service metrics, and set up SLOs.
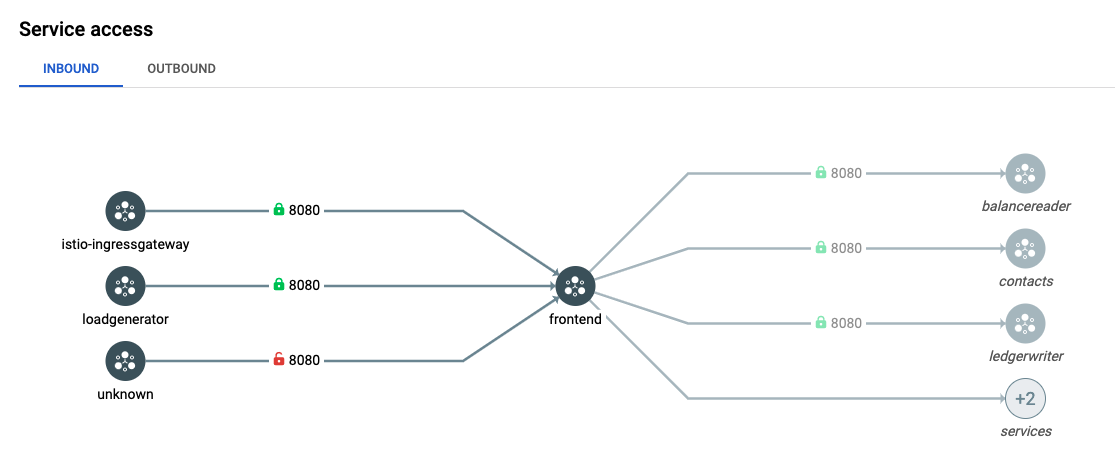
Notice that all service to service communication has a green lock. That's because all the communication is encrypted over mutual TLS. Also, notice that an unknown source has an open red lock. That means that an unauthenticated agent is accessing the frontend service that is communicating over plain text. This unauthenticated agent is the browser.
The table at the bottom of the page also shows the HTTP operations that clients are allowed to perform on the frontend service. In this case, the ingressgateway and the loadgenerator are allowed to perform HTTP GET and HTTP Post requests, but unauthenticated actors are only able to perform HTTP GET requests.
In this lab, you explored Anthos clusters in the Google Cloud Console and learned about the benefits of using Anthos Service Mesh to create distributed services. You observed distributed services, viewed metrics, set up SLOs, investigated network topology, and verified security and encryption configuration using the Anthos Service Mesh Dashboards.
When you have completed your lab, click End Lab. Google Skills removes the resources you’ve used and cleans the account for you.
You will be given an opportunity to rate the lab experience. Select the applicable number of stars, type a comment, and then click Submit.
The number of stars indicates the following:
You can close the dialog box if you don't want to provide feedback.
For feedback, suggestions, or corrections, please use the Support tab.
Copyright 2026 Google LLC All rights reserved. Google and the Google logo are trademarks of Google LLC. All other company and product names may be trademarks of the respective companies with which they are associated.


此内容目前不可用
一旦可用,我们会通过电子邮件告知您

太好了!
一旦可用,我们会通过电子邮件告知您

一次一个实验
确认结束所有现有实验并开始此实验