Te treści nie są jeszcze zoptymalizowane pod kątem urządzeń mobilnych.
Dla maksymalnej wygody odwiedź nas na komputerze, korzystając z linku przesłanego e-mailem.
Overview
This lab is the first in a series of labs, each of which is intended to build
skills related to the setup and operation of Anthos clusters on bare metal.
You prepare infrastructure, create the admin workstation, create admin
and user clusters, deploy workloads, and manage observability configurations.
Bare metal doesn't always mean bare metal
Anthos clusters on bare metal can indeed run on bare metal servers, but can
also run on virtual machines in VMware, AWS, or even GCE. Doing bare metal
installs doesn't take direct advantage of VMware, AWS, or GKE APIs, it uses
a more generic approach to making Anthos work on your cluster.
In this lab, you run Anthos clusters on bare metal atop of GCE VMs.
This does require a little extra work as the load balancer VMs need Layer 2
connectivity, so you need to configure the VMs to use VXLAN, which
encapsulates Layer 2 connections on a Layer 3 network. In a pure bare metal
deployment, you would just skip this step and everything else would remain
the same.
Objectives
In this lab, you learn how to perform the following tasks:
Configure your network, including firewall rules and Layer 2 connectivity.
Prepare your admin workstation and cluster servers, including SSH setup
and OS configuration.
Install the Anthos on bare metal admin cluster on the created infrastructure.
Setup and requirements
In this task, you perform initialization steps for your lab.
For each lab, you get a new Google Cloud project and set of resources for a fixed time at no cost.
Sign in to Google Skills using an incognito window.
Note the lab's access time (for example, 1:15:00), and make sure you can finish within that time.
There is no pause feature. You can restart if needed, but you have to start at the beginning.
When ready, click Start lab.
Note your lab credentials (Username and Password). You will use them to sign in to the Google Cloud Console.
Click Open Google Console.
Click Use another account and copy/paste credentials for this lab into the prompts.
If you use other credentials, you'll receive errors or incur charges.
Accept the terms and skip the recovery resource page.
After you complete the initial sign-in steps, the project dashboard appears.
Click Select a project, highlight your Google Cloud Project ID, and click
Open to select your project.
Activate Google Cloud Shell
Google Cloud Shell is a virtual machine that is loaded with development tools. It offers a persistent 5GB home directory and runs on the Google Cloud.
Google Cloud Shell provides command-line access to your Google Cloud resources.
In Cloud console, on the top right toolbar, click the Open Cloud Shell button.
Click Continue.
It takes a few moments to provision and connect to the environment. When you are connected, you are already authenticated, and the project is set to your PROJECT_ID. For example:
gcloud is the command-line tool for Google Cloud. It comes pre-installed on Cloud Shell and supports tab-completion.
You can list the active account name with this command:
[core]
project = qwiklabs-gcp-44776a13dea667a6
Note:
Full documentation of gcloud is available in the
gcloud CLI overview guide
.
Task 1. Confirm your network setup
To reflect real-world best practices, your project has been configured as
follows:
The Default network has been deleted.
A custom subnet network has been created.
Two firewall rules have been created. The first allows traffic from Identity Aware Proxy (IAP), so you can SSH to internal VMs without opening port 22 to the internet. The second is used to allow vxlan networking - more on this later in the lab.
Check the starting network configuration
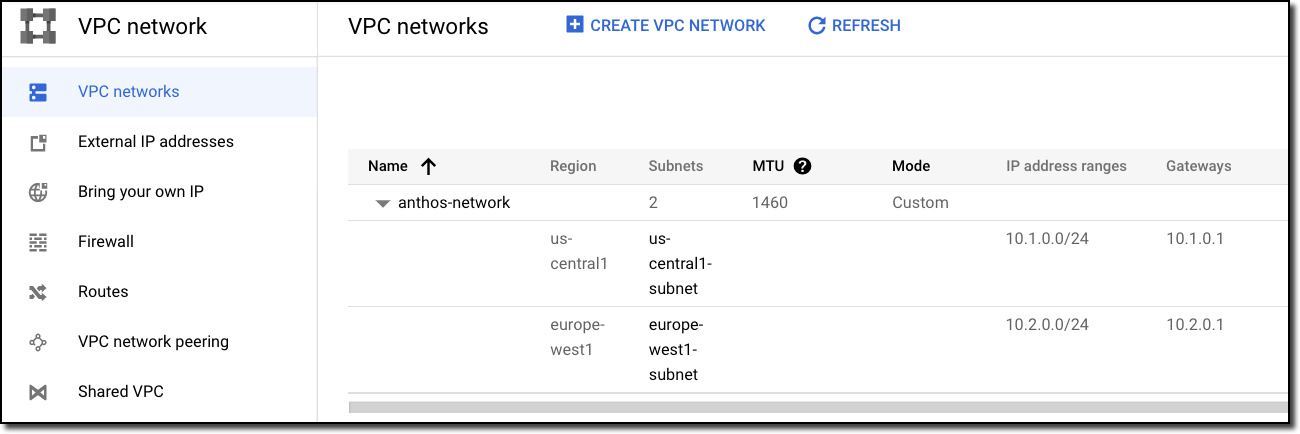
In the Console, go to Navigation > VPC network > VPC networks and verify
that you have a single custom subnet network. It should look like this:
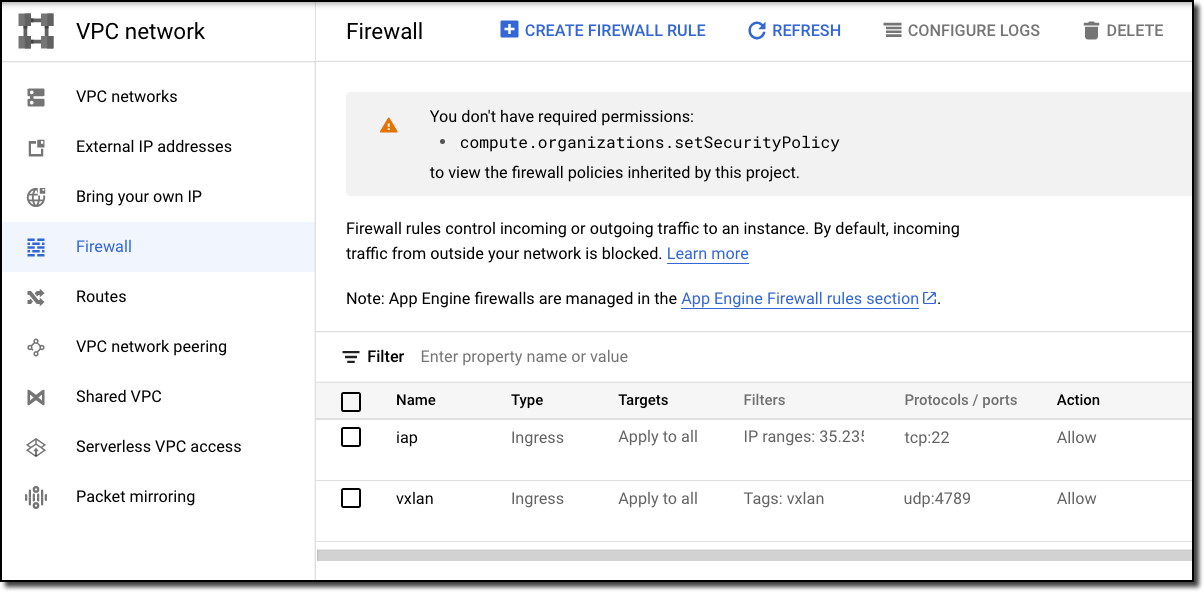
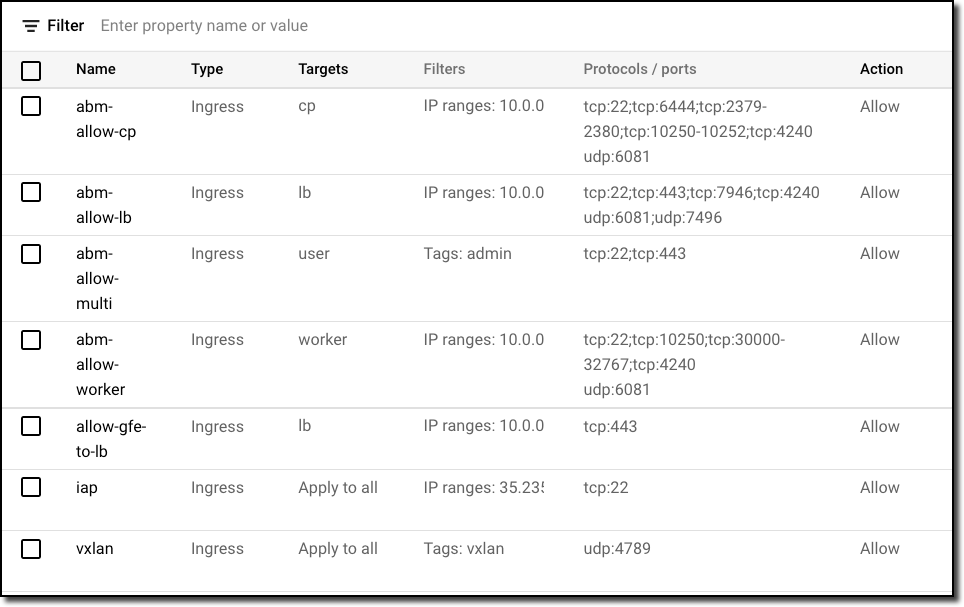
Go to Navigation > VPC network > Firewall and verify that you have two
firewall rules - one that only allows inbound SSH traffic via IAP, and one
that enables vxlan traffic. It should look like this:
Task 2. Create your server infrastructure
When you create Anthos clusters in Google Cloud, AWS, or VMware,
you typically use an environment-specific installation process that
takes advantage of native APIs.
When you create a bare metal cluster, the installation process doesn't
automatically create machines for you (typically, they are physical
machines so they can't be created out of thin air). That doesn't mean,
however, that you can't create "bare metal" clusters running on VMs
in any of those environments.
In this lab, you create a "bare metal" cluster on GCE VMs. It behaves almost
identically to a bare metal cluster running on physical devices in your data
center. The lab instructions highlight where the installation or administration
deviates from a pure bare metal scenario.
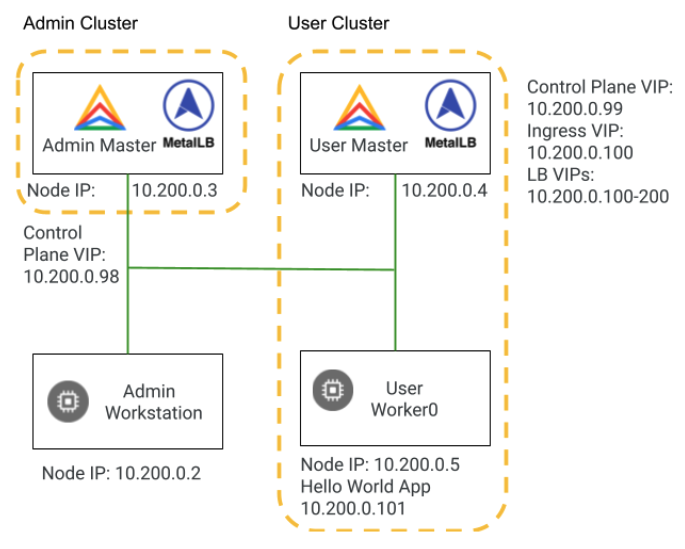
You will be building two clusters in the following labs (see diagram below).
The admin cluster, which you build in this lab, has a control plane node and no
worker nodes. The user cluster has a control plane node, and a worker node.
In a production environment, you might consider using three nodes for high
availability of both the data and the control plane.
Initialize state
In Cloud Shell, initialize environment variables you use in later commands:
# configure environment variables with project id and zone
export PROJECT_ID=$(gcloud config get-value project)
export ZONE=us-central1-a
# configure environment variable for machine type
WS_MACHINE_TYPE=e2-standard-4
CLUSTER_MACHINE_TYPE=e2-standard-4
# configure environment variables for server names
VM_PREFIX=abm
VM_WS=$VM_PREFIX-ws
VM_A_CP1=$VM_PREFIX-admin-cp1
VM_U_CP1=$VM_PREFIX-user-cp1
VM_U_W1=$VM_PREFIX-user-w1
# create arrays of the server names
declare -a VMs=("$VM_WS" "$VM_A_CP1" "$VM_U_CP1" "$VM_U_W1")
declare -a ADMIN_CP_VMs=("$VM_A_CP1")
declare -a USER_CP_VMs=("$VM_U_CP1")
declare -a USER_WORKER_VMs=("$VM_U_W1")
declare -a LB_VMs=("$VM_A_CP1" "$VM_U_CP1")
# create an array to hold the IP addresses of the servers
declare -a IPs=()
Build the GCE VMs that act as bare metal servers
Create the VM to be used as your admin workstation:
# loop through the array of server names
# for each server name, create a GCE VM
# add the new VM IP address to IP array
for vm in "${VMs[@]:1}"
do
gcloud compute instances create $vm \
--image-family=ubuntu-2204-lts \
--image-project=ubuntu-os-cloud \
--zone=${ZONE} \
--boot-disk-size 128G \
--boot-disk-type pd-standard \
--can-ip-forward \
--network anthos-network \
--subnet us-central1-subnet \
--scopes cloud-platform \
--machine-type $CLUSTER_MACHINE_TYPE \
--metadata=os-login=FALSE \
--verbosity=error
IP=$(gcloud compute instances describe $vm --zone ${ZONE} \
--format='get(networkInterfaces[0].networkIP)')
IPs+=("$IP")
done
Note: Questions
What operating system is being used on the servers?
What kind of machine is being provisioned?
Why is IP forwarding being enabled?
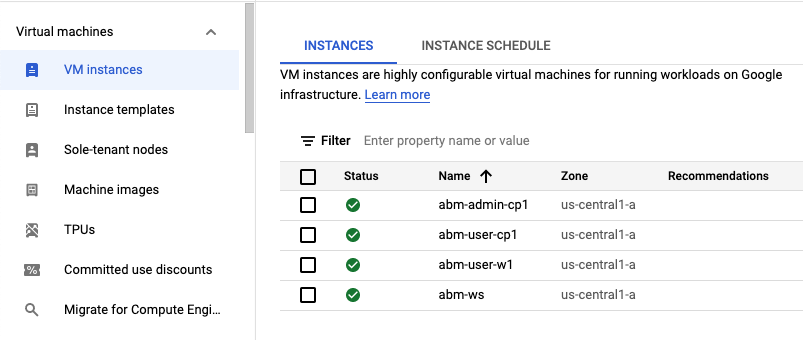
In the Console, go to Navigation > Compute Engine > VM instances and
confirm the VMs have been created. It should look like this:
In Cloud Shell, assign appropriate network tags to the servers,
based on their roles (these tags are used to control firewall rule
application):
for vm in "${ADMIN_CP_VMs[@]}"
do
gcloud compute instances add-tags $vm --zone ${ZONE} \
--tags="cp,admin"
done
for vm in "${USER_CP_VMs[@]}"
do
gcloud compute instances add-tags $vm --zone ${ZONE} \
--tags="cp,user"
done
for vm in "${USER_WORKER_VMs[@]}"
do
gcloud compute instances add-tags $vm --zone ${ZONE} \
--tags="worker,user"
done
for vm in "${LB_VMs[@]}"
do
gcloud compute instances add-tags $vm --zone ${ZONE} \
--tags="lb"
done
for vm in "${VMs[@]}"
do
gcloud compute instances add-tags $vm --zone ${ZONE} \
--tags="vxlan"
done
Configure the required IAM Roles for the Compute Engine VMs
In your Google Cloud Console, navigate to IAM & Admin.
In the IAM tab, find the Compute Engine service account. It looks like PROJECT_NUMBER-compute@developer.gserviceaccount.com.
Click on Edit Principal.
Click on +Add another role to add the following roles:
Project IAM Admin
Service Account Admin
Service Account Key Admin
Service Usage Admin
Click Save.
Configure the server OS as required for bare metal Anthos
Note: You must configure the base operating system of your node machines to
use Anthos clusters on bare metal. Specifically, on Ubuntu,
Uncomplicated Firewall (UFW) needs to be disabled. For more information, see the
Configure Ubuntu documentation.
You will disable UFW with a script that loops through a list of VM
names, establishes an SSH connection into each VM, and runs the command
to disable UFW.
Disable Uncomplicated Firewall (UFW) on each of the servers:
for vm in "${VMs[@]}"
do
echo "Disabling UFW on $vm"
gcloud compute ssh root@$vm --zone ${ZONE} --tunnel-through-iap << EOF
sudo ufw disable
EOF
done
Configure the servers for L2 connectivity
Note: With bare metal clusters, load balancer nodes need L2 connectivity. GCE
uses Software Defined Networking that doesn't provide L2 connectivity
between servers. So, in order to deploy a bare metal cluster on GCE VMs,
you need to configure the VMs with equivalent functionality.
Virtual Extensible LAN (VXLAN)
is a network virtualization technology that encapsulates L2 Ethernet
frames on an underlying L3 network. You configure this feature
on your servers for this lab.
It's likely that you would skip this step, or use alternate means of establishing L2 connectivity, if using physical servers in
your data center.
Configure each VM to implement vxlan functionality; each VM gets an
IP address in the 10.200.0.x range:
i=2
for vm in "${VMs[@]}"
do
gcloud compute ssh root@$vm --zone ${ZONE} --tunnel-through-iap << EOF
# update package list on VM
apt-get -qq update > /dev/null
apt-get -qq install -y jq > /dev/null
# print executed commands to terminal
set -x
# create new vxlan configuration
ip link add vxlan0 type vxlan id 42 dev ens4 dstport 4789
current_ip=\$(ip --json a show dev ens4 | jq '.[0].addr_info[0].local' -r)
echo "VM IP address is: \$current_ip"
for ip in ${IPs[@]}; do
if [ "\$ip" != "\$current_ip" ]; then
bridge fdb append to 00:00:00:00:00:00 dst \$ip dev vxlan0
fi
done
ip addr add 10.200.0.$i/24 dev vxlan0
ip link set up dev vxlan0
EOF
i=$((i+1))
done
Check the vxlan IPs that have been associated with each of the VMs:
i=2
for vm in "${VMs[@]}";
do
echo $vm;
gcloud compute ssh root@$vm --zone ${ZONE} --tunnel-through-iap --command="hostname -I";
i=$((i+1));
done
Configure the network firewall rules to allow Anthos traffic
Note: Currently, your VPC network does NOT have firewall
rules that allow required Anthos connections to be established with the
servers. You must configure firewall rules to allow this traffic.
Since you are using GCE VMs, you will use GCE firewall rules. In an
on-premises network, you would use other mechanisms, but strive to accomplish
the same connectivity. For details, see the
Network requirements documentation.
Create the firewall rules that allow traffic to the control plane servers:
Create the firewall rules that allow inbound traffic to the load balancer
nodes. In our case, the load balancer is hosted in the same node as the
admin cluster control plane node.
Create the firewall rules that allow multi-cluster traffic. This allows the
communication between the admin and the user cluster. If you were deploying an
Anthos cluster on bare metal of type hybrid or standalone with no other
user clusters, you would not need these firewall rules.
In the Console, confirm the creation of the firewall rules by visiting
Navigation > VPC network > Firewall. It should look like this:
Congratulations! You have set up your Google Cloud project, your network, and the servers that will be used by your bare metal cluster.
Task 3. Set up the admin workstation
In this task you prepare your admin workstation. This includes:
Installing and configuring the Google Cloud SDK.
Installing kubectl and bmctl and Docker.
You also configure your cluster servers to allow SSH sessions from the
admin workstation, so it can do its work.
Install tools
If you don't already have an open, active Cloud Shell session, open Cloud
Shell. Then, initialize key variables in Cloud Shell:
export PROJECT_ID=$(gcloud config get-value project)
export ZONE=us-central1-a
# configure environment variables for server names
VM_PREFIX=abm
VM_WS=$VM_PREFIX-ws
VM_A_CP1=$VM_PREFIX-admin-cp1
VM_U_CP1=$VM_PREFIX-user-cp1
VM_U_W1=$VM_PREFIX-user-w1
# create arrays of the server names
declare -a VMs=("$VM_WS" "$VM_A_CP1" "$VM_U_CP1" "$VM_U_W1")
declare -a ADMIN_CP_VMs=("$VM_A_CP1")
declare -a USER_CP_VMs=("$VM_U_CP1")
declare -a USER_WORKER_VMs=("$VM_U_W1")
declare -a LB_VMs=("$VM_A_CP1" "$VM_U_CP1")
SSH from the Cloud Shell VM into the machine you will use as your admin
workstation:
# enable ssh-agent
eval `ssh-agent`
# add your identity
ssh-add ~/.ssh/google_compute_engine
# ssh into the admin workstation with authentication forwarding
gcloud compute ssh --ssh-flag="-A" root@$VM_WS \
--zone ${ZONE} \
--tunnel-through-iap
In the SSH session to your admin workstation, set an environment variable:
Note: You need the Google Cloud SDK installed on your
admin workstation. In the Compute Engine VMs, the SDK is already
installed. So you remove it and then install it again to recreate
all the steps that you would need to perform in a physical environment.
Install the SDK onto the admin workstation. When prompted, enter the replies
shown in the table that follows the command:
# remove the GCE-specific version of the SDK
snap remove google-cloud-sdk
# install the SDK as you would on a non-GCE server
curl https://sdk.cloud.google.com | bash
Prompt
Value
Installation Directory
root (default)
Do you want to help...
N (default)
Do you want to continue ($PATH update)
Y (default)
Enter a path...
/root/.bashrc (default)
Restart your shell, then configure the Application Default Credentials
on your server:
# restart your shell
exec -l $SHELL
# Create keys for a service account with the same permissions as the lab user
gcloud iam service-accounts keys create installer.json \
--iam-account=${PROJECT_ID}@${PROJECT_ID}.iam.gserviceaccount.com
# set the Application Default Credentials
export GOOGLE_APPLICATION_CREDENTIALS=~/installer.json
Note: You need kubectl installed on your admin
workstation.
Use gcloud to install kubectl on the admin workstation:
Note: The installation process requires Docker on your admin
workstation.
Download and install Docker:
cd ~
echo "Installing docker"
curl -fsSL https://get.docker.com -o get-docker.sh
sh get-docker.sh
Confirm that Docker was successfully installed:
docker version
You should see output that looks similar to this:
Client: Docker Engine - Community
Version: 24.0.5
API version: 1.43
Go version: go1.20.6
Git commit: ced0996
Built: Fri Jul 21 20:35:23 2023
OS/Arch: linux/amd64
Context: default
...
Configure servers to allow SSH from admin workstation
In order for the admin workstation to configure all the servers in your clusters, the bmctl utility must be able to SSH into the servers. You are going to configure the servers to allow this by creating an SSH key pair for the admin workstation, then configuring each cluster server to allow SSH connections using the private key from that key pair.
In your SSH session to the admin workstation, create a new key pair with the
following command:
ssh-keygen -t rsa
When prompted, enter the following replies:
Prompt
Value
Enter file in which...
/root/.ssh/id_rsa (default)
Enter passphrase
<ENTER> (no passphrase)
Enter same passphrase...
<ENTER> (no passphrase)
Configure all the cluster machines to accept this key for SSH
sessions with the following commands:
VM_PREFIX=abm
VM_WS=$VM_PREFIX-ws
VM_A_CP1=$VM_PREFIX-admin-cp1
VM_U_CP1=$VM_PREFIX-user-cp1
VM_U_W1=$VM_PREFIX-user-w1
declare -a VMs=("$VM_WS" "$VM_A_CP1" "$VM_U_CP1" "$VM_U_W1")
for vm in "${VMs[@]:1}"
do
ssh-copy-id -o StrictHostKeyChecking=no -i ~/.ssh/id_rsa.pub root@$vm
done
Install kubectx on the admin workstation with the following commands:
Congratulations! You have set up and configured your admin workstation, and are now ready to use it to create and manage Anthos admin and user clusters.
Task 4. Create your admin cluster
In this task, you will create your admin cluster. This includes:
Enabling Anthos-related services.
Creating Anthos-required service accounts.
Creating and editing the admin cluster configuration file.
Building and connecting to an Anthos admin cluster.
Create the configuration file
In Cloud Shell, where you have an active SSH session into the admin
workstation, initialize some key environment variables:
# configure environment variables
export ZONE=us-central1-a
export SSH_PRIVATE_KEY=/root/.ssh/id_rsa
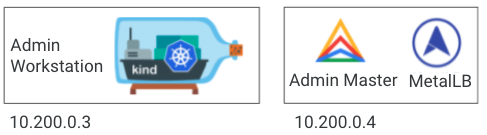
export LB_CONTROLL_PLANE_NODE=10.200.0.3
export LB_CONTROLL_PLANE_VIP=10.200.0.98
# create additional arrays of the server names
declare -a ADMIN_CP_VMs=("$VM_A_CP1")
declare -a USER_CP_VMs=("$VM_U_CP1")
declare -a USER_WORKER_VMs=("$VM_U_W1")
declare -a LB_VMs=("$VM_A_CP1" "$VM_U_CP1")
Note: You need a variety of services activated in your project in order
to use Anthos. These include:
container.googleapis.com
gkeconnect.googleapis.com
gkehub.googleapis.com
cloudresourcemanager.googleapis.com
anthos.googleapis.com
anthosgke.googleapis.com
anthosaudit.googleapis.com
serviceusage.googleapis.com
stackdriver.googleapis.com
monitoring.googleapis.com
logging.googleapis.com
The bmctl tool can enable these services for you. You use this feature, then manually verify that the services are
enabled by looking at the APIs & Services Dashboard.
Use the bmctl tool to enable APIs, create service accounts, and generate
a configuration file:
cd ~/baremetal
bmctl create config -c abm-admin-cluster --enable-apis --create-service-accounts --project-id=$PROJECT_ID
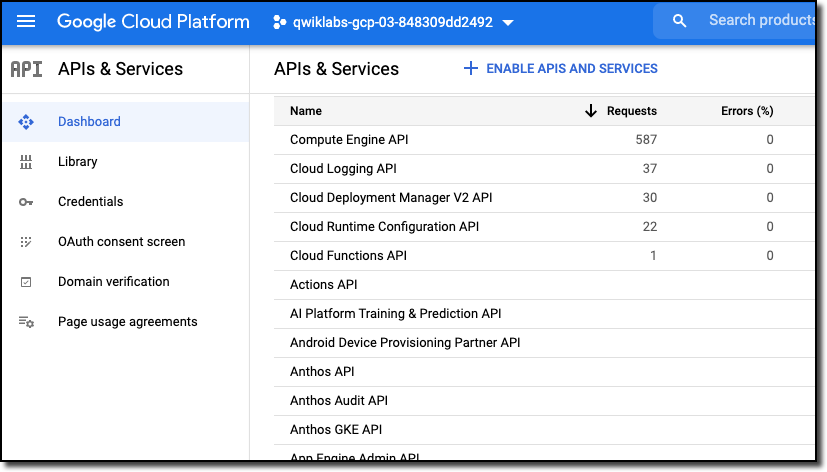
Check that the services are activated by going to
Navigation > APIs & Services > Dashboard. You should see the enabled
services in the list, like this:
If for some reason you don't see the Anthos services listed, it's likely
an issue with updating the list. You can search for one of the APIs in the
search bar at the top of the screen and see that it's enabled, or you
can take it on faith and continue.
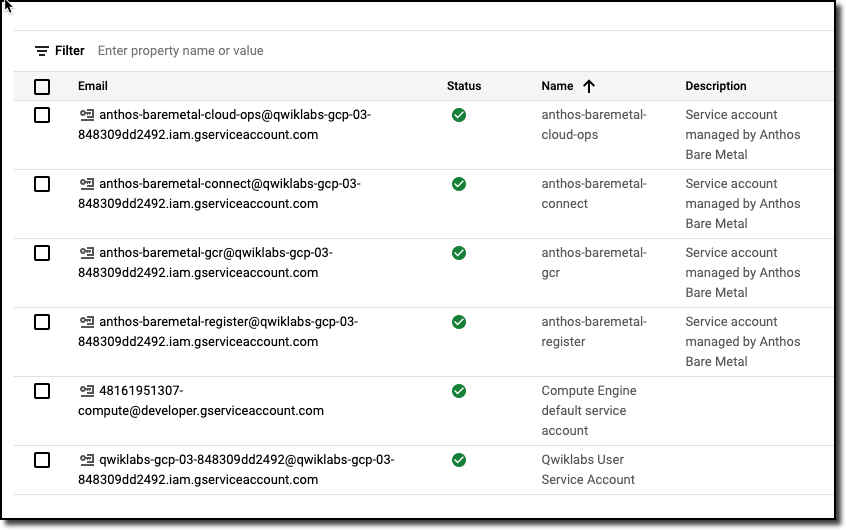
Note: The bmctl utility also creates services accounts required by the admin cluster, and grants those service accounts the appropriate permissions.
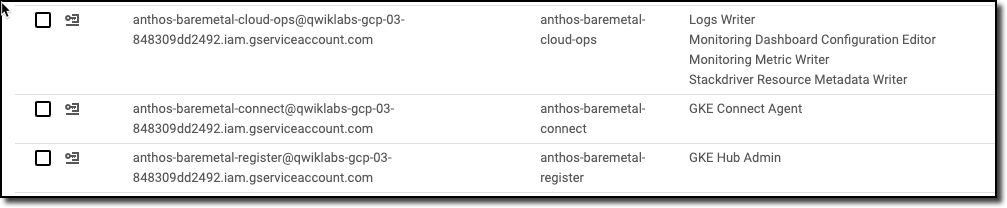
Check that the service accounts have been created by going to
Navigation > IAM & Admin > Service Accounts. You should see the newly
created service accounts:
Check the roles assigned to your service accounts by going to
Navigation > IAM & Admin > IAM. You should see the newly
created service accounts and their role assignment:
Check the key files for your service accounts have been downloaded:
ls bmctl-workspace/.sa-keys/
You should see the newly created service accounts and their role assignment:
While bmctl creates a draft configuration file, you need to make multiple edits to make the file usable. The instructions below walk you through the process.
To avoid mistakes, there are commands that pre-fill the information.
If you want to edit the file yourself, you can, just keep in mind that
spaces and indents count in YAML files, so be careful that you get
positioning correct.
Modify the config file by updating the following lines with the
values suggested below. You can either edit the file by hand in the
vi, or you can run the commands provided to update the
file for you.
Key
Value
spec:type
admin
sshPrivateKeyPath
/root/.ssh/id_rsa
controlPlane:nodePoolSpec:nodes
- address: 10.200.0.3
loadBalancer:vips:controlPlaneVIP
10.200.0.98
[automated update commands]
sed -r -i "s|sshPrivateKeyPath: <path to SSH private key, used for node access>|sshPrivateKeyPath: $(echo $SSH_PRIVATE_KEY)|g" bmctl-workspace/abm-admin-cluster/abm-admin-cluster.yaml
sed -r -i "s|type: hybrid|type: admin|g" bmctl-workspace/abm-admin-cluster/abm-admin-cluster.yaml
sed -r -i "s|- address: <Machine 1 IP>|- address: $(echo $LB_CONTROLL_PLANE_NODE)|g" bmctl-workspace/abm-admin-cluster/abm-admin-cluster.yaml
sed -r -i "s|controlPlaneVIP: 10.0.0.8|controlPlaneVIP: $(echo $LB_CONTROLL_PLANE_VIP)|g" bmctl-workspace/abm-admin-cluster/abm-admin-cluster.yaml
Note: For the clusterOperations subkeys, there are existing lines that you can uncomment and edit.
The keypath values were automatically populated for you, as was the cluster type.
Question: What is the pre-populated value for the spec:type key?
Delete the entire NodePool section of the configuration file. Typically,
admin clusters don't need worker nodes. You can do this manually or use
the following command to automate the modification:
head -n -11 bmctl-workspace/abm-admin-cluster/abm-admin-cluster.yaml > temp_file && mv temp_file bmctl-workspace/abm-admin-cluster/abm-admin-cluster.yaml
If you haven't already, review the modified admin cluster configuration
file:
Create your admin cluster with the following command:
bmctl create cluster -c abm-admin-cluster
It will take about 20 minutes for your cluster creation to complete.
Wait until the cluster creation is done before moving to the next task.
Task 5. Understand the admin bootstrap process and learn to troubleshoot
In order to create the admin cluster, Anthos must execute some scripts that
connect to the worker nodes and install the necessary software. Instead of
running the scripts directly on the admin-workstation, Anthos creates a
temporary Kind cluster on the admin-workstation
that runs those scripts as Kubernetes Jobs, and makes sure that the software is
installed correctly.
You can find the kubeconfig file under bmctl-workspace/.kindkubeconfig,
which you can use to access the Kind Kubernetes API to view logs and debug the
admin cluster creation process. To simplify the debugging process, and be able
to access the information after the creation has completed, the Kind
cluster exports the logs onto the admin-workstation under the
bmctl-workspace/abm-admin-cluster/log folder.
In the following task, you learn how to access those logs.
In Cloud Shell, find the logs exported in the creation process:
In addition to the create-cluster.log file, there is another file in that folder:
10.200.0.3: contains all the logs produced by the
admin master node. Here, you see checks to verify that the binaries
have been copied and installed (including custom tools, Docker, kubeadm,
kubectl, kubelet), creation of Kubernetes CA certificates and kubeadm
actions like initializing and joining the cluster.
View the admin master node logs:
cat $LATEST_ADMIN_FOLDER/10.200.0.3
Investigate the preflight checks that bmctl performs before creating the
cluster:
export LATEST_PREFLIGHT_FOLDER=$(ls -d bmctl-workspace/abm-admin-cluster/log/preflight* -t | head -n 1)
ls $LATEST_PREFLIGHT_FOLDER
Note: These are the preflight checks that were performed:
10.200.0.3: checks that all files have been copied
to the machine and the node has been added with kubeadm.
10.200.0.3-gcp: checks whether the admin master can
reach the Google Cloud APIs and the Google Container Registry.
gcp: checks that the service accounts
have been created and contain the right permissions.
node-network: checks that all nodes in the network
are accessible.
You can re-run those checks to diagnose the state of your cluster at any
time once your cluster is created. Running these checks takes 10+ minutes.
To do so, use the bmctl tool.
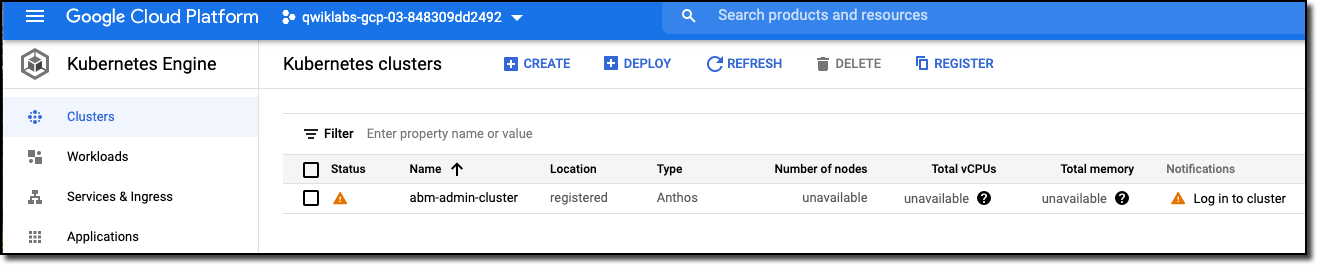
If you get disconnected from Cloud Shell and want to connect to the admin cluster:
# From the admin workstation (root@abm-ws)
export KUBECONFIG=$KUBECONFIG:~/baremetal/bmctl-workspace/abm-admin-cluster/abm-admin-cluster-kubeconfig
kubectx admin
kubectl get nodes
Review
In this lab, you deployed the bare metal infrastructure on GCE and installed
the Anthos on bare metal admin cluster. You also learned how to debug the
cluster creation and how to run health checks in your cluster. Finally, you
logged in through the Google Cloud Console and accessed your on-premises cluster from Google Cloud.
..
End your lab
When you have completed your lab, click End Lab. Google Skills removes the resources you’ve used and cleans the account for you.
You will be given an opportunity to rate the lab experience. Select the applicable number of stars, type a comment, and then click Submit.
The number of stars indicates the following:
1 star = Very dissatisfied
2 stars = Dissatisfied
3 stars = Neutral
4 stars = Satisfied
5 stars = Very satisfied
You can close the dialog box if you don't want to provide feedback.
For feedback, suggestions, or corrections, please use the Support tab.
Copyright 2026 Google LLC All rights reserved. Google and the Google logo are trademarks of Google LLC. All other company and product names may be trademarks of the respective companies with which they are associated.
Moduły tworzą projekt Google Cloud i zasoby na określony czas.
Moduły mają ograniczenie czasowe i nie mają funkcji wstrzymywania. Jeśli zakończysz moduł, musisz go zacząć od początku.
Aby rozpocząć, w lewym górnym rogu ekranu kliknij Rozpocznij moduł.
Użyj przeglądania prywatnego
Skopiuj podaną nazwę użytkownika i hasło do modułu.
Kliknij Otwórz konsolę w trybie prywatnym.
Zaloguj się w konsoli
Zaloguj się z użyciem danych logowania do modułu. Użycie innych danych logowania może spowodować błędy lub naliczanie opłat.
Zaakceptuj warunki i pomiń stronę zasobów przywracania.
Nie klikaj Zakończ moduł, chyba że właśnie został przez Ciebie zakończony lub chcesz go uruchomić ponownie, ponieważ spowoduje to usunięcie wyników i projektu.
Ta treść jest obecnie niedostępna
Kiedy dostępność się zmieni, wyślemy Ci e-maila z powiadomieniem
Świetnie
Kiedy dostępność się zmieni, skontaktujemy się z Tobą e-mailem
Jeden moduł, a potem drugi
Potwierdź, aby zakończyć wszystkie istniejące moduły i rozpocząć ten
Aby uruchomić moduł, użyj przeglądania prywatnego
Najlepszym sposobem na uruchomienie tego laboratorium jest użycie okna incognito lub przeglądania prywatnego. Dzięki temu unikniesz konfliktu między swoim kontem osobistym a kontem do nauki, co mogłoby spowodować naliczanie dodatkowych opłat na koncie osobistym.
Qwikstart - Anthos clusters on bare metal
Czas trwania:
Konfiguracja: 3 min
·
Dostęp na 100 min
·
Ukończono w 100 min