Overview
Cloud Run is a managed compute platform that enables you to run stateless containers that are invocable via HTTP requests. Cloud Run is serverless: it abstracts away all infrastructure management, so you can focus on what matters most — building great applications.
The goal of this lab is for you to build a simple containerized application image and deploy it to Cloud Run.
Objectives
In this lab, you learn to:
- Enable the Cloud Run and Artifact Registry APIs.
- Create a simple Node.js application that can be deployed as a serverless, stateless container.
- Create an Artifact Registry repository.
- Containerize your application and upload it to Artifact Registry.
- Deploy a containerized application on Cloud Run.
- Delete unneeded images to avoid incurring extra storage charges.
Setup and requirements
For each lab, you get a new Google Cloud project and set of resources for a fixed time at no cost.
-
Click the Start Lab button. If you need to pay for the lab, a pop-up opens for you to select your payment method.
On the left is the Lab Details panel with the following:
- The Open Google Cloud console button
- Time remaining
- The temporary credentials that you must use for this lab
- Other information, if needed, to step through this lab
-
Click Open Google Cloud console (or right-click and select Open Link in Incognito Window if you are running the Chrome browser).
The lab spins up resources, and then opens another tab that shows the Sign in page.
Tip: Arrange the tabs in separate windows, side-by-side.
Note: If you see the Choose an account dialog, click Use Another Account.
-
If necessary, copy the Username below and paste it into the Sign in dialog.
{{{user_0.username | "Username"}}}
You can also find the Username in the Lab Details panel.
-
Click Next.
-
Copy the Password below and paste it into the Welcome dialog.
{{{user_0.password | "Password"}}}
You can also find the Password in the Lab Details panel.
-
Click Next.
Important: You must use the credentials the lab provides you. Do not use your Google Cloud account credentials.
Note: Using your own Google Cloud account for this lab may incur extra charges.
-
Click through the subsequent pages:
- Accept the terms and conditions.
- Do not add recovery options or two-factor authentication (because this is a temporary account).
- Do not sign up for free trials.
After a few moments, the Google Cloud console opens in this tab.
Note: To view a menu with a list of Google Cloud products and services, click the Navigation menu at the top-left, or type the service or product name in the Search field.

Activate Google Cloud Shell
Google Cloud Shell is a virtual machine that is loaded with development tools. It offers a persistent 5GB home directory and runs on the Google Cloud.
Google Cloud Shell provides command-line access to your Google Cloud resources.
-
In Cloud console, on the top right toolbar, click the Open Cloud Shell button.

-
Click Continue.
It takes a few moments to provision and connect to the environment. When you are connected, you are already authenticated, and the project is set to your PROJECT_ID. For example:

gcloud is the command-line tool for Google Cloud. It comes pre-installed on Cloud Shell and supports tab-completion.
- You can list the active account name with this command:
gcloud auth list
Output:
Credentialed accounts:
- @.com (active)
Example output:
Credentialed accounts:
- google1623327_student@qwiklabs.net
- You can list the project ID with this command:
gcloud config list project
Output:
[core]
project =
Example output:
[core]
project = qwiklabs-gcp-44776a13dea667a6
Note:
Full documentation of gcloud is available in the
gcloud CLI overview guide
.
Reference
Basic Linux Commands
Below you will find a reference list of a few very basic Linux commands which may be included in the instructions or code blocks for this lab.
| Command --> |
Action |
. |
Command --> |
Action |
|
mkdir (make directory) |
create a new folder |
. |
cd (change directory) |
change location to another folder |
|
ls (list ) |
list files and folders in the directory |
. |
cat (concatenate) |
read contents of a file without using an editor |
| apt-get update |
update package manager library |
. |
ping |
signal to test reachability of a host |
|
mv (move ) |
moves a file |
. |
cp (copy) |
makes a file copy |
|
pwd (present working directory ) |
returns your current location |
. |
sudo (super user do) |
gives higher administration privileges |
Task 1. Enable the Cloud Run API and configure your Shell environment
In this task, you enable the necessary APIs and set up environment variables to simplify your commands.
- From Cloud Shell, enable the Cloud Run API and Artifact Registry API. This allows your project to accept requests for these services:
gcloud services enable run.googleapis.com artifactregistry.googleapis.com
- If you are asked to authorize the use of your credentials, do so. You should then see a successful message similar to this one:
Operation "operations/acf.cc11852d-40af-47ad-9d59-477a12847c9e" finished successfully.
Note: You can also enable the API using the APIs & Services section of the Google Cloud console.
- Set the compute region:
gcloud config set compute/region {{{project_0.default_region | "REGION"}}}
- Create a LOCATION environment variable:
LOCATION="{{{project_0.default_region | Region}}}"
Task 2. Write the sample application
In this task, you will build a simple express-based NodeJS application which responds to HTTP requests.
- In Cloud Shell create a new directory named
helloworld, then move your view into that directory:
mkdir helloworld && cd helloworld
-
Next you'll be creating and editing files. To edit files, use nano or the Cloud Shell Code Editor by clicking on the Open Editor button in Cloud Shell.
-
Create a package.json file, then add the following content to it:
nano package.json
{
"name": "helloworld",
"description": "Simple hello world sample in Node",
"version": "1.0.0",
"main": "index.js",
"scripts": {
"start": "node index.js"
},
"author": "Google LLC",
"license": "Apache-2.0",
"dependencies": {
"express": "^4.17.1"
}
}
Most importantly, the file above contains a start script command and a dependency on the Express web application framework.
-
Press CTRL+X, then Y, then Enter to save the package.json file.
-
Next, in the same directory, create an index.js file, and copy the following lines into it:
nano index.js
const express = require('express');
const app = express();
const port = process.env.PORT || 8080;
app.get('/', (req, res) => {
const name = process.env.NAME || 'World';
res.send(`Hello ${name}!`);
});
app.listen(port, () => {
console.log(`helloworld: listening on port ${port}`);
});
This code creates a basic web server that listens on the port defined by the PORT environment variable. Your app is now finished and ready to be containerized and uploaded to Artifact Registry.
- Press CTRL+X, then Y, then Enter to save the
index.js file
Note: You can use many other languages to get started with Cloud Run. You can find instructions for Go, Python, Java, PHP, Ruby, Shell scripts, and others from the Quickstarts guide.
Task 3. Create an Artifact Registry repository
In this task, you create a repository in Artifact Registry. This repository will act as the storage location for your container images, allowing Google Cloud services to access and pull them.
- Create a new Docker repository named
my-repository in your region:
gcloud artifacts repositories create my-repository \
--repository-format=docker \
--location=$LOCATION \
--description="Docker repository"
- Configure Docker to authenticate requests for Artifact Registry in your region:
gcloud auth configure-docker $LOCATION-docker.pkg.dev
Click Check my progress to verify the objective.
Create an Artifact Registry repository
Task 4. Containerize your app and upload it to Artifact Registry
In this task, you containerize your sample application and push the image to Artifact Registry.
- To containerize the sample app, create a new file named
Dockerfile in the same directory as the source files. This file acts as a recipe, instructing Docker how to build your image:
nano Dockerfile
# Use the official lightweight Node.js 12 image.
# https://hub.docker.com/_/node
FROM node:20-slim
# Create and change to the app directory.
WORKDIR /usr/src/app
# Copy application dependency manifests to the container image.
# A wildcard is used to ensure copying both package.json AND package-lock.json (when available).
# Copying this first prevents re-running npm install on every code change.
COPY package*.json ./
# Install production dependencies.
# If you add a package-lock.json, speed your build by switching to 'npm ci'.
# RUN npm ci --only=production
RUN npm install --only=production
# Copy local code to the container image.
COPY . ./
# Run the web service on container startup.
CMD [ "npm", "start" ]
-
Press CTRL+X, then Y, then Enter to save the Dockerfile file.
-
Now, build your container image using Cloud Build by running the following command from the directory containing the Dockerfile. (Note the $GOOGLE_CLOUD_PROJECT environmental variable in the command, which contains your lab's Project ID):
gcloud builds submit --tag $LOCATION-docker.pkg.dev/$GOOGLE_CLOUD_PROJECT/my-repository/helloworld
Cloud Build is a service that executes your builds on Google Cloud. It executes a series of build steps, where each build step is run in a Docker container to produce your application container (or other artifacts) and push it to Artifact Registry, all in one command.
Once pushed to the registry, you will see a SUCCESS message containing the image name. The image is stored in Artifact Registry and can be re-used if desired.
- To run and test the application locally from Cloud Shell, start it using this standard
docker command:
docker run -d -p 8080:8080 $LOCATION-docker.pkg.dev/$GOOGLE_CLOUD_PROJECT/my-repository/helloworld
- In the Cloud Shell window, click on Web preview and select Preview on port 8080.
This should open a browser window showing the "Hello World!" message. You could also simply use curl localhost:8080.
Click Check my progress to verify the objective.
Containerize your app and upload it to Artifact Registry
Task 5. Deploy to Cloud Run
In this task, you deploy your containerized application to Cloud Run. This process spins up a service that can respond to web requests via a secure HTTPS URL.
- Deploy your containerized application to Cloud Run using the following command:
gcloud run deploy helloworld \
--image $LOCATION-docker.pkg.dev/$GOOGLE_CLOUD_PROJECT/my-repository/helloworld \
--allow-unauthenticated \
--region=$LOCATION
The allow-unauthenticated flag in the command above makes your service publicly accessible.
- If prompted to enable APIs, type Y.
Wait a few moments until the deployment is complete. On success, the command line displays the service URL:
Service [helloworld] revision [helloworld-00001-xit] has been deployed
and is serving 100 percent of traffic.
Service URL: https://helloworld-h6cp412q3a-uc.a.run.app
You can now visit your deployed container by opening the service URL in any browser window.
Congratulations! You have just deployed an application packaged in a container image to Cloud Run. Cloud Run automatically and horizontally scales your container image to handle the received requests, then scales down when demand decreases. In your own environment, you only pay for the CPU, memory, and networking consumed during request handling.
For this lab you used the gcloud command-line. Cloud Run is also available via Cloud console.
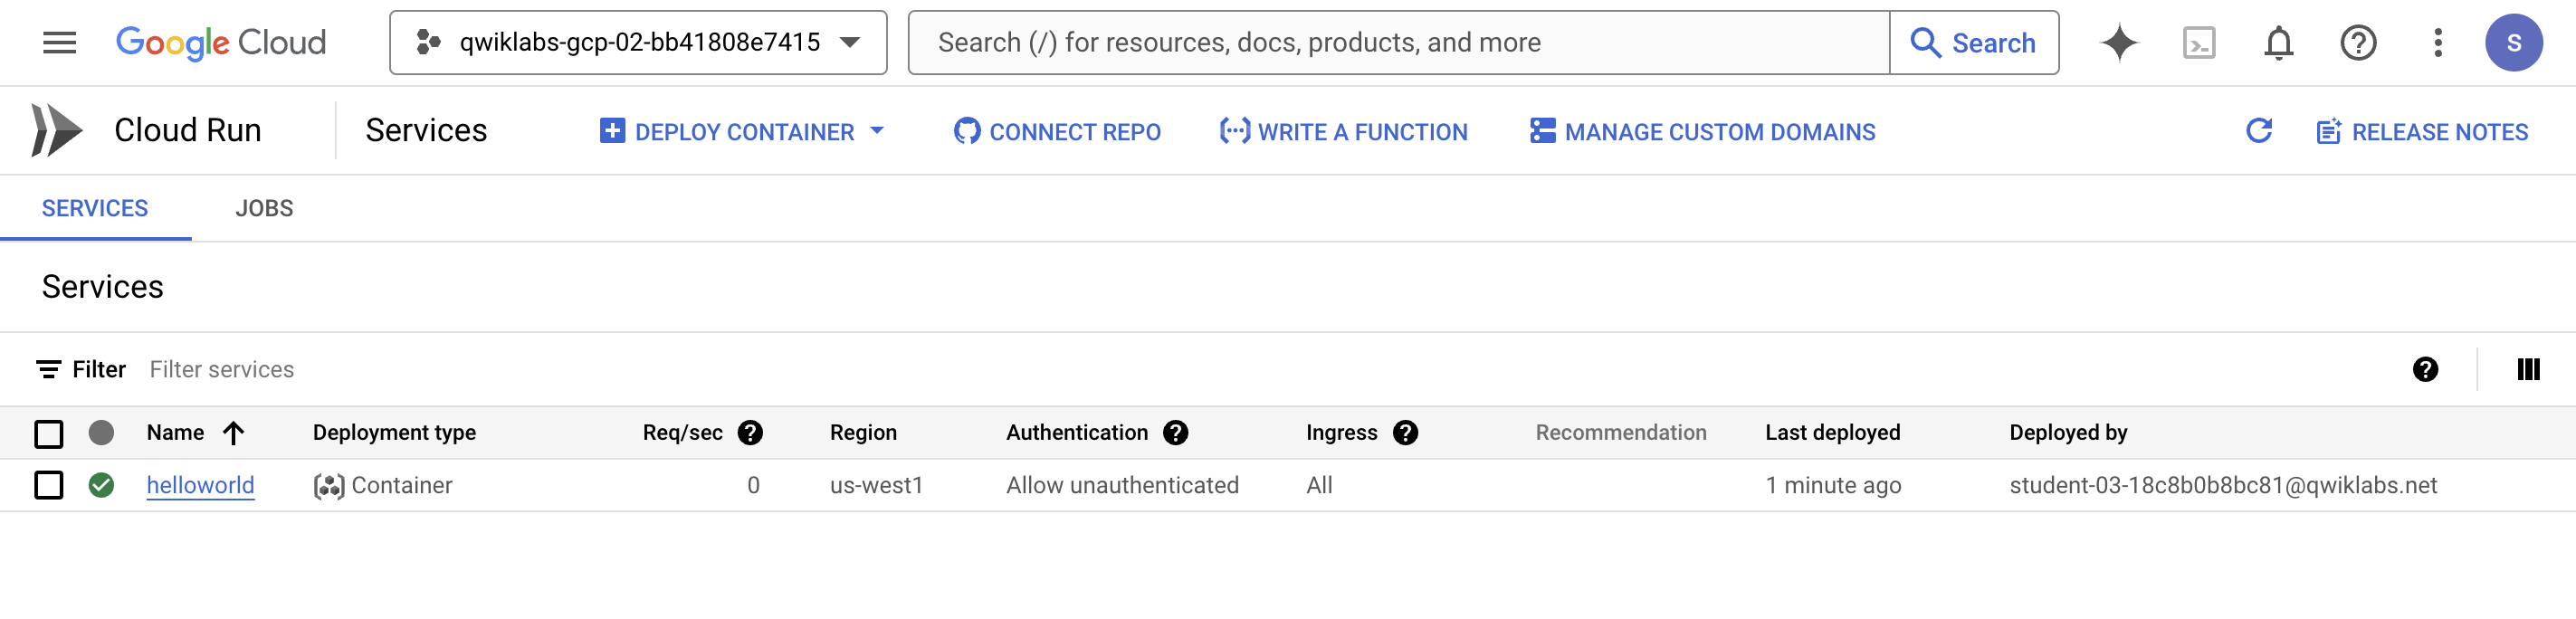
- In the Google Cloud console, on the Navigation menu (
 ), click Cloud Run and you should see your
 helloworld service listed:
Click Check my progress to verify the objective.
Deploy a containerized application on Cloud Run
Task 6. Clean up
In this task, you delete the deployed service and the container image to avoid incurring charges.
While Cloud Run does not charge when the service is not in use, you might still be charged for storing the built container image.
- You can delete your
helloworld image using the following command:
gcloud artifacts docker images delete $LOCATION-docker.pkg.dev/$GOOGLE_CLOUD_PROJECT/my-repository/helloworld
-
When prompted to continue type Y, and press Enter.
-
To delete the Cloud Run service, use this command :
gcloud run services delete helloworld --region={{{project_0.default_region | "REGION"}}}
- When prompted to continue type Y, and press Enter.
End your lab
When you have completed your lab, click End Lab. Google Skills removes the resources you’ve used and cleans the account for you.
You will be given an opportunity to rate the lab experience. Select the applicable number of stars, type a comment, and then click Submit.
The number of stars indicates the following:
- 1 star = Very dissatisfied
- 2 stars = Dissatisfied
- 3 stars = Neutral
- 4 stars = Satisfied
- 5 stars = Very satisfied
You can close the dialog box if you don't want to provide feedback.
For feedback, suggestions, or corrections, please use the Support tab.
Congratulations!
You have completed this lab!
Next steps / learn more
For more information on building a stateless HTTP container suitable for Cloud Run from code source and pushing it to Artifact Registry, view:
Copyright 2026 Google LLC All rights reserved. Google and the Google logo are trademarks of Google LLC. All other company and product names may be trademarks of the respective companies with which they are associated.


