Dieser Inhalt ist noch nicht für Mobilgeräte optimiert.
Die Lernumgebung funktioniert am besten, wenn Sie auf einem Computer über einen per E‑Mail gesendeten Link darauf zugreifen.
Overview
In this lab, you deploy a simple Windows app to Docker running on a Compute Engine instance. You will then push the same app into Google Container Registry and deploy it to Google Kubernetes Engine.
Objectives
In this lab, you learn how to perform the following tasks:
Create a simple Windows app.
Containerize the app using Docker.
Create your Kubernetes cluster on Kubernetes Engine.
Deploy your app to a pod.
Allow external traffic to your pod.
Setup and requirements
For each lab, you get a new Google Cloud project and set of resources for a fixed time at no cost.
Sign in to Google Skills using an incognito window.
Note the lab's access time (for example, 1:15:00), and make sure you can finish within that time.
There is no pause feature. You can restart if needed, but you have to start at the beginning.
When ready, click Start lab.
Note your lab credentials (Username and Password). You will use them to sign in to the Google Cloud Console.
Click Open Google Console.
Click Use another account and copy/paste credentials for this lab into the prompts.
If you use other credentials, you'll receive errors or incur charges.
Accept the terms and skip the recovery resource page.
Task 1. Enable Google Container Registry API
On the Google Cloud menu, click Activate Cloud Shell () icon then click Continue.
Make sure the Google Container Registry API is enabled, by running the following command:
On the Navigation menu (), click Compute Engine > VM instances.
Click the Drop down arrow icon next to RDP button and select Set Windows password.
Copy and save the Username value and click SET.
Copy and save the New Windows Password and click CLOSE.
Log into the Windows VM by clicking the RDP button of the VM:
Use credentials created in previous steps.
Once inside the Windows VM, you'll notice that it's a bare-minimum OS with minimal UI.
Note: If the command line window is not open, open it by going to Task Manager: Ctrl + Alt + Delete and choose "Task Manager". Then, go to File > Run new task > cmd.
In the Windows command prompt (C:\Users\gcpstagingXXXXX_stud>), run the following to see the images that are installed by default:
docker images
Output:
REPOSITORY TAG IMAGE ID
mcr.microsoft.com/windows/servercore ltsc2019 29a2c2cb7e4d
Task 3. Create a Windows container app
For the app inside the Windows container, use an IIS Web Server. IIS has an image for Windows Server 2019. You can use the image as is and it will serve the default IIS page, but fot this lab, do something more interesting and have IIS serve a page you define.
Create a folder called my-windows-app and enter into the directory:
mkdir my-windows-app
cd my-windows-app
Create folder named content:
mkdir content
Create a file named index.html in the content folder:
Save the index.html. This is the page IIS will serve.
Task 4. Build Docker image
Create a Dockerfile for the Docker image:
call > Dockerfile
Edit the dockerfile:
notepad Dockerfile
Add the following contents in the Dockerfile:
FROM mcr.microsoft.com/windows/servercore/iis:windowsservercore-ltsc2019
RUN powershell -NoProfile -Command Remove-Item -Recurse C:\inetpub\wwwroot\*
WORKDIR /inetpub/wwwroot
COPY content/ .
Save the Dockerfile.
Build the Docker image and tag it with Google Container Registry (GCR) and your project id. This will be useful when we push the image to GCR later (replace [PROJECT_ID] with your Google Skills project id):
Once the Docker image is built, you can see it along with its IIS dependency:
docker images
Sample output:
REPOSITORY TAG
gcr.io/[PROJECT_ID]/iis-site-windows latest
mcr.microsoft.com/windows/servercore/iis windowsservercore-ltsc2019
mcr.microsoft.com/windows/servercore ltsc2019
Run the following command to run the Windows container from your VM instance:
docker run -d -p 80:80 gcr.io/[PROJECT_ID]/iis-site-windows
Return to the Cloud Console. On the Navigation menu (), click Compute Engine > VM instances.
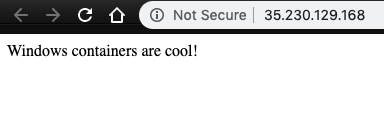
Open a browser window enter the External IP of the Compute Engine instance to see the app:
Click Check my progress below to verify you're on track in this lab.
Build Docker image
Task 5. Push container image to Google Container Registry
Configure Docker to point to Google Container Registry (GCR):
gcloud auth configure-docker
When prompted enter Y.
The output should look like this:
Adding credentials for all GCR repositories.
WARNING: A long list of credential helpers may cause delays running 'docker build'. We recommend passing the registry name to configure only the registry you are using.
After update, the following will be written to your Docker config file
located at [C:\Users\student_01_9786da300\.docker\config.json]:
{
"credHelpers": {
"gcr.io": "gcloud",
"us.gcr.io": "gcloud",
"eu.gcr.io": "gcloud",
"asia.gcr.io": "gcloud",
"staging-k8s.gcr.io": "gcloud",
"marketplace.gcr.io": "gcloud"
}
}
Do you want to continue (Y/n)? Y
Docker configuration file updated.
Push the image to Google Container Repository. Remember to replace [PROJECT_ID] with your Google Skills project id:
docker push gcr.io/[PROJECT_ID]/iis-site-windows
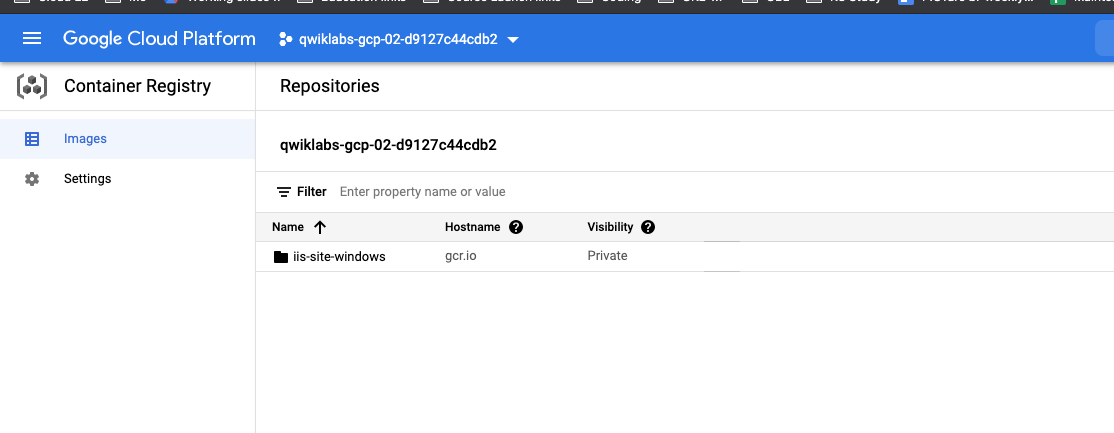
If you return to the Cloud Console and go Google Container Repository in the Navigation Menu you can see the image.
Task 6. Start a Kubernetes Engine cluster
On the Google Cloud menu, click Activate Cloud Shell () icon then click Continue.
Run the following command to set your environment variables for the project and zones and to set them as default:
export PROJECT_ID=[PROJECT_ID]
gcloud config set project ${PROJECT_ID}
export ZONE=us-central1-a
gcloud config set compute/zone ${ZONE}
Start a Kubernetes cluster managed by Kubernetes Engine. Name the cluster win-cluster and configure it to run 2 nodes:
It takes several minutes to create a cluster as Kubernetes Engine provisions virtual machines for you. Eventually, the cluster should be created.
Example output:
Creating cluster my-win-cluster in us-central1-a...done.
Created [https://container.googleapis.com/v1/projects/qwiklabs-gcp-03-3de91b1579f6/zones/us-central1-a/clusters/my-win-cluster].
To inspect the contents of your cluster, go to: https://console.cloud.google.com/kubernetes/workload_/gcloud/us-central1-a/my-win-cluster?project=qwiklabs-gcp-03-3de91b1579f6
kubeconfig entry generated for my-win-cluster.
NAME LOCATION MASTER_VERSION MASTER_IP MACHINE_TYPE NODE_VERSION NUM_NODES STATUS
my-win-cluster us-central1-a 1.24.3-gke.200 34.71.161.61 e2-medium 1.20.9-gke.1001 2 RUNNING
Note: Alternatively, you could create this cluster via the Console: Kubernetes Engine > Clusters > Create cluster.
Note: You can create the cluster in another zone, but we recommend that you keep it in the same region as the storage bucket used by the container registry (see previous step).
After the cluster is created, check your installed version of Kubernetes using the kubectl version command:
kubectl version
The gcloud container clusters create command automatically authenticated kubectl for you.
View your running nodes in the Cloud Console. On the Navigation menu (), click Compute Engine > VM Instances.
Your Kubernetes cluster is now ready for use.
Click Check my progress to verify the objective.
Start a Kubernetes Engine cluster
Task 7. Add Windows Node to cluster
Once we have the basic GKE cluster, we can go ahead and add a Windows pool for Windows nodes to it:
gcloud container node-pools create windows-node-pool \
--cluster=${CLUSTER_NAME} \
--image-type=WINDOWS_LTSC_CONTAINERD \
--no-enable-autoupgrade \
--machine-type=n1-standard-2
Note:
Notice that we're disabling automatic node upgrades. Windows container versions need to be compatible with the node OS version. To avoid unexpected workload disruption, it is recommended that users disable node autoupgrade for Windows node pools.
For Windows Server containers in GKE, you're already licensed for underlying Windows host VMs – containers need no additional licensing.
In the end, the GKE cluster is ready with 2 Linux nodes and 3 Windows nodes.
Task 8. Verify cluster initialization
Before running our Windows container as a pod on GKE, make sure the cluster is initialized.
Before using the cluster, wait for several seconds until windows.config.common-webhooks.networking.gke.io is created. This webhook adds scheduling tolerations to Pods created with the kubernetes.io/os: windows (or beta.kubernetes.io/os: windows) node selector to ensure they are allowed to run on Windows Server nodes. It also validates the Pod to ensure that it only uses features supported on Windows.
kubectl get mutatingwebhookconfigurations
Output:
NAME CREATED AT
windows.config.common-webhooks.networking.gke.io 2020-01-20T15:09:16Z
...
Now the cluster is ready for Windows containers.
Click Check my progress below to verify you're on track in this lab.
Deploy a Windows node pool
Task 9. Run Windows container as a pod in GKE
Create and open a file called iis-site-windows.yaml with nano using the following command:
nano iis-site-windows.yaml
Once nano has opened, paste following into the file (Remember to replace [PROJECT_ID] with your Google Skills project id):
Press Ctrl+O, and then press Enter to save your edited file.
Press Ctrl+X to exit the nano text editor.
Create a deployment for the cluster with the following command:
kubectl apply -f iis-site-windows.yaml
Check the deployment with the following command:
kubectl get deployment,pods
After a few minutes, you should see the deployment created and pods running:
NAME READY UP-TO-DATE AVAILABLE AGE
deployment.extensions/iis-site-windows 2/2 2 2 3m4s
NAME READY STATUS RESTARTS AGE
pod/iis-site-windows-5b6dfdf64b-k5b6r 1/1 Running 0 3m4s
pod/iis-site-windows-5b6dfdf64b-msr9s 1/1 Running 0
Task 10. Create a Kubernetes service
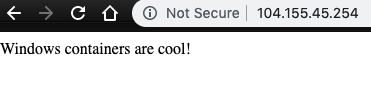
To make pods accessible to the outside world, we need to create a Kubernetes service with LoadBalancer type:
In a few minutes, you should see a new service with an external IP:
kubectl get service
You should see an output like this:
NAME TYPE CLUSTER-IP EXTERNAL-IP PORT(S)
iis-site-windows LoadBalancer 10.107.11.34 104.155.45.254 80:30035/TCP
Open a browser window and go to the external IP of the load balancer, you will see the app:
Deploy a LoadBalancer
Congratulations!
You have successfully configured and deployed a GKE cluster running a Windows Server workload.
In this lab, you learned how to perform the following tasks:
Create a simple Windows app.
Containerize the app using Docker.
Create your Kubernetes cluster on Kubernetes Engine.
Deploy your app to a pod.
Allow external traffic to your pod.
Copyright 2026 Google LLC All rights reserved. Google and the Google logo are trademarks of Google LLC. All other company and product names may be trademarks of the respective companies with which they are associated.
Labs erstellen ein Google Cloud-Projekt und Ressourcen für einen bestimmten Zeitraum
Labs haben ein Zeitlimit und keine Pausenfunktion. Wenn Sie das Lab beenden, müssen Sie von vorne beginnen.
Klicken Sie links oben auf dem Bildschirm auf Lab starten, um zu beginnen
Privates Surfen verwenden
Kopieren Sie den bereitgestellten Nutzernamen und das Passwort für das Lab
Klicken Sie im privaten Modus auf Konsole öffnen
In der Konsole anmelden
Melden Sie sich mit Ihren Lab-Anmeldedaten an. Wenn Sie andere Anmeldedaten verwenden, kann dies zu Fehlern führen oder es fallen Kosten an.
Akzeptieren Sie die Nutzungsbedingungen und überspringen Sie die Seite zur Wiederherstellung der Ressourcen
Klicken Sie erst auf Lab beenden, wenn Sie das Lab abgeschlossen haben oder es neu starten möchten. Andernfalls werden Ihre bisherige Arbeit und das Projekt gelöscht.
Diese Inhalte sind derzeit nicht verfügbar
Bei Verfügbarkeit des Labs benachrichtigen wir Sie per E-Mail
Sehr gut!
Bei Verfügbarkeit kontaktieren wir Sie per E-Mail
Es ist immer nur ein Lab möglich
Bestätigen Sie, dass Sie alle vorhandenen Labs beenden und dieses Lab starten möchten
Privates Surfen für das Lab verwenden
Am besten führen Sie dieses Lab in einem Inkognito- oder privaten Browserfenster aus. So vermeiden Sie Konflikte zwischen Ihrem privaten Konto und dem Teilnehmerkonto, die zusätzliche Kosten für Ihr privates Konto verursachen könnten.
In this lab, you deploy a simple Windows app to Docker running on a Compute Engine instance. You will then push the same app into Google Container Registry and deploy it to the Google Kubernetes Engine.

 ) icon then click Continue.
 ), click Compute Engine > VM instances.
 ), click Compute Engine > VM instances.